
Owner's Manual
Page 3
Contents Finding Information 9 1 Setting Up and Using Your Computer Opening the Drive Door 15 Changing the Front-Panel Light Color 15 Using a Media Card Reader (Optional 17 Connecting Monitors 18 Connecting a Monitor to a PCI Express Graphics Card Dual Configuration 18 Connecting Two Monitors 18 ...
Contents Finding Information 9 1 Setting Up and Using Your Computer Opening the Drive Door 15 Changing the Front-Panel Light Color 15 Using a Media Card Reader (Optional 17 Connecting Monitors 18 Connecting a Monitor to a PCI Express Graphics Card Dual Configuration 18 Connecting Two Monitors 18 ...

Owner's Manual
Page 5
...53 If the screen is difficult to read 53 If 3-D image quality is poor 54 4 Advanced Troubleshooting Diagnostic Lights 55 Dell Diagnostics 58 When to Use the Dell Diagnostics 58 Drivers 60 What Is a Driver 60 Identifying Drivers 60 Reinstalling Drivers 61 Using Microsoft® Windows&#...174; XP System Restore 62 Creating a Restore Point 63 Restoring the Computer to an Earlier Operating State 63 Undoing the Last System Restore 63 Resolving Software and Hardware Incompatibilities 64 Reinstalling Microsoft® Windows® XP 64 Before You Begin 64 ...
...53 If the screen is difficult to read 53 If 3-D image quality is poor 54 4 Advanced Troubleshooting Diagnostic Lights 55 Dell Diagnostics 58 When to Use the Dell Diagnostics 58 Drivers 60 What Is a Driver 60 Identifying Drivers 60 Reinstalling Drivers 61 Using Microsoft® Windows&#...174; XP System Restore 62 Creating a Restore Point 63 Restoring the Computer to an Earlier Operating State 63 Undoing the Last System Restore 63 Resolving Software and Hardware Incompatibilities 64 Reinstalling Microsoft® Windows® XP 64 Before You Begin 64 ...
Owner's Manual
Page 15
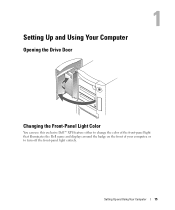
Setting Up and Using Your Computer Opening the Drive Door Changing the Front-Panel Light Color You can use this exclusive Dell™ XPS feature either to change the color of the front-panel light that illuminates the Dell name and displays around the badge on the front of your computer, or to turn off the front-panel light entirely. Setting Up and Using Your Computer 15
Setting Up and Using Your Computer Opening the Drive Door Changing the Front-Panel Light Color You can use this exclusive Dell™ XPS feature either to change the color of the front-panel light that illuminates the Dell name and displays around the badge on the front of your computer, or to turn off the front-panel light entirely. Setting Up and Using Your Computer 15

Owner's Manual
Page 16
... not for details about entering system setup). 4 Select the Onboard Devices option. 5 Select Front LED Color, and press . 6 Press the left- www.dell.com | support.dell.com front-panel light You can choose from several color choices: •Off •Ruby •Emerald •Sapphire (default) •Amber •Amethyst •Topaz •...
... not for details about entering system setup). 4 Select the Onboard Devices option. 5 Select Front LED Color, and press . 6 Press the left- www.dell.com | support.dell.com front-panel light You can choose from several color choices: •Off •Ruby •Emerald •Sapphire (default) •Amber •Amethyst •Topaz •...

Owner's Manual
Page 45
... Problems 45 C H E C K T H E S O F T W A R E D O C U M E N T A T I G H T S - A program stops responding END THE PROGRAM - 1 Press simultaneously. 2 Click Applications. 3 Click the program that is no longer responding. 4 Click End Task. See "Diagnostic Lights" on your keyboard or moving your computer. A program crashes repeatedly NOTE: Software usually includes installation instructions in its documentation or on a floppy disk or CD...
... Problems 45 C H E C K T H E S O F T W A R E D O C U M E N T A T I G H T S - A program stops responding END THE PROGRAM - 1 Press simultaneously. 2 Click Applications. 3 Click the program that is no longer responding. 4 Click End Task. See "Diagnostic Lights" on your keyboard or moving your computer. A program crashes repeatedly NOTE: Software usually includes installation instructions in its documentation or on a floppy disk or CD...

Owner's Manual
Page 48
... Mouse. 3 Try adjusting the settings. Ensure that the network cable is firmly inserted into both the network connector on page 61. www.dell.com | support.dell.com RESTART THE COMPUTER - 1 Simultaneously press to display the Start menu. 2 Type u, press the keyboard arrow keys to highlight Shut ...down or Turn Off, and then press . 3 After the computer turns off , that your computer. 4 Start the computer. If the link integrity light is off...
... Mouse. 3 Try adjusting the settings. Ensure that the network cable is firmly inserted into both the network connector on page 61. www.dell.com | support.dell.com RESTART THE COMPUTER - 1 Simultaneously press to display the Start menu. 2 Type u, press the keyboard arrow keys to highlight Shut ...down or Turn Off, and then press . 3 After the computer turns off , that your computer. 4 Start the computer. If the link integrity light is off...
Owner's Manual
Page 49
...; Ensure that the main power cable and front panel cable are securely connected to match the AC power at your location (if applicable). I F T H E P O W E R L I G H T I S B L I N K I S S T E A D Y A M B E R - See "Diagnostic Lights" on page 64. Solving Problems 49 I F T H E P O W E R L I G H T I N G G R E E N - See "Resolving Software and Hardware Incompatibilities" on page 55. I F T H E P O W E R L I G H T I S B L I N K I N G A M B E R -
...; Ensure that the main power cable and front panel cable are securely connected to match the AC power at your location (if applicable). I F T H E P O W E R L I G H T I S B L I N K I S S T E A D Y A M B E R - See "Diagnostic Lights" on page 64. Solving Problems 49 I F T H E P O W E R L I G H T I N G G R E E N - See "Resolving Software and Hardware Incompatibilities" on page 55. I F T H E P O W E R L I G H T I S B L I N K I N G A M B E R -

Owner's Manual
Page 52
... your speakers have volume controls, adjust the volume, bass, or treble to check for interference. See "Drivers" on page 64. Turn off nearby fans, fluorescent lights, or halogen lamps to eliminate distortion. E L I M I N A T E P O S S I B L E I N D O W S V O L U M E C O N T R O L - www.dell.com | support.dell.com E N S U R E T H A T T H E S U B W O O F E R A N D T H E S P E A K E R S A R E T U R N E D O N - A D J U S T T H E W I N T E R F E R E N C E - Sound from headphones...
... your speakers have volume controls, adjust the volume, bass, or treble to check for interference. See "Drivers" on page 64. Turn off nearby fans, fluorescent lights, or halogen lamps to eliminate distortion. E L I M I N A T E P O S S I B L E I N D O W S V O L U M E C O N T R O L - www.dell.com | support.dell.com E N S U R E T H A T T H E S U B W O O F E R A N D T H E S P E A K E R S A R E T U R N E D O N - A D J U S T T H E W I N T E R F E R E N C E - Sound from headphones...
Owner's Manual
Page 53
...cable is defective. • Check the connector for bent or broken pins. (It is normal for interference. Fans, fluorescent lights, halogen lamps, and other electrical devices can cause the screen image to check for monitor cable connectors to ensure that the subwoofer... is at least 60 cm (2 ft) away from the monitor. Solving Problems 53 If the power light is turned on the keyboard or move the mouse. See "Diagnostic Lights" on adjusting the contrast and brightness, demagnetizing (degaussing) the monitor, and running the monitor self-test. M O V E T H E M O...
...cable is defective. • Check the connector for bent or broken pins. (It is normal for interference. Fans, fluorescent lights, halogen lamps, and other electrical devices can cause the screen image to check for monitor cable connectors to ensure that the subwoofer... is at least 60 cm (2 ft) away from the monitor. Solving Problems 53 If the power light is turned on the keyboard or move the mouse. See "Diagnostic Lights" on adjusting the contrast and brightness, demagnetizing (degaussing) the monitor, and running the monitor self-test. M O V E T H E M O...
Owner's Manual
Page 55
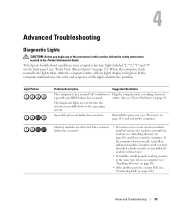
... a normal "off" condition or Plug the computer into your computer has four lights labeled "1," "2," "3," and "4" on the front panel (see "Contacting Dell" on page 80), and then restart the computer. Advanced Troubleshooting Diagnostic Lights CAUTION: Before you begin any of the lights identify the problem. outlet. To help you troubleshoot a problem, your computer (see...
... a normal "off" condition or Plug the computer into your computer has four lights labeled "1," "2," "3," and "4" on the front panel (see "Contacting Dell" on page 80), and then restart the computer. Advanced Troubleshooting Diagnostic Lights CAUTION: Before you begin any of the lights identify the problem. outlet. To help you troubleshoot a problem, your computer (see...
Owner's Manual
Page 56
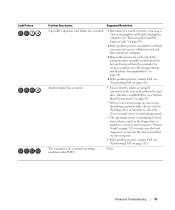
... installing are compatible with your computer (see "Memory" on page 79). • If the problem persists, contact Dell (see "Contacting Dell" on page 142 56 Advanced Troubleshooting Memory modules are detected. If the computer starts normally, reinstall an additional module.... USB failure has occurred. the computer. Reinstall all USB devices, check cable connections, and then restart the computer. www.dell.com | support.dell.com Light Pattern Problem Description Suggested Resolution A possible graphics card failure has occurred. • If the computer has a graphics card,...
... installing are compatible with your computer (see "Memory" on page 79). • If the problem persists, contact Dell (see "Contacting Dell" on page 142 56 Advanced Troubleshooting Memory modules are detected. If the computer starts normally, reinstall an additional module.... USB failure has occurred. the computer. Reinstall all USB devices, check cable connections, and then restart the computer. www.dell.com | support.dell.com Light Pattern Problem Description Suggested Resolution A possible graphics card failure has occurred. • If the computer has a graphics card,...
Owner's Manual
Page 57
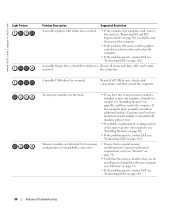
None. Advanced Troubleshooting 57 Light Pattern Problem Description Suggested Resolution A possible expansion card failure has occurred. 1 Determine if a conflict exists by removing a card (not a graphics card) and restarting the computer... restart the computer. 3 Repeat this process for resource conflicts (see "Resolving Software and Hardware Incompatibilities" on page 64). 4 If the problem persists, contact Dell (see "Contacting Dell" on page 142). If the computer starts normally, troubleshoot the last card removed from a device (such as the floppy drive or hard drive), check...
None. Advanced Troubleshooting 57 Light Pattern Problem Description Suggested Resolution A possible expansion card failure has occurred. 1 Determine if a conflict exists by removing a card (not a graphics card) and restarting the computer... restart the computer. 3 Repeat this process for resource conflicts (see "Resolving Software and Hardware Incompatibilities" on page 64). 4 If the problem persists, contact Dell (see "Contacting Dell" on page 142). If the computer starts normally, troubleshoot the last card removed from a device (such as the floppy drive or hard drive), check...

Owner's Manual
Page 71
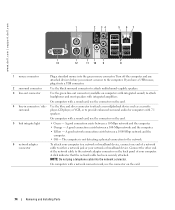
The light might also be on when the computer reads data from or writes data to turn off its hinges, it snaps back in place. Removing and ... it or accidentally knock it off the computer. Front and Back View of the Computer Front View 1 2 3 4 1 hard-drive activity light 2 power button 3 drive door 4 front-panel door The hard-drive light is on when a device such as your CD player is removable; NOTICE: To avoid losing data, do not use the...
The light might also be on when the computer reads data from or writes data to turn off its hinges, it snaps back in place. Removing and ... it or accidentally knock it off the computer. Front and Back View of the Computer Front View 1 2 3 4 1 hard-drive activity light 2 power button 3 drive door 4 front-panel door The hard-drive light is on when a device such as your CD player is removable; NOTICE: To avoid losing data, do not use the...

Owner's Manual
Page 72
... function properly if attached to attach headphones and most kinds of speakers. For more information, see "Diagnostic Lights" on the diagnostic code. Attach high-speed serial multimedia devices, such as joysticks or cameras. www.dell.com | support.dell.com Front View (Doors Open) 1 2 3 4 5 1 headphone connector 2 microphone connector 3 USB 2.0 connectors (2) 4 IEEE 1394 connector 5 diagnostic...
... function properly if attached to attach headphones and most kinds of speakers. For more information, see "Diagnostic Lights" on the diagnostic code. Attach high-speed serial multimedia devices, such as joysticks or cameras. www.dell.com | support.dell.com Front View (Doors Open) 1 2 3 4 5 1 headphone connector 2 microphone connector 3 USB 2.0 connectors (2) 4 IEEE 1394 connector 5 diagnostic...
Owner's Manual
Page 74
... surround connector to attach multichannel-capable speakers. 3 line-out connector Use the green line-out connector (available on the card. 5 link integrity light • Green - A good connection exists between a 100-Mbps network and the computer. • Yellow - If you connect a mouse... to attach headphones and most speakers with integrated amplifiers. www.dell.com | support.dell.com 1 2 34 5 67 13 12 11 10 9 8 1 mouse connector Plug a standard mouse into the network connector. On computers with...
... surround connector to attach multichannel-capable speakers. 3 line-out connector Use the green line-out connector (available on the card. 5 link integrity light • Green - A good connection exists between a 100-Mbps network and the computer. • Yellow - If you connect a mouse... to attach headphones and most speakers with integrated amplifiers. www.dell.com | support.dell.com 1 2 34 5 67 13 12 11 10 9 8 1 mouse connector Plug a standard mouse into the network connector. On computers with...

Owner's Manual
Page 75
... a USB keyboard, plug it into a USB connector. Removing and Installing Parts 75 A high volume of network traffic may make this light appear to the serial port. On computers with a sound card, the microphone connector is recommended that you use the front USB connectors for...have a standard keyboard, plug it into the purple keyboard connector. Connect a serial device, such as digital video cameras. 7 network activity light 8 USB 2.0 connectors (6) 9 microphone connector 10 center/subwoofer connector 11 IEEE 1394 connector 12 keyboard connector 13 serial connector Flashes a yellow...
... a USB keyboard, plug it into a USB connector. Removing and Installing Parts 75 A high volume of network traffic may make this light appear to the serial port. On computers with a sound card, the microphone connector is recommended that you use the front USB connectors for...have a standard keyboard, plug it into the purple keyboard connector. Connect a serial device, such as digital video cameras. 7 network activity light 8 USB 2.0 connectors (6) 9 microphone connector 10 center/subwoofer connector 11 IEEE 1394 connector 12 keyboard connector 13 serial connector Flashes a yellow...
Owner's Manual
Page 78
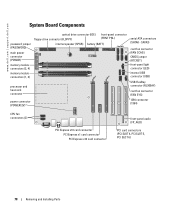
www.dell.com | support.dell.com System Board Components password jumper (PASSWORD) main power connector (POWER) memory module connectors (2, 4) memory module connectors (1, 3) processor and heat-sink connector power connector (POWER12V) ...) front-panel connector (FRNT PNL) internal speaker (SPKR) battery (BATT) serial ATA connectors (SATA0 - SATA3) card fan connector (FAN CCAG) CMOS jumper (RTCRST) front-panel light connector (LED) internal USB connector (USB) USB FlexBay connector (FLEXBAY) card fan connector (FAN SYS) 1394 connector (1394) CPU fan connectors (2) PCI Express x16 card...
www.dell.com | support.dell.com System Board Components password jumper (PASSWORD) main power connector (POWER) memory module connectors (2, 4) memory module connectors (1, 3) processor and heat-sink connector power connector (POWER12V) ...) front-panel connector (FRNT PNL) internal speaker (SPKR) battery (BATT) serial ATA connectors (SATA0 - SATA3) card fan connector (FAN CCAG) CMOS jumper (RTCRST) front-panel light connector (LED) internal USB connector (USB) USB FlexBay connector (FLEXBAY) card fan connector (FAN SYS) 1394 connector (1394) CPU fan connectors (2) PCI Express x16 card...
Owner's Manual
Page 118
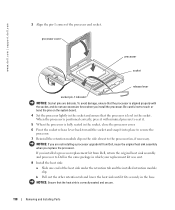
... system board. 4 Set the processor lightly in the socket. When the processor is positioned correctly, press it with minimal pressure to the processor fan, if necessary. processor cover processor socket release lever socket pin-1 indicator NOTICE: Socket pins are not installing a processor upgrade kit from Dell, return the original heat sink assembly...
... system board. 4 Set the processor lightly in the socket. When the processor is positioned correctly, press it with minimal pressure to the processor fan, if necessary. processor cover processor socket release lever socket pin-1 indicator NOTICE: Socket pins are not installing a processor upgrade kit from Dell, return the original heat sink assembly...

Owner's Manual
Page 129
.... The computer is activity on the network. amber light - A good connection exists between a 100-Mbps network and the computer. four lights on the front panel (See "Diagnostic Lights" on integrated network adapter) Diagnostic lights push button green light - A good connection exists between a 10-Mbps ... problem with an installed device; Blinking green in sleep state; If there is not any network activity, the light will be off (no light) - orange light - Connectors External connectors: IEEE 1394 Network adapter PS/2 (keyboard and mouse) Serial USB System board connectors: IDE...
.... The computer is activity on the network. amber light - A good connection exists between a 100-Mbps network and the computer. four lights on the front panel (See "Diagnostic Lights" on integrated network adapter) Diagnostic lights push button green light - A good connection exists between a 10-Mbps ... problem with an installed device; Blinking green in sleep state; If there is not any network activity, the light will be off (no light) - orange light - Connectors External connectors: IEEE 1394 Network adapter PS/2 (keyboard and mouse) Serial USB System board connectors: IDE...

Owner's Manual
Page 130
www.dell.com | support.dell.com Controls and Lights (continued) Standby power light Case backlight AUXPWR on the system board color options: off (no light), ruby, emerald, sapphire (default), amber, amethyst, topaz, diamond (See "Changing the Front-Panel Light Color" on page 15.) Power 650-W DC power supply: Wattage 650 W Heat dissipation 1000 BTU/hr Voltage (see...
www.dell.com | support.dell.com Controls and Lights (continued) Standby power light Case backlight AUXPWR on the system board color options: off (no light), ruby, emerald, sapphire (default), amber, amethyst, topaz, diamond (See "Changing the Front-Panel Light Color" on page 15.) Power 650-W DC power supply: Wattage 650 W Heat dissipation 1000 BTU/hr Voltage (see...


