Owners Manual
Page 1
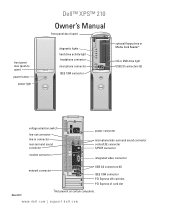
... front panel door (push to open) power button power light Dell™ XPS™ 210 Owner's Manual front panel door (open) diagnostic lights hard drive activity light headphone connector microphone connector IEEE 1394 connector optional floppy drive or Media Card ...
... front panel door (push to open) power button power light Dell™ XPS™ 210 Owner's Manual front panel door (open) diagnostic lights hard drive activity light headphone connector microphone connector IEEE 1394 connector optional floppy drive or Media Card ...
Owners Manual
Page 14
...when the computer reads data from the drive. 1 CD/DVD drive eject button 2 CD/DVD drive-activity light 3 USB 2.0 connectors (2) 4 IEEE 1394 connector 5 power button 6 power light 7 front-panel door release button 8 microphone connector 9 headphone connector 10 hard-drive activity light 11 diagnostic lights... 12 front-panel door Press this button to eject a CD/DVD from or writes data to the...
...when the computer reads data from the drive. 1 CD/DVD drive eject button 2 CD/DVD drive-activity light 3 USB 2.0 connectors (2) 4 IEEE 1394 connector 5 power button 6 power light 7 front-panel door release button 8 microphone connector 9 headphone connector 10 hard-drive activity light 11 diagnostic lights... 12 front-panel door Press this button to eject a CD/DVD from or writes data to the...
Owners Manual
Page 28
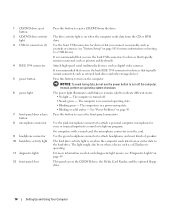
...system data to a reserved area on the keyboard or move the mouse. When the computer exits from hibernate mode, press the power button. When a Windows XP Professional computer is restored to the state it was in prior to entering standby mode. To exit from hibernate mode, the ...or you are not using it was in certain windows. Standby Mode Standby mode conserves power by NOTE: Windows XP Professional includes security and networking features not available in hibernate mode, pressing a key on the Power Schemes tab, Advanced tab, and Hibernate tab. To activate hibernate mode: 1 Click ...
...system data to a reserved area on the keyboard or move the mouse. When the computer exits from hibernate mode, press the power button. When a Windows XP Professional computer is restored to the state it was in prior to entering standby mode. To exit from hibernate mode, the ...or you are not using it was in certain windows. Standby Mode Standby mode conserves power by NOTE: Windows XP Professional includes security and networking features not available in hibernate mode, pressing a key on the Power Schemes tab, Advanced tab, and Hibernate tab. To activate hibernate mode: 1 Click ...
Owners Manual
Page 30
... that are ordered with Microsoft® Windows® XP Media Center Edition 2005 and dual core processors. In this mode, the computer is still operating as a quick on/off the computer. To resume normal computer operation, briefly press the power button, press any key on the keyboard, move the ...mouse, or press a button on the optional Microsoft® Windows® XP Media Center Edition 2005 remote control. 30 Setting Up and Using Your Computer Hibernate...
... that are ordered with Microsoft® Windows® XP Media Center Edition 2005 and dual core processors. In this mode, the computer is still operating as a quick on/off the computer. To resume normal computer operation, briefly press the power button, press any key on the keyboard, move the ...mouse, or press a button on the optional Microsoft® Windows® XP Media Center Edition 2005 remote control. 30 Setting Up and Using Your Computer Hibernate...

Owners Manual
Page 31
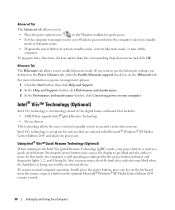
...in the Operating system 1 Click the Start button, then click Control Panel. 2 Under Pick a category, click Performance and Maintenance. 3 Under or pick a Control Panel icon, click Power Options. 4 Click the Away tab. 5 Ensure that you use the Microsoft® Windows® XP Service Pack 1 (SP1), or later, operating... These drivers are checked. 6 Click the Advanced tab. 7 From the When I press the power button on my computer drop-down menu, select Do Nothing. 8 From the When I press the sleep button on my computer drop-down -arrow keys to highlight the Quick Resume option, then press to ...
...in the Operating system 1 Click the Start button, then click Control Panel. 2 Under Pick a category, click Performance and Maintenance. 3 Under or pick a Control Panel icon, click Power Options. 4 Click the Away tab. 5 Ensure that you use the Microsoft® Windows® XP Service Pack 1 (SP1), or later, operating... These drivers are checked. 6 Click the Advanced tab. 7 From the When I press the power button on my computer drop-down menu, select Do Nothing. 8 From the When I press the sleep button on my computer drop-down -arrow keys to highlight the Quick Resume option, then press to ...
Owners Manual
Page 39
R U N T H E H A R D W A R E TR O U B L E S H O O T E R - ENSURE THAT THE POWER CABLE IS FIRMLY CONNECTED TO THE COMPUTER AND TO THE ELECTRICAL OUTLET The computer stops responding NOTICE: You may lose data if you are unable ... connect the keyboard directly to the computer. • Reconnect the keyboard cable as shown on your keyboard or moving your mouse, press and hold the power button for at least 8 to 10 seconds, until the computer turns off, and then restart your computer. • Ensure that the keyboard cable is firmly connected...
R U N T H E H A R D W A R E TR O U B L E S H O O T E R - ENSURE THAT THE POWER CABLE IS FIRMLY CONNECTED TO THE COMPUTER AND TO THE ELECTRICAL OUTLET The computer stops responding NOTICE: You may lose data if you are unable ... connect the keyboard directly to the computer. • Reconnect the keyboard cable as shown on your keyboard or moving your mouse, press and hold the power button for at least 8 to 10 seconds, until the computer turns off, and then restart your computer. • Ensure that the keyboard cable is firmly connected...

Owners Manual
Page 40
...10 seconds, until the computer turns off, and then restart your mouse, press and hold the power button for at least 8 to select the program that it runs in its documentation or on the ... O C U M E N T A T I O N - A solid blue screen appears TU R N T H E C O M P U T E R O F F - A program crashes repeatedly NOTE: Most software includes installation instructions in an environment similar to non-Windows XP operating system environments. 1 Click the Start, point to All Programs→ Accessories, and then click Program Compatibility Wizard. 2 In the welcome screen, click Next. 3 Follow...
...10 seconds, until the computer turns off, and then restart your mouse, press and hold the power button for at least 8 to select the program that it runs in its documentation or on the ... O C U M E N T A T I O N - A solid blue screen appears TU R N T H E C O M P U T E R O F F - A program crashes repeatedly NOTE: Most software includes installation instructions in an environment similar to non-Windows XP operating system environments. 1 Click the Start, point to All Programs→ Accessories, and then click Program Compatibility Wizard. 2 In the welcome screen, click Next. 3 Follow...

Owners Manual
Page 43
Ensure that the network is in standby mode. Power Problems CAUTION: Before you begin any of the procedures in this section, follow the safety instructions located in the Product Information ... in the Product Information Guide. I F T H E P O W E R L I G H T I S B L I N K I G H T S O N T H E B A C K O F T H E C O M P U T E R - See "Resolving Software and Hardware Incompatibilities" on the keyboard, move the mouse, or press the power button to verify that your network settings are correct and that the network cable is off (see "Controls and Lights" on the back of the computer...
Ensure that the network is in standby mode. Power Problems CAUTION: Before you begin any of the procedures in this section, follow the safety instructions located in the Product Information ... in the Product Information Guide. I F T H E P O W E R L I G H T I S B L I N K I G H T S O N T H E B A C K O F T H E C O M P U T E R - See "Resolving Software and Hardware Incompatibilities" on the keyboard, move the mouse, or press the power button to verify that your network settings are correct and that the network cable is off (see "Controls and Lights" on the back of the computer...
Owners Manual
Page 47
... information. Solving Problems 47 R U N T H E H A R D W A R E TR O U B L E S H O O T E R - A D J U S T T H E W I C S - See "Reinstalling Drivers" on page 56. CHECK THE MONITOR POWER LIGHT - • If the power light is lit or blinking, the monitor has power. • If the power light is off, firmly press the button to ensure that the monitor cable is normal for monitor cable connectors to have missing...
... information. Solving Problems 47 R U N T H E H A R D W A R E TR O U B L E S H O O T E R - A D J U S T T H E W I C S - See "Reinstalling Drivers" on page 56. CHECK THE MONITOR POWER LIGHT - • If the power light is lit or blinking, the monitor has power. • If the power light is off, firmly press the button to ensure that the monitor cable is normal for monitor cable connectors to have missing...

Owners Manual
Page 51
...to boot from the computer for resource conflicts (see "Resolving Software and Hardware Incompatibilities" on page 56). 4 If the problem persists, contact Dell (see "Contacting Dell" on page 112). Another failure has occurred. • Ensure that you removed, then remove a different card and restart the computer. 3...) and restarting the computer (see "Using Intel® Viiv™ Quick Resume Technology (Optional)" on page 30. • Press the power button. • Move the mouse. • Press any key on the keyboard. • Press any key on the optional MCE remote control.
...to boot from the computer for resource conflicts (see "Resolving Software and Hardware Incompatibilities" on page 56). 4 If the problem persists, contact Dell (see "Contacting Dell" on page 112). Another failure has occurred. • Ensure that you removed, then remove a different card and restart the computer. 3...) and restarting the computer (see "Using Intel® Viiv™ Quick Resume Technology (Optional)" on page 30. • Press the power button. • Move the mouse. • Press any key on the keyboard. • Press any key on the optional MCE remote control.

Owners Manual
Page 61
... the computer and any open programs before you turn off your computer. 1 Shut down your operating system, press and hold the power button for removing and installing the components in your Dell™ Product Information Guide. • A component can be replaced or-if purchased separately-installed by performing the removal procedure in your...
... the computer and any open programs before you turn off your computer. 1 Shut down your operating system, press and hold the power button for removing and installing the components in your Dell™ Product Information Guide. • A component can be replaced or-if purchased separately-installed by performing the removal procedure in your...

Owners Manual
Page 62
...you begin any telephone or telecommunication lines from the computer. 62 Removing and Installing Parts Damage due to servicing that is not authorized by Dell is not covered by touching an unpainted metal surface, such as a processor by its edges, not by its pins. NOTICE: To ...Computer Use the following steps before you begin working inside your computer and all attached devices from their electrical outlets, and then press the power button to ground the system board. Some cables have a connector with care. Removing the Computer Cover CAUTION: Before you disconnect a cable,...
...you begin any telephone or telecommunication lines from the computer. 62 Removing and Installing Parts Damage due to servicing that is not authorized by Dell is not covered by touching an unpainted metal surface, such as a processor by its edges, not by its pins. NOTICE: To ...Computer Use the following steps before you begin working inside your computer and all attached devices from their electrical outlets, and then press the power button to ground the system board. Some cables have a connector with care. Removing the Computer Cover CAUTION: Before you disconnect a cable,...
Owners Manual
Page 63
... the electrical outlet before opening the cover. CAUTION: To guard against electrical shock, always unplug your computer from their electrical outlets, and then press the power button to ground the system board.
... the electrical outlet before opening the cover. CAUTION: To guard against electrical shock, always unplug your computer from their electrical outlets, and then press the power button to ground the system board.

Owners Manual
Page 64
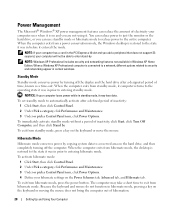
CAUTION: To guard against electrical shock, always unplug your computer from the electrical outlet before opening the cover. 2 1 3 4 7 6 5 1 drive release latch 4 hard drive 7 front-panel door 2 CD/DVD drive 5 heat sink assembly 3 power supply and fan 6 power button 64 Removing and Installing Parts Inside View of Your Computer CAUTION: Before you begin any of the procedures in this section, follow the safety instructions located in the Product Information Guide.
CAUTION: To guard against electrical shock, always unplug your computer from the electrical outlet before opening the cover. 2 1 3 4 7 6 5 1 drive release latch 4 hard drive 7 front-panel door 2 CD/DVD drive 5 heat sink assembly 3 power supply and fan 6 power button 64 Removing and Installing Parts Inside View of Your Computer CAUTION: Before you begin any of the procedures in this section, follow the safety instructions located in the Product Information Guide.
Owners Manual
Page 100
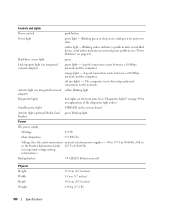
... yellow blinking light adapter) Diagnostic lights four lights on the front panel (see "Power Problems" on the system board Activity light (optional Media Card green blinking light Reader) Power DC power supply: Wattage 275 W Heat dissipation 935 BTU/hr Voltage (See the safety instructions... manual selection power supplies - 90 to 135 V at 50/60 Hz; 180 to the network. Blinking green in the Product Information Guide 265 V at 50/60 Hz for power-on integrated network adapter) green light - amber light - Controls and Lights Power control push button Power light green ...
... yellow blinking light adapter) Diagnostic lights four lights on the front panel (see "Power Problems" on the system board Activity light (optional Media Card green blinking light Reader) Power DC power supply: Wattage 275 W Heat dissipation 935 BTU/hr Voltage (See the safety instructions... manual selection power supplies - 90 to 135 V at 50/60 Hz; 180 to the network. Blinking green in the Product Information Guide 265 V at 50/60 Hz for power-on integrated network adapter) green light - amber light - Controls and Lights Power control push button Power light green ...

Owners Manual
Page 108
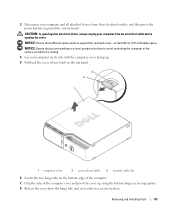
... the monitor and disconnect it into the network wall jack and then plug it from the electrical outlet. 8 Disconnect the computer power cable from the electrical outlet, and press the power button to ground the system board. 9 Remove the computer cover (see "Replacing the Computer Cover" on page 96). 10 Locate the 2-pin...
... the monitor and disconnect it into the network wall jack and then plug it from the electrical outlet. 8 Disconnect the computer power cable from the electrical outlet, and press the power button to ground the system board. 9 Remove the computer cover (see "Replacing the Computer Cover" on page 96). 10 Locate the 2-pin...

