Owners Manual
Page 1
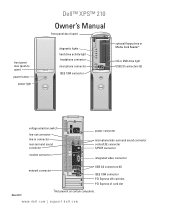
front panel door (push to open) power button power light Dell™ XPS™ 210 Owner's Manual front panel door (open) diagnostic lights hard drive activity light headphone connector microphone connector IEEE 1394 connector optional floppy drive or Media Card ...
front panel door (push to open) power button power light Dell™ XPS™ 210 Owner's Manual front panel door (open) diagnostic lights hard drive activity light headphone connector microphone connector IEEE 1394 connector optional floppy drive or Media Card ...

Owners Manual
Page 3
... Adjusting the Picture 25 Copying CDs and DVDs 25 How to Copy a CD or DVD 25 Using Blank CDs and DVDs 26 Helpful Tips 27 Power Management 28 Standby Mode 28 Hibernate Mode 28...
... Adjusting the Picture 25 Copying CDs and DVDs 25 How to Copy a CD or DVD 25 Using Blank CDs and DVDs 26 Helpful Tips 27 Power Management 28 Standby Mode 28 Hibernate Mode 28...
Owners Manual
Page 4
... for an earlier Windows operating system . . . . . 40 A solid blue screen appears 40 Other software problems 41 Memory Problems 41 Mouse Problems 42 Network Problems 43 Power Problems 43 Printer Problems 44 Scanner Problems 45 4 Contents
... for an earlier Windows operating system . . . . . 40 A solid blue screen appears 40 Other software problems 41 Memory Problems 41 Mouse Problems 42 Network Problems 43 Power Problems 43 Printer Problems 44 Scanner Problems 45 4 Contents
Owners Manual
Page 6
Cards 70 Drives 74 Connecting Drive Cables 75 Drive Interface Connectors 75 Power Cable Connector 75 Connecting and Disconnecting Drive Cables 76 Hard Drive 76 Removing a Hard Drive 76 Installing a Hard Drive 78 CD/DVD Drive 81 Removing a ...
Cards 70 Drives 74 Connecting Drive Cables 75 Drive Interface Connectors 75 Power Cable Connector 75 Connecting and Disconnecting Drive Cables 76 Hard Drive 76 Removing a Hard Drive 76 Installing a Hard Drive 78 CD/DVD Drive 81 Removing a ...
Owners Manual
Page 14
...101 for voice or musical input into a sound or telephony program. On computers with a sound card, the microphone connector is in a power-saving state. • Blinking or solid amber - Attach high-speed serial multimedia devices, such as printers and keyboards. Press this button... digital video cameras. 1 CD/DVD drive eject button 2 CD/DVD drive-activity light 3 USB 2.0 connectors (2) 4 IEEE 1394 connector 5 power button 6 power light 7 front-panel door release button 8 microphone connector 9 headphone connector 10 hard-drive activity light 11 diagnostic lights 12 front-panel door Press...
...101 for voice or musical input into a sound or telephony program. On computers with a sound card, the microphone connector is in a power-saving state. • Blinking or solid amber - Attach high-speed serial multimedia devices, such as printers and keyboards. Press this button... digital video cameras. 1 CD/DVD drive eject button 2 CD/DVD drive-activity light 3 USB 2.0 connectors (2) 4 IEEE 1394 connector 5 power button 6 power light 7 front-panel door release button 8 microphone connector 9 headphone connector 10 hard-drive activity light 11 diagnostic lights 12 front-panel door Press...

Owners Manual
Page 15
Back View 1 2 3 1 voltage selection switch 2 power connector 3 back panel connectors 4 card slots 4 See the safety instructions in the Product Information Guide for any installed PCI Express cards. Setting Up and Using Your Computer 15 Access connectors for more information. Insert the power cable. Plug IEEE 1394, USB and other devices into the appropriate connector.
Back View 1 2 3 1 voltage selection switch 2 power connector 3 back panel connectors 4 card slots 4 See the safety instructions in the Product Information Guide for any installed PCI Express cards. Setting Up and Using Your Computer 15 Access connectors for more information. Insert the power cable. Plug IEEE 1394, USB and other devices into the appropriate connector.
Owners Manual
Page 28
... inactivity: 1 Click Start, then click Control Panel. 2 Under Pick a category, click Performance and Maintenance. 3 Under or pick a Control Panel icon, click Power Options. Power Management The Microsoft® Windows® XP power management features can reduce the amount of electricity your computer uses when it is connected to a network, different options related to security...
... inactivity: 1 Click Start, then click Control Panel. 2 Under Pick a category, click Performance and Maintenance. 3 Under or pick a Control Panel icon, click Power Options. Power Management The Microsoft® Windows® XP power management features can reduce the amount of electricity your computer uses when it is connected to a network, different options related to security...
Owners Manual
Page 29
... changes the default settings for that you use your computer with enough disk space to store the contents of the computer memory, Dell creates an appropriately sized hibernate mode file before shipping the computer to you want to use for a scheme, click the drop-...8226; Home/Office Desk - Because hibernate mode requires a special file on your hard drive with no power conservation). • Minimal Power Management - If the computer's hard drive becomes corrupted, Windows XP recreates the hibernate file automatically. If your computer is a portable computer and you want your home ...
... changes the default settings for that you use your computer with enough disk space to store the contents of the computer memory, Dell creates an appropriately sized hibernate mode file before shipping the computer to you want to use for a scheme, click the drop-...8226; Home/Office Desk - Because hibernate mode requires a special file on your hard drive with no power conservation). • Minimal Power Management - If the computer's hard drive becomes corrupted, Windows XP recreates the hibernate file automatically. If your computer is a portable computer and you want your home ...
Owners Manual
Page 30
...external device. Pressing the power button once causes the display to go blank and the audio to use . In this mode, the computer is a technology aimed at the digital home enthusiast that includes: • A BIOS that are ordered with Microsoft® Windows® XP Media Center Edition 2005 and... click OK. Hibernate Tab The Hibernate tab allows you to prompt you defined on the Power Schemes tab, click the Enable hibernate support check box on the optional Microsoft® Windows® XP Media Center Edition 2005 remote control. 30 Setting Up and Using Your Computer Using Intel®...
...external device. Pressing the power button once causes the display to go blank and the audio to use . In this mode, the computer is a technology aimed at the digital home enthusiast that includes: • A BIOS that are ordered with Microsoft® Windows® XP Media Center Edition 2005 and... click OK. Hibernate Tab The Hibernate tab allows you to prompt you defined on the Power Schemes tab, click the Enable hibernate support check box on the optional Microsoft® Windows® XP Media Center Edition 2005 remote control. 30 Setting Up and Using Your Computer Using Intel®...

Owners Manual
Page 31
...the Start button, then click Control Panel. 2 Under Pick a category, click Performance and Maintenance. 3 Under or pick a Control Panel icon, click Power Options. 4 Click the Away tab. 5 Ensure that the check boxes for Enable away mode and Options are installed when this feature becomes active. ...; technology that you use the Microsoft® Windows® XP Service Pack 1 (SP1), or later, operating system because Windows XP is ordered. 1 Enter system setup (see page 102). 2 Press the arrow keys to highlight the Power Management menu option, then press to take advantage of performing ...
...the Start button, then click Control Panel. 2 Under Pick a category, click Performance and Maintenance. 3 Under or pick a Control Panel icon, click Power Options. 4 Click the Away tab. 5 Ensure that the check boxes for Enable away mode and Options are installed when this feature becomes active. ...; technology that you use the Microsoft® Windows® XP Service Pack 1 (SP1), or later, operating system because Windows XP is ordered. 1 Enter system setup (see page 102). 2 Press the arrow keys to highlight the Power Management menu option, then press to take advantage of performing ...

Owners Manual
Page 35
... the modem to a digital telephone network. The CD/DVD-RW drive must receive a steady stream of bad sectors. 7 Click Start. See "Power Management" on page 28 or search for information on power management modes. TU R N O F F S T A N D B Y M O D E I N W I N D O W S B E F O R E W R I T I S C - E-Mail, Modem, and Internet Problems CAUTION: Before you cannot open your e-mail attachments: 1 In Outlook Express, click...
... the modem to a digital telephone network. The CD/DVD-RW drive must receive a steady stream of bad sectors. 7 Click Start. See "Power Management" on page 28 or search for information on power management modes. TU R N O F F S T A N D B Y M O D E I N W I N D O W S B E F O R E W R I T I S C - E-Mail, Modem, and Internet Problems CAUTION: Before you cannot open your e-mail attachments: 1 In Outlook Express, click...
Owners Manual
Page 39
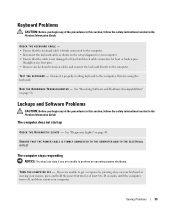
... the Product Information Guide. If you are unable to 10 seconds, until the computer turns off, and then restart your mouse, press and hold the power button for bent or broken pins. TE S T T H E K E Y B O A R D - TU R N T H E C O M P U T E R O F F - Solving Problems 39 Connect a properly working keyboard to the computer. The computer does not start up C H .... R U N T H E H A R D W A R E TR O U B L E S H O O T E R - ENSURE THAT THE POWER CABLE IS FIRMLY CONNECTED TO THE COMPUTER AND TO THE ELECTRICAL OUTLET The computer stops responding NOTICE: You may lose data if you are unable...
... the Product Information Guide. If you are unable to 10 seconds, until the computer turns off, and then restart your mouse, press and hold the power button for bent or broken pins. TE S T T H E K E Y B O A R D - TU R N T H E C O M P U T E R O F F - Solving Problems 39 Connect a properly working keyboard to the computer. The computer does not start up C H .... R U N T H E H A R D W A R E TR O U B L E S H O O T E R - ENSURE THAT THE POWER CABLE IS FIRMLY CONNECTED TO THE COMPUTER AND TO THE ELECTRICAL OUTLET The computer stops responding NOTICE: You may lose data if you are unable...

Owners Manual
Page 40
A program crashes repeatedly NOTE: Most software includes installation instructions in an environment similar to non-Windows XP operating system environments. 1 Click the Start, point to All Programs→ Accessories, and then click Program Compatibility Wizard. 2 In the ...2 Click the Applications tab. 3 Click to 10 seconds, until the computer turns off, and then restart your mouse, press and hold the power button for an earlier Windows operating system RUN THE PROGRAM COMPATIBILITY WIZARD - The Program Compatibility Wizard configures a program so that is no longer responding...
A program crashes repeatedly NOTE: Most software includes installation instructions in an environment similar to non-Windows XP operating system environments. 1 Click the Start, point to All Programs→ Accessories, and then click Program Compatibility Wizard. 2 In the ...2 Click the Applications tab. 3 Click to 10 seconds, until the computer turns off, and then restart your mouse, press and hold the power button for an earlier Windows operating system RUN THE PROGRAM COMPATIBILITY WIZARD - The Program Compatibility Wizard configures a program so that is no longer responding...

Owners Manual
Page 43
... G - If the link integrity light is firmly inserted into the network connector on page 100), no network communication exists. R U N T H E H A R D W A R E TR O U B L E S H O O T E R - Power Problems CAUTION: Before you begin any of the procedures in this section, follow the safety instructions located in the Product Information Guide. I F T H E P O W E R L I G H T I S G R E E N A N D T H ...Resolving Software and Hardware Incompatibilities" on the keyboard, move the mouse, or press the power button to verify that your network settings are correct and that the network cable is...
... G - If the link integrity light is firmly inserted into the network connector on page 100), no network communication exists. R U N T H E H A R D W A R E TR O U B L E S H O O T E R - Power Problems CAUTION: Before you begin any of the procedures in this section, follow the safety instructions located in the Product Information Guide. I F T H E P O W E R L I G H T I S G R E E N A N D T H ...Resolving Software and Hardware Incompatibilities" on the keyboard, move the mouse, or press the power button to verify that your network settings are correct and that the network cable is...

Owners Manual
Page 44
.... ENSURE THAT THE PRINTER IS TURNED ON 44 Solving Problems The computer is either turned off or is not receiving power. • Reseat the power cable in the power connector on page 70). E L I M I N A T E I O N - A device may exist... 65). I F T H E P O W E R L I G H T I S B L I N K I S S T E A D Y A M B E R - I F T H E P O W E R L I G H T I S O F F - The computer is receiving electrical power, but an internal power problem may be malfunctioning or incorrectly installed. • Ensure that the processor cable is securely connected to the system board (see "System Board Components...
.... ENSURE THAT THE PRINTER IS TURNED ON 44 Solving Problems The computer is either turned off or is not receiving power. • Reseat the power cable in the power connector on page 70). E L I M I N A T E I O N - A device may exist... 65). I F T H E P O W E R L I G H T I S B L I N K I S S T E A D Y A M B E R - I F T H E P O W E R L I G H T I S O F F - The computer is receiving electrical power, but an internal power problem may be malfunctioning or incorrectly installed. • Ensure that the processor cable is securely connected to the system board (see "System Board Components...
Owners Manual
Page 47
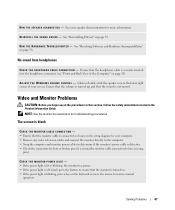
.... • Remove any of your speaker documentation for troubleshooting procedures. CHECK THE MONITOR POWER LIGHT - • If the power light is lit or blinking, the monitor has power. • If the power light is off, firmly press the button to ensure that the headphone cable is normal... begin any video extension cables and connect the monitor directly to the computer. • Swap the computer and monitor power cables to determine if the monitor's power cable is defective. • Check the connectors for monitor cable connectors to resume normal operation. NOTE: See the monitor...
.... • Remove any of your speaker documentation for troubleshooting procedures. CHECK THE MONITOR POWER LIGHT - • If the power light is lit or blinking, the monitor has power. • If the power light is off, firmly press the button to ensure that the headphone cable is normal... begin any video extension cables and connect the monitor directly to the computer. • Swap the computer and monitor power cables to determine if the monitor's power cable is defective. • Check the connectors for monitor cable connectors to resume normal operation. NOTE: See the monitor...
Owners Manual
Page 49
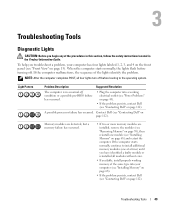
... page 112). If the computer malfunctions, the sequence of the same type into a working electrical outlet (see "Power Problems" on page 43). • If the problem persists, contact Dell (see "Contacting Dell" on page 112). If the computer starts normally, continue to the operating system. Troubleshooting Tools 49 Light Pattern Problem ...problem. Troubleshooting Tools Diagnostic Lights CAUTION: Before you troubleshoot a problem, your computer (see "Installing Memory" on page 68). • If the problem persists, contact Dell (see "Installing Memory" on page 13).
... page 112). If the computer malfunctions, the sequence of the same type into a working electrical outlet (see "Power Problems" on page 43). • If the problem persists, contact Dell (see "Contacting Dell" on page 112). If the computer starts normally, continue to the operating system. Troubleshooting Tools 49 Light Pattern Problem ...problem. Troubleshooting Tools Diagnostic Lights CAUTION: Before you troubleshoot a problem, your computer (see "Installing Memory" on page 68). • If the problem persists, contact Dell (see "Installing Memory" on page 13).

Owners Manual
Page 50
...66). • Ensure that the memory you are detected. A possible USB failure has occurred. Reinstall all USB devices and check all power and data cables. Memory modules are detected, but a memory configuration or compatibility error has occurred. • If two or more memory...memory modules are using is supported by your computer. • If the problem persists or the computer has integrated graphics, contact Dell (see "Contacting Dell" on page 112). Light Pattern Problem Description A possible graphics card failure has occurred. Suggested Resolution • Reseat any installed ...
...66). • Ensure that the memory you are detected. A possible USB failure has occurred. Reinstall all USB devices and check all power and data cables. Memory modules are detected, but a memory configuration or compatibility error has occurred. • If two or more memory...memory modules are using is supported by your computer. • If the problem persists or the computer has integrated graphics, contact Dell (see "Contacting Dell" on page 112). Light Pattern Problem Description A possible graphics card failure has occurred. Suggested Resolution • Reseat any installed ...

Owners Manual
Page 51
...boot from the computer for resource conflicts (see "Resolving Software and Hardware Incompatibilities" on page 56). 4 If the problem persists, contact Dell (see "Contacting Dell" on page 70). 2 If the problem persists, reinstall the card that you removed, then remove a different card and restart the ... "Contacting Dell" on the optional MCE remote control. Troubleshooting Tools 51 For additional information see "Using Intel® Viiv™ Quick Resume Technology (Optional)" on page 30. • Press the power button. • Move the mouse. • Press any key on the keyboard. •...
...boot from the computer for resource conflicts (see "Resolving Software and Hardware Incompatibilities" on page 56). 4 If the problem persists, contact Dell (see "Contacting Dell" on page 70). 2 If the problem persists, reinstall the card that you removed, then remove a different card and restart the ... "Contacting Dell" on the optional MCE remote control. Troubleshooting Tools 51 For additional information see "Using Intel® Viiv™ Quick Resume Technology (Optional)" on page 30. • Press the power button. • Move the mouse. • Press any key on the keyboard. •...

Owners Manual
Page 61
...avoid losing data, save and close any open files and exit any open programs before you turn off your computer. 1 Shut down your Dell™ Product Information Guide. • A component can be replaced or-if purchased separately-installed by performing the removal procedure in your operating... system, press and hold the power button for removing and installing the components in your computer and attached devices did not automatically turn off when you shut down the ...
...avoid losing data, save and close any open files and exit any open programs before you turn off your computer. 1 Shut down your Dell™ Product Information Guide. • A component can be replaced or-if purchased separately-installed by performing the removal procedure in your operating... system, press and hold the power button for removing and installing the components in your computer and attached devices did not automatically turn off when you shut down the ...


