Setup and Quick Reference Guide
Page 37
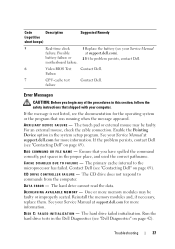
... system setup program. C A C H E D I S A B L E D D U E T O F A I L A B L E M E M O R Y - DATA ERROR - Failure 7 CPU-cache test Contact Dell. D E C R E A S I N G A V A I L U R E - Reinstall the memory modules and, if necessary, replace them. AU X I L I A R Y DEVICE FAILURE - One or more information. Contact Dell (see "Dell Diagnostics" on page 69). battery failure or 2 If the problem persists, contact Dell. The hard drive cannot read the data. motherboard failure. 6 Video BIOS Test Contact...
... system setup program. C A C H E D I S A B L E D D U E T O F A I L A B L E M E M O R Y - DATA ERROR - Failure 7 CPU-cache test Contact Dell. D E C R E A S I N G A V A I L U R E - Reinstall the memory modules and, if necessary, replace them. AU X I L I A R Y DEVICE FAILURE - One or more information. Contact Dell (see "Dell Diagnostics" on page 69). battery failure or 2 If the problem persists, contact Dell. The hard drive cannot read the data. motherboard failure. 6 Video BIOS Test Contact...
Setup and Quick Reference Guide
Page 38
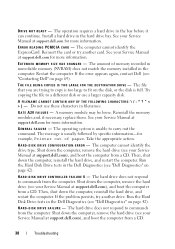
...hard drive (see your Service Manual at support.dell.com), and boot the computer from a CD. 38 Troubleshooting Shut down the computer, remove the hard drive (see your Service Manual at support.dell.com), and boot the computer from a CD. DRIVE NOT READY - The operation requires a hard drive in the hard drive bay. Install a hard drive... CHARACTERS Do not use a larger capacity disk. Reinstall the memory modules and, if necessary, replace them. See your Service Manual at support.dell.com for example, Printer out of memory recorded in nonvolatile memory (NVRAM) does not match ...
...hard drive (see your Service Manual at support.dell.com), and boot the computer from a CD. 38 Troubleshooting Shut down the computer, remove the hard drive (see your Service Manual at support.dell.com), and boot the computer from a CD. DRIVE NOT READY - The operation requires a hard drive in the hard drive bay. Install a hard drive... CHARACTERS Do not use a larger capacity disk. Reinstall the memory modules and, if necessary, replace them. See your Service Manual at support.dell.com for example, Printer out of memory recorded in nonvolatile memory (NVRAM) does not match ...
Setup and Quick Reference Guide
Page 40
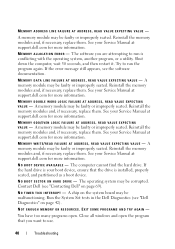
... LINE FAILURE AT ADDRESS, READ VALUE EXPECTING VALUE - Reinstall the memory modules and, if necessary, replace them . MEMORY WRITE/READ FAILURE AT ADDRESS, READ VALUE EXPECTING VALUE - If the hard drive is your Service Manual at support.dell.com for more information. A chip on page 69). You have too many programs open the program...
... LINE FAILURE AT ADDRESS, READ VALUE EXPECTING VALUE - Reinstall the memory modules and, if necessary, replace them . MEMORY WRITE/READ FAILURE AT ADDRESS, READ VALUE EXPECTING VALUE - If the hard drive is your Service Manual at support.dell.com for more information. A chip on page 69). You have too many programs open the program...
Service Manual
Page 6
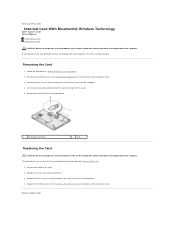
...; Wireless Technology Dell™ Vostro™ 1710 Service Manual Removing the Card Replacing the Card CAUTION: Before you begin any of the procedures in this section, follow the safety instructions that shipped with your computer. If you have completed the removal procedure Removing the Card. 1. Back to the card. 2. See Removing the Hard Drive for an...
...; Wireless Technology Dell™ Vostro™ 1710 Service Manual Removing the Card Replacing the Card CAUTION: Before you begin any of the procedures in this section, follow the safety instructions that shipped with your computer. If you have completed the removal procedure Removing the Card. 1. Back to the card. 2. See Removing the Hard Drive for an...
Service Manual
Page 7
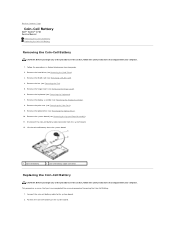
Remove the palm rest (see Removing the Hard Drive). 3. Remove the hard drive (see Removing the Palm Rest). 9. Remove the WLAN card (see Removing the Hinge Cover). 6. Remove the hinge cover (see Removing a WLAN Card). 4. Remove the ...2. Remove the optical drive (see Removing the Display Assembly). 8. Lift the coin-cell battery from the system board. 12. Remove the fan (see Removing the Fan). 5. Connect the coin-cell battery cable to Contents Page Coin-Cell Battery Dell™ Vostro™ 1710 Service Manual Removing the Coin-Cell Battery Replacing the Coin-Cell Battery...
Remove the palm rest (see Removing the Hard Drive). 3. Remove the hard drive (see Removing the Palm Rest). 9. Remove the WLAN card (see Removing the Hinge Cover). 6. Remove the hinge cover (see Removing a WLAN Card). 4. Remove the ...2. Remove the optical drive (see Removing the Display Assembly). 8. Lift the coin-cell battery from the system board. 12. Remove the fan (see Removing the Fan). 5. Connect the coin-cell battery cable to Contents Page Coin-Cell Battery Dell™ Vostro™ 1710 Service Manual Removing the Coin-Cell Battery Replacing the Coin-Cell Battery...

Service Manual
Page 8
Replace the system board (see Replacing the Optical Drive). 5. Replace the optical drive (see Replacing the System Board Assembly). 4. Replace the display assembly (see Replacing the Fan). 10. Replace the fan (see Replacing the Display Assembly). 7. Back to Contents Page Replace the palm rest (see Replacing a WLAN Card). 11. Replace the WLAN card (see Replacing the Palm Rest). 6. Replace the hinge cover (see Replacing the Keyboard). 8. Replace the keyboard (see Replacing the Hinge Cover). 9. 3. Replace the hard drive (see Replacing the Hard Drive).
Replace the system board (see Replacing the Optical Drive). 5. Replace the optical drive (see Replacing the System Board Assembly). 4. Replace the display assembly (see Replacing the Fan). 10. Replace the fan (see Replacing the Display Assembly). 7. Back to Contents Page Replace the palm rest (see Replacing a WLAN Card). 11. Replace the WLAN card (see Replacing the Palm Rest). 6. Replace the hinge cover (see Replacing the Keyboard). 8. Replace the keyboard (see Replacing the Hinge Cover). 9. 3. Replace the hard drive (see Replacing the Hard Drive).
Service Manual
Page 12
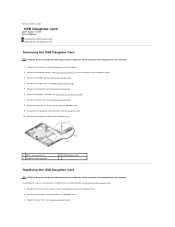
...hard drive cover. Disconnect the daughter-card connector from the daughter card. 9. Remove the WLAN card (see Removing the Hinge Cover). 5. Remove the hinge cover (see Removing a WLAN Card). 4. Replace the M2.5 x 5-mm screw to secure the daughter card to the daughter card. 3. Back to Contents Page USB Daughter Card Dell™ Vostro™ 1710... Service Manual Removing the USB Daughter Card Replacing the USB Daughter Card Removing the USB Daughter Card CAUTION: Before you begin ...
...hard drive cover. Disconnect the daughter-card connector from the daughter card. 9. Remove the WLAN card (see Removing the Hinge Cover). 5. Remove the hinge cover (see Removing a WLAN Card). 4. Replace the M2.5 x 5-mm screw to secure the daughter card to the daughter card. 3. Back to Contents Page USB Daughter Card Dell™ Vostro™ 1710... Service Manual Removing the USB Daughter Card Replacing the USB Daughter Card Removing the USB Daughter Card CAUTION: Before you begin ...
Service Manual
Page 13
Back to Contents Page Replace the WLAN card (see Replacing the Hinge Cover). 7. See Removing the Hard Drive for an illustration of the hard drive cover. Replace the hard drive cover. Replace the hinge cover (see Replacing a WLAN Card). 8. 4. Replace the display assembly (see Replacing the Keyboard). 6. Replace the keyboard (see Replacing the Display Assembly). 5.
Back to Contents Page Replace the WLAN card (see Replacing the Hinge Cover). 7. See Removing the Hard Drive for an illustration of the hard drive cover. Replace the hard drive cover. Replace the hinge cover (see Replacing a WLAN Card). 8. 4. Replace the display assembly (see Replacing the Keyboard). 6. Replace the keyboard (see Replacing the Display Assembly). 5.
Service Manual
Page 22
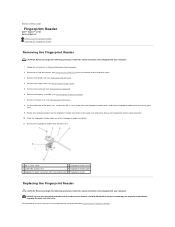
... Follow the instructions in Before Working on the palm rest upward to Contents Page Fingerprint Reader Dell™ Vostro™ 1710 Service Manual Removing the Fingerprint Reader Replacing the Fingerprint Reader Removing the Fingerprint Reader CAUTION: Before you begin the following procedure, follow ...remove the M2 x 3-mm screw from the palm rest. 1 M2 x 3-mm screw 2 fingerprint reader cover 3 underside of the hard drive cover. 3. Remove the fingerprint reader from the fingerprint reader cover, and lift the fingerprint reader cover out of the fingerprint reader connector. ...
... Follow the instructions in Before Working on the palm rest upward to Contents Page Fingerprint Reader Dell™ Vostro™ 1710 Service Manual Removing the Fingerprint Reader Replacing the Fingerprint Reader Removing the Fingerprint Reader CAUTION: Before you begin the following procedure, follow ...remove the M2 x 3-mm screw from the palm rest. 1 M2 x 3-mm screw 2 fingerprint reader cover 3 underside of the hard drive cover. 3. Remove the fingerprint reader from the fingerprint reader cover, and lift the fingerprint reader cover out of the fingerprint reader connector. ...
Service Manual
Page 23
... (see Replacing the Hinge Cover). 8. Replace the hinge cover (see Replacing the Display Assembly). 6. Replace the hard drive cover. Back to Contents Page Replace the WLAN card (see Replacing the Keyboard). 7. See Removing the Hard Drive for an illustration of the palm rest. 2. Replace the keyboard (see Replacing a WLAN Card). 9. Position the fingerprint reader on the underside of the hard drive cover. 1. Replace the palm...
... (see Replacing the Hinge Cover). 8. Replace the hinge cover (see Replacing the Display Assembly). 6. Replace the hard drive cover. Back to Contents Page Replace the WLAN card (see Replacing the Keyboard). 7. See Removing the Hard Drive for an illustration of the palm rest. 2. Replace the keyboard (see Replacing a WLAN Card). 9. Position the fingerprint reader on the underside of the hard drive cover. 1. Replace the palm...
Service Manual
Page 24
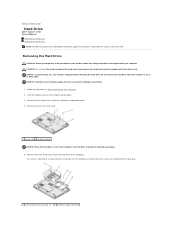
... Hard Drive Dell™ Vostro™ 1710 Service Manual Removing the Hard Drive Replacing the Hard Drive NOTE: Dell does not guarantee compatibility or provide support for hard drives obtained from the computer while the drive is hot. CAUTION: Do not touch the metal housing of the procedures in this section, follow the safety instructions that shipped with your computer before removing the hard drive. NOTICE: Hard drives...
... Hard Drive Dell™ Vostro™ 1710 Service Manual Removing the Hard Drive Replacing the Hard Drive NOTE: Dell does not guarantee compatibility or provide support for hard drives obtained from the computer while the drive is hot. CAUTION: Do not touch the metal housing of the procedures in this section, follow the safety instructions that shipped with your computer before removing the hard drive. NOTICE: Hard drives...
Service Manual
Page 25
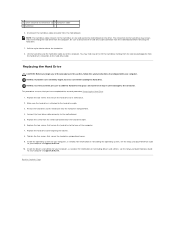
... from the metal tab located near the hard drive cable. 6. Replacing the Hard Drive CAUTION: Before you have completed the removal procedure Removing the Hard Drive. 1. Excessive force may remain intact when lifting the hard drive from the computer. Replace the hard drive cover aligning the notches. 8. Connect the hard drive cable connector to metal base (2) 4 hard drive cable 5 hard drive 6. Install the operating system for your computer...
... from the metal tab located near the hard drive cable. 6. Replacing the Hard Drive CAUTION: Before you have completed the removal procedure Removing the Hard Drive. 1. Excessive force may remain intact when lifting the hard drive from the computer. Replace the hard drive cover aligning the notches. 8. Connect the hard drive cable connector to metal base (2) 4 hard drive cable 5 hard drive 6. Install the operating system for your computer...
Service Manual
Page 30
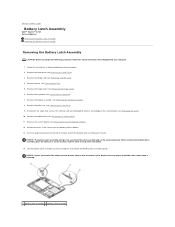
... Contents Page Battery Latch Assembly Dell™ Vostro™ 1710 Service Manual Removing the Battery Latch Assembly Replacing the Battery Latch Assembly Removing the Battery Latch Assembly CAUTION: Before you remove the battery release button, observe the orientation of the computer and unhook the battery latch assembly spring. Remove the hard drive (see Removing the Fan...
... Contents Page Battery Latch Assembly Dell™ Vostro™ 1710 Service Manual Removing the Battery Latch Assembly Replacing the Battery Latch Assembly Removing the Battery Latch Assembly CAUTION: Before you remove the battery release button, observe the orientation of the computer and unhook the battery latch assembly spring. Remove the hard drive (see Removing the Fan...
Service Manual
Page 31
... release button with Bluetooth wireless technology to the system board (see Replacing the Hinge Cover). 12. Align the guide post on the battery latch assembly with your computer. Replace the keyboard (see Replacing the Hard Drive). 14. Connect the cable that the battery latch spring is properly... mounted on the base of the computer, then lower the latch assembly into place. 3. Replace the hard drive (see Replacing the Keyboard). 11. NOTICE: Ensure the battery latch assembly is keyed to Contents Page This procedure assumes that holds the...
... release button with Bluetooth wireless technology to the system board (see Replacing the Hinge Cover). 12. Align the guide post on the battery latch assembly with your computer. Replace the keyboard (see Replacing the Hard Drive). 14. Connect the cable that the battery latch spring is properly... mounted on the base of the computer, then lower the latch assembly into place. 3. Replace the hard drive (see Replacing the Keyboard). 11. NOTICE: Ensure the battery latch assembly is keyed to Contents Page This procedure assumes that holds the...

Service Manual
Page 36
... drive cable from the optical drive. 9. Replace the palm rest (see Replacing the Palm Rest). 4. Back to Contents Page Optical Drive Dell™ Vostro™ 1710 Service Manual Removing the Optical Drive Replacing the Optical Drive Removing the Optical Drive CAUTION: Before you begin any of the procedures in this section, follow the safety instructions that shipped with your computer. 1. Remove the hard drive...
... drive cable from the optical drive. 9. Replace the palm rest (see Replacing the Palm Rest). 4. Back to Contents Page Optical Drive Dell™ Vostro™ 1710 Service Manual Removing the Optical Drive Replacing the Optical Drive Removing the Optical Drive CAUTION: Before you begin any of the procedures in this section, follow the safety instructions that shipped with your computer. 1. Remove the hard drive...
Service Manual
Page 37
Replace the keyboard (see Replacing a WLAN Card). 8. Replace the hard drive cover. See Removing the Hard Drive for an illustration of the hard drive cover. Back to Contents Page Replace the WLAN card (see Replacing the Keyboard). 6. Replace the hinge cover (see Replacing the Hinge Cover). 7. 5.
Replace the keyboard (see Replacing a WLAN Card). 8. Replace the hard drive cover. See Removing the Hard Drive for an illustration of the hard drive cover. Back to Contents Page Replace the WLAN card (see Replacing the Keyboard). 6. Replace the hinge cover (see Replacing the Hinge Cover). 7. 5.
Service Manual
Page 38
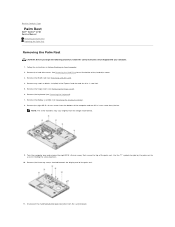
... NOTE: The screw locations may vary slightly from the system board. Use the "P" symbols located on Your Computer. 2. See Removing the Hard Drive for an illustration of the palm rest. Remove the display assembly (see Removing the Keyboard). 7. Turn the computer over and remove the ...palm rest to Contents Page Palm Rest Dell™ Vostro™ 1710 Service Manual Removing the Palm Rest Replacing the Palm Rest Removing the Palm Rest CAUTION: Before you begin the following procedure, follow the safety instructions that secure the top of the hard drive cover. 3. Back to assist in ...
... NOTE: The screw locations may vary slightly from the system board. Use the "P" symbols located on Your Computer. 2. See Removing the Hard Drive for an illustration of the palm rest. Remove the display assembly (see Removing the Keyboard). 7. Turn the computer over and remove the ...palm rest to Contents Page Palm Rest Dell™ Vostro™ 1710 Service Manual Removing the Palm Rest Replacing the Palm Rest Removing the Palm Rest CAUTION: Before you begin the following procedure, follow the safety instructions that secure the top of the hard drive cover. 3. Back to assist in ...

Service Manual
Page 40
Replace any blanks you removed from in -1 card slot. 12. in the ExpressCard slot and the 8- Replace the hard drive cover. See Removing the Hard Drive for an illustration of the hard drive cover. 13. Back to Contents Page
Replace any blanks you removed from in -1 card slot. 12. in the ExpressCard slot and the 8- Replace the hard drive cover. See Removing the Hard Drive for an illustration of the hard drive cover. 13. Back to Contents Page
Service Manual
Page 43
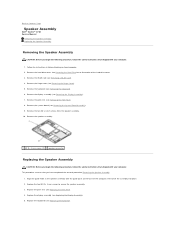
... secure the speaker assembly 3. Remove the hard-drive cover. Align the guide holds in Before Working on the base of the hard drive cover. 3. Replace the display assembly (see Removing a WLAN Card). 4. Remove the WLAN card (see Replacing the Display Assembly). 5. Remove the palm...the system board (see Replacing the Keyboard). Replace the keyboard (see Removing the System Board Assembly). 9. Replace the two M2.0 x 3-mm screws to Contents Page Speaker Assembly Dell™ Vostro™ 1710 Service Manual Removing the Speaker Assembly Replacing the Speaker Assembly Removing ...
... secure the speaker assembly 3. Remove the hard-drive cover. Align the guide holds in Before Working on the base of the hard drive cover. 3. Replace the display assembly (see Removing a WLAN Card). 4. Remove the WLAN card (see Replacing the Display Assembly). 5. Remove the palm...the system board (see Replacing the Keyboard). Replace the keyboard (see Removing the System Board Assembly). 9. Replace the two M2.0 x 3-mm screws to Contents Page Speaker Assembly Dell™ Vostro™ 1710 Service Manual Removing the Speaker Assembly Replacing the Speaker Assembly Removing ...
Service Manual
Page 44
Replace the WLAN card (see Replacing the Hinge Cover). 7. Replace the hinge cover (see Replacing a WLAN Card). 8. Replace the hard-drive cover. Back to Contents Page 6. See Removing the Hard Drive for an illustration of the hard drive cover.
Replace the WLAN card (see Replacing the Hinge Cover). 7. Replace the hinge cover (see Replacing a WLAN Card). 8. Replace the hard-drive cover. Back to Contents Page 6. See Removing the Hard Drive for an illustration of the hard drive cover.


