
Owner's Manual
Page 222
... receiver. • Plug the system into a different outlet so that interference will not occur in a residential installation. Worldwide Regulatory Compliance & Environmental Affairs One Dell Way Round Rock, TX 78682 USA 512-338-4400 222 Appendix If necessary, consult a representative of the FCC Rules. Operation is subject to operate this...cause undesired operation. These limits are on the device or devices covered in compliance with the FCC regulations: Product name: Model number: Company name: Dell™ Vostro™ 1500 PP22L Dell Inc. This device complies with Part 15 of...
... receiver. • Plug the system into a different outlet so that interference will not occur in a residential installation. Worldwide Regulatory Compliance & Environmental Affairs One Dell Way Round Rock, TX 78682 USA 512-338-4400 222 Appendix If necessary, consult a representative of the FCC Rules. Operation is subject to operate this...cause undesired operation. These limits are on the device or devices covered in compliance with the FCC regulations: Product name: Model number: Company name: Dell™ Vostro™ 1500 PP22L Dell Inc. This device complies with Part 15 of...

Service Manual
Page 1
... registered trademarks of your computer. Information in trademarks and trade names other countries. Trademarks used in this text: Dell, the DELL logo, Inspiron, and Vostro are either potential damage to hardware or loss of data and tells you make better use of Microsoft Corporation in... June 2007 Rev. Microsoft, Windows, and Windows Vista are trademarks of Dell Inc. Dell Inc. is subject to either the entities claiming the marks and names or their products. Dell™ Vostro™ 1500 and Inspiron™ 1520/1521 Service Manual Before You Begin ExpressCards Using ...
... registered trademarks of your computer. Information in trademarks and trade names other countries. Trademarks used in this text: Dell, the DELL logo, Inspiron, and Vostro are either potential damage to hardware or loss of data and tells you make better use of Microsoft Corporation in... June 2007 Rev. Microsoft, Windows, and Windows Vista are trademarks of Dell Inc. Dell Inc. is subject to either the entities claiming the marks and names or their products. Dell™ Vostro™ 1500 and Inspiron™ 1520/1521 Service Manual Before You Begin ExpressCards Using ...

Service Manual
Page 2
... (see Removing the Hard Drive). 4. Remove the M2 x3-mm screw that secures the wireless sniffer board to Contents Page Computer Base and Components Dell™ Vostro™ 1500 and Inspiron™ 1520/1521 Service Manual Wireless Sniffer Board Audio Connector Board Consumer Infrared (CIR) Board Modem Connector ExpressCard Cage Computer Base Wireless...
... (see Removing the Hard Drive). 4. Remove the M2 x3-mm screw that secures the wireless sniffer board to Contents Page Computer Base and Components Dell™ Vostro™ 1500 and Inspiron™ 1520/1521 Service Manual Wireless Sniffer Board Audio Connector Board Consumer Infrared (CIR) Board Modem Connector ExpressCard Cage Computer Base Wireless...

Service Manual
Page 10
...the battery from the ExpressCard slot (see Removing an ExpressCard or Blank) and the 8-in-1 memory card reader (see the Dell Support website at support.dell.com) Before Working Inside Your Computer Use the following tools: l Small flat-blade screwdriver l Phillips screwdriver l Small plastic ...the safety information in your computer, and then unplug it from the computer. 5. Back to Contents Page Before You Begin Dell™ Vostro™ 1500 and Inspiron™ 1520/1521 Service Manual Recommended Tools Before Working Inside Your Computer This document provides procedures for removing and...
...the battery from the ExpressCard slot (see Removing an ExpressCard or Blank) and the 8-in-1 memory card reader (see the Dell Support website at support.dell.com) Before Working Inside Your Computer Use the following tools: l Small flat-blade screwdriver l Phillips screwdriver l Small plastic ...the safety information in your computer, and then unplug it from the computer. 5. Back to Contents Page Before You Begin Dell™ Vostro™ 1500 and Inspiron™ 1520/1521 Service Manual Recommended Tools Before Working Inside Your Computer This document provides procedures for removing and...
Service Manual
Page 12
Back to Contents Page Flashing the BIOS Dell™ Vostro™ 1500 and Inspiron™ 1520/1521 Service Manual Flashing the BIOS From a CD Flashing the BIOS From the Hard Drive If a BIOS-update program CD is ... for your desktop and is installed properly. Failure to flash the BIOS, press before inserting the CD so that appear on your computer at support.dell.com. 4. Click Close if the Download Complete window appears. Turn on the computer. Ensure that the main battery is titled the same as the downloaded...
Back to Contents Page Flashing the BIOS Dell™ Vostro™ 1500 and Inspiron™ 1520/1521 Service Manual Flashing the BIOS From a CD Flashing the BIOS From the Hard Drive If a BIOS-update program CD is ... for your desktop and is installed properly. Failure to flash the BIOS, press before inserting the CD so that appear on your computer at support.dell.com. 4. Click Close if the Download Complete window appears. Turn on the computer. Ensure that the main battery is titled the same as the downloaded...

Service Manual
Page 14
... instructions in the Product Information Guide. Follow the procedures in Before You Begin. 2. Back to Contents Page Internal Card With Bluetooth® Wireless Technology Dell™ Vostro™ 1500 and Inspiron™ 1520/1521 Service Manual Removing the Bluetooth Card Replacing the Bluetooth Card CAUTION: Before you begin any of the procedures in...
... instructions in the Product Information Guide. Follow the procedures in Before You Begin. 2. Back to Contents Page Internal Card With Bluetooth® Wireless Technology Dell™ Vostro™ 1500 and Inspiron™ 1520/1521 Service Manual Removing the Bluetooth Card Replacing the Bluetooth Card CAUTION: Before you begin any of the procedures in...

Service Manual
Page 15
... the slot. If you encounter too much resistance, do not stop it from other particles. Back to Contents Page Using the Memory Card Reader Dell™ Vostro™ 1500 and Inspiron™ 1520/1521 Service Manual Memory Card Blanks Removing a Memory Card or Blank Installing a Memory Card The memory card reader provides a fast...
... the slot. If you encounter too much resistance, do not stop it from other particles. Back to Contents Page Using the Memory Card Reader Dell™ Vostro™ 1500 and Inspiron™ 1520/1521 Service Manual Memory Card Blanks Removing a Memory Card or Blank Installing a Memory Card The memory card reader provides a fast...

Service Manual
Page 17
... section, follow the safety instructions in Before You Begin. 2. Follow the procedures in the Product Information Guide. 1. Back to Contents Page Coin-Cell Battery Dell™ Vostro™ 1500 and Inspiron™ 1520/1521 Service Manual Removing the Coin-Cell Battery Replacing the Coin-Cell Battery Removing the Coin-Cell Battery CAUTION: Before...
... section, follow the safety instructions in Before You Begin. 2. Follow the procedures in the Product Information Guide. 1. Back to Contents Page Coin-Cell Battery Dell™ Vostro™ 1500 and Inspiron™ 1520/1521 Service Manual Removing the Coin-Cell Battery Replacing the Coin-Cell Battery Removing the Coin-Cell Battery CAUTION: Before...

Service Manual
Page 19
... ZIF socket, use a small, flat-blade screwdriver and rotate the ZIF-socket cam screw counterclockwise until it is perpendicular to Contents Page Processor Module Dell™ Vostro™ 1500 and Inspiron™ 1520/1521 Service Manual Removing the Processor Module Replacing the Processor Module Removing the Processor Module CAUTION: Before you begin the...
... ZIF socket, use a small, flat-blade screwdriver and rotate the ZIF-socket cam screw counterclockwise until it is perpendicular to Contents Page Processor Module Dell™ Vostro™ 1500 and Inspiron™ 1520/1521 Service Manual Removing the Processor Module Replacing the Processor Module Removing the Processor Module CAUTION: Before you begin the...

Service Manual
Page 22
... hard drive (see Removing the Display Assembly). 7. Remove the display assembly (see Removing the Hard Drive). 4. Back to Contents Page Processor Thermal-Cooling Assembly Dell™ Vostro™ 1500 and Inspiron™ 1520/1521 Service Manual Removing the Processor Thermal-Cooling Assembly Replacing the Processor Thermal-Cooling Assembly Removing the Processor Thermal-Cooling...
... hard drive (see Removing the Display Assembly). 7. Remove the display assembly (see Removing the Hard Drive). 4. Back to Contents Page Processor Thermal-Cooling Assembly Dell™ Vostro™ 1500 and Inspiron™ 1520/1521 Service Manual Removing the Processor Thermal-Cooling Assembly Replacing the Processor Thermal-Cooling Assembly Removing the Processor Thermal-Cooling...

Service Manual
Page 24
Back to Contents Page Display Dell™ Vostro™ 1500 and Inspiron™ 1520/1521 Service Manual Display Assembly Display Bezel Display Panel Display Latch Camera and Microphone Assembly Display Assembly Removing the Display Assembly ...
Back to Contents Page Display Dell™ Vostro™ 1500 and Inspiron™ 1520/1521 Service Manual Display Assembly Display Bezel Display Panel Display Latch Camera and Microphone Assembly Display Assembly Removing the Display Assembly ...

Service Manual
Page 31
.... 12. Remove the hinge cover (see Removing the Optical Drive). 3. Remove the two M2.5 x 5-mm screws that secure the fan to Contents Page Fan Dell™ Vostro™ 1500 and Inspiron™ 1520/1521 Service Manual Removing the Fan Replacing the Fan Removing the Fan CAUTION: Before you begin the following procedure, follow...
.... 12. Remove the hinge cover (see Removing the Optical Drive). 3. Remove the two M2.5 x 5-mm screws that secure the fan to Contents Page Fan Dell™ Vostro™ 1500 and Inspiron™ 1520/1521 Service Manual Removing the Fan Replacing the Fan Removing the Fan CAUTION: Before you begin the following procedure, follow...

Service Manual
Page 33
Align the three captive screws on the graphics card assembly with the screw holes on the Vostro 1500 and Inspiron 1520 only. Replace the internal card with Bluetooth wireless technology, if installed (see Removing the Hard Drive). 4. Remove the keyboard...Information Guide. 1. In sequential order, tighten the three captive screws to secure the graphics card assembly to Contents Page Graphics Card Assembly Dell™ Vostro™ 1500 and Inspiron™ 1520/1521 Service Manual Removing the Graphics Card Assembly Replacing the Graphics Card Assembly NOTE: The graphics card assembly is...
Align the three captive screws on the graphics card assembly with the screw holes on the Vostro 1500 and Inspiron 1520 only. Replace the internal card with Bluetooth wireless technology, if installed (see Removing the Hard Drive). 4. Remove the keyboard...Information Guide. 1. In sequential order, tighten the three captive screws to secure the graphics card assembly to Contents Page Graphics Card Assembly Dell™ Vostro™ 1500 and Inspiron™ 1520/1521 Service Manual Removing the Graphics Card Assembly Replacing the Graphics Card Assembly NOTE: The graphics card assembly is...

Service Manual
Page 35
... of the hard drive bezel, then pull to Contents Page Hard Drive Dell™ Vostro™ 1500 and Inspiron™ 1520/1521 Service Manual Removing the Hard Drive Replacing the Hard Drive NOTE: Dell does not guarantee compatibility or provide support for hard drives obtained from sources... other than Dell. Exercise care when handling the hard drive. 1. NOTICE: To prevent data ...
... of the hard drive bezel, then pull to Contents Page Hard Drive Dell™ Vostro™ 1500 and Inspiron™ 1520/1521 Service Manual Removing the Hard Drive Replacing the Hard Drive NOTE: Dell does not guarantee compatibility or provide support for hard drives obtained from sources... other than Dell. Exercise care when handling the hard drive. 1. NOTICE: To prevent data ...

Service Manual
Page 37
... the indent to lift the hinge cover on your work surface. Exercise care when removing the hinge cover. 1. Back to Contents Page Hinge Cover Dell™ Vostro™ 1500 and Inspiron™ 1520/1521 Service Manual Removing the Hinge Cover Replacing the Hinge Cover Removing the Hinge Cover CAUTION: Before you begin any...
... the indent to lift the hinge cover on your work surface. Exercise care when removing the hinge cover. 1. Back to Contents Page Hinge Cover Dell™ Vostro™ 1500 and Inspiron™ 1520/1521 Service Manual Removing the Hinge Cover Replacing the Hinge Cover Removing the Hinge Cover CAUTION: Before you begin any...

Service Manual
Page 38
... any of the keyboard. Follow the procedures in Before You Begin. 2. Slide the keyboard cable into the keyboard connector. Back to Contents Page Keyboard Dell™ Vostro™ 1500 and Inspiron™ 1520/1521 Service Manual Removing the Keyboard Replacing the Keyboard For more information about the keyboard, see Removing the Hinge Cover). 3.
... any of the keyboard. Follow the procedures in Before You Begin. 2. Slide the keyboard cable into the keyboard connector. Back to Contents Page Keyboard Dell™ Vostro™ 1500 and Inspiron™ 1520/1521 Service Manual Removing the Keyboard Replacing the Keyboard For more information about the keyboard, see Removing the Hinge Cover). 3.

Service Manual
Page 40
.... 2. Remove the computer base (see Replacing the Computer Base). NOTICE: The battery release button is properly oriented. Back to Contents Page Battery Latch Assembly Dell™ Vostro™ 1500 and Inspiron™ 1520/1521 Service Manual Removing the Battery Latch Assembly Replacing the Battery Latch Assembly Removing the Battery Latch Assembly CAUTION: Before...
.... 2. Remove the computer base (see Replacing the Computer Base). NOTICE: The battery release button is properly oriented. Back to Contents Page Battery Latch Assembly Dell™ Vostro™ 1500 and Inspiron™ 1520/1521 Service Manual Removing the Battery Latch Assembly Replacing the Battery Latch Assembly Removing the Battery Latch Assembly CAUTION: Before...
Service Manual
Page 42
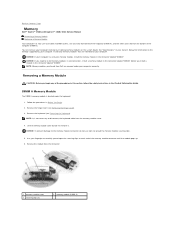
...If your computer. NOTICE: To prevent damage to the memory module connector, do not remove it. Back to Contents Page Memory Dell™ Vostro™ 1500 and Inspiron™ 1520/1521 Service Manual Removing a Memory Module Replacing a Memory Module Your computer has two user-accessible SODIMM ... cover 3 securing clips (2) 2 memory module (DIMM A) NOTE: It is located under your fingertips to disconnect the keyboard cable from Dell are intended for information on the memory supported by your computer memory by installing memory modules on each end of the procedures in this ...
...If your computer. NOTICE: To prevent damage to the memory module connector, do not remove it. Back to Contents Page Memory Dell™ Vostro™ 1500 and Inspiron™ 1520/1521 Service Manual Removing a Memory Module Replacing a Memory Module Your computer has two user-accessible SODIMM ... cover 3 securing clips (2) 2 memory module (DIMM A) NOTE: It is located under your fingertips to disconnect the keyboard cable from Dell are intended for information on the memory supported by your computer memory by installing memory modules on each end of the procedures in this ...

Service Manual
Page 46
... section, follow the safety instructions in Before You Begin. 2. Disconnect the antenna cables from the WLAN card. Back to Contents Page Wireless Mini Cards Dell™ Vostro™ 1500 and Inspiron™ 1520/1521 Service Manual Removing a Mini Card Replacing a Mini Card CAUTION: Before you ordered a wireless Mini Card with your computer, the...
... section, follow the safety instructions in Before You Begin. 2. Disconnect the antenna cables from the WLAN card. Back to Contents Page Wireless Mini Cards Dell™ Vostro™ 1500 and Inspiron™ 1520/1521 Service Manual Removing a Mini Card Replacing a Mini Card CAUTION: Before you ordered a wireless Mini Card with your computer, the...

Service Manual
Page 52
... safety instructions in the Product Information Guide. 1. Back to disconnect the modem from the modem connector on the pull tab to Contents Page Modem Dell™ Vostro™ 1500 and Inspiron™ 1520/1521 Service Manual Removing the Modem Replacing the Modem Removing the Modem CAUTION: Before you begin the following procedure, follow...
... safety instructions in the Product Information Guide. 1. Back to disconnect the modem from the modem connector on the pull tab to Contents Page Modem Dell™ Vostro™ 1500 and Inspiron™ 1520/1521 Service Manual Removing the Modem Replacing the Modem Removing the Modem CAUTION: Before you begin the following procedure, follow...


