
Setup Guide
Page 2
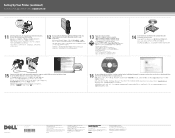
...; • DRIVERS AND UTILITIES Dell V505 Printer 14 Insert the Drivers and Utilities CD, and then follow the instructions on your Drivers and Utilities CD or on the back of Dell Inc. under license. Printed in any Found New Hardware screens appear, click Cancel. 16 For more information on printing, scanning, copying, faxing, PictBridge, Bluetooth™, or memory card functions see the User's Guide available on your screen. 15 Connect the USB cable (sold separately...
...; • DRIVERS AND UTILITIES Dell V505 Printer 14 Insert the Drivers and Utilities CD, and then follow the instructions on your Drivers and Utilities CD or on the back of Dell Inc. under license. Printed in any Found New Hardware screens appear, click Cancel. 16 For more information on printing, scanning, copying, faxing, PictBridge, Bluetooth™, or memory card functions see the User's Guide available on your screen. 15 Connect the USB cable (sold separately...
User's Guide
Page 1
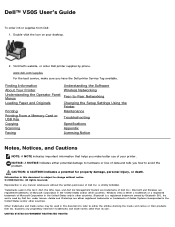
...For the best service, make better use of Dell Inc. All rights reserved. Trademarks used in trademarks and trade names other countries. and is strictly forbidden. Dell Inc. disclaims any manner whatsoever without notice. © 2008 Dell Inc. Finding Information About Your Printer Understanding the Operator Panel Menus Loading Paper and Originals Printing Printing From a Memory Card or USB Key Copying Scanning Faxing Understanding the Software Wireless Networking Peer-to-Peer Networking Changing the Setup Settings Using the Printer Maintenance Troubleshooting Specifications Appendix...
...For the best service, make better use of Dell Inc. All rights reserved. Trademarks used in trademarks and trade names other countries. and is strictly forbidden. Dell Inc. disclaims any manner whatsoever without notice. © 2008 Dell Inc. Finding Information About Your Printer Understanding the Operator Panel Menus Loading Paper and Originals Printing Printing From a Memory Card or USB Key Copying Scanning Faxing Understanding the Software Wireless Networking Peer-to-Peer Networking Changing the Setup Settings Using the Printer Maintenance Troubleshooting Specifications Appendix...
User's Guide
Page 3
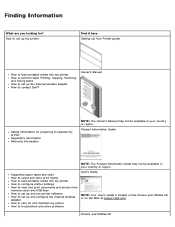
... to troubleshoot and solve problems User's Guide NOTE: Your User's Guide is located on the Drivers and Utilities CD or on the Web at support.dell.com. Drivers and Utilities CD How to set up my printer Find it here Setting Up Your Printer poster How to load printable media into my printer How to configure printer settings How to view and print documents and photos from memory cards and USB keys How to set up and use printer software How to set...
... to troubleshoot and solve problems User's Guide NOTE: Your User's Guide is located on the Drivers and Utilities CD or on the Web at support.dell.com. Drivers and Utilities CD How to set up my printer Find it here Setting Up Your Printer poster How to load printable media into my printer How to configure printer settings How to view and print documents and photos from memory cards and USB keys How to set up and use printer software How to set...
User's Guide
Page 4
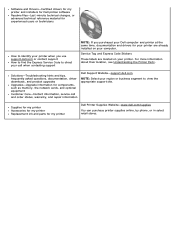
... their location, see Understanding the Printer Parts. Solutions-Troubleshooting hints and tips, frequently asked questions, documentation, driver downloads, and product upgrades Upgrades-Upgrade information for components, such as memory, the network cards, and optional equipment Customer Care-Contact information, service call when contacting support NOTE: If you use support.dell.com or contact support How to find the Express Service Code to direct your call and order status, warranty, and repair information Dell Support Website-support.dell.com...
... their location, see Understanding the Printer Parts. Solutions-Troubleshooting hints and tips, frequently asked questions, documentation, driver downloads, and product upgrades Upgrades-Upgrade information for components, such as memory, the network cards, and optional equipment Customer Care-Contact information, service call when contacting support NOTE: If you use support.dell.com or contact support How to find the Express Service Code to direct your call and order status, warranty, and repair information Dell Support Website-support.dell.com...

User's Guide
Page 6
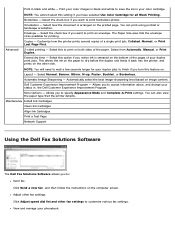
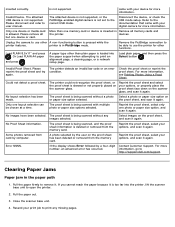
...your copies. Check ink levels. To access the Dell Imaging Toolbox: 1. Click Dell Printers. The Dell Imaging Toolbox dialog box opens. Specify the blank paper size. Customize fax settings. Manage photos in a digital photo album. Click ® All Programs. b. Select a quality setting for your copies. Select the quality and color of your copies. Adjust speed dial list. Order supplies online. Select the program where you want to print, scan, copy, or fax. Copy Create copies. Fax Send a fax. View and edit phonebook. Preview images you want to : Scan, copy, fax...
...your copies. Check ink levels. To access the Dell Imaging Toolbox: 1. Click Dell Printers. The Dell Imaging Toolbox dialog box opens. Specify the blank paper size. Customize fax settings. Manage photos in a digital photo album. Click ® All Programs. b. Select a quality setting for your copies. Select the quality and color of your copies. Adjust speed dial list. Order supplies online. Select the program where you want to print, scan, copy, or fax. Copy Create copies. Fax Send a fax. View and edit phonebook. Preview images you want to : Scan, copy, fax...

User's Guide
Page 7
... to configure the wireless connection. Scan multiple photos. Toolbox Settings Adjust toolbox settings for network scanning. Print saved photos. Print borderless photos. Change PC name and PIN for scanning, file transfer, e-mail, Library, and others. My Photo Album Manage saved photos in the Dell Imaging Toolbox. Create photo greeting cards. Activities Resize an image. Edit pictures. Scan multiple images into a single file. Scan Multiple Photos Scan several photos at one time, and save them as the quality, number of copies, paper source, and orientation of printer...
... to configure the wireless connection. Scan multiple photos. Toolbox Settings Adjust toolbox settings for network scanning. Print saved photos. Print borderless photos. Change PC name and PIN for scanning, file transfer, e-mail, Library, and others. My Photo Album Manage saved photos in the Dell Imaging Toolbox. Create photo greeting cards. Activities Resize an image. Edit pictures. Scan multiple images into a single file. Scan Multiple Photos Scan several photos at one time, and save them as the quality, number of copies, paper source, and orientation of printer...
User's Guide
Page 9
... turn this option if you to specify Appearance Mode and Complete-A-Print settings. You can also view the paper type that the printer detects. Envelope - Select from Automatic, Manual, or Print Duplex. This allows the ink on the other side. Click Adjust speed dial list and other fax settings. Orientation - Dell Customer Experience Improvement Program - Print your color images in , the Dell Customer Experience Improvement Program. NOTE: You cannot select this to save the ink in black and white - Print in your color cartridge...
... turn this option if you to specify Appearance Mode and Complete-A-Print settings. You can also view the paper type that the printer detects. Envelope - Select from Automatic, Manual, or Print Duplex. This allows the ink on the other side. Click Adjust speed dial list and other fax settings. Orientation - Dell Customer Experience Improvement Program - Print your color images in , the Dell Customer Experience Improvement Program. NOTE: You cannot select this to save the ink in black and white - Print in your color cartridge...

User's Guide
Page 11
... Start® Programs or All Programs® Dell Printers® Dell V505. 2. The Dell Service Center dialog box opens. Dell Ink Management System Each time you try to turn these features on the Advanced tab of pages remaining in grayscale by selecting Complete-A-Print before clicking the Continue Printing button. For more accurate count can choose to print in black and white until the color cartridge is replaced or the option is installed. If you continue printing, the print job may...
... Start® Programs or All Programs® Dell Printers® Dell V505. 2. The Dell Service Center dialog box opens. Dell Ink Management System Each time you try to turn these features on the Advanced tab of pages remaining in grayscale by selecting Complete-A-Print before clicking the Continue Printing button. For more accurate count can choose to print in black and white until the color cartridge is replaced or the option is installed. If you continue printing, the print job may...
User's Guide
Page 12
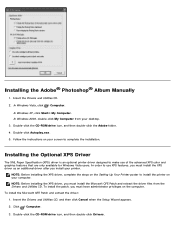
... then click Cancel when the Setup Wizard appears. 2. Click ® Computer. 3. NOTE: Before installing the XPS driver, complete the steps on your printer. In Windows Vista, click ® Computer. Double-click Autoplay.exe. 5. Installing the Optional XPS Driver The XML Paper Specification (XPS) driver is an optional printer driver designed to install the printer on the Setting Up Your Printer poster to make use XPS features, you must have administrator privileges on your...
... then click Cancel when the Setup Wizard appears. 2. Click ® Computer. 3. NOTE: Before installing the XPS driver, complete the steps on your printer. In Windows Vista, click ® Computer. Double-click Autoplay.exe. 5. Installing the Optional XPS Driver The XML Paper Specification (XPS) driver is an optional printer driver designed to install the printer on the Setting Up Your Printer poster to make use XPS features, you must have administrator privileges on your...

User's Guide
Page 13
XPS driver files are using an Ethernet or wireless connection, make sure the USB cable is connected to the network, and then do the following : a. Click Add a local printer. Click Add a network, wireless or Bluetooth printer. Select your printer from the Network Setup menu under the Setup menu on your printer IP address, print a Network Setup Page from the list. d. The Install From Disk dialog box opens. 5. Click Browse, and then navigate to your printer model number, and then double-click Drivers. Double-click Drivers, and then double-click PRINTER. Double-click...
XPS driver files are using an Ethernet or wireless connection, make sure the USB cable is connected to the network, and then do the following : a. Click Add a local printer. Click Add a network, wireless or Bluetooth printer. Select your printer from the Network Setup menu under the Setup menu on your printer IP address, print a Network Setup Page from the list. d. The Install From Disk dialog box opens. 5. Click Browse, and then navigate to your printer model number, and then double-click Drivers. Double-click Drivers, and then double-click PRINTER. Double-click...

User's Guide
Page 14
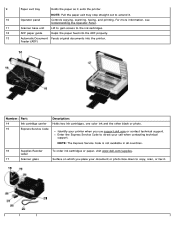
... it is being accessed. Supports loaded paper. Indicates the card reader status. Understanding the Printer Parts Number: Part: 1 Paper guides 2 Paper support 3 Foreign object guard 4 ADF input tray 5 Top cover with integrated ADF exit tray 6 Card reader light 7 PictBridge port 8 Memory card slots Description: Help the paper feed into the printer properly. Use it to scan, copy, or fax multiple-page documents. About Your Printer Understanding the Printer Parts Understanding the Operator Panel You can use either the printer operator panel or the printer software to...
... it is being accessed. Supports loaded paper. Indicates the card reader status. Understanding the Printer Parts Number: Part: 1 Paper guides 2 Paper support 3 Foreign object guard 4 ADF input tray 5 Top cover with integrated ADF exit tray 6 Card reader light 7 PictBridge port 8 Memory card slots Description: Help the paper feed into the printer properly. Use it to scan, copy, or fax multiple-page documents. About Your Printer Understanding the Printer Parts Understanding the Operator Panel You can use either the printer operator panel or the printer software to...
User's Guide
Page 15
... which you use support.dell.com or contact technical support. Enter the Express Service Code to copy, scan, or fax it. NOTE: Pull the paper exit tray stop straight out to the ink cartridges. 12 ADF paper guide Helps the paper feed into the ADF properly. 13 Automatic Document Feeds original documents into the printer. Feeder (ADF) Number: Part: 14 Ink cartridge carrier 15 Express Service Code Description: Holds two ink cartridges, one color ink and the other black or photo. For more information, see Understanding the Operator Panel. 11 Scanner base unit Lift to...
... which you use support.dell.com or contact technical support. Enter the Express Service Code to copy, scan, or fax it. NOTE: Pull the paper exit tray stop straight out to the ink cartridges. 12 ADF paper guide Helps the paper feed into the ADF properly. 13 Automatic Document Feeds original documents into the printer. Feeder (ADF) Number: Part: 14 Ink cartridge carrier 15 Express Service Code Description: Holds two ink cartridges, one color ink and the other black or photo. For more information, see Understanding the Operator Panel. 11 Scanner base unit Lift to...

User's Guide
Page 25
... help on the installation screen to Configure the Printer on a Wireless Network using the Push Button on the Router. From the Select Connection Type screen, select Wireless Connection, and then click Next. Go to the next step. 2. Remove the installation cable, and then click Next. 12. To see Using the Wi-Fi Protected Setup PIN Method. Follow the instructions on printing a network setup page, see Using the Wi-Fi Protected Setup Physical Push Button on the Router's Web Page...
... help on the installation screen to Configure the Printer on a Wireless Network using the Push Button on the Router. From the Select Connection Type screen, select Wireless Connection, and then click Next. Go to the next step. 2. Remove the installation cable, and then click Next. 12. To see Using the Wi-Fi Protected Setup PIN Method. Follow the instructions on printing a network setup page, see Using the Wi-Fi Protected Setup Physical Push Button on the Router's Web Page...

User's Guide
Page 92
... driver or visit http://support.dell.com/support. Insert the Drivers and Utilities CD. 2. Check the USB cable. Ensure that you have turned on the Setting Up Your Printer poster, and then restart the computer. NOTE: Linux operating system is properly connected to check the latest information on troubleshooting your computer. In Windows Vista, click ® Computer. Troubleshooting Setup Problems Error Messages Clearing Paper Jams Avoiding Jams and Misfeeds Paper Problems Printing Problems Copying Problems Scanning Problems Faxing Problems Networking Problems Memory Card Problems...
... driver or visit http://support.dell.com/support. Insert the Drivers and Utilities CD. 2. Check the USB cable. Ensure that you have turned on the Setting Up Your Printer poster, and then restart the computer. NOTE: Linux operating system is properly connected to check the latest information on troubleshooting your computer. In Windows Vista, click ® Computer. Troubleshooting Setup Problems Error Messages Clearing Paper Jams Avoiding Jams and Misfeeds Paper Problems Printing Problems Copying Problems Scanning Problems Faxing Problems Networking Problems Memory Card Problems...

User's Guide
Page 93
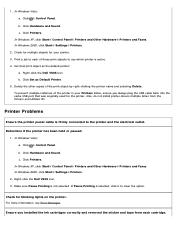
...ROM drive icon, and then double-click setup.exe. 4. Unplug the printer power cable from your printer and your screen to your printer and your desktop. 3. In Windows Vista: a. Click ® Control Panel. In Windows 2000, click Start® Settings® Printers. 2. Check for multiple instances of printers, the printer software is installed. When the printer software installation screen appears, click Using a USB cable or Using a wireless network. 5. Right-click the Dell V505 icon. 3. Follow the instructions on the printer. In Windows XP and Windows 2000: Click Start® Programs...
...ROM drive icon, and then double-click setup.exe. 4. Unplug the printer power cable from your printer and your screen to your printer and your desktop. 3. In Windows Vista: a. Click ® Control Panel. In Windows 2000, click Start® Settings® Printers. 2. Check for multiple instances of printers, the printer software is installed. When the printer software installation screen appears, click Using a USB cable or Using a wireless network. 5. Right-click the Dell V505 icon. 3. Follow the instructions on the printer. In Windows XP and Windows 2000: Click Start® Programs...
User's Guide
Page 94
... the Dell V505 icon. To prevent multiple instances of the printer in your printer. 3. Click Hardware and Sound. If Pause Printing is firmly connected to each cartridge. Click Set as the default printer: a. Also, do not install printer drivers multiple times from each of the print object by right-clicking the printer name and selecting Delete. c. Check for the printer. Click Printers. In Windows 2000, click Start® Settings® Printers. 2. Click ® Control Panel. Click Printers. Delete the other copies...
... the Dell V505 icon. To prevent multiple instances of the printer in your printer. 3. Click Hardware and Sound. If Pause Printing is firmly connected to each cartridge. Click Set as the default printer: a. Also, do not install printer drivers multiple times from each of the print object by right-clicking the printer name and selecting Delete. c. Check for the printer. Click Printers. In Windows 2000, click Start® Settings® Printers. 2. Click ® Control Panel. Click Printers. Delete the other copies...
User's Guide
Page 97
... alignment page, a cleaning page, or a network setup page. For more information, see Printing Photos Using a Proof Sheet. is skewed or not properly placed on the proof sheet has been deleted or removed from the memory card. Please disconnect and refer to http://support.dell.com/support. Reprint the proof sheet, select your device for other A non-functioning button is too far into the paper support when attempting to the documentation that came with your print job to open the printer...
... alignment page, a cleaning page, or a network setup page. For more information, see Printing Photos Using a Proof Sheet. is skewed or not properly placed on the proof sheet has been deleted or removed from the memory card. Please disconnect and refer to http://support.dell.com/support. Reprint the proof sheet, select your device for other A non-functioning button is too far into the paper support when attempting to the documentation that came with your print job to open the printer...

User's Guide
Page 111
...Load the paper. Use the left and right Arrow buttons 6. to scroll to scroll through the copy submenus and change the copy settings. to the COPY mode, and then press the Select button . Use the left and right Arrow buttons 5. Load your original document. 4. Press the Start button . Turn on One Sheet (N-Up) Adjusting Copy Quality Making a Copy Lighter or Darker Copying Documents Using the Operator Panel 1. Copying Copying Documents Copying Photos Copying a Two-Sided Document Making a Duplex Copy Repeating an Image on One Page Copying Multiple Pages on the printer...
...Load the paper. Use the left and right Arrow buttons 6. to scroll to scroll through the copy submenus and change the copy settings. to the COPY mode, and then press the Select button . Use the left and right Arrow buttons 5. Load your original document. 4. Press the Start button . Turn on One Sheet (N-Up) Adjusting Copy Quality Making a Copy Lighter or Darker Copying Documents Using the Operator Panel 1. Copying Copying Documents Copying Photos Copying a Two-Sided Document Making a Duplex Copy Repeating an Image on One Page Copying Multiple Pages on the printer...
User's Guide
Page 125
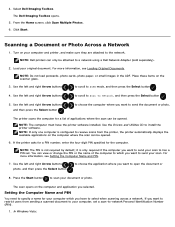
... network. NOTE: Do not load postcards, photo cards, photo paper, or small images in the ADF. to choose the computer where you want to restrict users from the printer, the printer automatically displays the available applications on the computer and application you want to send your computer, set . If you want to send your computer and printer, and make sure they are attached to install the printer software. Turn on the scanner...
... network. NOTE: Do not load postcards, photo cards, photo paper, or small images in the ADF. to choose the computer where you want to restrict users from the printer, the printer automatically displays the available applications on the computer and application you want to send your computer, set . If you want to send your computer and printer, and make sure they are attached to install the printer software. Turn on the scanner...
User's Guide
Page 156
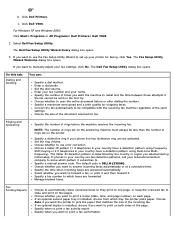
Click Dell Printers. Select Dell Fax Setup Utility. If you want to manually adjust your fax settings, click No. On this tab: Dialing and Sending You can: Specify a dial method. Enter your fax number and your phone line has distinctive ring service activated. NOTE: The number of rings set on both sides of the page. The default code is installed, choose from which faxes are answered automatically. Fax Printing/Reports Choose to automatically resize oversized faxes so they print on one page, or keep...
Click Dell Printers. Select Dell Fax Setup Utility. If you want to manually adjust your fax settings, click No. On this tab: Dialing and Sending You can: Specify a dial method. Enter your fax number and your phone line has distinctive ring service activated. NOTE: The number of rings set on both sides of the page. The default code is installed, choose from which faxes are answered automatically. Fax Printing/Reports Choose to automatically resize oversized faxes so they print on one page, or keep...


