User's Guide
Page 3
... printer software 58 Scanning to a PDF...59 Scanning FAQ...60 Canceling scan jobs...60 Networking 61 Installing the printer on a wireless network...61 Advanced wireless setup...66 Networking FAQ...72 Contents 3
... printer software 58 Scanning to a PDF...59 Scanning FAQ...60 Canceling scan jobs...60 Networking 61 Installing the printer on a wireless network...61 Advanced wireless setup...66 Networking FAQ...72 Contents 3
User's Guide
Page 4
Maintaining the printer 84 Maintaining ink cartridges...84 Cleaning the exterior of the printer...86 Cleaning the scanner glass...86 Troubleshooting 87 Before you troubleshoot...87 Using the Service Center to solve printer problems 87 If Troubleshooting does not solve your problem...87 Setup troubleshooting...87 Jams and misfeeds troubleshooting...94 Print troubleshooting...96 Copy and scan troubleshooting...98 Memory card troubleshooting...100 Wireless troubleshooting...102 Notices 120 Product information...120 Edition notice...120 Power consumption...122 Index 131 Contents 4
Maintaining the printer 84 Maintaining ink cartridges...84 Cleaning the exterior of the printer...86 Cleaning the scanner glass...86 Troubleshooting 87 Before you troubleshoot...87 Using the Service Center to solve printer problems 87 If Troubleshooting does not solve your problem...87 Setup troubleshooting...87 Jams and misfeeds troubleshooting...94 Print troubleshooting...96 Copy and scan troubleshooting...98 Memory card troubleshooting...100 Wireless troubleshooting...102 Notices 120 Product information...120 Edition notice...120 Power consumption...122 Index 131 Contents 4
User's Guide
Page 6
.... The Power Saver feature puts the printer in the Print Preview dialog or the printer display (depending on your new printer right away, use the setup materials that came with our printers, and we could do encounter any problems along the way, one side of the paper. On selected printer models...
.... The Power Saver feature puts the printer in the Print Preview dialog or the printer display (depending on your new printer right away, use the setup materials that came with our printers, and we could do encounter any problems along the way, one side of the paper. On selected printer models...
User's Guide
Page 7
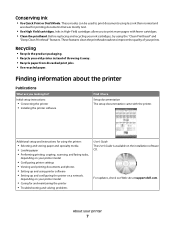
..." and "Deep Clean Printhead" features. Finding information about the printer Publications What are mostly text. • Use High Yield cartridges. Initial setup instructions: • Connecting the printer • Installing the printer software Find it away. • Recycle paper from discarded print jobs. •...and recycling your prints. Conserving ink • Use Quick Print or Draft Mode. For updates, check our Web site at support.dell.com. Recycling • Recycle the product packaging. • Recycle your old printer instead of your ink cartridges, try using less ...
..." and "Deep Clean Printhead" features. Finding information about the printer Publications What are mostly text. • Use High Yield cartridges. Initial setup instructions: • Connecting the printer • Installing the printer software Find it away. • Recycle paper from discarded print jobs. •...and recycling your prints. Conserving ink • Use Quick Print or Draft Mode. For updates, check our Web site at support.dell.com. Recycling • Recycle the product packaging. • Recycle your old printer instead of your ink cartridges, try using less ...

User's Guide
Page 15
... a menu or submenu item that appears on the display. 11 Back button • Return to the previous screen. • Exit from a menu level of the Setup menu to the top level of inactivity or after the printer is turned off in progress. • Exit from a menu level of the Copy, Scan..., Photo, or File Print menu to the top level of a menu. • Exit from one menu level to a higher one. 12 Setup button Access the setup menu and change printer settings. Note: The Copy, Scan and Photo button lights are off when this button is selected.
... a menu or submenu item that appears on the display. 11 Back button • Return to the previous screen. • Exit from a menu level of the Setup menu to the top level of inactivity or after the printer is turned off in progress. • Exit from a menu level of the Copy, Scan..., Photo, or File Print menu to the top level of a menu. • Exit from one menu level to a higher one. 12 Setup button Access the setup menu and change printer settings. Note: The Copy, Scan and Photo button lights are off when this button is selected.
User's Guide
Page 16
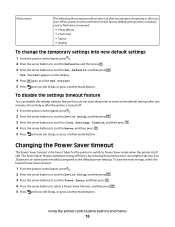
... to Clear Settings Timeout, and then press . 4 Press the arrow buttons to scroll to Never, and then press . 5 Press until you exit Setup, or press another mode button. The Power Saver feature optimizes energy efficiency by reducing the printer power consumption (as much as 28 percent on the... Press the arrow buttons to scroll to Defaults, and then press . 3 Press the arrow buttons to scroll to select Use Current. 5 Press until you exit Setup, or press another mode button. To save the most energy, select the lowest Power Saver timeout. 1 From the printer control panel, press . 2 Press the ...
... to Clear Settings Timeout, and then press . 4 Press the arrow buttons to scroll to Never, and then press . 5 Press until you exit Setup, or press another mode button. The Power Saver feature optimizes energy efficiency by reducing the printer power consumption (as much as 28 percent on the... Press the arrow buttons to scroll to Defaults, and then press . 3 Press the arrow buttons to scroll to select Use Current. 5 Press until you exit Setup, or press another mode button. To save the most energy, select the lowest Power Saver timeout. 1 From the printer control panel, press . 2 Press the ...

User's Guide
Page 17
...• The printer display is dimmed. • The printer changes to individual settings that are using the printer control panel buttons. Initial Setup Complete appears on the display. Note: Do not release and until the light near "Eco-Mode" comes on both sides of your selections... settings of your printer, make your selections using Eco-Mode, then the Eco-Mode settings override any changes you have previously selected. Initial Setup Complete appears on the display. Using the printer control panel menus 1 From the printer control panel, press . 2 Press the arrow buttons...
...• The printer display is dimmed. • The printer changes to individual settings that are using the printer control panel buttons. Initial Setup Complete appears on the display. Note: Do not release and until the light near "Eco-Mode" comes on both sides of your selections... settings of your printer, make your selections using Eco-Mode, then the Eco-Mode settings override any changes you have previously selected. Initial Setup Complete appears on the display. Using the printer control panel menus 1 From the printer control panel, press . 2 Press the arrow buttons...
User's Guide
Page 19
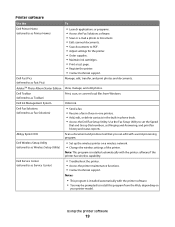
...edit, or delete contacts in the built-in phone book. • Access the Dell Fax Setup Utility. Dell Fast Pics (referred to as Fast Pics) Manage, edit, transfer, and print photos and documents. Dell Toolbar (referred to as Toolbar) Print, scan, or convert local files from the... is installed automatically with a word-processing program. Use the Fax Setup Utility to as Service Center) • Troubleshoot the printer. • Access the printer maintenance functions. • Contact technical support. Dell Service Center (referred to install this program from Windows. Using the...
...edit, or delete contacts in the built-in phone book. • Access the Dell Fax Setup Utility. Dell Fast Pics (referred to as Fast Pics) Manage, edit, transfer, and print photos and documents. Dell Toolbar (referred to as Toolbar) Print, scan, or convert local files from the... is installed automatically with a word-processing program. Use the Fax Setup Utility to as Service Center) • Troubleshoot the printer. • Access the printer maintenance functions. • Contact technical support. Dell Service Center (referred to install this program from Windows. Using the...
User's Guide
Page 20
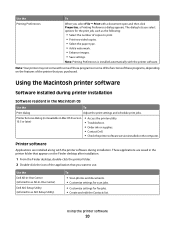
...the Finder desktop, double-click the printer folder. 2 Double-click the icon of the application that you want to as All-In-One Center) Dell AIO Setup Utility (referred to use. The dialog lets you select File Print with some of these programs or some of the functions of these... OS Use the To Print dialog Adjust the print settings and schedule print jobs. Using the printer software 20 Use the Dell All-In-One Center (referred to as AIO Setup Utility) To • Scan photos and documents. • Customize settings for scan jobs. • Customize settings for the print ...
...the Finder desktop, double-click the printer folder. 2 Double-click the icon of the application that you want to as All-In-One Center) Dell AIO Setup Utility (referred to use. The dialog lets you select File Print with some of these programs or some of the functions of these... OS Use the To Print dialog Adjust the print settings and schedule print jobs. Using the printer software 20 Use the Dell All-In-One Center (referred to as AIO Setup Utility) To • Scan photos and documents. • Customize settings for scan jobs. • Customize settings for the print ...
User's Guide
Page 21
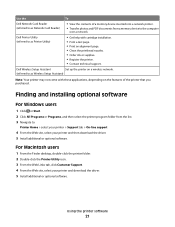
..., click Customer Support. 4 From the Web site, select your printer and then download the driver. 5 Install additional or optional software. Dell Wireless Setup Assistant Set up the printer on the features of a memory device inserted into a network printer. • Transfer photos and PDF documents from.... (referred to as Network Card Reader) • View the contents of the printer that you purchased. Use the To Dell Network Card Reader (referred to as Wireless Setup Assistant) Note: Your printer may not come with cartridge installation. • Print a test page. • Print an ...
..., click Customer Support. 4 From the Web site, select your printer and then download the driver. 5 Install additional or optional software. Dell Wireless Setup Assistant Set up the printer on the features of a memory device inserted into a network printer. • Transfer photos and PDF documents from.... (referred to as Network Card Reader) • View the contents of the printer that you purchased. Use the To Dell Network Card Reader (referred to as Wireless Setup Assistant) Note: Your printer may not come with cartridge installation. • Print a test page. • Print an ...
User's Guide
Page 22
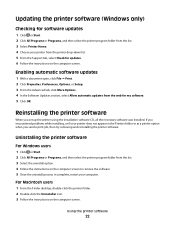
... you encountered problems while installing, or if your computer. Enabling automatic software updates 1 With a document open, click File Print. 2 Click Properties, Preferences, Options, or Setup. 3 From the Advanced tab, click More Options. 4 In the Software Updates section, select Allow automatic updates from the list. 3 Select the uninstall option. 4 Follow the...
... you encountered problems while installing, or if your computer. Enabling automatic software updates 1 With a document open, click File Print. 2 Click Properties, Preferences, Options, or Setup. 3 From the Advanced tab, click More Options. 4 In the Software Updates section, select Allow automatic updates from the list. 3 Select the uninstall option. 4 Follow the...

User's Guide
Page 23
... , or click Start and then click Run. Using the Internet Updated printer software may be available at support.dell.com. Using the printer software 23 b In the Start Search or Run box, type D:\setup.exe, where D is the letter of your CD or DVD drive. c Press Enter, or click OK. 3 Follow the...
... , or click Start and then click Run. Using the Internet Updated printer software may be available at support.dell.com. Using the printer software 23 b In the Start Search or Run box, type D:\setup.exe, where D is the letter of your CD or DVD drive. c Press Enter, or click OK. 3 Follow the...
User's Guide
Page 27
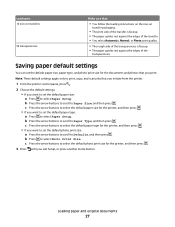
... Paper Type, and then press . c Press the arrow buttons to select the default paper size for the printer, and then press . 3 Press until you exit Setup, or press another mode button. c Press the arrow buttons to select the default photo print size for the printer, and then press . • If you... type, and photo print size for the printer, and then press . • If you want to set the default paper type: a Press to select Paper Setup. b Press the arrow buttons to scroll to select Photo Print Size. b Press the arrow buttons to scroll to print, copy, and scan jobs that : &#...
... Paper Type, and then press . c Press the arrow buttons to select the default paper size for the printer, and then press . 3 Press until you exit Setup, or press another mode button. c Press the arrow buttons to select the default photo print size for the printer, and then press . • If you... type, and photo print size for the printer, and then press . • If you want to set the default paper type: a Press to select Paper Setup. b Press the arrow buttons to scroll to select Photo Print Size. b Press the arrow buttons to scroll to print, copy, and scan jobs that : &#...

User's Guide
Page 29
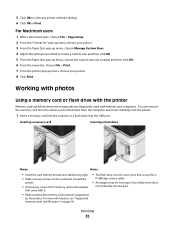
For Macintosh users 1 With a document open , click File > Print. 2 Click Properties, Preferences, Options, or Setup. 3 Select the print quality, the number of copies to print, the type of paper to use, and how the pages should print. 4 Click OK to ...use, and how the pages should print. 7 Click Print. Printing basic documents Printing a document For Windows users 1 With a document open , choose File > Page Setup. 2 From the Page Setup dialog, set the printer, paper size, and orientation. 3 Click OK. 4 From the menu bar, choose File > Print. 5 From the Printer pop-up menu...
For Macintosh users 1 With a document open , click File > Print. 2 Click Properties, Preferences, Options, or Setup. 3 Select the print quality, the number of copies to print, the type of paper to use, and how the pages should print. 4 Click OK to ...use, and how the pages should print. 7 Click Print. Printing basic documents Printing a document For Windows users 1 With a document open , choose File > Page Setup. 2 From the Page Setup dialog, set the printer, paper size, and orientation. 3 Click OK. 4 From the menu bar, choose File > Print. 5 From the Printer pop-up menu...

User's Guide
Page 30
...top, then do the following: For Windows users 1 With a document open , click File > Print. 2 Click Properties, Preferences, Options, or Setup. 3 Navigate to: Print Setup tab > Copies area 4 Enter the number of copies that you want to print, and then select Collate Copies. 5 Click OK to close ... The collate option is printed first. For Windows users 1 With a document open , click File > Print. 2 Click Properties, Preferences, Options, or Setup. Collating printed copies When printing multiple copies of a document, you can choose to print each photo as groups of pages (not collated).
...top, then do the following: For Windows users 1 With a document open , click File > Print. 2 Click Properties, Preferences, Options, or Setup. 3 Navigate to: Print Setup tab > Copies area 4 Enter the number of copies that you want to print, and then select Collate Copies. 5 Click OK to close ... The collate option is printed first. For Windows users 1 With a document open , click File > Print. 2 Click Properties, Preferences, Options, or Setup. Collating printed copies When printing multiple copies of a document, you can choose to print each photo as groups of pages (not collated).

User's Guide
Page 31
...Print. To change the print order, you cannot print the last page first. For Macintosh users 1 With a document open, choose File > Page Setup. 2 From the Page Setup dialog, set the printer, paper size, and orientation. 3 Click OK. 4 From the menu bar, choose File > Print. 5 From the... Macintosh users 1 With a document open , click File > Print. 2 Click Properties, Preferences, Options, or Setup. 3 Navigate to: Advanced tab > Layout list > select Pages per sheet 4 Select the number of the Print Setup tab, select a page order: • To print the last page first, select Print Last Page First. ...
...Print. To change the print order, you cannot print the last page first. For Macintosh users 1 With a document open, choose File > Page Setup. 2 From the Page Setup dialog, set the printer, paper size, and orientation. 3 Click OK. 4 From the menu bar, choose File > Print. 5 From the... Macintosh users 1 With a document open , click File > Print. 2 Click Properties, Preferences, Options, or Setup. 3 Navigate to: Advanced tab > Layout list > select Pages per sheet 4 Select the number of the Print Setup tab, select a page order: • To print the last page first, select Print Last Page First. ...

User's Guide
Page 33
Printing labels For Windows users 1 With a document open , choose File > Page Setup. 2 From the "Format for" pop-up menu, choose your printer. 3 From the Paper Size pop-up menu, choose your envelope size If no size matches ..., choose your envelope size. Printing specialty documents Printing envelopes For Windows users 1 With a document open, click File > Print. 2 Click Properties, Preferences, Options, or Setup. 3 Navigate to: Print Setup tab > Paper Type list > select Plain Paper 4 Navigate to close any printer software dialogs. 7 Click OK or Print. If no size matches the envelope...
Printing labels For Windows users 1 With a document open , choose File > Page Setup. 2 From the "Format for" pop-up menu, choose your printer. 3 From the Paper Size pop-up menu, choose your envelope size If no size matches ..., choose your envelope size. Printing specialty documents Printing envelopes For Windows users 1 With a document open, click File > Print. 2 Click Properties, Preferences, Options, or Setup. 3 Navigate to: Print Setup tab > Paper Type list > select Plain Paper 4 Navigate to close any printer software dialogs. 7 Click OK or Print. If no size matches the envelope...

User's Guide
Page 34
...; Use full label sheets. Printing 34 For Macintosh users 1 With a document open , click File > Print. 2 Click Properties, Preferences, Options, or Setup. 3 Navigate to: Print Setup tab > Paper Size list > select Custom Size 4 Adjust the settings as needed to create a custom size, and then click OK. Partial sheets (with... feeds into the printer first. • Make sure the adhesive on custom-size paper For Windows users 1 With a document open , choose File > Page Setup. 2 From the "Format for" pop-up menu, choose your printer. 3 From the Paper Size pop-up menu, choose your printer. 7 From the...
...; Use full label sheets. Printing 34 For Macintosh users 1 With a document open , click File > Print. 2 Click Properties, Preferences, Options, or Setup. 3 Navigate to: Print Setup tab > Paper Size list > select Custom Size 4 Adjust the settings as needed to create a custom size, and then click OK. Partial sheets (with... feeds into the printer first. • Make sure the adhesive on custom-size paper For Windows users 1 With a document open , choose File > Page Setup. 2 From the "Format for" pop-up menu, choose your printer. 3 From the Paper Size pop-up menu, choose your printer. 7 From the...
User's Guide
Page 35
... drive from the computer and insert it . • Make sure that is supported by the printer. For Macintosh users 1 With a document open, choose File > Page Setup. 2 From the "Format for a PictBridge camera cable. • An adapter may be necessary if your printer. 8 Click Print. 5 Click OK to close any arrows on...
... drive from the computer and insert it . • Make sure that is supported by the printer. For Macintosh users 1 With a document open, choose File > Page Setup. 2 From the "Format for a PictBridge camera cable. • An adapter may be necessary if your printer. 8 Click Print. 5 Click OK to close any arrows on...

User's Guide
Page 40
...profiles: Object Push Profile (OPP) and Serial Port Profile (SPP). It is set to set up a connection with the printer. You need to repeat the setup if: • You reset the printer to its factory default settings. • You change the Bluetooth security level or the Bluetooth pass key. • ... specify a photo size while the memory card is still in the camera, then make sure that you use to send a print job to repeat the setup of each Bluetooth device that came with the paper.) 2 From the printer control panel, press . 3 Insert a memory card. Note: For best results, allow the...
...profiles: Object Push Profile (OPP) and Serial Port Profile (SPP). It is set to set up a connection with the printer. You need to repeat the setup if: • You reset the printer to its factory default settings. • You change the Bluetooth security level or the Bluetooth pass key. • ... specify a photo size while the memory card is still in the camera, then make sure that you use to send a print job to repeat the setup of each Bluetooth device that came with the paper.) 2 From the printer control panel, press . 3 Insert a memory card. Note: For best results, allow the...


