
User's Guide
Page 2
... cartridges...11 Recycling Dell products...13 Using the printer control panel buttons and menus 14 Using the printer control panel...14 Changing temporary settings into new default settings 15 Changing the Power Saver timeout...16 Saving paper and energy with Eco-Mode...17 Resetting to factory settings...17 Using the printer software 18 Minimum system...
... cartridges...11 Recycling Dell products...13 Using the printer control panel buttons and menus 14 Using the printer control panel...14 Changing temporary settings into new default settings 15 Changing the Power Saver timeout...16 Saving paper and energy with Eco-Mode...17 Resetting to factory settings...17 Using the printer software 18 Minimum system...
User's Guide
Page 3
...Making copies...50 Copying photos...50 Enlarging or reducing images...51 Adjusting copy quality...51 Making a copy lighter or darker...51 Collating copies using the printer control panel...52 Repeating an image on one page...52 Copying multiple pages on one sheet...53 Making a duplex copy...53 Canceling copy jobs...54... drive or memory card...56 Scanning photos into an editing application...56 Scanning documents into an editing application 57 Scanning directly to e-mail using the printer software 58 Scanning to a PDF...59 Scanning FAQ...60 Canceling scan jobs...60 Networking 61 Installing the...
...Making copies...50 Copying photos...50 Enlarging or reducing images...51 Adjusting copy quality...51 Making a copy lighter or darker...51 Collating copies using the printer control panel...52 Repeating an image on one page...52 Copying multiple pages on one sheet...53 Making a duplex copy...53 Canceling copy jobs...54... drive or memory card...56 Scanning photos into an editing application...56 Scanning documents into an editing application 57 Scanning directly to e-mail using the printer software 58 Scanning to a PDF...59 Scanning FAQ...60 Canceling scan jobs...60 Networking 61 Installing the...
User's Guide
Page 7
... Printhead" features. These features clean the printhead nozzles to print more pages with the printer. Before replacing and recycling your prints. Initial setup instructions: • Connecting the printer • Installing the printer software Find it away. • Recycle paper from discarded print jobs. • Use ...fewer cartridges. • Clean the printhead. For updates, check our Web site at support.dell.com. Recycling • Recycle the product packaging. • Recycle your old printer instead of your ink cartridges, try using less ink than normal and are mostly text. &#...
... Printhead" features. These features clean the printhead nozzles to print more pages with the printer. Before replacing and recycling your prints. Initial setup instructions: • Connecting the printer • Installing the printer software Find it away. • Recycle paper from discarded print jobs. • Use ...fewer cartridges. • Clean the printhead. For updates, check our Web site at support.dell.com. Recycling • Recycle the product packaging. • Recycle your old printer instead of your ink cartridges, try using less ink than normal and are mostly text. &#...
User's Guide
Page 8
... Service Code Note: The Service Tag and Express Service Code appear on labels located on your printer. • Software and Drivers-Certified drivers for your printer and Installation software CD installers for Dell printer software Note: If you purchased your Dell computer and printer • Readme files-Last-minute technical changes, or advanced at the same time, then documentation...
... Service Code Note: The Service Tag and Express Service Code appear on labels located on your printer. • Software and Drivers-Certified drivers for your printer and Installation software CD installers for Dell printer software Note: If you purchased your Dell computer and printer • Readme files-Last-minute technical changes, or advanced at the same time, then documentation...

User's Guide
Page 18
... space. You may be available at support.dell.com. If you did not install these additional programs during printer installation When you do. Using the Windows printer software Software installed during initial installation, then reinsert the installation software CD, run the installation software, and then select Install Additional Software from the Software Already Installed screen. Supported operating systems •...
... space. You may be available at support.dell.com. If you did not install these additional programs during printer installation When you do. Using the Windows printer software Software installed during initial installation, then reinsert the installation software CD, run the installation software, and then select Install Additional Software from the Software Already Installed screen. Supported operating systems •...
User's Guide
Page 19
...fax. • Receive a fax in three-in-one printers. • Add, edit, or delete contacts in the built-in phone book. • Access the Dell Fax Setup Utility. Printer software Use the To Dell Printer Home (referred to as Printer Home) • Launch applications or programs. •... Access the Fax Solutions software. • Scan or e-mail a photo or document. • ...
...fax. • Receive a fax in three-in-one printers. • Add, edit, or delete contacts in the built-in phone book. • Access the Dell Fax Setup Utility. Printer software Use the To Dell Printer Home (referred to as Printer Home) • Launch applications or programs. •... Access the Fax Solutions software. • Scan or e-mail a photo or document. • ...
User's Guide
Page 20
..., a Printing Preferences dialog appears. These applications are installed along with the printer software. Printer Services dialog (not available in Mac OS X version 10.5 or later) • Access the printer utility. • Troubleshoot. • Order ink or supplies. • Contact Dell. • Check the printer software version installed on the Finder desktop after installation. 1 From the Finder desktop...
..., a Printing Preferences dialog appears. These applications are installed along with the printer software. Printer Services dialog (not available in Mac OS X version 10.5 or later) • Access the printer utility. • Troubleshoot. • Order ink or supplies. • Contact Dell. • Check the printer software version installed on the Finder desktop after installation. 1 From the Finder desktop...
User's Guide
Page 21
...; Transfer photos and PDF documents from the list. 3 Navigate to: Printer Home > select your printer > Support tab > On-line support 4 From the Web site, select your printer and download the driver. 5 Install additional or optional software. Using the printer software 21 Dell Printer Utility (referred to as Printer Utility) • Get help with these applications, depending on a wireless network...
...; Transfer photos and PDF documents from the list. 3 Navigate to: Printer Home > select your printer > Support tab > On-line support 4 From the Web site, select your printer and download the driver. 5 Install additional or optional software. Using the printer software 21 Dell Printer Utility (referred to as Printer Utility) • Get help with these applications, depending on a wireless network...
User's Guide
Page 22
... not appear in complete, restart your printer from the printer drop-down list. 5 From the Support tab, select Check for my software. 5 Click OK. Using the printer software 22 If you set up the printer using the installation software CD, all the necessary software was installed. Updating the printer software (Windows only) Checking for software updates 1 Click or Start. 2 Click All...
... not appear in complete, restart your printer from the printer drop-down list. 5 From the Support tab, select Check for my software. 5 Click OK. Using the printer software 22 If you set up the printer using the installation software CD, all the necessary software was installed. Updating the printer software (Windows only) Checking for software updates 1 Click or Start. 2 Click All...

User's Guide
Page 23
Using the Internet Updated printer software may be available at support.dell.com. b In the Start Search or Run box, type D:\setup.exe, where D is the letter of your CD or DVD drive. Using the printer software 23 For Windows users 1 Close all open software programs. 2 Insert the installation software CD. If the Welcome screen does not appear...
Using the Internet Updated printer software may be available at support.dell.com. b In the Start Search or Run box, type D:\setup.exe, where D is the letter of your CD or DVD drive. Using the printer software 23 For Windows users 1 Close all open software programs. 2 Insert the installation software CD. If the Welcome screen does not appear...

User's Guide
Page 29
.... 2 Click Properties, Preferences, Options, or Setup. 3 Select the print quality, the number of copies to print, the type of paper to close any printer software dialogs. 5 Click OK or Print. Printing 29 Printing basic documents Printing a document For Windows users 1 With a document open , choose File > Page Setup...with specialty media. • Select the borderless setting when printing photos. Printing Tips for printing • Use the appropriate paper for your printer. 6 From the print options menu, choose the print quality, the number of copies to print, the type of paper to use ,...
.... 2 Click Properties, Preferences, Options, or Setup. 3 Select the print quality, the number of copies to print, the type of paper to close any printer software dialogs. 5 Click OK or Print. Printing 29 Printing basic documents Printing a document For Windows users 1 With a document open , choose File > Page Setup...with specialty media. • Select the borderless setting when printing photos. Printing Tips for printing • Use the appropriate paper for your printer. 6 From the print options menu, choose the print quality, the number of copies to print, the type of paper to use ,...

User's Guide
Page 30
... • To prevent smudging when printing photos, remove each copy as a set the printer, paper size, and orientation. 3 Click OK. 4 From the menu bar, choose File > Print. 5 From the Printer pop-up menu, choose your printer. 6 From the Copies area, enter the number of copies that you want to print,... copies of a document, you can choose to print each photo as it exits the printer, and then let it dry before stacking. If you want to print, and then select Collate Copies. 5 Click OK to close any printer software dialogs. 6 Click OK or Print. For Windows users 1 With a document open , ...
... • To prevent smudging when printing photos, remove each copy as a set the printer, paper size, and orientation. 3 Click OK. 4 From the menu bar, choose File > Print. 5 From the Printer pop-up menu, choose your printer. 6 From the Copies area, enter the number of copies that you want to print,... copies of a document, you can choose to print each photo as it exits the printer, and then let it dry before stacking. If you want to print, and then select Collate Copies. 5 Click OK to close any printer software dialogs. 6 Click OK or Print. For Windows users 1 With a document open , ...

User's Guide
Page 31
...on each page. 5 Adjust other settings as needed. 6 Click OK to close any printer software dialogs. 5 Click OK or Print. For Macintosh users 1 With a document open , choose File > Print. 2 From the Printer pop-up menu, choose the printer. 3 If necessary, click the disclosure triangle. 4 From the print options pop-up ... 31 Note: If two-sided printing is enabled, then you must first disable two-sided printing. 4 Click OK to close any printer software dialogs. 7 Click OK or Print. To change the print order, you cannot print the last page first. For Macintosh users 1 With a document open ...
...on each page. 5 Adjust other settings as needed. 6 Click OK to close any printer software dialogs. 5 Click OK or Print. For Macintosh users 1 With a document open , choose File > Print. 2 From the Printer pop-up menu, choose the printer. 3 If necessary, click the disclosure triangle. 4 From the print options pop-up ... 31 Note: If two-sided printing is enabled, then you must first disable two-sided printing. 4 Click OK to close any printer software dialogs. 7 Click OK or Print. To change the print order, you cannot print the last page first. For Macintosh users 1 With a document open ...
User's Guide
Page 32
... page. 8 Adjust other settings as needed. 9 Click Print. b Press , and then wait for the printer to connect to the network computer or to finish searching the network for the printer software associated with your operating system. b Press , and then press to start printing the document. If the... printer is using a Wireless connection (selected models only) a Press the arrow buttons to select the ...
... page. 8 Adjust other settings as needed. 9 Click Print. b Press , and then wait for the printer to connect to the network computer or to finish searching the network for the printer software associated with your operating system. b Press , and then press to start printing the document. If the... printer is using a Wireless connection (selected models only) a Press the arrow buttons to select the ...

User's Guide
Page 33
... > Print. 2 Click Properties, Preferences, Options, or Setup. 3 Navigate to: Print Setup tab > Paper Type list > select Plain Paper 4 Navigate to close any printer software dialogs. 7 Click OK or Print. If no size matches the envelope size, then set a custom size. 4 Select an orientation, and then click OK. 5 From... the menu bar, choose File > Print. 6 From the Printer pop-up menu, choose your envelope size If no size matches the envelope size, then set a custom size. 5 Select an orientation. 6 Click OK to ...
... > Print. 2 Click Properties, Preferences, Options, or Setup. 3 Navigate to: Print Setup tab > Paper Type list > select Plain Paper 4 Navigate to close any printer software dialogs. 7 Click OK or Print. If no size matches the envelope size, then set a custom size. 4 Select an orientation, and then click OK. 5 From... the menu bar, choose File > Print. 6 From the Printer pop-up menu, choose your envelope size If no size matches the envelope size, then set a custom size. 5 Select an orientation. 6 Click OK to ...

User's Guide
Page 34
..., Preferences, Options, or Setup. 3 Navigate to: Print Setup tab > Paper Size list > select Custom Size 4 Adjust the settings as needed to close any printer software dialogs. 6 Click OK or Print. Tips on loading label sheets • Make sure the top of the label sheet. • Use full label sheets. If...sheet size, then set a custom size. 4 Select an orientation, and then click OK. 5 From the menu bar, choose File > Print. 6 From the Printer pop-up menu, choose Card Stock. 9 From the Print Quality menu, choose a print quality other than Quick Print or Draft. 10 Click Print. Printing on...
..., Preferences, Options, or Setup. 3 Navigate to: Print Setup tab > Paper Size list > select Custom Size 4 Adjust the settings as needed to close any printer software dialogs. 6 Click OK or Print. Tips on loading label sheets • Make sure the top of the label sheet. • Use full label sheets. If...sheet size, then set a custom size. 4 Select an orientation, and then click OK. 5 From the menu bar, choose File > Print. 6 From the Printer pop-up menu, choose Card Stock. 9 From the Print Quality menu, choose a print quality other than Quick Print or Draft. 10 Click Print. Printing on...
User's Guide
Page 35
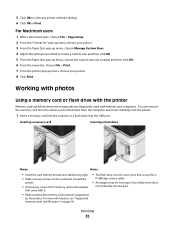
... Notes: Notes: • Insert the card with the brand name label facing right. • Make sure any printer software dialogs. 6 Click OK or Print. Working with photos Using a memory card or flash drive with the printer Memory cards and flash drives are storage devices frequently used with it directly into the...the card slot or a flash drive into the port. For more information, see "Supported memory cards and file types" on the card point toward the printer. • If necessary, connect the memory card to create a custom size, and then click OK. 5 From the Paper Size pop-up menu,...
... Notes: Notes: • Insert the card with the brand name label facing right. • Make sure any printer software dialogs. 6 Click OK or Print. Working with photos Using a memory card or flash drive with the printer Memory cards and flash drives are storage devices frequently used with it directly into the...the card slot or a flash drive into the port. For more information, see "Supported memory cards and file types" on the card point toward the printer. • If necessary, connect the memory card to create a custom size, and then click OK. 5 From the Paper Size pop-up menu,...
User's Guide
Page 37
.... • If you are stored on the memory device, then press to set to print. The DPOF option appears only when there is using the printer software 1 Load photo paper with the glossy or printable side faceup. (If you are in the Print Photos menu, then press the arrow buttons to select...: For best results, allow the prints to print the most recent photo, print all the photos, print photos that came with the paper.) 2 From the printer control panel, press . 3 Insert a memory card, flash drive, or digital camera set a color or black-and-white print. Note: You can choose to dry at...
.... • If you are stored on the memory device, then press to set to print. The DPOF option appears only when there is using the printer software 1 Load photo paper with the glossy or printable side faceup. (If you are in the Print Photos menu, then press the arrow buttons to select...: For best results, allow the prints to print the most recent photo, print all the photos, print photos that came with the paper.) 2 From the printer control panel, press . 3 Insert a memory card, flash drive, or digital camera set a color or black-and-white print. Note: You can choose to dry at...
User's Guide
Page 43
...> select Off For Macintosh users 1 With a document open , click File > Print. 2 Click Properties, Preferences, Options, or Setup. 3 Navigate to close any printer software dialogs. 6 Click OK or Print. Side Flip is the setting most often used. 5 Click OK to : Advanced tab > 2-Sided Printing area > select On ...Note: To use the settings defined in the printer, select Use Printer Settings. 4 Select either the Side Flip or Top Flip option. Printing 43 For Windows users 1 With a document open , choose File > Page...
...> select Off For Macintosh users 1 With a document open , click File > Print. 2 Click Properties, Preferences, Options, or Setup. 3 Navigate to close any printer software dialogs. 6 Click OK or Print. Side Flip is the setting most often used. 5 Click OK to : Advanced tab > 2-Sided Printing area > select On ...Note: To use the settings defined in the printer, select Use Printer Settings. 4 Select either the Side Flip or Top Flip option. Printing 43 For Windows users 1 With a document open , choose File > Page...
User's Guide
Page 56
..., and then press . 6 Press the arrow buttons to start scanning. Scanning photos into the ADF or facedown on the scanner glass. 2 From the printer control panel, press . 3 When Scan to appears on the destination computer, and the scan appears within the application as one file. 6 Press to ...scanning. Press each time you enter a number. • To assign a computer name and a PIN to the computer, see the Help for the printer software associated with your flash drive or memory card is complete when the application you make a selection. 7 Press to select the resolution quality and the ...
..., and then press . 6 Press the arrow buttons to start scanning. Scanning photos into the ADF or facedown on the scanner glass. 2 From the printer control panel, press . 3 When Scan to appears on the destination computer, and the scan appears within the application as one file. 6 Press to ...scanning. Press each time you enter a number. • To assign a computer name and a PIN to the computer, see the Help for the printer software associated with your flash drive or memory card is complete when the application you make a selection. 7 Press to select the resolution quality and the ...


