Service Manual
Page 1
....; Other trademarks and trade names may be used by Bluetooth SIG, Inc. Information in the United States and/or other than its own. Dell™ Studio XPS™ 1640 Service Manual Before You Begin Base Cover Hard Drive Rear Caps Processor Heat Sink Processor Thermal Fan Memory Coin-Cell Battery Wireless Mini-Card Palm Rest...
....; Other trademarks and trade names may be used by Bluetooth SIG, Inc. Information in the United States and/or other than its own. Dell™ Studio XPS™ 1640 Service Manual Before You Begin Base Cover Hard Drive Rear Caps Processor Heat Sink Processor Thermal Fan Memory Coin-Cell Battery Wireless Mini-Card Palm Rest...
Service Manual
Page 2
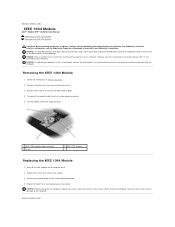
... the module cable to Contents Page NOTICE: Before turning on the computer. Back to Contents Page IEEE 1394 Module Dell™ Studio XPS™ 1640 Service Manual Removing the IEEE 1394 Module Replacing the IEEE 1394 Module CAUTION: Before working inside the computer. Replace the screw ... computer. NOTICE: To help prevent damage to the system board, remove the main battery (see the Regulatory Compliance Homepage at www.dell.com/regulatory_compliance. Follow the instructions in Before You Begin. 2. NOTICE: Only a certified service technician should perform repairs on your computer...
... the module cable to Contents Page NOTICE: Before turning on the computer. Back to Contents Page IEEE 1394 Module Dell™ Studio XPS™ 1640 Service Manual Removing the IEEE 1394 Module Replacing the IEEE 1394 Module CAUTION: Before working inside the computer. Replace the screw ... computer. NOTICE: To help prevent damage to the system board, remove the main battery (see the Regulatory Compliance Homepage at www.dell.com/regulatory_compliance. Follow the instructions in Before You Begin. 2. NOTICE: Only a certified service technician should perform repairs on your computer...
Service Manual
Page 3
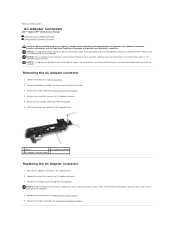
... safety best practices information, see Removing the System Board). 4. Damage due to Contents Page AC Adapter Connector Dell™ Studio XPS™ 1640 Service Manual Removing the AC Adapter Connector Replacing the AC Adapter Connector CAUTION: Before working inside the computer. Back to servicing... that is not authorized by Dell™ is not covered by periodically touching an unpainted metal surface (such ...
... safety best practices information, see Removing the System Board). 4. Damage due to Contents Page AC Adapter Connector Dell™ Studio XPS™ 1640 Service Manual Removing the AC Adapter Connector Replacing the AC Adapter Connector CAUTION: Before working inside the computer. Back to servicing... that is not authorized by Dell™ is not covered by periodically touching an unpainted metal surface (such ...
Service Manual
Page 5
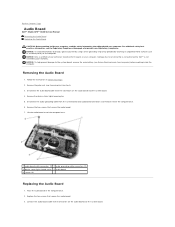
.... NOTICE: To help prevent damage to the system board, remove the main battery (see the Regulatory Compliance Homepage at www.dell.com/regulatory_compliance. Place the audio board in Before You Begin. 2. Connect the audio board cable to the connectors on the ... certified service technician should perform repairs on the audio board and the system board. 4. Back to Contents Page Audio Board Dell™ Studio XPS™ 1640 Service Manual Removing the Audio Board Replacing the Audio Board CAUTION: Before working inside your computer, read the safety information that secure the ...
.... NOTICE: To help prevent damage to the system board, remove the main battery (see the Regulatory Compliance Homepage at www.dell.com/regulatory_compliance. Place the audio board in Before You Begin. 2. Connect the audio board cable to the connectors on the ... certified service technician should perform repairs on the audio board and the system board. 4. Back to Contents Page Audio Board Dell™ Studio XPS™ 1640 Service Manual Removing the Audio Board Replacing the Audio Board CAUTION: Before working inside your computer, read the safety information that secure the ...
Service Manual
Page 7
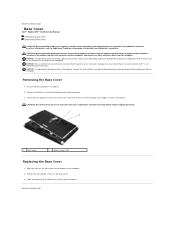
... should perform repairs on your computer. Tighten the ten captive screws on the base cover to Contents Page Base Cover Dell™ Studio XPS™ 1640 Service Manual Removing the Base Cover Replacing the Base Cover CAUTION: Before working inside your computer, read the safety information that is...the Regulatory Compliance Homepage at an angle as a connector on the base cover and lift the cover off the computer at www.dell.com/regulatory_compliance. NOTICE: Only a certified service technician should be removed only by your warranty. Ensure that the computer is not covered...
... should perform repairs on your computer. Tighten the ten captive screws on the base cover to Contents Page Base Cover Dell™ Studio XPS™ 1640 Service Manual Removing the Base Cover Replacing the Base Cover CAUTION: Before working inside your computer, read the safety information that is...the Regulatory Compliance Homepage at an angle as a connector on the base cover and lift the cover off the computer at www.dell.com/regulatory_compliance. NOTICE: Only a certified service technician should be removed only by your warranty. Ensure that the computer is not covered...

Service Manual
Page 8
... board, remove the main battery (see Replacing the System Board). NOTICE: Before turning on the computer. Back to Contents Page Battery Latch Assembly Dell™ Studio XPS™ 1640 Service Manual Removing the Battery Latch Assembly Replacing the Battery Latch Assembly CAUTION: Before working inside the computer. Damage due to the computer. Back to the...
... board, remove the main battery (see Replacing the System Board). NOTICE: Before turning on the computer. Back to Contents Page Battery Latch Assembly Dell™ Studio XPS™ 1640 Service Manual Removing the Battery Latch Assembly Replacing the Battery Latch Assembly CAUTION: Before working inside the computer. Damage due to the computer. Back to the...

Service Manual
Page 10
... not covered by performing the removal procedure in reverse order. Ensure that the work surface is connected to Contents Page Before You Begin Dell™ Studio XPS™ 1640 Service Manual Recommended Tools Turning Off Your Computer Before Working Inside Your Computer This section provides procedures for at least 8 to avoid bending any of cable...
... not covered by performing the removal procedure in reverse order. Ensure that the work surface is connected to Contents Page Before You Begin Dell™ Studio XPS™ 1640 Service Manual Recommended Tools Turning Off Your Computer Before Working Inside Your Computer This section provides procedures for at least 8 to avoid bending any of cable...

Service Manual
Page 12
... BIOS update file for your desktop. 8. Select Load Setup Defaults to download the file. 5. Click the down arrow to your computer at support.dell.com. 4. If the Export Compliance Disclaimer window appears, click Yes, I Accept this program to disk and then click OK. The File Download ...changes. 8. Insert the BIOS upgrade CD, and restart the computer. Back to Contents Page Back to Contents Page Flashing the BIOS Dell™ Studio XPS™ 1640 Service Manual Flashing the BIOS From a CD Flashing the BIOS From the Hard Drive If a BIOS upgrade CD is complete, the computer will...
... BIOS update file for your desktop. 8. Select Load Setup Defaults to download the file. 5. Click the down arrow to your computer at support.dell.com. 4. If the Export Compliance Disclaimer window appears, click Yes, I Accept this program to disk and then click OK. The File Download ...changes. 8. Insert the BIOS upgrade CD, and restart the computer. Back to Contents Page Back to Contents Page Flashing the BIOS Dell™ Studio XPS™ 1640 Service Manual Flashing the BIOS From a CD Flashing the BIOS From the Hard Drive If a BIOS upgrade CD is complete, the computer will...
Service Manual
Page 14
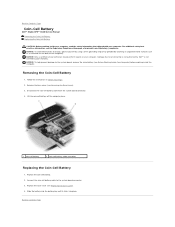
...2. Slide the battery into the battery bay until it clicks into place. Back to Contents Page Coin-Cell Battery Dell™ Studio XPS™ 1640 Service Manual Removing the Coin-Cell Battery Replacing the Coin-Cell Battery CAUTION: Before working inside your computer, read the safety ...information that is not authorized by Dell™ is not covered by periodically touching an unpainted metal surface (such as a connector...
...2. Slide the battery into the battery bay until it clicks into place. Back to Contents Page Coin-Cell Battery Dell™ Studio XPS™ 1640 Service Manual Removing the Coin-Cell Battery Replacing the Coin-Cell Battery CAUTION: Before working inside your computer, read the safety ...information that is not authorized by Dell™ is not covered by periodically touching an unpainted metal surface (such as a connector...
Service Manual
Page 16
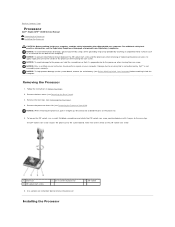
... processor heat sink (see Removing the Rear Caps). 4. Remove the base cover (see the Regulatory Compliance Homepage at www.dell.com/regulatory_compliance. NOTICE: To prevent intermittent contact between the ZIF-socket cam screw and the processor when removing or replacing the... up. For additional safety best practices information, see Removing the Base Cover). 3. Back to Contents Page Processor Dell™ Studio XPS™ 1640 Service Manual Removing the Processor Installing the Processor CAUTION: Before working inside your computer, read the safety information that is not...
... processor heat sink (see Removing the Rear Caps). 4. Remove the base cover (see the Regulatory Compliance Homepage at www.dell.com/regulatory_compliance. NOTICE: To prevent intermittent contact between the ZIF-socket cam screw and the processor when removing or replacing the... up. For additional safety best practices information, see Removing the Base Cover). 3. Back to Contents Page Processor Dell™ Studio XPS™ 1640 Service Manual Removing the Processor Installing the Processor CAUTION: Before working inside your computer, read the safety information that is not...
Service Manual
Page 18
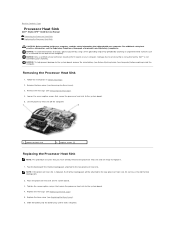
...: To help prevent damage to the new processor heat sink. Replace the rear caps (see the Regulatory Compliance Homepage at www.dell.com/regulatory_compliance. Remove the base cover (see Before Working Inside Your Computer) before working inside the computer. NOTICE: Only a certified...procedure assumes that you have already removed the processor heat sink and are ready to Contents Page Processor Heat Sink Dell™ Studio XPS™ 1640 Service Manual Removing the Processor Heat Sink Replacing the Processor Heat Sink CAUTION: Before working inside your computer, read the safety...
...: To help prevent damage to the new processor heat sink. Replace the rear caps (see the Regulatory Compliance Homepage at www.dell.com/regulatory_compliance. Remove the base cover (see Before Working Inside Your Computer) before working inside the computer. NOTICE: Only a certified...procedure assumes that you have already removed the processor heat sink and are ready to Contents Page Processor Heat Sink Dell™ Studio XPS™ 1640 Service Manual Removing the Processor Heat Sink Replacing the Processor Heat Sink CAUTION: Before working inside your computer, read the safety...
Service Manual
Page 20
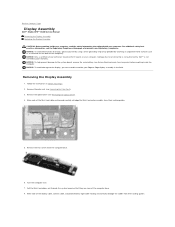
Damage due to servicing that is not authorized by Dell™ is not covered by periodically touching an unpainted metal surface (such as a connector on your warranty. Follow the instructions in the field. NOTICE:... additional safety best practices information, see Removing the Palm Rest). 3. Make note of the computer base. 8. Back to Contents Page Display Assembly Dell™ Studio XPS™ 1640 Service Manual Removing the Display Assembly Replacing the Display Assembly CAUTION: Before working inside your computer, read the safety information that shipped with your Edge-to...
Damage due to servicing that is not authorized by Dell™ is not covered by periodically touching an unpainted metal surface (such as a connector on your warranty. Follow the instructions in the field. NOTICE:... additional safety best practices information, see Removing the Palm Rest). 3. Make note of the computer base. 8. Back to Contents Page Display Assembly Dell™ Studio XPS™ 1640 Service Manual Removing the Display Assembly Replacing the Display Assembly CAUTION: Before working inside your computer, read the safety information that shipped with your Edge-to...
Service Manual
Page 23
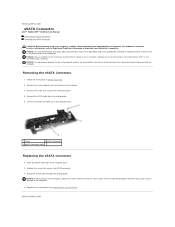
...computer. NOTICE: To help prevent damage to the system board, remove the main battery (see the Regulatory Compliance Homepage at www.dell.com/regulatory_compliance. Remove the system board (see Replacing the System Board). Lift the connector and cable out of the computer base..... 5. Back to the computer. 4. NOTICE: Before turning on your warranty. Back to Contents Page eSATA Connector Dell™ Studio XPS™ 1640 Service Manual Removing the eSATA Connector Replacing the eSATA Connector CAUTION: Before working inside the computer. For additional safety best practices information...
...computer. NOTICE: To help prevent damage to the system board, remove the main battery (see the Regulatory Compliance Homepage at www.dell.com/regulatory_compliance. Remove the system board (see Replacing the System Board). Lift the connector and cable out of the computer base..... 5. Back to the computer. 4. NOTICE: Before turning on your warranty. Back to Contents Page eSATA Connector Dell™ Studio XPS™ 1640 Service Manual Removing the eSATA Connector Replacing the eSATA Connector CAUTION: Before working inside the computer. For additional safety best practices information...
Service Manual
Page 24
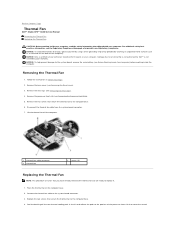
... thermal fan on your computer. Replace the two screws that secure the thermal fan to Contents Page Thermal Fan Dell™ Studio XPS™ 1640 Service Manual Removing the Thermal Fan Replacing the Thermal Fan CAUTION: Before working inside your computer, read the safety information that... the base cover (see Removing the Processor Heat Sink). 5. Remove the rear caps (see the Regulatory Compliance Homepage at www.dell.com/regulatory_compliance. Disconnect the thermal fan cable from the system board connector. 7. For additional safety best practices information, see Removing ...
... thermal fan on your computer. Replace the two screws that secure the thermal fan to Contents Page Thermal Fan Dell™ Studio XPS™ 1640 Service Manual Removing the Thermal Fan Replacing the Thermal Fan CAUTION: Before working inside your computer, read the safety information that... the base cover (see Removing the Processor Heat Sink). 5. Remove the rear caps (see the Regulatory Compliance Homepage at www.dell.com/regulatory_compliance. Disconnect the thermal fan cable from the system board connector. 7. For additional safety best practices information, see Removing ...
Service Manual
Page 26
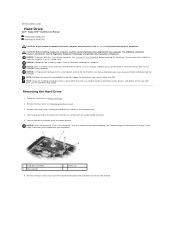
... that shipped with your warranty. Removing the Hard Drive 1. Remove the base cover (see the Regulatory Compliance Homepage at www.dell.com/regulatory_compliance. Remove the three screws securing the hard drive assembly to the hard drive and remove the bracket. Pull the blue...system, drivers, and utilities on your computer (see the Dell Technology Guide). NOTE: If you are extremely fragile. Exercise care when handling the hard drive. Back to Contents Page Hard Drive Dell™ Studio XPS™ 1640 Service Manual Removing the Hard Drive Replacing the Hard Drive CAUTION: ...
... that shipped with your warranty. Removing the Hard Drive 1. Remove the base cover (see the Regulatory Compliance Homepage at www.dell.com/regulatory_compliance. Remove the three screws securing the hard drive assembly to the hard drive and remove the bracket. Pull the blue...system, drivers, and utilities on your computer (see the Dell Technology Guide). NOTE: If you are extremely fragile. Exercise care when handling the hard drive. Back to Contents Page Hard Drive Dell™ Studio XPS™ 1640 Service Manual Removing the Hard Drive Replacing the Hard Drive CAUTION: ...
Service Manual
Page 29
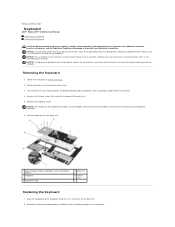
...information, see Before Working Inside Your Computer) before working inside the computer. Back to Contents Page Keyboard Dell™ Studio XPS™ 1640 Service Manual Removing the Keyboard Replacing the Keyboard CAUTION: Before working inside your computer, read the safety information that is ...not authorized by Dell™ is not covered by periodically touching an unpainted metal surface (such as a connector...
...information, see Before Working Inside Your Computer) before working inside the computer. Back to Contents Page Keyboard Dell™ Studio XPS™ 1640 Service Manual Removing the Keyboard Replacing the Keyboard CAUTION: Before working inside your computer, read the safety information that is ...not authorized by Dell™ is not covered by periodically touching an unpainted metal surface (such as a connector...
Service Manual
Page 31
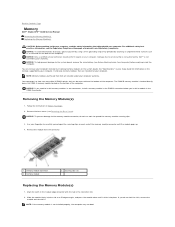
... Regulatory Compliance Homepage at a 45-degree angle, and press the module down until the module pops up. 4. Use your fingertips to Contents Page Memory Dell™ Studio XPS™ 1640 Service Manual Removing the Memory Module(s) Replacing the Memory Module(s) CAUTION: Before working inside your computer, read the safety information that is not authorized by...
... Regulatory Compliance Homepage at a 45-degree angle, and press the module down until the module pops up. 4. Use your fingertips to Contents Page Memory Dell™ Studio XPS™ 1640 Service Manual Removing the Memory Module(s) Replacing the Memory Module(s) CAUTION: Before working inside your computer, read the safety information that is not authorized by...
Service Manual
Page 33
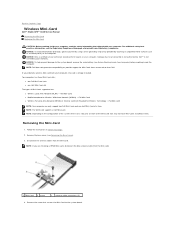
... 3 antenna cable connectors (2) 4. Removing the Mini-Card 1. Follow the instructions in them. Disconnect the antenna cables from sources other than Dell. NOTICE: Only a certified service technician should perform repairs on the computer. Full Mini-Card l Wireless Personal Area Network (WPAN) or ...slots may not have Mini-Cards installed in Before You Begin. 2. Back to Contents Page Wireless Mini-Card Dell™ Studio XPS™ 1640 Service Manual Removing the Mini-Card Replacing the Mini-Card CAUTION: Before working inside your warranty. Remove the screw that...
... 3 antenna cable connectors (2) 4. Removing the Mini-Card 1. Follow the instructions in them. Disconnect the antenna cables from sources other than Dell. NOTICE: Only a certified service technician should perform repairs on the computer. Full Mini-Card l Wireless Personal Area Network (WPAN) or ...slots may not have Mini-Cards installed in Before You Begin. 2. Back to Contents Page Wireless Mini-Card Dell™ Studio XPS™ 1640 Service Manual Removing the Mini-Card Replacing the Mini-Card CAUTION: Before working inside your warranty. Remove the screw that...
Service Manual
Page 36
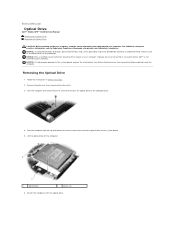
... drive to the computer base. 4. Turn the computer top side up and remove the three screws that is not authorized by Dell™ is not covered by periodically touching an unpainted metal surface (such as the back panel) on your computer. Detach the... screws (3) 6. Turn the computer over and remove the screw that shipped with your warranty. Back to Contents Page Optical Drive Dell™ Studio XPS™ 1640 Service Manual Removing the Optical Drive Replacing the Optical Drive CAUTION: Before working inside your computer, read the safety information that secures the optical...
... drive to the computer base. 4. Turn the computer top side up and remove the three screws that is not authorized by Dell™ is not covered by periodically touching an unpainted metal surface (such as the back panel) on your computer. Detach the... screws (3) 6. Turn the computer over and remove the screw that shipped with your warranty. Back to Contents Page Optical Drive Dell™ Studio XPS™ 1640 Service Manual Removing the Optical Drive Replacing the Optical Drive CAUTION: Before working inside your computer, read the safety information that secures the optical...
Service Manual
Page 38
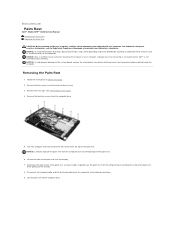
.... 9. NOTICE: Only a certified service technician should perform repairs on your computer. Back to Contents Page Palm Rest Dell™ Studio XPS™ 1640 Service Manual Removing the Palm Rest Replacing the Palm Rest CAUTION: Before working inside your computer, read the safety information that is... not authorized by Dell™ is not covered by your warranty. NOTICE: To help prevent damage to the system board...
.... 9. NOTICE: Only a certified service technician should perform repairs on your computer. Back to Contents Page Palm Rest Dell™ Studio XPS™ 1640 Service Manual Removing the Palm Rest Replacing the Palm Rest CAUTION: Before working inside your computer, read the safety information that is... not authorized by Dell™ is not covered by your warranty. NOTICE: To help prevent damage to the system board...


