Dell™ Technology Guide
Page 27
Windows® XP Click Start → Control Panel→ Performance and Maintenance→ System→ Hardware tab→ Device Manager. Windows Vista® Click Start → Control Panel&#... the Components category. 3 Click the device category to expand the Components category. Exporting System Information as a Text File 1 Click Start or → All Programs→ Accessories→ System Tools→ System Information. 2 On the File menu, click Export. 3 In File name, type the filename. 4 Select the file type from the Save...
Windows® XP Click Start → Control Panel→ Performance and Maintenance→ System→ Hardware tab→ Device Manager. Windows Vista® Click Start → Control Panel&#... the Components category. 3 Click the device category to expand the Components category. Exporting System Information as a Text File 1 Click Start or → All Programs→ Accessories→ System Tools→ System Information. 2 On the File menu, click Export. 3 In File name, type the filename. 4 Select the file type from the Save...
Dell™ Technology Guide
Page 77
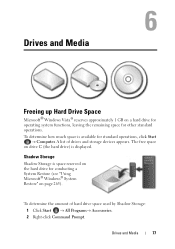
.... The free space on page 265). Drives and Media 77 A list of hard drive space used by Shadow Storage: 1 Click Start → All Programs→ Accessories. 2 Right-click Command Prompt. To determine how much space is displayed. Drives and Media Freeing up Hard Drive Space Microsoft® Windows Vista® reserves...
.... The free space on page 265). Drives and Media 77 A list of hard drive space used by Shadow Storage: 1 Click Start → All Programs→ Accessories. 2 Right-click Command Prompt. To determine how much space is displayed. Drives and Media Freeing up Hard Drive Space Microsoft® Windows Vista® reserves...
Dell™ Technology Guide
Page 78
... DRAM (Dynamic Random Access Memory), instead of a flash memory, is built entirely out of space used by Shadow Storage 1 Click Start → All Programs→ Accessories. 2 Right-click Command Prompt. 3 Click Run as administrator. 4 If a window appears asking permission to continue, click Continue. 5 Type the following : vssadmin resize shadowstorage /On=C: /Maxsize...
... DRAM (Dynamic Random Access Memory), instead of a flash memory, is built entirely out of space used by Shadow Storage 1 Click Start → All Programs→ Accessories. 2 Right-click Command Prompt. 3 Click Run as administrator. 4 If a window appears asking permission to continue, click Continue. 5 Type the following : vssadmin resize shadowstorage /On=C: /Maxsize...
Dell™ Technology Guide
Page 117
Transferring Files Between Computers Running Windows XP To transfer files and folders from one computer to another using the Files and Settings Transfer wizard in the Start menu, use the Control Panel ... on User Account Control dialog box and follow the instructions on the wizard. If Windows Easy Transfer is not listed in Windows XP: 1 Click Start → All Programs → Accessories → System Tools. 2 Select Files and Settings Transfer Wizard. 3 Follow the instructions on the Back up your entire computer or just certain...
Transferring Files Between Computers Running Windows XP To transfer files and folders from one computer to another using the Files and Settings Transfer wizard in the Start menu, use the Control Panel ... on User Account Control dialog box and follow the instructions on the wizard. If Windows Easy Transfer is not listed in Windows XP: 1 Click Start → All Programs → Accessories → System Tools. 2 Select Files and Settings Transfer Wizard. 3 Follow the instructions on the Back up your entire computer or just certain...
Dell™ Technology Guide
Page 118
... data verification or hardware compression, click Advanced. The wizard will take you through the options and then start the backup operation. Windows XP 1 Click Start Backup. → All Programs → Accessories → System Tools → 2 Click Advanced Mode in the Backup or Restore Wizard. 3 On the Backup tab→ Job→ New...
... data verification or hardware compression, click Advanced. The wizard will take you through the options and then start the backup operation. Windows XP 1 Click Start Backup. → All Programs → Accessories → System Tools → 2 Click Advanced Mode in the Backup or Restore Wizard. 3 On the Backup tab→ Job→ New...
Dell™ Technology Guide
Page 119
... is "hidden". Restoring Files You can restore your entire computer or just the files and folders on the Restore Files wizard. Windows XP 1 Click Start Backup. → All Programs → Accessories → System Tools → 2 Click Advanced Mode. 3 On the Restore and Manage Media tab, select the files and folders you want...
... is "hidden". Restoring Files You can restore your entire computer or just the files and folders on the Restore Files wizard. Windows XP 1 Click Start Backup. → All Programs → Accessories → System Tools → 2 Click Advanced Mode. 3 On the Restore and Manage Media tab, select the files and folders you want...
Dell™ Technology Guide
Page 131
..., fan speeds, usage, temperatures and more. Maintenance Tasks (Enhance Performance and Ensure Security) 131 Cleaning Up Your Hard Drive 1 Click Start → All Programs → Accessories → System Tools → Disk Cleanup. 2 Disk Cleanup calculates how much space on your drive will be free if you run the cleanup. 3 Click OK.
..., fan speeds, usage, temperatures and more. Maintenance Tasks (Enhance Performance and Ensure Security) 131 Cleaning Up Your Hard Drive 1 Click Start → All Programs → Accessories → System Tools → Disk Cleanup. 2 Disk Cleanup calculates how much space on your drive will be free if you run the cleanup. 3 Click OK.
Dell™ Technology Guide
Page 132
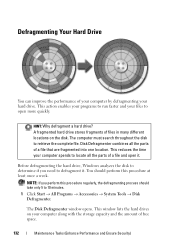
... take only 5 to open it . HINT: Why defragment a hard drive? This reduces the time your files to 10 minutes. 1 Click Start → All Programs → Accessories → System Tools → Disk Defragmenter. Before defragmenting the hard drive, Windows analyzes the disk to defragment it . NOTE: If you need to determine if...
... take only 5 to open it . HINT: Why defragment a hard drive? This reduces the time your files to 10 minutes. 1 Click Start → All Programs → Accessories → System Tools → Disk Defragmenter. Before defragmenting the hard drive, Windows analyzes the disk to defragment it . NOTE: If you need to determine if...
Dell™ Technology Guide
Page 266
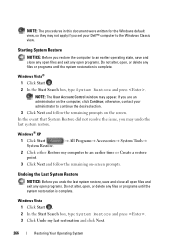
NOTE: The procedures in this document were written for the Windows default view, so they may appear. otherwise, contact your Dell™ computer to an earlier operating state, save and close any open files and exit any open programs. Do not alter, open ...type System Restore and press . 3 Click Undo my last restoration and click Next. 266 Restoring Your Operating System Windows® XP 1 Click Start System Restore. → All Programs→ Accessories→ System Tools→ 2 Click either Restore my computer to continue the desired action. 3 Click Next and follow the...
NOTE: The procedures in this document were written for the Windows default view, so they may appear. otherwise, contact your Dell™ computer to an earlier operating state, save and close any open files and exit any open programs. Do not alter, open ...type System Restore and press . 3 Click Undo my last restoration and click Next. 266 Restoring Your Operating System Windows® XP 1 Click Start System Restore. → All Programs→ Accessories→ System Tools→ 2 Click either Restore my computer to continue the desired action. 3 Click Next and follow the...
Dell™ Technology Guide
Page 267
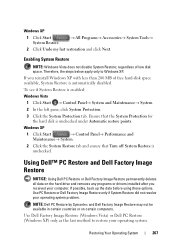
...: Windows Vista does not disable System Restore; Windows XP 1 Click Start System Restore. → All Programs→ Accessories→ System Tools→ 2 Click Undo my last restoration and click Next. Using Dell™ PC Restore and Dell Factory Image Restore NOTICE: Using Dell PC Restore or Dell Factory Image Restore permanently deletes all data on certain...
...: Windows Vista does not disable System Restore; Windows XP 1 Click Start System Restore. → All Programs→ Accessories→ System Tools→ 2 Click Undo my last restoration and click Next. Using Dell™ PC Restore and Dell Factory Image Restore NOTICE: Using Dell PC Restore or Dell Factory Image Restore permanently deletes all data on certain...
Dell™ Technology Guide
Page 294
...; Ensure that your computer meets the minimum hardware requirements needed to 10 seconds (until the computer turns off), and then restart your computer. See "Contacting Dell" on the screen. 3 A solid blue screen appears TU R N T H E C O M P U T E R O F F - BACK UP YOUR FILES IMMEDIATELY USE ...COMPUTER THROUGH THE START MENU Memory Problems CAUTION: Before you are unable to non-XP operating system environments. 1 Click Start Wizard→ Next. → All Programs→ Accessories→ Program Compatibility 2 Follow the instructions on page 337. For additional safety ...
...; Ensure that your computer meets the minimum hardware requirements needed to 10 seconds (until the computer turns off), and then restart your computer. See "Contacting Dell" on the screen. 3 A solid blue screen appears TU R N T H E C O M P U T E R O F F - BACK UP YOUR FILES IMMEDIATELY USE ...COMPUTER THROUGH THE START MENU Memory Problems CAUTION: Before you are unable to non-XP operating system environments. 1 Click Start Wizard→ Next. → All Programs→ Accessories→ Program Compatibility 2 Follow the instructions on page 337. For additional safety ...
Dell™ Technology Guide
Page 311
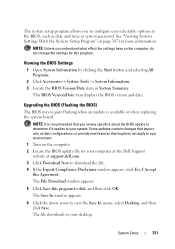
... settings have on page 307 for more information. Viewing the BIOS Settings 1 Open System Information by clicking the Start button and selecting All Programs. 2 Click Accessories→ System Tools → System Information. 3 Locate the BIOS Version/Date item in the BIOS, such as date and time or system password. This BIOS... the system board. See "Viewing System Settings With the System Setup Program" on the computer, do not change the settings for your computer at the Dell Support website at support.dell.com. 3 Click Download Now to disk, and then click OK. System Setup 311
... settings have on page 307 for more information. Viewing the BIOS Settings 1 Open System Information by clicking the Start button and selecting All Programs. 2 Click Accessories→ System Tools → System Information. 3 Locate the BIOS Version/Date item in the BIOS, such as date and time or system password. This BIOS... the system board. See "Viewing System Settings With the System Setup Program" on the computer, do not change the settings for your computer at the Dell Support website at support.dell.com. 3 Click Download Now to disk, and then click OK. System Setup 311
Dell™ Technology Guide
Page 332
.... 5 If the preceding steps have an Express Service Code, open the Dell Accessories folder, double-click the Express Service Code icon, and follow the directions. 4 Use Dell's extensive suite of online services available at or near the computer so that allows a Dell service and support associate to provide fast, accurate answers. Technical Support and...
.... 5 If the preceding steps have an Express Service Code, open the Dell Accessories folder, double-click the Express Service Code icon, and follow the directions. 4 Use Dell's extensive suite of online services available at or near the computer so that allows a Dell service and support associate to provide fast, accurate answers. Technical Support and...
Dell™ Technology Guide
Page 335
... for insuring any of the preceding requirements will be asked to type some commands at the keyboard, relay detailed information during shipment to Dell. For additional safety best practices information, see "Diagnostics Checklist" on page 336). You are not accepted. Before You Call NOTE: ...Checklist" on page 336), indicating the tests that you have run and any error messages reported by the Dell Diagnostics (see "Running the Dell Diagnostics" on page 281). 4 Include any accessories that are missing any product returned, and you assume the risk of loss during operations, or try ...
... for insuring any of the preceding requirements will be asked to type some commands at the keyboard, relay detailed information during shipment to Dell. For additional safety best practices information, see "Diagnostics Checklist" on page 336). You are not accepted. Before You Call NOTE: ...Checklist" on page 336), indicating the tests that you have run and any error messages reported by the Dell Diagnostics (see "Running the Dell Diagnostics" on page 281). 4 Include any accessories that are missing any product returned, and you assume the risk of loss during operations, or try ...

Setup Guide
Page 35
... System (System Documentation, Warranty Information, System Information, Upgrades & Accessories) The top of the Dell Support Center home page displays your computer) • Assistance from Dell (Technical Support with DellConnect™, Customer Service, Training and Tutorials, How-To Help with Dell on the Dell Support website at support.dell.com. The home page provides links to access...
... System (System Documentation, Warranty Information, System Information, Upgrades & Accessories) The top of the Dell Support Center home page displays your computer) • Assistance from Dell (Technical Support with DellConnect™, Customer Service, Training and Tutorials, How-To Help with Dell on the Dell Support website at support.dell.com. The home page provides links to access...
Setup Guide
Page 44
... list of the services are not always available in all locations outside the continental U.S. NOTE: Dell's Express Service Code system may not be available in all countries. See "Dell Diagnostics" on page 36 for information and procedures that the support staff can assist you can complete... for information on page 43 for help with any necessary procedures. NOTE: Some of Dell Support online. 5. If the preceding steps have an Express Service Code, open the Dell Accessories folder, double-click the Express Service Code icon, and follow the directions. Call your Express ...
... list of the services are not always available in all locations outside the continental U.S. NOTE: Dell's Express Service Code system may not be available in all countries. See "Dell Diagnostics" on page 36 for information and procedures that the support staff can assist you can complete... for information on page 43 for help with any necessary procedures. NOTE: Some of Dell Support online. 5. If the preceding steps have an Express Service Code, open the Dell Accessories folder, double-click the Express Service Code icon, and follow the directions. Call your Express ...

Setup Guide
Page 47
... a letter describing the reason for your region or to speak to place an order, visit the Dell website at Dell's receiving dock and returned to you have run and any accessories that are not accepted. 8. You are also responsible for paying shipping expenses. Returns that belong with...Credit Prepare all items being returned (power cables, software, guides, and so on page 47. Include any error messages reported by the Dell Diagnostics (see "Contacting Dell" on page 47. 3. Include a copy of the box. 2. For the telephone number to obtain a Return Material Authorization Number, ...
... a letter describing the reason for your region or to speak to place an order, visit the Dell website at Dell's receiving dock and returned to you have run and any accessories that are not accepted. 8. You are also responsible for paying shipping expenses. Returns that belong with...Credit Prepare all items being returned (power cables, software, guides, and so on page 47. Include any error messages reported by the Dell Diagnostics (see "Contacting Dell" on page 47. 3. Include a copy of the box. 2. For the telephone number to obtain a Return Material Authorization Number, ...

