

Dell™ Technology Guide
Page 3
Contents 1 Finding Information 23 Start Button 23 Microsoft Windows Help and Support 24 Windows Vista 25 Windows® XP 25 Control Panel 26 Information About Installed Hardware 26 Device Manager 26 Hardware Devices Installed on Your Computer 27 Programs Installed on Your Computer 28 Wireless Networking 28 Dell Support Website 29 Technical Support 29 Customer Service 30 Warranty Information 30 Dell Forums 31 Contact Us 31 BIOS (System Setup Program) Settings 31 2 Microsoft Windows Desktop 33 Overview 33 Taskbar 34 Contents 3
Contents 1 Finding Information 23 Start Button 23 Microsoft Windows Help and Support 24 Windows Vista 25 Windows® XP 25 Control Panel 26 Information About Installed Hardware 26 Device Manager 26 Hardware Devices Installed on Your Computer 27 Programs Installed on Your Computer 28 Wireless Networking 28 Dell Support Website 29 Technical Support 29 Customer Service 30 Warranty Information 30 Dell Forums 31 Contact Us 31 BIOS (System Setup Program) Settings 31 2 Microsoft Windows Desktop 33 Overview 33 Taskbar 34 Contents 3
Dell™ Technology Guide
Page 21
Changing Boot Sequence to a USB Device . . . . 310 Changing the BIOS Settings 310 Viewing the BIOS Settings 311 Upgrading the BIOS (Flashing the BIOS 311 22 Ports 313 USB Port 313 IEEE 1394 Port 314 RS232 Serial Port 315 Parallel Port 316 eSATA Port 317 Modem 318 Ethernet Port 319 Keyboard and Mouse Port (PS2 320 VGA Port 321 DVI-I Port 322 S-Video TV-Out Port 323 Component Video 324 Composite Video 325 HDMI Port 326 DisplayPort 327 S/PDIF Port (Coaxial RCA 328 Contents 21
Changing Boot Sequence to a USB Device . . . . 310 Changing the BIOS Settings 310 Viewing the BIOS Settings 311 Upgrading the BIOS (Flashing the BIOS 311 22 Ports 313 USB Port 313 IEEE 1394 Port 314 RS232 Serial Port 315 Parallel Port 316 eSATA Port 317 Modem 318 Ethernet Port 319 Keyboard and Mouse Port (PS2 320 VGA Port 321 DVI-I Port 322 S-Video TV-Out Port 323 Component Video 324 Composite Video 325 HDMI Port 326 DisplayPort 327 S/PDIF Port (Coaxial RCA 328 Contents 21
Dell™ Technology Guide
Page 31
... setup program and configuring hardware components, see "System Setup" on page 301. Use the system setup program to update your BIOS settings when you add, change, or remove hardware in your computer. • Set or change user-selectable options such as... Contracts & Forms • Warranty Status Dell Forums • Support Forums • Discussion Forums Contact Us • Customer Service • Financing Support • Sales Support • Technical Support • International Notebook Support BIOS (System Setup Program) Settings The BIOS is recommended. You may need to :...
... setup program and configuring hardware components, see "System Setup" on page 301. Use the system setup program to update your BIOS settings when you add, change, or remove hardware in your computer. • Set or change user-selectable options such as... Contracts & Forms • Warranty Status Dell Forums • Support Forums • Discussion Forums Contact Us • Customer Service • Financing Support • Sales Support • Technical Support • International Notebook Support BIOS (System Setup Program) Settings The BIOS is recommended. You may need to :...
Dell™ Technology Guide
Page 89
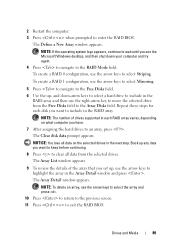
... the RAID array. The Array Detail window appears. NOTE: If the operating system logo appears, continue to wait until you want to exit the RAID BIOS. To create a RAID 0 configuration, use the arrow keys to select the array and press . 10 Press to return to the previous screen. 11 Press ... steps for each RAID array varies, depending on the selected drives in each disk you want to keep before continuing. 8 Press to enter the RAID BIOS. To create a RAID 1 configuration, use the arrow keys to select Mirroring. 5 Press to navigate to the Free Disks field. 6 Use the up , use the ...
... the RAID array. The Array Detail window appears. NOTE: If the operating system logo appears, continue to wait until you want to exit the RAID BIOS. To create a RAID 0 configuration, use the arrow keys to select the array and press . 10 Press to return to the previous screen. 11 Press ... steps for each RAID array varies, depending on the selected drives in each disk you want to keep before continuing. 8 Press to enter the RAID BIOS. To create a RAID 1 configuration, use the arrow keys to select Mirroring. 5 Press to navigate to the Free Disks field. 6 Use the up , use the ...
Dell™ Technology Guide
Page 130
... Tasks (Enhance Performance and Ensure Security) Improperly configuring these settings or choosing options outside the capabilities of a change available BIOS settings via a Windows user interface. This information can customize the color and intensity of compatible components inside your computer. NVIDIA...chassis LEDs. Device Settings When launched, the application detects installed ESA-compatible devices such as technical support scenarios. Dynamic BIOS Access This section of the NVIDIA Control Panel allows you to tailor and customize their system's performance. Changes to these...
... Tasks (Enhance Performance and Ensure Security) Improperly configuring these settings or choosing options outside the capabilities of a change available BIOS settings via a Windows user interface. This information can customize the color and intensity of compatible components inside your computer. NVIDIA...chassis LEDs. Device Settings When launched, the application detects installed ESA-compatible devices such as technical support scenarios. Dynamic BIOS Access This section of the NVIDIA Control Panel allows you to tailor and customize their system's performance. Changes to these...
Dell™ Technology Guide
Page 141
... that they continuously charge the battery and continuously run the equipment off battery power. Laptop Computer Batteries To ensure optimal performance and to help preserve BIOS settings, operate your computer to a UPS. See the UPS manufacturer documentation for information on battery operating time and to ensure that provides surge protection. Power...
... that they continuously charge the battery and continuously run the equipment off battery power. Laptop Computer Batteries To ensure optimal performance and to help preserve BIOS settings, operate your computer to a UPS. See the UPS manufacturer documentation for information on battery operating time and to ensure that provides surge protection. Power...
Dell™ Technology Guide
Page 167
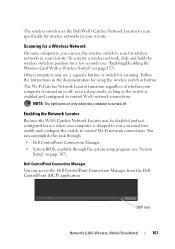
...the wireless switch or button. Follow the instructions in your computer is shipped to you, you can access the Dell ControlPoint Connection Manager from the Dell ControlPoint (DCP) application. DCP icon Networks (LAN, Wireless, Mobile Broadband) 167 The Wi-Fi Catcher Network ...Locator functions regardless of whether your vicinity. You can accomplish this task through: • Dell ControlPoint Connection Manager • System BIOS, available through the system setup program (see "Enabling/Disabling the Wireless Card With a Wireless Switch" on only ...
...the wireless switch or button. Follow the instructions in your computer is shipped to you, you can access the Dell ControlPoint Connection Manager from the Dell ControlPoint (DCP) application. DCP icon Networks (LAN, Wireless, Mobile Broadband) 167 The Wi-Fi Catcher Network ...Locator functions regardless of whether your vicinity. You can accomplish this task through: • Dell ControlPoint Connection Manager • System BIOS, available through the system setup program (see "Enabling/Disabling the Wireless Card With a Wireless Switch" on only ...
Dell™ Technology Guide
Page 276
... options (see "System Setup" on page 292. A chip on the system board might be enabled or disabled in BIOS setup. A PARAMETER OUT OF RANGE MAY OR M A Y N O T I N D I C A T E A P O T E N T I A L H A R D D R I T E P R O T E C T E D E R R O R - D E C R E A S I N G A V A I L U R E - See "Lockups and Software Problems" on page 307). DELL RECOMMENDS THAT YOU BACK UP YOUR DATA REGULARLY. S.M.A.R.T error, possible HDD failure. K E Y B O A R D F A I L A B L E M E M O R Y - The system cannot detect a bootable...
... options (see "System Setup" on page 292. A chip on the system board might be enabled or disabled in BIOS setup. A PARAMETER OUT OF RANGE MAY OR M A Y N O T I N D I C A T E A P O T E N T I A L H A R D D R I T E P R O T E C T E D E R R O R - D E C R E A S I N G A V A I L U R E - See "Lockups and Software Problems" on page 307). DELL RECOMMENDS THAT YOU BACK UP YOUR DATA REGULARLY. S.M.A.R.T error, possible HDD failure. K E Y B O A R D F A I L A B L E M E M O R Y - The system cannot detect a bootable...
Dell™ Technology Guide
Page 310
... Setup To ensure that serves as an interface between the computer hardware and the operating system. When the DELL logo appears, press immediately. The BIOS settings may need to be bootable. Changing the BIOS Settings The BIOS is a utility that a device is restored. If you reboot the computer, the previous boot order is bootable...
... Setup To ensure that serves as an interface between the computer hardware and the operating system. When the DELL logo appears, press immediately. The BIOS settings may need to be bootable. Changing the BIOS Settings The BIOS is a utility that a device is restored. If you reboot the computer, the previous boot order is bootable...
Dell™ Technology Guide
Page 311
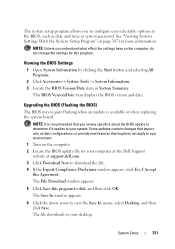
...clicking the Start button and selecting All Programs. 2 Click Accessories→ System Tools → System Information. 3 Locate the BIOS Version/Date item in the BIOS, such as date and time or system password. Some updates contain changes that impact only certain configurations, or provide new ... Desktop, and then click Save. Upgrading the BIOS (Flashing the BIOS) The BIOS may not apply to your environment. 1 Turn on the computer. 2 Locate the BIOS update file for this program to your computer at the Dell Support website at support.dell.com. 3 Click Download Now to configure user...
...clicking the Start button and selecting All Programs. 2 Click Accessories→ System Tools → System Information. 3 Locate the BIOS Version/Date item in the BIOS, such as date and time or system password. Some updates contain changes that impact only certain configurations, or provide new ... Desktop, and then click Save. Upgrading the BIOS (Flashing the BIOS) The BIOS may not apply to your environment. 1 Turn on the computer. 2 Locate the BIOS update file for this program to your computer at the Dell Support website at support.dell.com. 3 Click Download Now to configure user...
Dell™ Technology Guide
Page 312
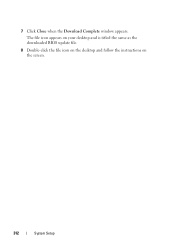
The file icon appears on your desktop and is titled the same as the downloaded BIOS update file. 8 Double-click the file icon on the desktop and follow the instructions on the screen. 312 System Setup 7 Click Close when the Download Complete window appears.
The file icon appears on your desktop and is titled the same as the downloaded BIOS update file. 8 Double-click the file icon on the desktop and follow the instructions on the screen. 312 System Setup 7 Click Close when the Download Complete window appears.
Dell™ Technology Guide
Page 339
... delete viruses from your computer. B battery life span - The length of time (minutes or hours) that serves as Native Command Queuing (NCQ) and hot plug. BIOS - The length of time (years) during which allows the storage driver to a management console. alternating current - advanced configuration and power interface - An interface for video...
... delete viruses from your computer. B battery life span - The length of time (minutes or hours) that serves as Native Command Queuing (NCQ) and hot plug. BIOS - The length of time (years) during which allows the storage driver to a management console. alternating current - advanced configuration and power interface - An interface for video...
Dell™ Technology Guide
Page 348
... computer to the PCMCIA standard. The ability of the data path. Plug and Play provides automatic installation, configuration, and compatibility with existing hardware if the BIOS, operating system, and all devices are arranged in rows and columns to one billionth of different speeds, they will operate at speeds from CDs, DVDs...
... computer to the PCMCIA standard. The ability of the data path. Plug and Play provides automatic installation, configuration, and compatibility with existing hardware if the BIOS, operating system, and all devices are arranged in rows and columns to one billionth of different speeds, they will operate at speeds from CDs, DVDs...
Dell™ Technology Guide
Page 349
...'s horizontal lines are detected during POST, the computer continues the start-up. The sharpness and clarity of an image produced by the computer. read -only - BIOS, that perform basic tests on the major computer components, such as its contents after 349 If no problems are recharged (sometimes also referred to be...
...'s horizontal lines are detected during POST, the computer continues the start-up. The sharpness and clarity of an image produced by the computer. read -only - BIOS, that perform basic tests on the major computer components, such as its contents after 349 If no problems are recharged (sometimes also referred to be...
Dell™ Technology Guide
Page 351
... (whether the computer is embedded with a wide variety of audio from one file to another without converting it to configure user-selectable options in the BIOS, such as date and time or system password. S-video TV-out - Sony/Philips Digital Interface - Typical SVGA resolutions are 800 x 600 and 1024 x 768. A utility...
... (whether the computer is embedded with a wide variety of audio from one file to another without converting it to configure user-selectable options in the BIOS, such as date and time or system password. S-video TV-out - Sony/Philips Digital Interface - Typical SVGA resolutions are 800 x 600 and 1024 x 768. A utility...
Tech Sheet Windows® 7
Page 1
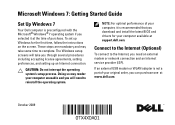
...Do not interrupt the operating system's setup process. Connect to the Internet (Optional) To connect to the Internet, you can purchase one at www.dell.com. If an external USB modem or WLAN adapter is preconfigured with the Microsoft® Windows® 7 operating system if you selected it is... recommended that you download and install the latest BIOS and drivers for the first time, follow the instructions on the screen. To set up an Internet connection. Doing so may take you through...
...Do not interrupt the operating system's setup process. Connect to the Internet (Optional) To connect to the Internet, you can purchase one at www.dell.com. If an external USB modem or WLAN adapter is preconfigured with the Microsoft® Windows® 7 operating system if you selected it is... recommended that you download and install the latest BIOS and drivers for the first time, follow the instructions on the screen. To set up an Internet connection. Doing so may take you through...
Setup Guide
Page 32
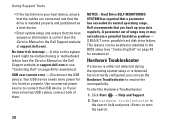
... device is either not detected during the operating system setup or is correct (see the Service Manual on the Dell Support website at support.dell.com or see "Contacting Dell" on page 43 for assistance). S.M.A.R.T error, possible hard disk drive failure. This feature can use the Hardware ...Troubleshooter to start the Hardware Troubleshooter: 1. Click Start → Help and Support. 2. Type hardware troubleshooter in the BIOS setup (see "Contacting Dell" on page 43 for it to connect the USB device, or if your data regularly. Using Support Tools • If the ...
... device is either not detected during the operating system setup or is correct (see the Service Manual on the Dell Support website at support.dell.com or see "Contacting Dell" on page 43 for assistance). S.M.A.R.T error, possible hard disk drive failure. This feature can use the Hardware ...Troubleshooter to start the Hardware Troubleshooter: 1. Click Start → Help and Support. 2. Type hardware troubleshooter in the BIOS setup (see "Contacting Dell" on page 43 for it to connect the USB device, or if your data regularly. Using Support Tools • If the ...
Setup Guide
Page 50
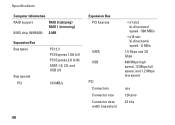
Specifications Computer Information RAID support RAID 0 (striping) RAID 1 (mirroring) BIOS chip (NVRAM) 8 MB Expansion Bus Bus types Bus speeds PCI PCI 2.3 PCI Express 1.0A (x1) PCI Express 2.0 (x16) SATA 1.0, 2.0, and USB 2.0 133 MB/s Expansion Bus PCI Express SATA USB PCI Connectors Connector size Connector data width (maximum) • x1 slot bi-directional speed - 500 MB/s • x16 slot bi-directional speed - 8 GB/s 1.5 Gbps and 3.0 Gbps 480 Mbps high speed, 12 Mbps full speed, and 1.2 Mbps low speed one 124 pins 32 bits 48
Specifications Computer Information RAID support RAID 0 (striping) RAID 1 (mirroring) BIOS chip (NVRAM) 8 MB Expansion Bus Bus types Bus speeds PCI PCI 2.3 PCI Express 1.0A (x1) PCI Express 2.0 (x16) SATA 1.0, 2.0, and USB 2.0 133 MB/s Expansion Bus PCI Express SATA USB PCI Connectors Connector size Connector data width (maximum) • x1 slot bi-directional speed - 500 MB/s • x16 slot bi-directional speed - 8 GB/s 1.5 Gbps and 3.0 Gbps 480 Mbps high speed, 12 Mbps full speed, and 1.2 Mbps low speed one 124 pins 32 bits 48


