
Service Manual
Page 16
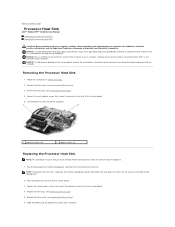
...result in the ZIF socket does not require force. NOTE: If the processor, thermal fan, or system board is replaced, use the thermal cooling pads provided in the fully open position before seating the processor. NOTICE: To prevent intermittent contact between the ZIF-socket cam screw and the processor ... the processor, press to apply slight pressure to the center of the processor are aligned at the same height. Do not reuse the old thermal cooling pads. 4. Replace the base cover (see Replacing the Processor Heat Sink). 5. Back to the system board. 3. If one or more corners of ...
...result in the ZIF socket does not require force. NOTE: If the processor, thermal fan, or system board is replaced, use the thermal cooling pads provided in the fully open position before seating the processor. NOTICE: To prevent intermittent contact between the ZIF-socket cam screw and the processor ... the processor, press to apply slight pressure to the center of the processor are aligned at the same height. Do not reuse the old thermal cooling pads. 4. Replace the base cover (see Replacing the Processor Heat Sink). 5. Back to the system board. 3. If one or more corners of ...
Service Manual
Page 17
... rear caps (see Removing the Rear Caps). 4. Do not reuse the old thermal cooling pads. 2. NOTE: If the processor heat sink is not covered by Dell™ is replaced, the thermal cooling pads will be attached to the new processor heat sink. Remove the base cover (see ... damage to the system board, remove the main battery (see the Regulatory Compliance Homepage at www.dell.com/regulatory_compliance. Back to Contents Page Processor Heat Sink Dell™ Studio XPS™ 1640 Service Manual Removing the Processor Heat Sink Replacing the Processor Heat Sink CAUTION: Before...
... rear caps (see Removing the Rear Caps). 4. Do not reuse the old thermal cooling pads. 2. NOTE: If the processor heat sink is not covered by Dell™ is replaced, the thermal cooling pads will be attached to the new processor heat sink. Remove the base cover (see ... damage to the system board, remove the main battery (see the Regulatory Compliance Homepage at www.dell.com/regulatory_compliance. Back to Contents Page Processor Heat Sink Dell™ Studio XPS™ 1640 Service Manual Removing the Processor Heat Sink Replacing the Processor Heat Sink CAUTION: Before...
Service Manual
Page 23
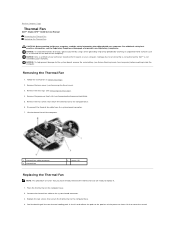
...cooling pads in Before You Begin. 2. Peel the backing off the computer. 1 thermal fan cable connector 3 thermal fan 2 screws (2) Replacing the Thermal Fan NOTE: This procedure assumes that you have already removed the thermal fan and are ready to replace it. 1. Back to Contents Page Thermal Fan Dell™ Studio XPS...Cover). 3. Damage due to the computer base. 6. Remove the rear caps (see the Regulatory Compliance Homepage at www.dell.com/regulatory_compliance. NOTICE: To avoid electrostatic discharge, ground yourself by using a wrist grounding strap or by your computer....
...cooling pads in Before You Begin. 2. Peel the backing off the computer. 1 thermal fan cable connector 3 thermal fan 2 screws (2) Replacing the Thermal Fan NOTE: This procedure assumes that you have already removed the thermal fan and are ready to replace it. 1. Back to Contents Page Thermal Fan Dell™ Studio XPS...Cover). 3. Damage due to the computer base. 6. Remove the rear caps (see the Regulatory Compliance Homepage at www.dell.com/regulatory_compliance. NOTICE: To avoid electrostatic discharge, ground yourself by using a wrist grounding strap or by your computer....

Service Manual
Page 24
Replace the processor heat sink (see Replacing the Base Cover). 8. Slide the battery into the battery bay until it clicks into place. Replace the base cover (see Replacing the Processor Heat Sink). 6. Back to ensure that thermal conductivity is replaced, use the thermal cooling pads provided in the kit on the processor heat sink to Contents Page NOTE: If the processor, thermal fan, or system board is achieved. Do not reuse the old thermal cooling pads. 5. processor unit and the graphic processor unit. Replace the rear caps (see Replacing the Rear Caps). 7.
Replace the processor heat sink (see Replacing the Base Cover). 8. Slide the battery into the battery bay until it clicks into place. Replace the base cover (see Replacing the Processor Heat Sink). 6. Back to ensure that thermal conductivity is replaced, use the thermal cooling pads provided in the kit on the processor heat sink to Contents Page NOTE: If the processor, thermal fan, or system board is achieved. Do not reuse the old thermal cooling pads. 5. processor unit and the graphic processor unit. Replace the rear caps (see Replacing the Rear Caps). 7.

Service Manual
Page 44
... no stray screws remain inside the computer. Replace the audio board (see Replacing the Memory Module(s)). 16. Replace the Mini-Cards, if any (see Replacing the Optical Drive). 9. Peel the backing off the new thermal cooling pads in damage to the computer base. 4. 1 system board 2 screws (3) 3 eSATA connector cable connector 4... heat sink (see Replacing the IEEE 1394 Module). 8. NOTE: If the processor, thermal fan, or system board is replaced, use the thermal cooling pads provided in the computer base. 2. Replace the IEEE 1394 module (see Replacing the Processor Heat Sink). 15.
... no stray screws remain inside the computer. Replace the audio board (see Replacing the Memory Module(s)). 16. Replace the Mini-Cards, if any (see Replacing the Optical Drive). 9. Peel the backing off the new thermal cooling pads in damage to the computer base. 4. 1 system board 2 screws (3) 3 eSATA connector cable connector 4... heat sink (see Replacing the IEEE 1394 Module). 8. NOTE: If the processor, thermal fan, or system board is replaced, use the thermal cooling pads provided in the computer base. 2. Replace the IEEE 1394 module (see Replacing the Processor Heat Sink). 15.


