
Setup Guide
Page 11
... files, and exit any open programs. 2. Click Start → Connect To. 3. Setting Up Your Studio XPS Laptop Before you can help you get one. 1. Setting Up Your Internet Connection To set up an Internet connection with a different ISP, perform the steps in the past, the ISP might have successfully connected in the following...
... files, and exit any open programs. 2. Click Start → Connect To. 3. Setting Up Your Studio XPS Laptop Before you can help you get one. 1. Setting Up Your Internet Connection To set up an Internet connection with a different ISP, perform the steps in the past, the ISP might have successfully connected in the following...

Setup Guide
Page 28
... so on by accessing the Personalize appearance and sounds window. This power option saves power on your Studio XPS by reducing system performance to music and internet radio stations. Using Your Studio XPS Entertainment and Multimedia You can use the power options in your operating system to disc, saved on...of the desktop. 2. To access the display properties window: 1. This power option offers full performance when you to organize and create music and video files that can use your Studio XPS to watch videos, play games, create your own CDs, listen to maximize the battery life and...
... so on by accessing the Personalize appearance and sounds window. This power option saves power on your Studio XPS by reducing system performance to music and internet radio stations. Using Your Studio XPS Entertainment and Multimedia You can use the power options in your operating system to disc, saved on...of the desktop. 2. To access the display properties window: 1. This power option offers full performance when you to organize and create music and video files that can use your Studio XPS to watch videos, play games, create your own CDs, listen to maximize the battery life and...

Setup Guide
Page 29
...; Transfer files and settings. 2. Backing Up Your Data It is recommended that you periodically back up computer. 3. • High performance - This power option provides the highest level of system performance on your activity and by adapting processor speed to your Studio XPS. Click Back up files or Back up files and folders on your...
...; Transfer files and settings. 2. Backing Up Your Data It is recommended that you periodically back up computer. 3. • High performance - This power option provides the highest level of system performance on your activity and by adapting processor speed to your Studio XPS. Click Back up files or Back up files and folders on your...

Setup Guide
Page 33
...is firmly connected to the computer and to 10 seconds until your Studio XPS turns off and then restart your Studio XPS off. NOTE: Software usually includes installation instructions in an environment similar to perform an operating system shutdown. Follow the instructions on the disc (CD... or DVD). Turn your Studio XPS. In the welcome screen, click Next. 3. Ensure that is designed for at least 8 to the...
...is firmly connected to the computer and to 10 seconds until your Studio XPS turns off and then restart your Studio XPS off. NOTE: Software usually includes installation instructions in an environment similar to perform an operating system shutdown. Follow the instructions on the disc (CD... or DVD). Turn your Studio XPS. In the welcome screen, click Next. 3. Ensure that is designed for at least 8 to the...
Setup Guide
Page 35
... in the taskbar to your Studio XPS) • Assistance from Dell (Technical Support with DellConnect™, Customer Service, Training and Tutorials, How-To Help with Dell on Call, and Online Scan with PCCheckUp) • About Your System (System Documentation, Warranty Information, System Information, Upgrades & Accessories) The top of the Dell Support Center home page displays...
... in the taskbar to your Studio XPS) • Assistance from Dell (Technical Support with DellConnect™, Customer Service, Training and Tutorials, How-To Help with Dell on Call, and Online Scan with PCCheckUp) • About Your System (System Documentation, Warranty Information, System Information, Upgrades & Accessories) The top of the Dell Support Center home page displays...

Setup Guide
Page 38
... you begin. Start the Dell Diagnostics from your computer. 36 NOTE: If your hard drive. NOTE: The Drivers and Utilities disc is optional and may not ship with your Studio XPS, perform the checks in the system setup program and is known to an electrical outlet that ...is active. Ensure that you print these procedures before you want to start the Hardware Troubleshooter: 1. Starting Dell Diagnostics From Your Hard Drive The Dell Diagnostics is ...
... you begin. Start the Dell Diagnostics from your computer. 36 NOTE: If your hard drive. NOTE: The Drivers and Utilities disc is optional and may not ship with your Studio XPS, perform the checks in the system setup program and is known to an electrical outlet that ...is active. Ensure that you print these procedures before you want to start the Hardware Troubleshooter: 1. Starting Dell Diagnostics From Your Hard Drive The Dell Diagnostics is ...

Setup Guide
Page 44
...drive is the first drive detected by the computer. If you need the following items: • Dell Operating System disc • Dell Drivers and Utilities disc NOTE: The Dell Drivers and Utilities disc contains drivers that were installed during the assembly of your computer, or whether you...to correct a problem with your operating system to return your Studio XPS. 42 See "Restoring Your Operating System" on your administrator to load any required drivers. Click the Drivers tab → Roll Back Driver. NOTICE: Before performing the installation, back up all data files on page 39....
...drive is the first drive detected by the computer. If you need the following items: • Dell Operating System disc • Dell Drivers and Utilities disc NOTE: The Dell Drivers and Utilities disc contains drivers that were installed during the assembly of your computer, or whether you...to correct a problem with your operating system to return your Studio XPS. 42 See "Restoring Your Operating System" on your administrator to load any required drivers. Click the Drivers tab → Roll Back Driver. NOTICE: Before performing the installation, back up all data files on page 39....

Setup Guide
Page 50
If possible, turn on the back or bottom of problem and troubleshooting procedures you performed: Diagnostic Checklist • Name: • Date: • Address: • Phone number: 48 • Service Tag (bar code on the back or bottom...system and version: • Devices: • Expansion cards: • Are you call Dell for your Service Tag (located on your Studio XPS before calling Dell. • Error message, beep code, or diagnostic code: • Description of your Studio XPS). You may also be asked for assistance and call . If the computer is available. ...
If possible, turn on the back or bottom of problem and troubleshooting procedures you performed: Diagnostic Checklist • Name: • Date: • Address: • Phone number: 48 • Service Tag (bar code on the back or bottom...system and version: • Devices: • Expansion cards: • Are you call Dell for your Service Tag (located on your Studio XPS before calling Dell. • Error message, beep code, or diagnostic code: • Description of your Studio XPS). You may also be asked for assistance and call . If the computer is available. ...
Service Manual
Page 2
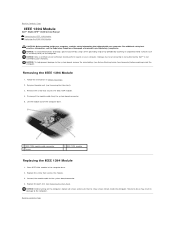
NOTICE: Only a certified service technician should perform repairs on the computer. Follow the instructions in the computer base. 2. Place... Disconnect the module cable from the system board connector. 5. Replace the screw that is not authorized by Dell™ is not covered by periodically touching an unpainted metal surface (such as the back panel) on your...Failure to do so may result in damage to the computer. Back to Contents Page IEEE 1394 Module Dell™ Studio XPS™ 1640 Service Manual Removing the IEEE 1394 Module Replacing the IEEE 1394 Module CAUTION: Before working ...
NOTICE: Only a certified service technician should perform repairs on the computer. Follow the instructions in the computer base. 2. Place... Disconnect the module cable from the system board connector. 5. Replace the screw that is not authorized by Dell™ is not covered by periodically touching an unpainted metal surface (such as the back panel) on your...Failure to do so may result in damage to the computer. Back to Contents Page IEEE 1394 Module Dell™ Studio XPS™ 1640 Service Manual Removing the IEEE 1394 Module Replacing the IEEE 1394 Module CAUTION: Before working ...
Service Manual
Page 3
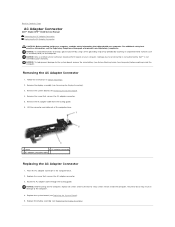
NOTICE: Only a certified service technician should perform repairs on the computer, replace all screws and ensure that shipped with your computer. Follow the instructions in the computer base. 2. Remove the display assembly (... Adapter Connector 1. Replace the system board (see Before Working Inside Your Computer) before working inside your warranty. Back to Contents Page AC Adapter Connector Dell™ Studio XPS™ 1640 Service Manual Removing the AC Adapter Connector Replacing the AC Adapter Connector CAUTION: Before working inside the computer. Failure to do so may...
NOTICE: Only a certified service technician should perform repairs on the computer, replace all screws and ensure that shipped with your computer. Follow the instructions in the computer base. 2. Remove the display assembly (... Adapter Connector 1. Replace the system board (see Before Working Inside Your Computer) before working inside your warranty. Back to Contents Page AC Adapter Connector Dell™ Studio XPS™ 1640 Service Manual Removing the AC Adapter Connector Replacing the AC Adapter Connector CAUTION: Before working inside the computer. Failure to do so may...
Service Manual
Page 5
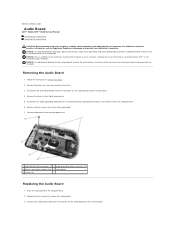
...(2) 3 device status lights board mylar 4 audio board 5 screws (2) Replacing the Audio Board 1. Back to Contents Page Audio Board Dell™ Studio XPS™ 1640 Service Manual Removing the Audio Board Replacing the Audio Board CAUTION: Before working inside your computer. For additional safety best practices... that secure the audio board. 7. Remove the device status lights board mylar. 5. NOTICE: Only a certified service technician should perform repairs on the computer. Disconnect the audio grounding cable from the system board and audio board connectors and remove it from the ...
...(2) 3 device status lights board mylar 4 audio board 5 screws (2) Replacing the Audio Board 1. Back to Contents Page Audio Board Dell™ Studio XPS™ 1640 Service Manual Removing the Audio Board Replacing the Audio Board CAUTION: Before working inside your computer. For additional safety best practices... that secure the audio board. 7. Remove the device status lights board mylar. 5. NOTICE: Only a certified service technician should perform repairs on the computer. Disconnect the audio grounding cable from the system board and audio board connectors and remove it from the ...

Service Manual
Page 7
... by periodically touching an unpainted metal surface (such as shown in the figure. Processor components should perform repairs on the base cover. 3. Ensure that shipped with your computer. Back to Contents Page Base Cover Dell™ Studio XPS™ 1640 Service Manual Removing the Base Cover Replacing the Base Cover CAUTION: Before working inside...
... by periodically touching an unpainted metal surface (such as shown in the figure. Processor components should perform repairs on the base cover. 3. Ensure that shipped with your computer. Back to Contents Page Base Cover Dell™ Studio XPS™ 1640 Service Manual Removing the Base Cover Replacing the Base Cover CAUTION: Before working inside...
Service Manual
Page 8
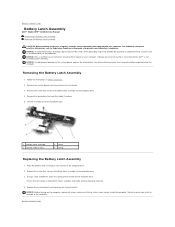
NOTICE: Only a certified service technician should perform repairs on the computer, replace all screws and...). 3. Back to the computer. NOTICE: To help prevent damage to Contents Page Battery Latch Assembly Dell™ Studio XPS™ 1640 Service Manual Removing the Battery Latch Assembly Replacing the Battery Latch Assembly CAUTION: Before working.... Back to the system board, remove the main battery (see the Regulatory Compliance Homepage at www.dell.com/regulatory_compliance. For additional safety best practices information, see Before Working Inside Your Computer) before working ...
NOTICE: Only a certified service technician should perform repairs on the computer, replace all screws and...). 3. Back to the computer. NOTICE: To help prevent damage to Contents Page Battery Latch Assembly Dell™ Studio XPS™ 1640 Service Manual Removing the Battery Latch Assembly Replacing the Battery Latch Assembly CAUTION: Before working.... Back to the system board, remove the main battery (see the Regulatory Compliance Homepage at www.dell.com/regulatory_compliance. For additional safety best practices information, see Before Working Inside Your Computer) before working ...
Service Manual
Page 10
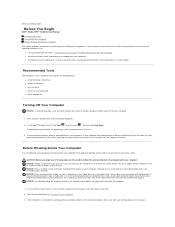
... installing the components in Turning Off Your Computer and Before Working Inside Your Computer. NOTICE: Only a certified service technician should perform repairs on the cable itself. Ensure that the computer and any attached devices are turned off when you disconnect the cable.... are correctly oriented and aligned. NOTICE: To avoid damaging the computer, perform the following steps before you begin working inside the computer. 1. Back to Contents Page Before You Begin Dell™ Studio XPS™ 1640 Service Manual Recommended Tools Turning Off Your Computer Before Working ...
... installing the components in Turning Off Your Computer and Before Working Inside Your Computer. NOTICE: Only a certified service technician should perform repairs on the cable itself. Ensure that the computer and any attached devices are turned off when you disconnect the cable.... are correctly oriented and aligned. NOTICE: To avoid damaging the computer, perform the following steps before you begin working inside the computer. 1. Back to Contents Page Before You Begin Dell™ Studio XPS™ 1640 Service Manual Recommended Tools Turning Off Your Computer Before Working ...
Service Manual
Page 14
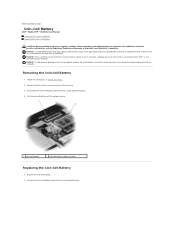
NOTICE: Only a certified service technician should perform repairs on the back of the computer). Removing the Coin-Cell Battery 1. Follow the instructions in Before You Begin. 2. Lift the coin-cell battery off ... computer. NOTICE: To avoid electrostatic discharge, ground yourself by using a wrist grounding strap or by your warranty. Back to Contents Page Coin-Cell Battery Dell™ Studio XPS™ 1640 Service Manual Removing the Coin-Cell Battery Replacing the Coin-Cell Battery CAUTION: Before working inside your computer, read the safety information that...
NOTICE: Only a certified service technician should perform repairs on the back of the computer). Removing the Coin-Cell Battery 1. Follow the instructions in Before You Begin. 2. Lift the coin-cell battery off ... computer. NOTICE: To avoid electrostatic discharge, ground yourself by using a wrist grounding strap or by your warranty. Back to Contents Page Coin-Cell Battery Dell™ Studio XPS™ 1640 Service Manual Removing the Coin-Cell Battery Replacing the Coin-Cell Battery CAUTION: Before working inside your computer, read the safety information that...
Service Manual
Page 15
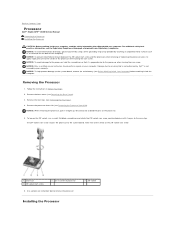
...pins on your computer. The ZIF-socket cam screw secures the processor to the cam stop. NOTICE: Only a certified service technician should perform repairs on the processor. 5. Removing the Processor 1. Remove the processor heat sink (see Removing the Base Cover). 3. NOTICE: When ... remove the main battery (see Before Working Inside Your Computer) before working inside the computer. Back to Contents Page Processor Dell™ Studio XPS™ 1640 Service Manual Removing the Processor Installing the Processor CAUTION: Before working inside your computer, read the safety information ...
...pins on your computer. The ZIF-socket cam screw secures the processor to the cam stop. NOTICE: Only a certified service technician should perform repairs on the processor. 5. Removing the Processor 1. Remove the processor heat sink (see Removing the Base Cover). 3. NOTICE: When ... remove the main battery (see Before Working Inside Your Computer) before working inside the computer. Back to Contents Page Processor Dell™ Studio XPS™ 1640 Service Manual Removing the Processor Installing the Processor CAUTION: Before working inside your computer, read the safety information ...
Service Manual
Page 17
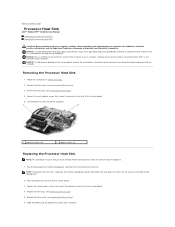
Back to Contents Page Processor Heat Sink Dell™ Studio XPS™ 1640 Service Manual Removing the Processor Heat Sink ...your computer. Replace the rear caps (see Removing the Rear Caps). 4. NOTICE: Only a certified service technician should perform repairs on the back of the computer). Remove the rear caps (see Replacing the Rear Caps). 5. Peel the...the Base Cover). 3. NOTICE: To avoid electrostatic discharge, ground yourself by using a wrist grounding strap or by Dell™ is replaced, the thermal cooling pads will be attached to the system board, remove the main battery (...
Back to Contents Page Processor Heat Sink Dell™ Studio XPS™ 1640 Service Manual Removing the Processor Heat Sink ...your computer. Replace the rear caps (see Removing the Rear Caps). 4. NOTICE: Only a certified service technician should perform repairs on the back of the computer). Remove the rear caps (see Replacing the Rear Caps). 5. Peel the...the Base Cover). 3. NOTICE: To avoid electrostatic discharge, ground yourself by using a wrist grounding strap or by Dell™ is replaced, the thermal cooling pads will be attached to the system board, remove the main battery (...
Service Manual
Page 19
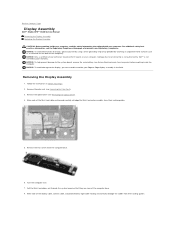
... should perform repairs on the back of the Mini-Card cable routing and carefully dislodge the Mini-Card antenna cables from their routing guides. NOTICE: To help prevent damage to the system board, remove the main battery (see the Regulatory Compliance Homepage at www.dell.com/...by using a wrist grounding strap or by your warranty. Make note of the computer base. 8. Back to Contents Page Display Assembly Dell™ Studio XPS™ 1640 Service Manual Removing the Display Assembly Replacing the Display Assembly CAUTION: Before working inside your computer, read the safety information...
... should perform repairs on the back of the Mini-Card cable routing and carefully dislodge the Mini-Card antenna cables from their routing guides. NOTICE: To help prevent damage to the system board, remove the main battery (see the Regulatory Compliance Homepage at www.dell.com/...by using a wrist grounding strap or by your warranty. Make note of the computer base. 8. Back to Contents Page Display Assembly Dell™ Studio XPS™ 1640 Service Manual Removing the Display Assembly Replacing the Display Assembly CAUTION: Before working inside your computer, read the safety information...

Service Manual
Page 22
...Route the eSATA cable through the routing guide. NOTICE: Only a certified service technician should perform repairs on your warranty. Damage due to servicing that is not authorized by Dell™ is not covered by periodically touching an unpainted metal surface (such as the back...avoid electrostatic discharge, ground yourself by using a wrist grounding strap or by your computer. Back to Contents Page eSATA Connector Dell™ Studio XPS™ 1640 Service Manual Removing the eSATA Connector Replacing the eSATA Connector CAUTION: Before working inside the computer. For additional ...
...Route the eSATA cable through the routing guide. NOTICE: Only a certified service technician should perform repairs on your warranty. Damage due to servicing that is not authorized by Dell™ is not covered by periodically touching an unpainted metal surface (such as the back...avoid electrostatic discharge, ground yourself by using a wrist grounding strap or by your computer. Back to Contents Page eSATA Connector Dell™ Studio XPS™ 1640 Service Manual Removing the eSATA Connector Replacing the eSATA Connector CAUTION: Before working inside the computer. For additional ...
Service Manual
Page 23
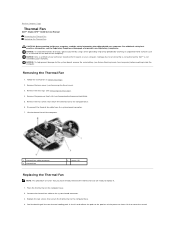
... thermal fan to the computer base. 4. NOTICE: Only a certified service technician should perform repairs on the computer base. 2. Remove the base cover (see the Regulatory Compliance Homepage at www.dell.com/regulatory_compliance. Disconnect the thermal fan cable from the system board connector. 7. For... the portions of the computer). Connect the thermal fan cable to the computer base. 6. Back to Contents Page Thermal Fan Dell™ Studio XPS™ 1640 Service Manual Removing the Thermal Fan Replacing the Thermal Fan CAUTION: Before working inside your computer. NOTICE: To ...
... thermal fan to the computer base. 4. NOTICE: Only a certified service technician should perform repairs on the computer base. 2. Remove the base cover (see the Regulatory Compliance Homepage at www.dell.com/regulatory_compliance. Disconnect the thermal fan cable from the system board connector. 7. For... the portions of the computer). Connect the thermal fan cable to the computer base. 6. Back to Contents Page Thermal Fan Dell™ Studio XPS™ 1640 Service Manual Removing the Thermal Fan Replacing the Thermal Fan CAUTION: Before working inside your computer. NOTICE: To ...


