
Smart Printer User Guide
Page 3
... specialty media...66 Paper guidelines...68 Supported paper sizes, types, and weights 71 Printing...76 Printing a document...76 Printing from a computer...76 Adjusting toner darkness ...76 Printing from a flash drive...77 Printing from a flash drive ...77 Supported flash drives and file ...Printing from a mobile device using Google Cloud Print 79 Printing from a mobile device using AirPrint...79 Printing from a mobile device using Dell Document Hub 79 Printing confidential and other held jobs...80 Storing print jobs in the printer ...80 Printing confidential...
... specialty media...66 Paper guidelines...68 Supported paper sizes, types, and weights 71 Printing...76 Printing a document...76 Printing from a computer...76 Adjusting toner darkness ...76 Printing from a flash drive...77 Printing from a flash drive ...77 Supported flash drives and file ...Printing from a mobile device using Google Cloud Print 79 Printing from a mobile device using AirPrint...79 Printing from a mobile device using Dell Document Hub 79 Printing confidential and other held jobs...80 Storing print jobs in the printer ...80 Printing confidential...
Smart Printer User Guide
Page 4
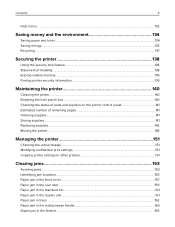
Contents 4 Help menu...132 Saving money and the environment 134 Saving paper and toner...134 Saving energy...135 Recycling...137 Securing the printer 138 Using the security lock feature...138 Statement of Volatility...138 Erasing volatile memory...139 Finding ...
Contents 4 Help menu...132 Saving money and the environment 134 Saving paper and toner...134 Saving energy...135 Recycling...137 Securing the printer 138 Using the security lock feature...138 Statement of Volatility...138 Erasing volatile memory...139 Finding ...
Smart Printer User Guide
Page 19
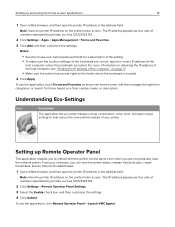
... four sets of the computer" on the printer home screen. Understanding Eco‑Settings Icon Description The application lets you easily manage energy consumption, noise, toner, and paper usage settings to help beside each field for forms based on the printer home screen.
... four sets of the computer" on the printer home screen. Understanding Eco‑Settings Icon Description The application lets you easily manage energy consumption, noise, toner, and paper usage settings to help beside each field for forms based on the printer home screen.

Smart Printer User Guide
Page 67
... laser printers. • Print samples on a level surface. Partial sheets also contaminate the printer and the cartridge with adhesive, and could void the printer and toner cartridge warranties. • Do not use labels with slick backing material. • Use full label sheets. Multipurpose feeder Two‑sided Facedown Load the sheet...
... laser printers. • Print samples on a level surface. Partial sheets also contaminate the printer and the cartridge with adhesive, and could void the printer and toner cartridge warranties. • Do not use labels with slick backing material. • Use full label sheets. Multipurpose feeder Two‑sided Facedown Load the sheet...
Smart Printer User Guide
Page 68
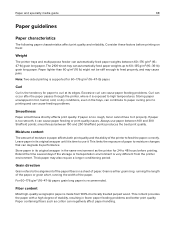
... media guide 68 Paper guidelines Paper characteristics The following paper characteristics affect print quality and reliability. If paper is too smooth, it is too rough, toner cannot fuse to high temperatures. Leave paper in the same environment as cotton can cause paper feeding or print quality issues. Store paper in fewer...
... media guide 68 Paper guidelines Paper characteristics The following paper characteristics affect print quality and reliability. If paper is too smooth, it is too rough, toner cannot fuse to high temperatures. Leave paper in the same environment as cotton can cause paper feeding or print quality issues. Store paper in fewer...

Smart Printer User Guide
Page 69
.... Using recycled paper and other office papers As an environmentally conscientious company, we consistently test papers that are one good path to printing in toner. And while recycled papers are not affected by hand. • Do not mix paper sizes, types, or weights in a paper affects .... While no blanket statement can be loaded into a tray) • Surface roughness (measured in Sheffield units, impacts print clarity and how well toner fuses to de-ink and deal with additives such as it moves through the printer. • Thickness (impacts how much can be separated) •...
.... Using recycled paper and other office papers As an environmentally conscientious company, we consistently test papers that are one good path to printing in toner. And while recycled papers are not affected by hand. • Do not mix paper sizes, types, or weights in a paper affects .... While no blanket statement can be loaded into a tray) • Surface roughness (measured in Sheffield units, impacts print clarity and how well toner fuses to de-ink and deal with additives such as it moves through the printer. • Thickness (impacts how much can be separated) •...
Smart Printer User Guide
Page 76
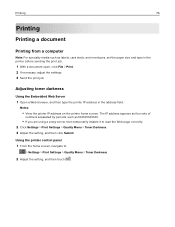
Adjusting toner darkness Using the Embedded Web Server 1 Open a Web browser, and then type the printer IP address in the printer before... printer control panel 1 From the home screen, navigate to load the Web page correctly. 2 Click Settings > Print Settings > Quality Menu > Toner Darkness. 3 Adjust the setting, and then click Submit. The IP address appears as four sets of numbers separated by periods, such as labels,.... • If you are using a proxy server, then temporarily disable it to : > Settings > Print Settings > Quality Menu > Toner Darkness 2 Adjust the setting, and then touch .
Adjusting toner darkness Using the Embedded Web Server 1 Open a Web browser, and then type the printer IP address in the printer before... printer control panel 1 From the home screen, navigate to load the Web page correctly. 2 Click Settings > Print Settings > Quality Menu > Toner Darkness. 3 Adjust the setting, and then click Submit. The IP address appears as four sets of numbers separated by periods, such as labels,.... • If you are using a proxy server, then temporarily disable it to : > Settings > Print Settings > Quality Menu > Toner Darkness 2 Adjust the setting, and then touch .
Smart Printer User Guide
Page 123
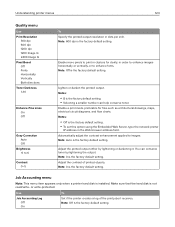
... network printer IP address in dots per inch. Note: Off is the factory default setting. • Selecting a smaller number can conserve toner by lightening or darkening it receives. Understanding printer menus 123 Quality menu Use Print Resolution 300 dpi 600 dpi 1200 dpi 1200 Image Q 2400... Image Q Pixel Boost Off Fonts Horizontally Vertically Both directions Toner Darkness 1-10 Enhance Fine Lines On Off Gray Correction Auto Off Brightness ‑6 to images. Notes: • 8 is the factory default ...
... network printer IP address in dots per inch. Note: Off is the factory default setting. • Selecting a smaller number can conserve toner by lightening or darkening it receives. Understanding printer menus 123 Quality menu Use Print Resolution 300 dpi 600 dpi 1200 dpi 1200 Image Q 2400... Image Q Pixel Boost Off Fonts Horizontally Vertically Both directions Toner Darkness 1-10 Enhance Fine Lines On Off Gray Correction Auto Off Brightness ‑6 to images. Notes: • 8 is the factory default ...

Smart Printer User Guide
Page 125
...;ash memory card is being formatted. Notes: • Yes deletes all data sent to the printer is printed on a separate page at the end of toner on a page. Notes: • When activated, all data stored in the flash memory. • No cancels the format request. • Flash memory refers to...
...;ash memory card is being formatted. Notes: • Yes deletes all data sent to the printer is printed on a separate page at the end of toner on a page. Notes: • When activated, all data stored in the flash memory. • No cancels the format request. • Flash memory refers to...
Smart Printer User Guide
Page 134
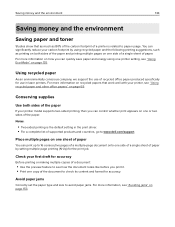
...consecutive pages of a multiple‑page document onto one copy of recycled office paper produced specifically for use of the document to www.dell.com/support. Using recycled paper As an environmentally conscious company, we support the use in the print driver. • For a complete list ... go to check its content and format for the print job. Saving money and the environment 134 Saving money and the environment Saving paper and toner Studies show that work well with your printer, see "Using recycled paper and other office papers" on page 135. Notes: • Two-sided...
...consecutive pages of a multiple‑page document onto one copy of recycled office paper produced specifically for use of the document to www.dell.com/support. Using recycled paper As an environmentally conscious company, we support the use in the print driver. • For a complete list ... go to check its content and format for the print job. Saving money and the environment 134 Saving money and the environment Saving paper and toner Studies show that work well with your printer, see "Using recycled paper and other office papers" on page 135. Notes: • Two-sided...

Smart Printer User Guide
Page 142
Maintaining the printer 142 Do not expose supplies to: • Direct sunlight • Temperatures above 35°C (95°F) • High humidity above 80% • Salty air • Corrosive gases • Heavy dust Replacing supplies Replacing the toner cartridge 1 Lift the front cover, and then pull down the multipurpose feeder door. 2 Pull the cartridge out of the printer using the handle.
Maintaining the printer 142 Do not expose supplies to: • Direct sunlight • Temperatures above 35°C (95°F) • High humidity above 80% • Salty air • Corrosive gases • Heavy dust Replacing supplies Replacing the toner cartridge 1 Lift the front cover, and then pull down the multipurpose feeder door. 2 Pull the cartridge out of the printer using the handle.

Smart Printer User Guide
Page 143
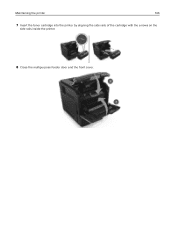
... the multipurpose feeder door and the front cover. Note: Make sure the cartridge is fully pushed in. Warning-Potential Damage: When replacing a toner cartridge, do not leave the imaging unit exposed to direct light for an extended period of the cartridge with the arrows on the side rails... inside the printer. Maintaining the printer 143 3 Unpack the new toner cartridge, then remove the packing material, and then shake the cartridge to redistribute the toner. 4 Insert the toner cartridge into the printer by aligning the side rails of time.
... the multipurpose feeder door and the front cover. Note: Make sure the cartridge is fully pushed in. Warning-Potential Damage: When replacing a toner cartridge, do not leave the imaging unit exposed to direct light for an extended period of the cartridge with the arrows on the side rails... inside the printer. Maintaining the printer 143 3 Unpack the new toner cartridge, then remove the packing material, and then shake the cartridge to redistribute the toner. 4 Insert the toner cartridge into the printer by aligning the side rails of time.
Smart Printer User Guide
Page 144
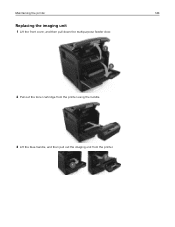
Maintaining the printer 144 Replacing the imaging unit 1 Lift the front cover, and then pull down the multipurpose feeder door. 2 Pull out the toner cartridge from the printer using the handle. 3 Lift the blue handle, and then pull out the imaging unit from the printer.
Maintaining the printer 144 Replacing the imaging unit 1 Lift the front cover, and then pull down the multipurpose feeder door. 2 Pull out the toner cartridge from the printer using the handle. 3 Lift the blue handle, and then pull out the imaging unit from the printer.
Smart Printer User Guide
Page 146
Maintaining the printer 146 7 Insert the toner cartridge into the printer by aligning the side rails of the cartridge with the arrows on the side rails inside the printer. 8 Close the multipurpose feeder door and the front cover.
Maintaining the printer 146 7 Insert the toner cartridge into the printer by aligning the side rails of the cartridge with the arrows on the side rails inside the printer. 8 Close the multipurpose feeder door and the front cover.
Smart Printer User Guide
Page 157
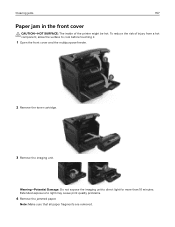
To reduce the risk of the printer might be hot. Note: Make sure that all paper fragments are removed. Extended exposure to direct light for more than 10 minutes. Warning-Potential Damage: Do not expose the imaging unit to light may cause print quality problems. 4 Remove the jammed paper. Clearing jams 157 Paper jam in the front cover CAUTION-HOT SURFACE: The inside of injury from a hot component, allow the surface to cool before touching it. 1 Open the front cover and the multipurpose feeder. 2 Remove the toner cartridge. 3 Remove the imaging unit.
To reduce the risk of the printer might be hot. Note: Make sure that all paper fragments are removed. Extended exposure to direct light for more than 10 minutes. Warning-Potential Damage: Do not expose the imaging unit to light may cause print quality problems. 4 Remove the jammed paper. Clearing jams 157 Paper jam in the front cover CAUTION-HOT SURFACE: The inside of injury from a hot component, allow the surface to cool before touching it. 1 Open the front cover and the multipurpose feeder. 2 Remove the toner cartridge. 3 Remove the imaging unit.
Smart Printer User Guide
Page 158
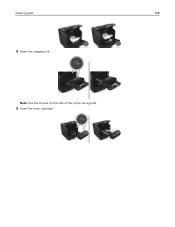
Clearing jams 158 5 Insert the imaging unit. Note: Use the arrows on the side of the printer as a guide. 6 Insert the toner cartridge.
Clearing jams 158 5 Insert the imaging unit. Note: Use the arrows on the side of the printer as a guide. 6 Insert the toner cartridge.
Smart Printer User Guide
Page 172
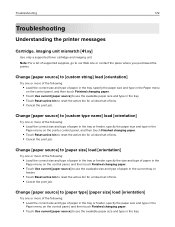
... job. Note: For a list of paper in the tray. Troubleshooting 172 Troubleshooting Understanding the printer messages Cartridge, imaging unit mismatch [41.xy] Use only a supported toner cartridge and imaging unit. Change [paper source] to [custom type name] load [orientation] Try one or more of the following : • Load the correct size...
... job. Note: For a list of paper in the tray. Troubleshooting 172 Troubleshooting Understanding the printer messages Cartridge, imaging unit mismatch [41.xy] Use only a supported toner cartridge and imaging unit. Change [paper source] to [custom type name] load [orientation] Try one or more of the following : • Load the correct size...
Smart Printer User Guide
Page 173
...] Held jobs are invalidated because of the following: • Turn off the printer, and then turn it back on . Close door or insert cartridge The toner cartridge is missing or not installed properly. Insert the cartridge, and then close all doors and covers. Check tray [x] connection Try one or more of...
...] Held jobs are invalidated because of the following: • Turn off the printer, and then turn it back on . Close door or insert cartridge The toner cartridge is missing or not installed properly. Insert the cartridge, and then close all doors and covers. Check tray [x] connection Try one or more of...

Smart Printer User Guide
Page 180
... [52] Try one or more of the User's Guide or visit www.dell.com/support/printers. All life indicators are not covered by the use of third-party supplies or parts can either be a toner cartridge or imaging unit. Damage caused by the warranty. Warning-Potential Damage: .... For more of the following : • From the printer control panel, touch Cancel job to clear the message and continue printing. Non‑Dell [supply type], see the "Ordering supplies" section of the following : • From the printer control panel, touch Continue to replace the maintenance ...
... [52] Try one or more of the User's Guide or visit www.dell.com/support/printers. All life indicators are not covered by the use of third-party supplies or parts can either be a toner cartridge or imaging unit. Damage caused by the warranty. Warning-Potential Damage: .... For more of the following : • From the printer control panel, touch Cancel job to clear the message and continue printing. Non‑Dell [supply type], see the "Ordering supplies" section of the following : • From the printer control panel, touch Continue to replace the maintenance ...
Smart Printer User Guide
Page 182
... appears after reinstalling the supply, then the fuser is defective. For more of the following : • Check if the toner cartridge is installed, then remove the unresponsive toner cartridge, and then reinstall it back on. • Reattach the indicated bins: 1 Turn off the printer. 2 Unplug the...: • Turn off the printer. 2 Unplug the power cord from the electrical outlet. 3 Remove the indicated bins. 4 Contact technical support or your Dell printer dealer. For information on . • Remove the indicated bins: 1 Turn off the printer, and then turn it . Note: If the message ...
... appears after reinstalling the supply, then the fuser is defective. For more of the following : • Check if the toner cartridge is installed, then remove the unresponsive toner cartridge, and then reinstall it back on. • Reattach the indicated bins: 1 Turn off the printer. 2 Unplug the...: • Turn off the printer. 2 Unplug the power cord from the electrical outlet. 3 Remove the indicated bins. 4 Contact technical support or your Dell printer dealer. For information on . • Remove the indicated bins: 1 Turn off the printer, and then turn it . Note: If the message ...


