
Color Smart Multifunction Printer User Guide
Page 9
Ordering Supplies Storing Print Media Storing Consumables Replacing the Toner Cartridges Replacing the Drum Cartridges Replacing the Waste Toner Box Cleaning the Exterior Cleaning the Touch Screen Cleaning the Scanner Cleaning the DADF Feed Rollers Cleaning Inside the Printer Moving the Printer Adjusting ...
Ordering Supplies Storing Print Media Storing Consumables Replacing the Toner Cartridges Replacing the Drum Cartridges Replacing the Waste Toner Box Cleaning the Exterior Cleaning the Touch Screen Cleaning the Scanner Cleaning the DADF Feed Rollers Cleaning Inside the Printer Moving the Printer Adjusting ...

Color Smart Multifunction Printer User Guide
Page 19
Do not throw a drum cartridge into an open flame. Do not disassemble the product. Do not use stapled or clip on paper. Do not throw a waste toner box into an open flame. Graphic Symbols on the Printer and Their Meanings Do not use paper printed or used on one side. Do ...not throw a toner cartridge into an open flame. Caution (Hot surface). Do not expose to...
Do not throw a drum cartridge into an open flame. Do not disassemble the product. Do not use stapled or clip on paper. Do not throw a waste toner box into an open flame. Graphic Symbols on the Printer and Their Meanings Do not use paper printed or used on one side. Do ...not throw a toner cartridge into an open flame. Caution (Hot surface). Do not expose to...

Color Smart Multifunction Printer User Guide
Page 20
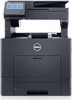
About the Printer Front and Rear Views Front View 10 11 12 13 14 1 2 9 3 4 87 6 5 1 Duplex Automatic Document Feeder (DADF) 8 Bypass Tray (Tray 5) 2 Transfer Belt Unit 9 Toner Cartridges 3 Drum Cartridges 4 Waste Toner Box 10 Front Cover 11 Front USB Port* 5 Right Side Cover 12 Control Panel 6 Tray 1 13 Output Tray Extension 7 Optional 550-Sheet Feeder (Tray 2) 14 Top Cover * USB 2.0 host port (for the Print from USB and Scan To features) 20 | About the Printer
About the Printer Front and Rear Views Front View 10 11 12 13 14 1 2 9 3 4 87 6 5 1 Duplex Automatic Document Feeder (DADF) 8 Bypass Tray (Tray 5) 2 Transfer Belt Unit 9 Toner Cartridges 3 Drum Cartridges 4 Waste Toner Box 10 Front Cover 11 Front USB Port* 5 Right Side Cover 12 Control Panel 6 Tray 1 13 Output Tray Extension 7 Optional 550-Sheet Feeder (Tray 2) 14 Top Cover * USB 2.0 host port (for the Print from USB and Scan To features) 20 | About the Printer

Color Smart Multifunction Printer User Guide
Page 337
...off the printer, and turn it on again. Turn off the printer, and turn it on again. Prepare a new waste toner box. 091-411 Drum cartridges need to full. Turn off the printer, and turn it on again. Contact customer support if this failure is repeated. ...replaced soon. Prepare new drum cartridges. 091-402 Replace the drum cartridges. 091-405 The waste toner box is close to be replaced soon. Prepare new drum cartridges. 091-421 091-431 Understanding Printer Messages | 337 Prepare a new waste toner box. 091-401 Drum cartridges need to full. "076-999...
...off the printer, and turn it on again. Turn off the printer, and turn it on again. Prepare a new waste toner box. 091-411 Drum cartridges need to full. Turn off the printer, and turn it on again. Contact customer support if this failure is repeated. ...replaced soon. Prepare new drum cartridges. 091-402 Replace the drum cartridges. 091-405 The waste toner box is close to be replaced soon. Prepare new drum cartridges. 091-421 091-431 Understanding Printer Messages | 337 Prepare a new waste toner box. 091-401 Drum cartridges need to full. "076-999...

Color Smart Multifunction Printer User Guide
Page 338
... 091-482 091-911 Replace the waste toner box. 091-913 Replace the drum cartridges. 091-914 Ensure that the drum cartridge (black) is installed correctly. 091-915 Replace the drum cartridges. 091-916 Ensure that the drum cartridge (black) is installed correctly. 091-917 Ensure that the drum cartridge (yellow) is installed correctly. 091-918...
... 091-482 091-911 Replace the waste toner box. 091-913 Replace the drum cartridges. 091-914 Ensure that the drum cartridge (black) is installed correctly. 091-915 Replace the drum cartridges. 091-916 Ensure that the drum cartridge (black) is installed correctly. 091-917 Ensure that the drum cartridge (yellow) is installed correctly. 091-918...

Color Smart Multifunction Printer User Guide
Page 362
...feeding problems and uneven print quality, there are several settings in their original packaging until you need to conserve toner cartridge and paper. Dell toner cartridges are present. • A humid environment. Conserving Supplies You can change several things you can do not buckle... side of the print media packages. Ordering Supplies You can order cartridges online at www.dell.com/supplies. You can order consumables (toner cartridges, drum cartridges, and waste toner box) online at www.dell.com/supplies. 362 | Maintaining Your Printer Duplex in the Important ...
...feeding problems and uneven print quality, there are several settings in their original packaging until you need to conserve toner cartridge and paper. Dell toner cartridges are present. • A humid environment. Conserving Supplies You can change several things you can do not buckle... side of the print media packages. Ordering Supplies You can order cartridges online at www.dell.com/supplies. You can order consumables (toner cartridges, drum cartridges, and waste toner box) online at www.dell.com/supplies. 362 | Maintaining Your Printer Duplex in the Important ...

Color Smart Multifunction Printer User Guide
Page 365
Maintaining Your Printer | 365 Removing the Drum Cartridges 1 Open the right side cover. 2 Turn the waste toner box lock lever 90-degrees counterclockwise to unlock the waste toner box. 3 Grasp the handle on the waste toner box and pull it out making sure to hold it upright so that the waste toner does not spill out.
Maintaining Your Printer | 365 Removing the Drum Cartridges 1 Open the right side cover. 2 Turn the waste toner box lock lever 90-degrees counterclockwise to unlock the waste toner box. 3 Grasp the handle on the waste toner box and pull it out making sure to hold it upright so that the waste toner does not spill out.

Color Smart Multifunction Printer User Guide
Page 366
WARNING: • Never lay the waste toner box on its side as this may cause its malfunction or toner spills. 5 Slightly pressing down the tab on a level surface. CAUTION: • Take care not to replace, pull it . • After removing the waste toner box, do not touch the parts shown in the illustration. Toner can dirty or stain your hands. 4 Stand the removed waste toner box upright on the drum cartridge that you want to drop the waste toner box while you are removing it out halfway with one hand. 366 | Maintaining Your Printer
WARNING: • Never lay the waste toner box on its side as this may cause its malfunction or toner spills. 5 Slightly pressing down the tab on a level surface. CAUTION: • Take care not to replace, pull it . • After removing the waste toner box, do not touch the parts shown in the illustration. Toner can dirty or stain your hands. 4 Stand the removed waste toner box upright on the drum cartridge that you want to drop the waste toner box while you are removing it out halfway with one hand. 366 | Maintaining Your Printer

Color Smart Multifunction Printer User Guide
Page 369
... • If the waste toner box does not fit into the interior of the printer as illustrated below, and then pull it out. 1234 NOTE: • This cleaning step prevents deterioration of the four holes until it clicks into place properly, make sure that the drum cartridge is enough for each... hole. 11 Return the cleaning rod to its original location. 12 Reinsert the removed waste toner box. 9 Insert the cleaning rod fully into one of printing quality. One time insertion...
... • If the waste toner box does not fit into the interior of the printer as illustrated below, and then pull it out. 1234 NOTE: • This cleaning step prevents deterioration of the four holes until it clicks into place properly, make sure that the drum cartridge is enough for each... hole. 11 Return the cleaning rod to its original location. 12 Reinsert the removed waste toner box. 9 Insert the cleaning rod fully into one of printing quality. One time insertion...

Color Smart Multifunction Printer User Guide
Page 381
Cleaning the Raster Optical Scanner (ROS) Window To prevent deterioration of printing quality due to stains inside the printer, clean inside the printer regularly by using the cleaning rod whenever you replace drum cartridges. 1 Open the right side cover. 2 Turn the waste toner box lock lever 90-degrees counterclockwise to unlock the waste toner box. 3 Grasp the handle on the waste toner box and pull it out making sure to hold it upright so that the waste toner does not spill out. Maintaining Your Printer | 381
Cleaning the Raster Optical Scanner (ROS) Window To prevent deterioration of printing quality due to stains inside the printer, clean inside the printer regularly by using the cleaning rod whenever you replace drum cartridges. 1 Open the right side cover. 2 Turn the waste toner box lock lever 90-degrees counterclockwise to unlock the waste toner box. 3 Grasp the handle on the waste toner box and pull it out making sure to hold it upright so that the waste toner does not spill out. Maintaining Your Printer | 381

Color Smart Multifunction Printer User Guide
Page 427
... problem? 5 Replace the drum cartridges. Does this solve your problem? 9 Replace the toner cartridge (C). Does this solve your problem? 2 Replace the transfer belt unit, the 2nd BTR, and the retard roller. Does this solve your problem? 4 Replace the waste toner box. The task is complete... Replace it with a new one .) Noise | 427 Yes No The task is complete. Go to action 7. (The toner cartridge (K) has been damaged. Contact Dell. (The toner cartridge (C) has been damaged. Go to action 3. Replace it with a new one .) The task is complete. The task is complete...
... problem? 5 Replace the drum cartridges. Does this solve your problem? 9 Replace the toner cartridge (C). Does this solve your problem? 2 Replace the transfer belt unit, the 2nd BTR, and the retard roller. Does this solve your problem? 4 Replace the waste toner box. The task is complete... Replace it with a new one .) Noise | 427 Yes No The task is complete. Go to action 7. (The toner cartridge (K) has been damaged. Contact Dell. (The toner cartridge (C) has been damaged. Go to action 3. Replace it with a new one .) The task is complete. The task is complete...


