
Smart Printer User Guide
Page 3
... Reports menu...54 Network/Ports menu...55 Security menu...64 Settings menu...67 Help menu...81 Saving money and the environment 82 Saving paper and toner...82 Saving energy...82 Recycling...85 Securing the printer 86 Using the security lock feature...86 Statement of Volatility...86 Erasing volatile memory...86 Erasing...
... Reports menu...54 Network/Ports menu...55 Security menu...64 Settings menu...67 Help menu...81 Saving money and the environment 82 Saving paper and toner...82 Saving energy...82 Recycling...85 Securing the printer 86 Using the security lock feature...86 Statement of Volatility...86 Erasing volatile memory...86 Erasing...

Smart Printer User Guide
Page 34
.... Thick paper may also require a longer conditioning period. Paper characteristics The following paper characteristics affect print quality and reliability. Curl Curl is too rough, then toner cannot fuse to curl at its original wrapper in its edges. If paper is the tendency for 60-90‑g/m2 (16-24‑lb...
.... Thick paper may also require a longer conditioning period. Paper characteristics The following paper characteristics affect print quality and reliability. Curl Curl is too rough, then toner cannot fuse to curl at its original wrapper in its edges. If paper is the tendency for 60-90‑g/m2 (16-24‑lb...

Smart Printer User Guide
Page 35
...; Do not mix paper sizes, types, or weights in doubt, contact the paper supplier. Use inks that are specifically designed for use in toner. This content provides the paper with rough or heavily textured surfaces. Selecting preprinted forms and letterhead Use these forms: • Coated papers (erasable bond), synthetic...
...; Do not mix paper sizes, types, or weights in doubt, contact the paper supplier. Use inks that are specifically designed for use in toner. This content provides the paper with rough or heavily textured surfaces. Selecting preprinted forms and letterhead Use these forms: • Coated papers (erasable bond), synthetic...

Smart Printer User Guide
Page 36
... the printer. • Thickness (impacts how much can be loaded into a tray) • Surface roughness (measured in Sheffield units, impacts print clarity and how well toner fuses to the paper) • Surface friction (determines how easily sheets can be separated) • Grain and formation (impacts curling, which also in an environmentally...
... the printer. • Thickness (impacts how much can be loaded into a tray) • Surface roughness (measured in Sheffield units, impacts print clarity and how well toner fuses to the paper) • Surface friction (determines how easily sheets can be separated) • Grain and formation (impacts curling, which also in an environmentally...
Smart Printer User Guide
Page 38
...;kPa (25‑psi) pressure without sealing, excessive curling, wrinkling, or releasing hazardous emissions. - Adhesive material contaminates the printer and could void the printer and toner cartridge warranties. • Do not use labels with the manufacturer or vendor to Rough in a jam. Paper and specialty media guide 38 Tips on using...
...;kPa (25‑psi) pressure without sealing, excessive curling, wrinkling, or releasing hazardous emissions. - Adhesive material contaminates the printer and could void the printer and toner cartridge warranties. • Do not use labels with the manufacturer or vendor to Rough in a jam. Paper and specialty media guide 38 Tips on using...

Smart Printer User Guide
Page 42
... print job type. 4 If necessary, assign a user name. 5 Send the print job. 6 From the printer home screen, select Held Jobs. Adjusting toner darkness Using the Embedded Web Server 1 Open a Web browser, and then type the IP address of numbers separated by periods, such as 123.123.123... you are using a proxy server, then temporarily disable it to load the Web page correctly. 2 Click Settings > Print Settings > Quality Menu > Toner Darkness. 3 Adjust the toner darkness, and then click Submit. Note: The Change Options setting is not available for the Held Jobs function. 7 Send the print job.
... print job type. 4 If necessary, assign a user name. 5 Send the print job. 6 From the printer home screen, select Held Jobs. Adjusting toner darkness Using the Embedded Web Server 1 Open a Web browser, and then type the IP address of numbers separated by periods, such as 123.123.123... you are using a proxy server, then temporarily disable it to load the Web page correctly. 2 Click Settings > Print Settings > Quality Menu > Toner Darkness. 3 Adjust the toner darkness, and then click Submit. Note: The Change Options setting is not available for the Held Jobs function. 7 Send the print job.

Smart Printer User Guide
Page 43
... wireless network. Printing 43 Using the printer control panel 1 From the printer control panel, navigate to: > Settings > > Print Settings > > Quality Menu > 2 Adjust the toner darkness, and then press . > Toner Darkness Printing from a mobile device Note: Make sure that allows enabled applications on mobile devices to print to any Mopria‑certifi...
... wireless network. Printing 43 Using the printer control panel 1 From the printer control panel, navigate to: > Settings > > Print Settings > > Quality Menu > 2 Adjust the toner darkness, and then press . > Toner Darkness Printing from a mobile device Note: Make sure that allows enabled applications on mobile devices to print to any Mopria‑certifi...

Smart Printer User Guide
Page 73
... orientation. Print a border when using Paper Saver. Note: None is the factory default setting. • Selecting a smaller number can help conserve toner. Notes: • Off is the factory default setting. • The number selected is the factory default setting. Specify the positioning of multiple&#... Print Resolution 300 dpi 600 dpi 1200 dpi 1200 Image Q 2400 Image Q Pixel Boost Off Fonts Horizontally Vertically Both directions Toner Darkness 1-10 To Print multiple‑page images on the number of a multiple‑page document. The printer chooses between portrait and ...
... orientation. Print a border when using Paper Saver. Note: None is the factory default setting. • Selecting a smaller number can help conserve toner. Notes: • Off is the factory default setting. • The number selected is the factory default setting. Specify the positioning of multiple&#... Print Resolution 300 dpi 600 dpi 1200 dpi 1200 Image Q 2400 Image Q Pixel Boost Off Fonts Horizontally Vertically Both directions Toner Darkness 1-10 To Print multiple‑page images on the number of a multiple‑page document. The printer chooses between portrait and ...

Smart Printer User Guide
Page 74
.... Note: Auto is the factory default setting. Adjust the contrast of printed objects. Notes: • Off is the factory default setting. • You can conserve toner by lightening or darkening it. To Print a page containing information on errors, including XML markup errors. Note: Off is the factory default setting. Disable the...
.... Note: Auto is the factory default setting. Adjust the contrast of printed objects. Notes: • Off is the factory default setting. • You can conserve toner by lightening or darkening it. To Print a page containing information on errors, including XML markup errors. Note: Off is the factory default setting. Disable the...

Smart Printer User Guide
Page 82
Saving money and the environment 82 Saving money and the environment Saving paper and toner Studies show that as much as printing on both sides of the paper and printing multiple pages on one or more information, see "Avoiding jams" ... model supports two‑sided printing, then you can significantly reduce your printer's environmental impact. 1 From the printer control panel, navigate to www.dell.com/support. You can quickly save paper and energy using recycled paper and the following printing suggestions, such as eighty percent of the carbon footprint...
Saving money and the environment 82 Saving money and the environment Saving paper and toner Studies show that as much as printing on both sides of the paper and printing multiple pages on one or more information, see "Avoiding jams" ... model supports two‑sided printing, then you can significantly reduce your printer's environmental impact. 1 From the printer control panel, navigate to www.dell.com/support. You can quickly save paper and energy using recycled paper and the following printing suggestions, such as eighty percent of the carbon footprint...

Smart Printer User Guide
Page 89
... • Temperatures above 35°C (95°F) • High humidity above 80% • Salty air • Corrosive gases • Heavy dust Replacing supplies Replacing the toner cartridge 1 Press the button on the Start menu to use them. Maintaining the printer 89 Ordering supplies Ordering supplies using Printer Home 1 Use the Search... side of the printer, and then open the front door. Store supplies right side up in their original packing until you are ready to locate Dell Printer Home. 2 Open the application, and then click Maintenance > Order supplies.
... • Temperatures above 35°C (95°F) • High humidity above 80% • Salty air • Corrosive gases • Heavy dust Replacing supplies Replacing the toner cartridge 1 Press the button on the Start menu to use them. Maintaining the printer 89 Ordering supplies Ordering supplies using Printer Home 1 Use the Search... side of the printer, and then open the front door. Store supplies right side up in their original packing until you are ready to locate Dell Printer Home. 2 Open the application, and then click Maintenance > Order supplies.
Smart Printer User Guide
Page 90
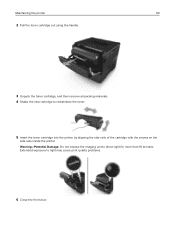
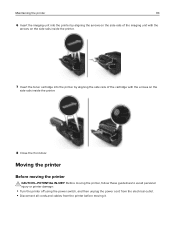
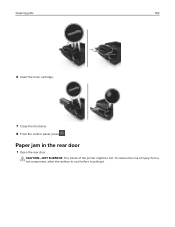
Maintaining the printer 90 2 Pull the toner cartridge out using the handle. 3 Unpack the toner cartridge, and then remove all packing materials. 4 Shake the new cartridge to direct light for more than 10 minutes. Warning-Potential Damage: Do not expose the imaging unit to redistribute the toner. 5 Insert the toner cartridge into the printer by aligning the side rails of the cartridge with the arrows on the side rails inside the printer. Extended exposure to light may cause print quality problems. 6 Close the front door.
Maintaining the printer 90 2 Pull the toner cartridge out using the handle. 3 Unpack the toner cartridge, and then remove all packing materials. 4 Shake the new cartridge to direct light for more than 10 minutes. Warning-Potential Damage: Do not expose the imaging unit to redistribute the toner. 5 Insert the toner cartridge into the printer by aligning the side rails of the cartridge with the arrows on the side rails inside the printer. Extended exposure to light may cause print quality problems. 6 Close the front door.
Smart Printer User Guide
Page 91
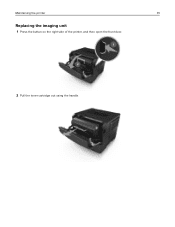
Maintaining the printer 91 Replacing the imaging unit 1 Press the button on the right side of the printer, and then open the front door. 2 Pull the toner cartridge out using the handle.
Maintaining the printer 91 Replacing the imaging unit 1 Press the button on the right side of the printer, and then open the front door. 2 Pull the toner cartridge out using the handle.
Smart Printer User Guide
Page 93
... printer by aligning the arrows on the side rails of the imaging unit with the arrows on the side rails inside the printer. 7 Insert the toner cartridge into the printer by aligning the side rails of the cartridge with the arrows on the side rails inside the printer. 8 Close the front...
... printer by aligning the arrows on the side rails of the imaging unit with the arrows on the side rails inside the printer. 7 Insert the toner cartridge into the printer by aligning the side rails of the cartridge with the arrows on the side rails inside the printer. 8 Close the front...
Smart Printer User Guide
Page 95
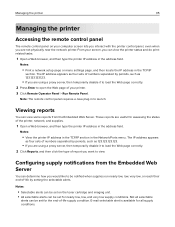
... plug‑in the address field. Managing the printer 95 Managing the printer Accessing the remote control panel The remote control panel on the toner cartridge and imaging unit. • All selectable alerts can be set for the end‑of‑life supply condition. These reports are using a proxy...
... plug‑in the address field. Managing the printer 95 Managing the printer Accessing the remote control panel The remote control panel on the toner cartridge and imaging unit. • All selectable alerts can be set for the end‑of‑life supply condition. These reports are using a proxy...

Smart Printer User Guide
Page 100
To reduce the risk of the printer might be hot. Clearing jams 100 Paper jam in the front door CAUTION-HOT SURFACE: The inside of injury from a hot component, allow the surface to cool before touching it. 1 Open the front door. 2 Remove the toner cartridge.
To reduce the risk of the printer might be hot. Clearing jams 100 Paper jam in the front door CAUTION-HOT SURFACE: The inside of injury from a hot component, allow the surface to cool before touching it. 1 Open the front door. 2 Remove the toner cartridge.
Smart Printer User Guide
Page 102
To reduce the risk of the printer might be hot. CAUTION-HOT SURFACE: The inside of injury from a hot component, allow the surface to cool before touching it. Paper jam in the rear door 1 Open the rear door. Clearing jams 102 6 Insert the toner cartridge. 7 Close the front door. 8 From the control panel, press .
To reduce the risk of the printer might be hot. CAUTION-HOT SURFACE: The inside of injury from a hot component, allow the surface to cool before touching it. Paper jam in the rear door 1 Open the rear door. Clearing jams 102 6 Insert the toner cartridge. 7 Close the front door. 8 From the control panel, press .
Smart Printer User Guide
Page 110
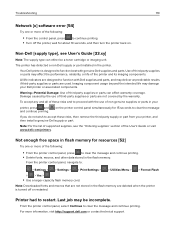
... card. Warning-Potential Damage: Use of third-party supplies or parts are deleted when the printer is designed to function best with genuine Dell supplies and parts. Damage caused by the warranty. From the printer control panel, navigate to restart. Use of third-party supplies or ...parts may be a toner cartridge or imaging unit. Last job may affect the performance, reliability, or life of the User's Guide or visit www.dell.com/printers. From the printer control panel, select Continue to accept these risks ...
... card. Warning-Potential Damage: Use of third-party supplies or parts are deleted when the printer is designed to function best with genuine Dell supplies and parts. Damage caused by the warranty. From the printer control panel, navigate to restart. Use of third-party supplies or ...parts may be a toner cartridge or imaging unit. Last job may affect the performance, reliability, or life of the User's Guide or visit www.dell.com/printers. From the printer control panel, select Continue to accept these risks ...
Smart Printer User Guide
Page 112
Troubleshooting 112 Note: If the error message remains, then the flash memory device may need to order a toner cartridge. If necessary, press and continue printing. Cartridge low [88.xy] You may be defective and need to be replaced. Cartridge very low, [x] estimated ...the printer back on the printer control panel to clear the message and continue printing. Imaging unit low [84.xy] You may need to replace a toner cartridge very soon. For more information, see the "Replacing supplies" section of the printer. Close front door Close the front door of the User's Guide...
Troubleshooting 112 Note: If the error message remains, then the flash memory device may need to order a toner cartridge. If necessary, press and continue printing. Cartridge low [88.xy] You may be defective and need to be replaced. Cartridge very low, [x] estimated ...the printer back on the printer control panel to clear the message and continue printing. Imaging unit low [84.xy] You may need to replace a toner cartridge very soon. For more information, see the "Replacing supplies" section of the printer. Close front door Close the front door of the User's Guide...
Smart Printer User Guide
Page 114
...reinstalling the supply, then the cartridge is defective. For more information, see the instruction sheet that tray. If missing, install the toner cartridge. Replace the toner cartridge. Memory full [38] Try one or more of the following: • From the printer control panel, press •... you purchased the printer. For information on installing the cartridge, see the "Replacing supplies" section of the User's Guide. • If the toner cartridge is missing. Troubleshooting 114 Load [paper source] with [paper type] [paper size] [orientation] Try one or more of the following: ...
...reinstalling the supply, then the cartridge is defective. For more information, see the instruction sheet that tray. If missing, install the toner cartridge. Replace the toner cartridge. Memory full [38] Try one or more of the following: • From the printer control panel, press •... you purchased the printer. For information on installing the cartridge, see the "Replacing supplies" section of the User's Guide. • If the toner cartridge is missing. Troubleshooting 114 Load [paper source] with [paper type] [paper size] [orientation] Try one or more of the following: ...


