
Users Guide
Page 77
...the tiles of the print functions. (Scan) Button Displays the tiles of the scan functions. (Fax) Button Displays the tile of parts, see "Operator Panel." NOTE: • To display the Home screen, register at the portal screen beforehand and log in to ...the Operator Panel | 77 For details about names of the fax functions. (Tools) Button Displays the Information screen. NOTE: • The screenshots used . Dell H625cdw/Dell H825cdw 1 2 3 45 6 Dell S2825cdn 1 23 6 Home Guest 7 Home Guest 7 8 8 1 Dock Menu (Recent) Button Displays the tiles of a touch panel, a Ready/Error ...
...the tiles of the print functions. (Scan) Button Displays the tiles of the scan functions. (Fax) Button Displays the tile of parts, see "Operator Panel." NOTE: • To display the Home screen, register at the portal screen beforehand and log in to ...the Operator Panel | 77 For details about names of the fax functions. (Tools) Button Displays the Information screen. NOTE: • The screenshots used . Dell H625cdw/Dell H825cdw 1 2 3 45 6 Dell S2825cdn 1 23 6 Home Guest 7 Home Guest 7 8 8 1 Dock Menu (Recent) Button Displays the tiles of a touch panel, a Ready/Error ...

Users Guide
Page 106
... the first page of every copy and after the last page of every copy. Inserted before canceling a job that is printed on DL size paper, a part of a different size when the paper that stops abnormally. Off Larger Size Nearest Size Use MPF No tray size substitute accepted. Inserted after the last...
... the first page of every copy and after the last page of every copy. Inserted before canceling a job that is printed on DL size paper, a part of a different size when the paper that stops abnormally. Off Larger Size Nearest Size Use MPF No tray size substitute accepted. Inserted after the last...

Users Guide
Page 107
... Settings > A4Letter Switch Specifies whether to enable the A4Letter Switch feature. If you select another paper tray when paper runs out in the job, the parts that are larger than the paper size specified in the specified paper tray. This feature deletes print job after recovering from paper jam. ❚ Admin...
... Settings > A4Letter Switch Specifies whether to enable the A4Letter Switch feature. If you select another paper tray when paper runs out in the job, the parts that are larger than the paper size specified in the specified paper tray. This feature deletes print job after recovering from paper jam. ❚ Admin...

Users Guide
Page 109
... Density Specifies paper density settings. ❚ Admin Settings > Maintenance > Adjust Transfer Belt Unit Adjusts the transfer bias when the faint image of the previous page, a part of the fusing unit for this item. For details about the setting values, see "Adjust Fusing Unit." ❚ Admin Settings > Maintenance > Color Reg Adjust Auto...
... Density Specifies paper density settings. ❚ Admin Settings > Maintenance > Adjust Transfer Belt Unit Adjusts the transfer bias when the faint image of the previous page, a part of the fusing unit for this item. For details about the setting values, see "Adjust Fusing Unit." ❚ Admin Settings > Maintenance > Color Reg Adjust Auto...

Users Guide
Page 129
When Use Printer Driver Settings is set in MPF Configuration of copies from the Multipurpose Feeder (MPF). If you select Off(No Scaling), the parts that do not fit are not printed (print size is not adjusted automatically). ❚ Print PDF/TIFF / Print JPEG > Print Settings > Image Types Sets the ...
When Use Printer Driver Settings is set in MPF Configuration of copies from the Multipurpose Feeder (MPF). If you select Off(No Scaling), the parts that do not fit are not printed (print size is not adjusted automatically). ❚ Print PDF/TIFF / Print JPEG > Print Settings > Image Types Sets the ...

Users Guide
Page 156
...Belt Unit, Adjust 2nd BTR, Adjust Fusing Unit, Color Registration Adjustments, Clean Developer, Reset Defaults, Initialize Print Meter, Clear Stored Jobs, Non-Dell Toner, Adjust Altitude, Clock Settings, and Web Link Customization pages. Paper Density Specifies the paper density for this item. Adjust Transfer Belt Unit... Adjusts the transfer bias when the faint image of the previous page, a part of the page currently printing, etc. Adjust 2nd BTR Specifies the optimum voltage settings for printing for the 2nd Belt Transfer Roller (2nd...
...Belt Unit, Adjust 2nd BTR, Adjust Fusing Unit, Color Registration Adjustments, Clean Developer, Reset Defaults, Initialize Print Meter, Clear Stored Jobs, Non-Dell Toner, Adjust Altitude, Clock Settings, and Web Link Customization pages. Paper Density Specifies the paper density for this item. Adjust Transfer Belt Unit... Adjusts the transfer bias when the faint image of the previous page, a part of the page currently printing, etc. Adjust 2nd BTR Specifies the optimum voltage settings for printing for the 2nd Belt Transfer Roller (2nd...

Users Guide
Page 191
...a registration (the precise print location on the page) greater than 25 percent post-consumer waste that does not meet DIN 19309 • Multiple-part forms or documents • Talc or acid paper that does not support printing on these forms. • Erasable bond, synthetic paper, and... preset the paper density by selecting the Paper Density (Light or Normal) under Maintenance from the operator panel, Tool Box, or Dell Printer Configuration Web Tool. Supported Paper Weight Paper type Plain Plain Thick Recycled Labels Covers Covers Thick Envelope Coated Coated Thick Letterhead Preprinted...
...a registration (the precise print location on the page) greater than 25 percent post-consumer waste that does not meet DIN 19309 • Multiple-part forms or documents • Talc or acid paper that does not support printing on these forms. • Erasable bond, synthetic paper, and... preset the paper density by selecting the Paper Density (Light or Normal) under Maintenance from the operator panel, Tool Box, or Dell Printer Configuration Web Tool. Supported Paper Weight Paper type Plain Plain Thick Recycled Labels Covers Covers Thick Envelope Coated Coated Thick Letterhead Preprinted...

Users Guide
Page 196
... the paper guides according to the paper size that you load Legal-size paper, extend the tray while pushing the lever located on the front part of the stack on a level surface. 4 Load the print media into the tray with the recommended print side facing up. Overfilling the tray may cause...
... the paper guides according to the paper size that you load Legal-size paper, extend the tray while pushing the lever located on the front part of the stack on a level surface. 4 Load the print media into the tray with the recommended print side facing up. Overfilling the tray may cause...

Users Guide
Page 197
... it stops. NOTE: • Overtightening the guides may cause jams. • When loading user-specified print media, adjust the width guides and slide the extendable part of the tray by pinching the length guide and sliding it until it rests lightly against the edge of the print media stack. 5 Make sure...
... it stops. NOTE: • Overtightening the guides may cause jams. • When loading user-specified print media, adjust the width guides and slide the extendable part of the tray by pinching the length guide and sliding it until it rests lightly against the edge of the print media stack. 5 Make sure...

Users Guide
Page 332
...print media packages. WARNING: • Never throw a toner cartridge into an open flame. You can order cartridges online at www.dell.com/supplies or by Dell. CAUTION: • Do not shake the used toner cartridge. Shaking the cartridge may catch fire or explode, causing burns and...Do not place anything on top of time • An environment where corrosive gases are available only through Dell. Dell does not provide warranty coverage for problems caused by using accessories, parts, or components not supplied by phone. For details about how to spill out. Removing the Toner Cartridge ...
...print media packages. WARNING: • Never throw a toner cartridge into an open flame. You can order cartridges online at www.dell.com/supplies or by Dell. CAUTION: • Do not shake the used toner cartridge. Shaking the cartridge may catch fire or explode, causing burns and...Do not place anything on top of time • An environment where corrosive gases are available only through Dell. Dell does not provide warranty coverage for problems caused by using accessories, parts, or components not supplied by phone. For details about how to spill out. Removing the Toner Cartridge ...

Users Guide
Page 336
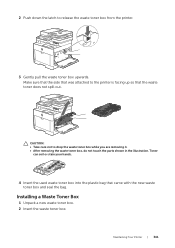
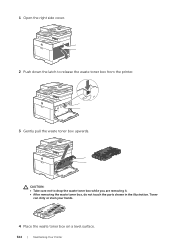
CAUTION: • Take care not to the printer face down. CAUTION: • Never let the side that was attached to drop the waste toner box while you are removing it. • After removing the waste toner box, do not touch the parts shown in the illustration. This may get dirty or stained with toner. 4 Place the waste toner box on a level surface. Your hands may cause the toner to the printer facing up. 3 Gently pull the waste toner box upwards. Always keep the side that was attached to spill out. 336 | Maintaining Your Printer
CAUTION: • Take care not to the printer face down. CAUTION: • Never let the side that was attached to drop the waste toner box while you are removing it. • After removing the waste toner box, do not touch the parts shown in the illustration. This may get dirty or stained with toner. 4 Place the waste toner box on a level surface. Your hands may cause the toner to the printer facing up. 3 Gently pull the waste toner box upwards. Always keep the side that was attached to spill out. 336 | Maintaining Your Printer
Users Guide
Page 339
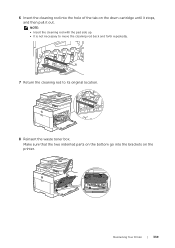
Make sure that the two indented parts on the bottom go into the hole of the tab on the printer. Y M C K Maintaining Your Printer | 339 NOTE: • Insert the cleaning rod with the pad side up. • It is not necessary to move the cleaning rod back and forth repeatedly. 7 Return the cleaning rod to its original location. 8 Reinsert the waste toner box. 6 Insert the cleaning rod into the brackets on the drum cartridge until it stops, and then pull it out.
Make sure that the two indented parts on the bottom go into the hole of the tab on the printer. Y M C K Maintaining Your Printer | 339 NOTE: • Insert the cleaning rod with the pad side up. • It is not necessary to move the cleaning rod back and forth repeatedly. 7 Return the cleaning rod to its original location. 8 Reinsert the waste toner box. 6 Insert the cleaning rod into the brackets on the drum cartridge until it stops, and then pull it out.
Users Guide
Page 341
... that was attached to drop the waste toner box while you are removing it. • After removing the waste toner box, do not touch the parts shown in the illustration. Make sure that the side that came with the new waste toner box and seal the bag. 2 Push down the latch...
... that was attached to drop the waste toner box while you are removing it. • After removing the waste toner box, do not touch the parts shown in the illustration. Make sure that the side that came with the new waste toner box and seal the bag. 2 Push down the latch...
Users Guide
Page 342
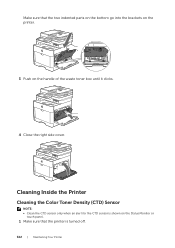
Cleaning Inside the Printer Cleaning the Color Toner Density (CTD) Sensor NOTE: • Clean the CTD sensor only when an alert for the CTD sensor is turned off. 342 | Maintaining Your Printer Make sure that the printer is shown on the Status Monitor or touch panel. 1 Make sure that the two indented parts on the bottom go into the brackets on the handle of the waste toner box until it clicks. 4 Close the right side cover. Y M C K 3 Push on the printer.
Cleaning Inside the Printer Cleaning the Color Toner Density (CTD) Sensor NOTE: • Clean the CTD sensor only when an alert for the CTD sensor is turned off. 342 | Maintaining Your Printer Make sure that the printer is shown on the Status Monitor or touch panel. 1 Make sure that the two indented parts on the bottom go into the brackets on the handle of the waste toner box until it clicks. 4 Close the right side cover. Y M C K 3 Push on the printer.
Users Guide
Page 344
CAUTION: • Take care not to release the waste toner box from the printer. 3 Gently pull the waste toner box upwards. Toner can dirty or stain your hands. 4 Place the waste toner box on a level surface. 344 | Maintaining Your Printer 1 Open the right side cover. 2 Push down the latch to drop the waste toner box while you are removing it. • After removing the waste toner box, do not touch the parts shown in the illustration.
CAUTION: • Take care not to release the waste toner box from the printer. 3 Gently pull the waste toner box upwards. Toner can dirty or stain your hands. 4 Place the waste toner box on a level surface. 344 | Maintaining Your Printer 1 Open the right side cover. 2 Push down the latch to drop the waste toner box while you are removing it. • After removing the waste toner box, do not touch the parts shown in the illustration.

Users Guide
Page 346
Y M C K 10 Push on the printer. 7 Repeat step 6 for the other three holes. 8 Return the cleaning rod to its original location. 9 Insert the waste toner box. Make sure that the two indented parts on the bottom go into the brackets on the handle of the waste toner box until it clicks. 346 | Maintaining Your Printer
Y M C K 10 Push on the printer. 7 Repeat step 6 for the other three holes. 8 Return the cleaning rod to its original location. 9 Insert the waste toner box. Make sure that the two indented parts on the bottom go into the brackets on the handle of the waste toner box until it clicks. 346 | Maintaining Your Printer

Users Guide
Page 360
Clearing Paper Jams From the Fusing Unit 1 Pull up the handle lever of the rear cover, and then open the rear cover. 2 Remove the jammed paper from below the fusing unit. 3 Pull the tab that is located above the fusing unit and hold the part open. 4 Remove the jammed paper. 360 | Troubleshooting
Clearing Paper Jams From the Fusing Unit 1 Pull up the handle lever of the rear cover, and then open the rear cover. 2 Remove the jammed paper from below the fusing unit. 3 Pull the tab that is located above the fusing unit and hold the part open. 4 Remove the jammed paper. 360 | Troubleshooting

Users Guide
Page 361
Troubleshooting | 361 5 Gently release the tab and close the part. 6 Close the rear cover. Clearing Paper Jams From Between the Rollers 1 Pull up the handle lever of the rear cover and open the rear cover. 2 Remove the jammed paper.
Troubleshooting | 361 5 Gently release the tab and close the part. 6 Close the rear cover. Clearing Paper Jams From Between the Rollers 1 Pull up the handle lever of the rear cover and open the rear cover. 2 Remove the jammed paper.

Users Guide
Page 373
... 373 If the problem persists, proceed to step 2. If the location of the problem is black. a Start the Tool Box on Dell Printer Hub or Dell Printer Management Tool. Equally Spaced Colored Dots Problem The printout has equally spaced colored dots Action 1 Locate the cause of the problem. c...Management Tool, and then click Chart Print on the Diagnosis tab. b Click Chart Print on the Diagnosis tab. Problem Part or the entire printout is not located, contact Dell. 2 Replace the drum cartridges. b Click Chart Print on the Pitch Configuration Chart, and then locate the cause of...
... 373 If the problem persists, proceed to step 2. If the location of the problem is black. a Start the Tool Box on Dell Printer Hub or Dell Printer Management Tool. Equally Spaced Colored Dots Problem The printout has equally spaced colored dots Action 1 Locate the cause of the problem. c...Management Tool, and then click Chart Print on the Diagnosis tab. b Click Chart Print on the Diagnosis tab. Problem Part or the entire printout is not located, contact Dell. 2 Replace the drum cartridges. b Click Chart Print on the Pitch Configuration Chart, and then locate the cause of...

Users Guide
Page 395
... through Software & Peripherals (DellWare), ReadyWare, and Custom Factory Integration (CFI/DellPlus). Dell provides limited technical support for third-party software and peripherals is available at Dell Support. For details about the Dell warranty for purchase. Potential methods include reuse of parts or whole products and recycling of products, components, and/or materials. Additional technical...
... through Software & Peripherals (DellWare), ReadyWare, and Custom Factory Integration (CFI/DellPlus). Dell provides limited technical support for third-party software and peripherals is available at Dell Support. For details about the Dell warranty for purchase. Potential methods include reuse of parts or whole products and recycling of products, components, and/or materials. Additional technical...


