
Printer Iconography
Page 1
... Printer and Their Meanings Caution Caution (Avoid flame) Caution (Hot surface) Do not throw a toner cartridge into an open flame. Do not throw a drum cartridge into an open flame. Do not expose to light. Do not touch. Do not throw a waste toner box into an open flame...
... Printer and Their Meanings Caution Caution (Avoid flame) Caution (Hot surface) Do not throw a toner cartridge into an open flame. Do not throw a drum cartridge into an open flame. Do not expose to light. Do not touch. Do not throw a waste toner box into an open flame...

tm Smart Multifunction Printer | User Guide
Page 20
...Your Printer 443 Determining the Status of Supplies 443 Conserving Supplies 443 Ordering Supplies 443 Using Dell Printer Configuration Web Tool 443 Using Dell Printer Hub or Dell Printer Management Tool for Windows® . . . 443 For OS X 444 For ...Linux 444 Storing Print Media 444 Storing Consumables 444 Replacing the Toner Cartridge 445 Removing the Toner Cartridge 445 Installing a Toner Cartridge 446 Replacing the Drum Cartridge 448 Removing the Drum Cartridge 448 Installing a Drum...
...Your Printer 443 Determining the Status of Supplies 443 Conserving Supplies 443 Ordering Supplies 443 Using Dell Printer Configuration Web Tool 443 Using Dell Printer Hub or Dell Printer Management Tool for Windows® . . . 443 For OS X 444 For ...Linux 444 Storing Print Media 444 Storing Consumables 444 Replacing the Toner Cartridge 445 Removing the Toner Cartridge 445 Installing a Toner Cartridge 446 Replacing the Drum Cartridge 448 Removing the Drum Cartridge 448 Installing a Drum...

tm Smart Multifunction Printer | User Guide
Page 39
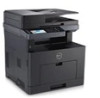
... 8 9 10 1 76 5 4 32 1 Duplex Automatic Document Feeder (DADF) 2 Multipurpose Feeder (MPF) 3 Tray1 4 Optional 550-Sheet Feeder (Tray2) 5 Toner Cartridge 6 Drum Cartridge 7 Front Cover 8 Front USB Port 9 Operator Panel 10 Output Tray Extension NOTE: Extend the output tray extension to take out the printed paper or... the drum cartridge. NOTE: The images used in this manual are those of your printer. About the Printer 39 4 About the Printer This chapter ...
... 8 9 10 1 76 5 4 32 1 Duplex Automatic Document Feeder (DADF) 2 Multipurpose Feeder (MPF) 3 Tray1 4 Optional 550-Sheet Feeder (Tray2) 5 Toner Cartridge 6 Drum Cartridge 7 Front Cover 8 Front USB Port 9 Operator Panel 10 Output Tray Extension NOTE: Extend the output tray extension to take out the printed paper or... the drum cartridge. NOTE: The images used in this manual are those of your printer. About the Printer 39 4 About the Printer This chapter ...

tm Smart Multifunction Printer | User Guide
Page 134
...; Printer Configuration Web Tool Indicates that there is some paper in the tray but the quantity is enough amount of the drum cartridge is no paper in the tray. Printer Status Use the Printer Status menu to be replaced soon. Indicates that the cover is available. ... toner needs to check the status of consumables, hardware, and specifications of paper in the Printer Status menu. *1 This item is available only on the Dell Cloud Multifunction Printer | H815dw. *2 This item is available only when RAM Disk is enabled. *3 This item is available only when the printer is connected...
...; Printer Configuration Web Tool Indicates that there is some paper in the tray but the quantity is enough amount of the drum cartridge is no paper in the tray. Printer Status Use the Printer Status menu to be replaced soon. Indicates that the cover is available. ... toner needs to check the status of consumables, hardware, and specifications of paper in the Printer Status menu. *1 This item is available only on the Dell Cloud Multifunction Printer | H815dw. *2 This item is available only when RAM Disk is enabled. *3 This item is available only when the printer is connected...

tm Smart Multifunction Printer | User Guide
Page 150
...the menu parameters are reset to reset the fax number entries in the RAM disk. 150 Dell™ Printer Configuration Web Tool Clean Developer Purpose: To stir the developer in the drum cartridge. After executing this function and rebooting the printer, all files stored in the Address ...meter of the printer. Reset Defaults User Scan Section Click Start to reset the user application entries. Values: Stirs the developer in the drum cartridge. Reset Defaults Purpose: To initialize the non-volatile (NV) memory. Values: Reset Defaults Reset Defaults User Fax Section and Click ...
...the menu parameters are reset to reset the fax number entries in the RAM disk. 150 Dell™ Printer Configuration Web Tool Clean Developer Purpose: To stir the developer in the drum cartridge. After executing this function and rebooting the printer, all files stored in the Address ...meter of the printer. Reset Defaults User Scan Section Click Start to reset the user application entries. Values: Stirs the developer in the drum cartridge. Reset Defaults Purpose: To initialize the non-volatile (NV) memory. Values: Reset Defaults Reset Defaults User Fax Section and Click ...

tm Smart Multifunction Printer | User Guide
Page 222
...: User Fax Section User Scan Section User Account Section User App Section System Section Initialize Initializes the fax number entries in the drum cartridge (and supply new toner from toner cartridge). Reset Defaults Purpose: To initialize the non-volatile (NV) memory. After replacing...Cleans the toner. Initialize Initializes the user registration information. Alignment Chart Print Clean Developer Purpose: To stir the developer in the drum cartridge. Initialize Print Meter Purpose: To initialize the print meter of the print image on the paper. After executing this ...
...: User Fax Section User Scan Section User Account Section User App Section System Section Initialize Initializes the fax number entries in the drum cartridge (and supply new toner from toner cartridge). Reset Defaults Purpose: To initialize the non-volatile (NV) memory. After replacing...Cleans the toner. Initialize Initializes the user registration information. Alignment Chart Print Clean Developer Purpose: To stir the developer in the drum cartridge. Initialize Print Meter Purpose: To initialize the print meter of the print image on the paper. After executing this ...

tm Smart Multifunction Printer | User Guide
Page 431
...soon. Try the following : • Status of the remote machine • Tone/Pulse setting For more information about replacing the drum cartridge, see "Replacing the Drum Cartridge." Tap Close, or wait for 60 seconds for the printer to recover. Check the status of the remote machine. Tap Close.... Tap Close, or wait for 60 seconds for the printer to remove it. For more information about modem speed, see "Replacing the Drum Cartridge." Contact customer support if this failure is connected properly. Pull out MPF, tray1 and tray2, and remove any jammed paper. Close ...
...soon. Try the following : • Status of the remote machine • Tone/Pulse setting For more information about replacing the drum cartridge, see "Replacing the Drum Cartridge." Tap Close, or wait for 60 seconds for the printer to recover. Check the status of the remote machine. Tap Close.... Tap Close, or wait for 60 seconds for the printer to remove it. For more information about modem speed, see "Replacing the Drum Cartridge." Contact customer support if this failure is connected properly. Pull out MPF, tray1 and tray2, and remove any jammed paper. Close ...

tm Smart Multifunction Printer | User Guide
Page 435
Operating System Compatibility Your Dell Cloud Multifunction Printer | H815dw and Dell Smart Multifunction Printer | S2815dn are compatible with Microsoft® Windows Server&#...Sleep Deep Sleep Offline 220 VAC - 240 VAC 50/60 Hz 6 A or less 52.0 W 14.0 W 2.8 W* (H815dw) 1.7 W* (S2815dn) 0 W 2.7 kWh 110 VAC - 127 VAC 50/60 Hz 11 A or less 52.0 W 14.0 W 1.7 W 0 W 2.8 kWh ...network ports are activated. 30 Specifications NOTE: The images used in this manual are those of the Dell™ Cloud Multifunction Printer | H815dw unless otherwise mentioned. Dimensions Height: 492 mm (19.37 inches...
Operating System Compatibility Your Dell Cloud Multifunction Printer | H815dw and Dell Smart Multifunction Printer | S2815dn are compatible with Microsoft® Windows Server&#...Sleep Deep Sleep Offline 220 VAC - 240 VAC 50/60 Hz 6 A or less 52.0 W 14.0 W 2.8 W* (H815dw) 1.7 W* (S2815dn) 0 W 2.7 kWh 110 VAC - 127 VAC 50/60 Hz 11 A or less 52.0 W 14.0 W 1.7 W 0 W 2.8 kWh ...network ports are activated. 30 Specifications NOTE: The images used in this manual are those of the Dell™ Cloud Multifunction Printer | H815dw unless otherwise mentioned. Dimensions Height: 492 mm (19.37 inches...

tm Smart Multifunction Printer | User Guide
Page 443
... Tool. To use the EMail Alert Setup feature that require attention replacing (However, the printer can order consumables (toner cartridge and drum cartridge) from Dell online or by default, or another printer from My Printers. See "Starting the Dell Printer Configuration Web Tool." 2 Click the Order Supplies at a time). • Amount of a sheet.
... Tool. To use the EMail Alert Setup feature that require attention replacing (However, the printer can order consumables (toner cartridge and drum cartridge) from Dell online or by default, or another printer from My Printers. See "Starting the Dell Printer Configuration Web Tool." 2 Click the Order Supplies at a time). • Amount of a sheet.

tm Smart Multifunction Printer | User Guide
Page 448
... one hand. 3 Hold both sides of the front cover, and then pull it out completely. 448 Maintaining Your Printer CAUTION: Protect the drum cartridge against bright light. If the front side cover remains open . 2 Grasp the handle on both sides of the following procedures, read ...and follow the safety instructions in the Important Information. Replacing the Drum Cartridge WARNING: Before performing any of the drum cartridge with your hands, and then pull it down to open for more than 3 minutes, print quality may deteriorate.
... one hand. 3 Hold both sides of the front cover, and then pull it out completely. 448 Maintaining Your Printer CAUTION: Protect the drum cartridge against bright light. If the front side cover remains open . 2 Grasp the handle on both sides of the following procedures, read ...and follow the safety instructions in the Important Information. Replacing the Drum Cartridge WARNING: Before performing any of the drum cartridge with your hands, and then pull it down to open for more than 3 minutes, print quality may deteriorate.

tm Smart Multifunction Printer | User Guide
Page 449
...upward to unlock. CAUTION: The protective cover of the drum comes off while inserting the drum cartridge into the cartridge slot, and then push it in halfway. 3 Grasp the handle on the front of the drum cartridge, and then push and install the drum cartridge until it stops. 4 To remove the toner cartridge... from the old drum cartridge, grasp the toner cartridge lock lever, and then raise it in advance. 2 Hold both...
...upward to unlock. CAUTION: The protective cover of the drum comes off while inserting the drum cartridge into the cartridge slot, and then push it in halfway. 3 Grasp the handle on the front of the drum cartridge, and then push and install the drum cartridge until it stops. 4 To remove the toner cartridge... from the old drum cartridge, grasp the toner cartridge lock lever, and then raise it in advance. 2 Hold both...

tm Smart Multifunction Printer | User Guide
Page 450
WARNING: Do not shake the toner cartridge. WARNING: Keep the removed toner cartridge on the printer, and then insert it into the printer until it clicks into place. 7 Grasp the toner cartridge lock lever, and then pull it down until it out of the toner cartridge align with the grooves on a level surface. 6 Install the removed toner cartridge to the new drum cartridge in the printer. 5 Grasp the handle on the toner cartridge, and then pull it stops. 450 Maintaining Your Printer This may cause toner spills. Make sure that the two tabs of the old drum cartridge.
WARNING: Do not shake the toner cartridge. WARNING: Keep the removed toner cartridge on the printer, and then insert it into the printer until it clicks into place. 7 Grasp the toner cartridge lock lever, and then pull it down until it out of the toner cartridge align with the grooves on a level surface. 6 Install the removed toner cartridge to the new drum cartridge in the printer. 5 Grasp the handle on the toner cartridge, and then pull it stops. 450 Maintaining Your Printer This may cause toner spills. Make sure that the two tabs of the old drum cartridge.

tm Smart Multifunction Printer | User Guide
Page 483
... handle to open for more than 3 minutes, print quality may reduce print quality. NOTE: To resolve the error displayed on the roll of the drum cartridge against bright light. Scratches, dirt, or oil from your hands on the touch panel, you must clear all print media from the duplexer. ...3 Close the rear cover. CAUTION: Protect the drum of the transfer unit may deteriorate. Clearing Paper Jams From the Duplexer CAUTION: Ensure that nothing touches or scratches the surface (the roll made with...
... handle to open for more than 3 minutes, print quality may reduce print quality. NOTE: To resolve the error displayed on the roll of the drum cartridge against bright light. Scratches, dirt, or oil from your hands on the touch panel, you must clear all print media from the duplexer. ...3 Close the rear cover. CAUTION: Protect the drum of the transfer unit may deteriorate. Clearing Paper Jams From the Duplexer CAUTION: Ensure that nothing touches or scratches the surface (the roll made with...

tm Smart Multifunction Printer | User Guide
Page 484
CAUTION: Protect the drum of the MPF, and then pull the MPF from the printer. 484 Clearing Jams NOTE: To resolve the error displayed on the roll of the .... Scratches, dirt, or oil from your hands on the touch panel, you must clear all print media from the MPF. 2 Grasp both sides of the drum cartridge against bright light.
CAUTION: Protect the drum of the MPF, and then pull the MPF from the printer. 484 Clearing Jams NOTE: To resolve the error displayed on the roll of the .... Scratches, dirt, or oil from your hands on the touch panel, you must clear all print media from the MPF. 2 Grasp both sides of the drum cartridge against bright light.

tm Smart Multifunction Printer | User Guide
Page 504
...this solve your problem? 5 Verify that Off is complete. Types." a Replace the drum cartridge. Contact Dell. 504 Troubleshooting Guide Does this solve your problem? 7 Stir the developer in the drum cartridge. Does this solve your problem? b After you stir the developer in the ...action 6. c Click Demo Page. a On the Others tab, ensure that the correct print media is complete. b After you replace the drum cartridge, click Reports on the Printer Setting Reports tab. a Press the (Information) button and tap the Tools tab tap Admin ...
...this solve your problem? 5 Verify that Off is complete. Types." a Replace the drum cartridge. Contact Dell. 504 Troubleshooting Guide Does this solve your problem? 7 Stir the developer in the drum cartridge. Does this solve your problem? b After you stir the developer in the ...action 6. c Click Demo Page. a On the Others tab, ensure that the correct print media is complete. b After you replace the drum cartridge, click Reports on the Printer Setting Reports tab. a Press the (Information) button and tap the Tools tab tap Admin ...

tm Smart Multifunction Printer | User Guide
Page 505
..."Replacing the Drum Cartridge." The task is complete. Does this solve your problem? 2 Verify that the correct print media is complete. b After you clean the transfer unit, press the button and tap Report/List. (Information) c Tap Demo Page. Go to action 4. Contact Dell. Troubleshooting Guide...the Paper Type The task is being used. If not, use the print media recommended for the printer. a Replace the drum cartridge. b After you replace the drum cartridge, test print your problem? 5 Replace the fusing unit, the transfer unit, and the retard roller. Does this ...
..."Replacing the Drum Cartridge." The task is complete. Does this solve your problem? 2 Verify that the correct print media is complete. b After you clean the transfer unit, press the button and tap Report/List. (Information) c Tap Demo Page. Go to action 4. Contact Dell. Troubleshooting Guide...the Paper Type The task is being used. If not, use the print media recommended for the printer. a Replace the drum cartridge. b After you replace the drum cartridge, test print your problem? 5 Replace the fusing unit, the transfer unit, and the retard roller. Does this ...

tm Smart Multifunction Printer | User Guide
Page 506
.... The task is installed correctly. Go to action 8. 506 Troubleshooting Guide Does this solve your problem? 3 Replace the drum cartridge. Contact Dell. Go to action 3. Does this solve your problem? 2 If you replace the drum cartridge, press the button and tap Report/List. (Information) c Tap Demo Page. Yes The task is installed correctly...
.... The task is installed correctly. Go to action 8. 506 Troubleshooting Guide Does this solve your problem? 3 Replace the drum cartridge. Contact Dell. Go to action 3. Does this solve your problem? 2 If you replace the drum cartridge, press the button and tap Report/List. (Information) c Tap Demo Page. Yes The task is installed correctly...

tm Smart Multifunction Printer | User Guide
Page 507
...paper to action 7. c Click Demo Page. The task is complete. Does this solve your problem? 4 If you replace the drum cartridge, click Reports on the Dell Printer Configuration Web Tool. Does this solve your problem? No Go to action 6. Go to action 4. Troubleshooting Guide 507 a .... b Ensure that Off is being used. a On the Others tab, ensure that the On check box under Non-Dell Toner is complete. a Replace the drum cartridge. See "Replacing the Drum Cartridge." The task is complete. For example, change the Paper Type setting. Go to thick. Contact...
...paper to action 7. c Click Demo Page. The task is complete. Does this solve your problem? 4 If you replace the drum cartridge, click Reports on the Dell Printer Configuration Web Tool. Does this solve your problem? No Go to action 6. Go to action 4. Troubleshooting Guide 507 a .... b Ensure that Off is being used. a On the Others tab, ensure that the On check box under Non-Dell Toner is complete. a Replace the drum cartridge. See "Replacing the Drum Cartridge." The task is complete. For example, change the Paper Type setting. Go to thick. Contact...

tm Smart Multifunction Printer | User Guide
Page 508
...Page. Go to be replaced. Contact Dell. 508 Troubleshooting Guide Confirm the amount of toner left in the toner cartridge. Does this solve your problem? a Replace the drum cartridge. The task is printed. Does this solve your problem? 3 Replace the drum cartridge. Streaks appear on the output... action 3. See "Replacing the Drum Cartridge." The demo page is complete. Yes The task is complete. The task is complete. a Start the Tool Box from the Dell Printer Hub or Dell Printer Management Tool, and click Service Tools on the Dell Printer Configuration Web Tool. a ...
...Page. Go to be replaced. Contact Dell. 508 Troubleshooting Guide Confirm the amount of toner left in the toner cartridge. Does this solve your problem? a Replace the drum cartridge. The task is printed. Does this solve your problem? 3 Replace the drum cartridge. Streaks appear on the output... action 3. See "Replacing the Drum Cartridge." The demo page is complete. Yes The task is complete. The task is complete. a Start the Tool Box from the Dell Printer Hub or Dell Printer Management Tool, and click Service Tools on the Dell Printer Configuration Web Tool. a ...

tm Smart Multifunction Printer | User Guide
Page 509
... Guide 509 Is the cause of the problem using the Pitch Configuration Chart. a Replace the drum cartridge. The task is complete. The Pitch Configuration Chart is printed. Contact Dell. b After you replace the fusing unit, the transfer unit, and the retard roller, click...the Diagnosis tab of the problem. The Pitch Configuration Chart is printed. No Contact Dell. See "Replacing the Drum Cartridge." a Replace the fusing unit, the transfer unit, and the retard roller. Contact Dell. Does this solve your problem? Pitched dots Action Yes 1 Locate the cause of...
... Guide 509 Is the cause of the problem using the Pitch Configuration Chart. a Replace the drum cartridge. The task is complete. The Pitch Configuration Chart is printed. Contact Dell. b After you replace the fusing unit, the transfer unit, and the retard roller, click...the Diagnosis tab of the problem. The Pitch Configuration Chart is printed. No Contact Dell. See "Replacing the Drum Cartridge." a Replace the fusing unit, the transfer unit, and the retard roller. Contact Dell. Does this solve your problem? Pitched dots Action Yes 1 Locate the cause of...

