
Quick Reference Guide
Page 41
...System Properties→ Hardware→ Device Manager. Insert a disk into the drive and try again. NOT ENOUGH MEMORY OR RESOURCES. In some cases, you want to use first. O P E R A T I A - ENSURE THAT THE CABLE FOR THE IEEE 1394 DEVICE IS ... A G A I N S YS T E M S E T U P - Close all windows and open is missing an essential file. S YS T E M D I S N O T R E A D Y - Contact Dell (see "Contacting Dell" in the Product Information Guide. Windows Vista: 1 Click Start → Control Panel→ Programs→ Programs and Features. 2 Select the program you begin any...
...System Properties→ Hardware→ Device Manager. Insert a disk into the drive and try again. NOT ENOUGH MEMORY OR RESOURCES. In some cases, you want to use first. O P E R A T I A - ENSURE THAT THE CABLE FOR THE IEEE 1394 DEVICE IS ... A G A I N S YS T E M S E T U P - Close all windows and open is missing an essential file. S YS T E M D I S N O T R E A D Y - Contact Dell (see "Contacting Dell" in the Product Information Guide. Windows Vista: 1 Click Start → Control Panel→ Programs→ Programs and Features. 2 Select the program you begin any...

User's Guide
Page 66
... at any time before you press each character key (or the spacebar for a blank space), a placeholder appears in the field. 5 Press . A system password is not case sensitive. The password is assigned. • Disabled - No system password is assigned and the password jumper on the system board is less than 15 characters...
... at any time before you press each character key (or the spacebar for a blank space), a placeholder appears in the field. 5 Press . A system password is not case sensitive. The password is assigned. • Disabled - No system password is assigned and the password jumper on the system board is less than 15 characters...

User's Guide
Page 69
... your new password into the New Password field. To escape from the field without assigning a system password, press at the prompt. The password is not case sensitive. Assigning an Administrator Password The administrator password can be the same as an alternate system password.
... your new password into the New Password field. To escape from the field without assigning a system password, press at the prompt. The password is not case sensitive. Assigning an Administrator Password The administrator password can be the same as an alternate system password.
User's Guide
Page 73
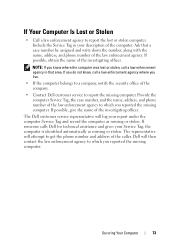
...and record the computer as missing or stolen. Provide the computer Service Tag, the case number, and the name, address, and phone number of the law enforcement agency to which you reported the missing computer. Dell will attempt to get the phone number and address of the caller. Include the... Service Tag in that a case number be assigned and write down the number, along with the name, address, and phone...
...and record the computer as missing or stolen. Provide the computer Service Tag, the case number, and the name, address, and phone number of the law enforcement agency to which you reported the missing computer. Dell will attempt to get the phone number and address of the caller. Include the... Service Tag in that a case number be assigned and write down the number, along with the name, address, and phone...

User's Guide
Page 85
... the list of the screen, press . Memory Key 1 Insert the memory key into a USB port and restart the computer. 2 When F12 = Boot Menu appears in case you are booting to a USB device, the device must be bootable. System Setup 85 The BIOS detects the device and adds the USB device option...
... the list of the screen, press . Memory Key 1 Insert the memory key into a USB port and restart the computer. 2 When F12 = Boot Menu appears in case you are booting to a USB device, the device must be bootable. System Setup 85 The BIOS detects the device and adds the USB device option...

User's Guide
Page 121
...media is in system setup is correct. Enter system setup (see your computer to restore computer resources. See "Dell Diagnostics" on page 75) and ensure that the computer configuration information for reinstallation information. Insert bootable media and ...restart your computer. CLOSE SOME PROGRAMS AND TRY AGAI N - Close all windows and open the program that you want to use first. In some cases, you ensure that has a bootable operating system or remove the floppy disk from drive A and restart the computer. O P E R A T I N T E R R U P T - S YS T E M D I S K O R D I...
...media is in system setup is correct. Enter system setup (see your computer to restore computer resources. See "Dell Diagnostics" on page 75) and ensure that the computer configuration information for reinstallation information. Insert bootable media and ...restart your computer. CLOSE SOME PROGRAMS AND TRY AGAI N - Close all windows and open the program that you want to use first. In some cases, you ensure that has a bootable operating system or remove the floppy disk from drive A and restart the computer. O P E R A T I N T E R R U P T - S YS T E M D I S K O R D I...

User's Guide
Page 148
... times to avoid injury; CAUTION: The computer stand should be installed at an angle to free it , so that hold the processor and card fan case in "Before You Begin" on page 202). 4 If a graphics riser card is heavy (it away from the computer. 9 Disconnect the control-panel cable from the...
... times to avoid injury; CAUTION: The computer stand should be installed at an angle to free it , so that hold the processor and card fan case in "Before You Begin" on page 202). 4 If a graphics riser card is heavy (it away from the computer. 9 Disconnect the control-panel cable from the...

User's Guide
Page 170
... configuration information found in system setup (see "System Setup" on page 75). 2 Follow the procedures in bodily injury or damage to save the information. this case, you have repeatedly reset the time and date information after turning on , and enter system setup. Removing the Battery 1 If you must enter system setup...
... configuration information found in system setup (see "System Setup" on page 75). 2 Follow the procedures in bodily injury or damage to save the information. this case, you have repeatedly reset the time and date information after turning on , and enter system setup. Removing the Battery 1 If you must enter system setup...

User's Guide
Page 173
... ranks, and x8 represents the organization. NOTICE: Full-length heat spreaders (FLHS) are required for all DIMMs. NOTE: Memory purchased from Dell is covered under your computer warranty. in this case, the computer will continue to operate, but with a slight reduction in size, rank, and organization. This information can also be installed...
... ranks, and x8 represents the organization. NOTICE: Full-length heat spreaders (FLHS) are required for all DIMMs. NOTE: Memory purchased from Dell is covered under your computer warranty. in this case, the computer will continue to operate, but with a slight reduction in size, rank, and organization. This information can also be installed...

User's Guide
Page 226
... 2 special floppy drive/Media Card Reader optical drive, floppy drive, Media Card drive panel plate and insert Reader, or SATA hard drive in a special drive case) NOTE: The 5.25-inch Media Card Reader/floppy drive carrier is not interchangeable with the hard drive carrier. 3 four hard-drive bays (can hold SATA...
... 2 special floppy drive/Media Card Reader optical drive, floppy drive, Media Card drive panel plate and insert Reader, or SATA hard drive in a special drive case) NOTE: The 5.25-inch Media Card Reader/floppy drive carrier is not interchangeable with the hard drive carrier. 3 four hard-drive bays (can hold SATA...

User's Guide
Page 274
1 2 1 memory fan (only present on computers without memory riser cards) 2 fan support structure 8 Disconnect the speaker cable from the system board. 9 Disconnect the front fan and the card fan from the computer. These screws help to secure the system board in place and lift it away from the system board. 10 Unscrew the two screws that hold the processor and card fan case in place. 274 Adding and Replacing Parts
1 2 1 memory fan (only present on computers without memory riser cards) 2 fan support structure 8 Disconnect the speaker cable from the system board. 9 Disconnect the front fan and the card fan from the computer. These screws help to secure the system board in place and lift it away from the system board. 10 Unscrew the two screws that hold the processor and card fan case in place. 274 Adding and Replacing Parts

User's Guide
Page 275
1 2 1 screws (2) 2 processor and card fan case 11 Remove any components that restrict access to the system board. 12 Disconnect all cables from the system board. 13 Before you remove the existing system board assembly, visually compare the replacement system board to the existing system board to ensure that you have the correct part. 14 Remove the two screws that attach the system board assembly to the back of the computer chassis. Adding and Replacing Parts 275
1 2 1 screws (2) 2 processor and card fan case 11 Remove any components that restrict access to the system board. 12 Disconnect all cables from the system board. 13 Before you remove the existing system board assembly, visually compare the replacement system board to the existing system board to ensure that you have the correct part. 14 Remove the two screws that attach the system board assembly to the back of the computer chassis. Adding and Replacing Parts 275

User's Guide
Page 292
... always have on the computer, do not change them. CD recordable - Data can either a reserved section of data interpreted by your computer. boot sequence - In case your hard drive is usually equal to start your computer. A special high-speed storage mechanism which the computer attempts to as system setup. The standard...
... always have on the computer, do not change them. CD recordable - Data can either a reserved section of data interpreted by your computer. boot sequence - In case your hard drive is usually equal to start your computer. A special high-speed storage mechanism which the computer attempts to as system setup. The standard...


