
Mobile Precision Re-Image Guide
Page 10
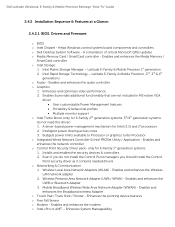
... Wireless LAN network adapter 2. Mobile Broadband Wireless Wide Area Network Adapter (WWAN) - Latitude E-Family & Mobile Precision 2nd, 3rd & 4th generations o Audio - Even if you do not need this driver) 1. o Dell Desktop System Software - Enables and enhances the Media Memory / SmartCard controller o Intel Storage: 1. only for Intel i3, i5 and i7 processors 2. Enhances System...
... Wireless LAN network adapter 2. Mobile Broadband Wireless Wide Area Network Adapter (WWAN) - Latitude E-Family & Mobile Precision 2nd, 3rd & 4th generations o Audio - Even if you do not need this driver) 1. o Dell Desktop System Software - Enables and enhances the Media Memory / SmartCard controller o Intel Storage: 1. only for Intel i3, i5 and i7 processors 2. Enhances System...
Mobile Precision Re-Image Guide
Page 14
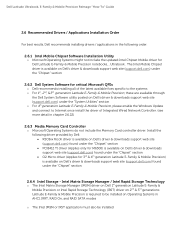
... support web site (support.dell.com) found under the "System Utilities" section o For 4th generation Latitude E-Family & Mobile Precision, please enable the Windows Update and connect to Internet once install the driver of the latest available fixes specific to be installed on Operating Systems in chapter 2.6.22) 2.6.3 Media Memory Card Controller o Microsoft Operating...
... support web site (support.dell.com) found under the "System Utilities" section o For 4th generation Latitude E-Family & Mobile Precision, please enable the Windows Update and connect to Internet once install the driver of the latest available fixes specific to be installed on Operating Systems in chapter 2.6.22) 2.6.3 Media Memory Card Controller o Microsoft Operating...

Owner's Manual
Page 4
... Area Network (WWAN) Card 41 Removing The Wireless Wide Area Network (WWAN) Card 41 Installing The Wireless Wide Area Network (WWAN) Card 42 15 Primary Memory 43 Removing The Primary Memory 43 Installing The Primary...
... Area Network (WWAN) Card 41 Removing The Wireless Wide Area Network (WWAN) Card 41 Installing The Wireless Wide Area Network (WWAN) Card 42 15 Primary Memory 43 Removing The Primary Memory 43 Installing The Primary...
Owner's Manual
Page 5
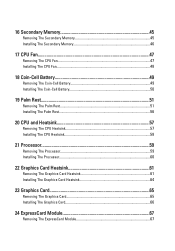
16 Secondary Memory 45 Removing The Secondary Memory 45 Installing The Secondary Memory 46 17 CPU Fan...47 Removing The CPU Fan 47 Installing The CPU Fan...48 18 Coin-Cell Battery 49 Removing The Coin-Cell Battery ...
16 Secondary Memory 45 Removing The Secondary Memory 45 Installing The Secondary Memory 46 17 CPU Fan...47 Removing The CPU Fan 47 Installing The CPU Fan...48 18 Coin-Cell Battery 49 Removing The Coin-Cell Battery ...

Owner's Manual
Page 13
Secure Digital (SD) Card 2 Removing The Secure Digital (SD) Card 1. Follow the procedures in the Secure Digital (SD) memory card to release it is fully engaged with a click sound. 13 Slide the SD memory card out of the chassis. 2. Installing The Secure Digital (SD) Card 1. Locate the Secure Digital (SD) memory card compartment on the left side of the computer. Press in Before Working On Your Computer 2. Push the SD memory card into the compartment until it . 3.
Secure Digital (SD) Card 2 Removing The Secure Digital (SD) Card 1. Follow the procedures in the Secure Digital (SD) memory card to release it is fully engaged with a click sound. 13 Slide the SD memory card out of the chassis. 2. Installing The Secure Digital (SD) Card 1. Locate the Secure Digital (SD) memory card compartment on the left side of the computer. Press in Before Working On Your Computer 2. Push the SD memory card into the compartment until it . 3.

Owner's Manual
Page 43
Remove the battery. 3. Remove the memory modules from the memory modules. 5. Gently pry the retention clips away from the computer. 43 Remove the base cover. 4. Primary Memory 15 Removing The Primary Memory 1. Follow the procedures in Before Working On Your Computer 2.
Remove the battery. 3. Remove the memory modules from the memory modules. 5. Gently pry the retention clips away from the computer. 43 Remove the base cover. 4. Primary Memory 15 Removing The Primary Memory 1. Follow the procedures in Before Working On Your Computer 2.

Owner's Manual
Page 44
Locate the memory slot in place. 4. Installing The Primary Memory 1. Install the battery. 6. Insert the memory into the memory socket. 3. Install the base cover. 5. Press down on the memory until the securing clips secure the memory in the computer. 2. Follow the procedures in After Working Inside Your Computer. 44
Locate the memory slot in place. 4. Installing The Primary Memory 1. Install the battery. 6. Insert the memory into the memory socket. 3. Install the base cover. 5. Press down on the memory until the securing clips secure the memory in the computer. 2. Follow the procedures in After Working Inside Your Computer. 44

Owner's Manual
Page 45
Gently pry the retention clips away from the computer. 7. Remove the memory module from the memory module. 6. Follow the procedures in Before Working On Your Computer 2. Remove the keyboard trim. 4. Remove the keyboard. 5. Remove the battery. 3. Gently pry the retention clips away from the memory module. 45 Secondary Memory 16 Removing The Secondary Memory 1.
Gently pry the retention clips away from the computer. 7. Remove the memory module from the memory module. 6. Follow the procedures in Before Working On Your Computer 2. Remove the keyboard trim. 4. Remove the keyboard. 5. Remove the battery. 3. Gently pry the retention clips away from the memory module. 45 Secondary Memory 16 Removing The Secondary Memory 1.
Owner's Manual
Page 46
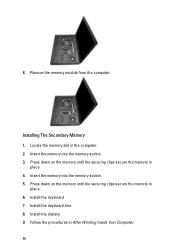
Insert the memory into the memory socket. 3. 8. Installing The Secondary Memory 1. Locate the memory slot in After Working Inside Your Computer. 46 Press down on the memory until the securing clips secure the memory in place. 6. Install the battery. 9. Install the keyboard trim. 8. Press down on the memory until the securing clips secure the memory in place. 4. Insert the memory into the memory socket. 5. Remove the memory module from the computer. Install the keyboard. 7. Follow the procedures in the computer. 2.
Insert the memory into the memory socket. 3. 8. Installing The Secondary Memory 1. Locate the memory slot in After Working Inside Your Computer. 46 Press down on the memory until the securing clips secure the memory in place. 6. Install the battery. 9. Install the keyboard trim. 8. Press down on the memory until the securing clips secure the memory in place. 4. Insert the memory into the memory socket. 5. Remove the memory module from the computer. Install the keyboard. 7. Follow the procedures in the computer. 2.

Owner's Manual
Page 56
... cover 15. Starting from the right edge of the palm rest, press downwards on the computer to the anchor hooks on the memory until the securing clips secure the memory in place. 6. Follow the procedures in place. 9. Align the metal anchors at the bottom edge of the system securing the palm rest...
... cover 15. Starting from the right edge of the palm rest, press downwards on the computer to the anchor hooks on the memory until the securing clips secure the memory in place. 6. Follow the procedures in place. 9. Align the metal anchors at the bottom edge of the system securing the palm rest...

Owner's Manual
Page 83
.... Remove the CPU heatsink. 17. Disconnect the coin-cell battery cable. 28 83 Remove the base cover. 5. Remove the secondary memory. 14. Remove the CPU fan. 15. Remove the processor. 18. Remove the graphics card heatsink. 19. Remove the Input/Output board. 21. Remove the keyboard ...
.... Remove the CPU heatsink. 17. Disconnect the coin-cell battery cable. 28 83 Remove the base cover. 5. Remove the secondary memory. 14. Remove the CPU fan. 15. Remove the processor. 18. Remove the graphics card heatsink. 19. Remove the Input/Output board. 21. Remove the keyboard ...

Owner's Manual
Page 86
...the system board in cable. 4. Install the Input/Output board. 8. Install the CPU heatsink. 12. Install the CPU fan. 14. Install the primary memory. 16. Install the WLAN card. 18. Install the battery. 2865. Install the graphics card. 9. Connect the DC-in place. 3. Install the display ...assembly. 7. Install the WWAN card. 17. Install the keyboard. 22. Install the secondary memory. 15. Align the system board to the port connectors on the bottom side of the chassis and place the system board in After Working ...
...the system board in cable. 4. Install the Input/Output board. 8. Install the CPU heatsink. 12. Install the CPU fan. 14. Install the primary memory. 16. Install the WLAN card. 18. Install the battery. 2865. Install the graphics card. 9. Connect the DC-in place. 3. Install the display ...assembly. 7. Install the WWAN card. 17. Install the keyboard. 22. Install the secondary memory. 15. Align the system board to the port connectors on the bottom side of the chassis and place the system board in After Working ...

Owner's Manual
Page 111
... of your computer, click Start (or Start in Windows XP) Help and Support, and then select the option to 8 MB cache depending on processor type Memory Type DDR3 Speed 1333 MHz and 1600 MHz (faster UI) Connectors: Intel Core i5 and i7 Dual Core processors two DIMM slots Intel Core i7... Quad Core and i7 Quad four DIMM slots Extreme processors Capacity 1 GB, 2 GB, 4 GB, and 8 GB Minimum Memory 2 GB Maximum memory: Intel Core i5 and i7 Dual Core processors 16 GB Intel Core i7 Quad Core and i7 Quad 32 GB Extreme processors 111
... of your computer, click Start (or Start in Windows XP) Help and Support, and then select the option to 8 MB cache depending on processor type Memory Type DDR3 Speed 1333 MHz and 1600 MHz (faster UI) Connectors: Intel Core i5 and i7 Dual Core processors two DIMM slots Intel Core i7... Quad Core and i7 Quad four DIMM slots Extreme processors Capacity 1 GB, 2 GB, 4 GB, and 8 GB Minimum Memory 2 GB Maximum memory: Intel Core i5 and i7 Dual Core processors 16 GB Intel Core i7 Quad Core and i7 Quad 32 GB Extreme processors 111

Owner's Manual
Page 117
... work incorrectly. Entering System Setup 1. Once the F2 prompt appears, press immediately. CAUTION: Unless you are prompted, this program. When the blue DELL logo is recommended that the keyboard has initialized. This prompt can cause your computer. • set or change , or remove any hardware in ... the system configuration information after you add, change a user-selectable option such as the user password. • read the current amount of memory or set the type of the General menu. 117 System Setup 37 System Setup Overview System Setup allows you to appear. 3.
... work incorrectly. Entering System Setup 1. Once the F2 prompt appears, press immediately. CAUTION: Unless you are prompted, this program. When the blue DELL logo is recommended that the keyboard has initialized. This prompt can cause your computer. • set or change , or remove any hardware in ... the system configuration information after you add, change a user-selectable option such as the user password. • read the current amount of memory or set the type of the General menu. 117 System Setup 37 System Setup Overview System Setup allows you to appear. 3.

Owner's Manual
Page 118
...; UEFI Date/Time Allows you to change the order in this section may or may not appear. Depending on your computer. • System Information • Memory Information • Processor Information • Device Information Battery Information Boot Sequence Displays the battery status and the type of the System Configuration menu. Allows you...
...; UEFI Date/Time Allows you to change the order in this section may or may not appear. Depending on your computer. • System Information • Memory Information • Processor Information • Device Information Battery Information Boot Sequence Displays the battery status and the type of the System Configuration menu. Allows you...

Owner's Manual
Page 133
Blinking Blinking Solid The video card is preventing the system from completing POST. Solid Blinking Blinking No SODIMMs are installed. Solid Blinking Solid The memory has encountered an error. Blinking Blinking Off The keyboard is preventing the system from completing POST. Off Blinking Blinking The modem is faulty. Blinking Blinking ...
Blinking Blinking Solid The video card is preventing the system from completing POST. Solid Blinking Blinking No SODIMMs are installed. Solid Blinking Solid The memory has encountered an error. Blinking Blinking Off The keyboard is preventing the system from completing POST. Off Blinking Blinking The modem is faulty. Blinking Blinking ...
Setup and Features Information Tech Sheet
Page 7
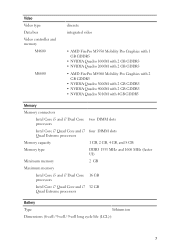
Video Video type Data bus Video controller and memory M4600 M6600 discrete integrated video • AMD FirePro M5950 Mobility Pro Graphics with 1 GB GDDR5 • NVIDIA Quadro 1000M with 2 GB GDDR3 • NVIDIA Quadro 2000M with 2 ... Intel Core i5 and i7 Dual Core processors Intel Core i7 Quad Core and i7 Quad Extreme processors Memory capacity Memory type Minimum memory Maximum memory Intel Core i5 and i7 Dual Core processors Intel Core i7 Quad Core and i7 Quad Extreme processors two DIMM slots four DIMM slots 1 GB, 2 ...
Video Video type Data bus Video controller and memory M4600 M6600 discrete integrated video • AMD FirePro M5950 Mobility Pro Graphics with 1 GB GDDR5 • NVIDIA Quadro 1000M with 2 GB GDDR3 • NVIDIA Quadro 2000M with 2 ... Intel Core i5 and i7 Dual Core processors Intel Core i7 Quad Core and i7 Quad Extreme processors Memory capacity Memory type Minimum memory Maximum memory Intel Core i5 and i7 Dual Core processors Intel Core i7 Quad Core and i7 Quad Extreme processors two DIMM slots four DIMM slots 1 GB, 2 ...


