Mobile Precision Re-Image Guide
Page 10
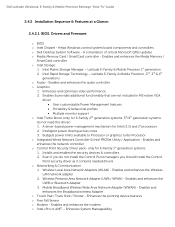
... 2. Enhances the pointing device features o Free Fall Sensor o Modem - Dell Latitude Ultrabook, E-Family & Mobile Precision Reimage "How-To" Guide 2.4.2 Installation Sequence & Features at a Glance:... Pointer - A compilation of critical Microsoft QFEs updates o Media Memory Card / SmartCard controller - Enhances System Manageability Enables & provides additional functionality that... audio controller o Graphics: 1. o Dell Desktop System Software - only for E-Family 1st generation systems 1. Budgets power limits available to Processor or graphics turbo Processor o ...
... 2. Enhances the pointing device features o Free Fall Sensor o Modem - Dell Latitude Ultrabook, E-Family & Mobile Precision Reimage "How-To" Guide 2.4.2 Installation Sequence & Features at a Glance:... Pointer - A compilation of critical Microsoft QFEs updates o Media Memory Card / SmartCard controller - Enhances System Manageability Enables & provides additional functionality that... audio controller o Graphics: 1. o Dell Desktop System Software - only for E-Family 1st generation systems 1. Budgets power limits available to Processor or graphics turbo Processor o ...
Mobile Precision Re-Image Guide
Page 18
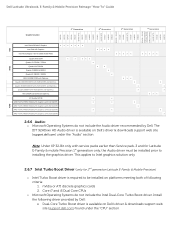
... the graphics driver. nVidia or ATI discrete graphics cards 2. Core i7 and i5 Dual Core CPUs o Microsoft Operating Systems do not include the Audio driver recommended by Dell: Dual-Core Turbo Boost driver is available on Dell's driver & downloads support web site (support.dell.com)...Precision Reimage "How-To" Guide E4200 E4300 E5400 E5500 E6400 E6400 ATG E6500 M2400 M4400 M6400 E6410 E6410 ATG E6510 M4500 M6500 E5420 / E5520 E6320 E6420 E6420 ATG E6520 M4600 M6600 E5430 / E5530 E6230/E6330/ E6430u/3330 E6430/E6430s E6430 ATG E6530 M4700 M6700 Intel nVidia AMD Graphic...
... the graphics driver. nVidia or ATI discrete graphics cards 2. Core i7 and i5 Dual Core CPUs o Microsoft Operating Systems do not include the Audio driver recommended by Dell: Dual-Core Turbo Boost driver is available on Dell's driver & downloads support web site (support.dell.com)...Precision Reimage "How-To" Guide E4200 E4300 E5400 E5500 E6400 E6400 ATG E6500 M2400 M4400 M6400 E6410 E6410 ATG E6510 M4500 M6500 E5420 / E5520 E6320 E6420 E6420 ATG E6520 M4600 M6600 E5430 / E5530 E6230/E6330/ E6430u/3330 E6430/E6430s E6430 ATG E6530 M4700 M6700 Intel nVidia AMD Graphic...
Mobile Precision Re-Image Guide
Page 40
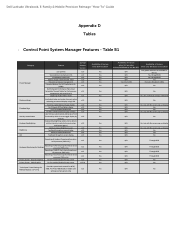
... log information at OS presence (PWS only) Reporting of Feature when DCP Installed? UMA Graphics Fn+E to toggle display by default). Only power schemes are available in BIOS/OS N/A...No DCP App? battery charge enable/disable status Network card power management Extended Battery Life/ All Day Battery Life. (ADBL) Dell Enhanced Performance Plans (User Selectable Thermal Tables for NTSC,...activating an external display using FnF8. Control Point System Manager Features - Dell Latitude Ultrabook, E-Family & Mobile Precision Reimage "How-To" Guide Appendix D Tables - Table B1 Category ...
... log information at OS presence (PWS only) Reporting of Feature when DCP Installed? UMA Graphics Fn+E to toggle display by default). Only power schemes are available in BIOS/OS N/A...No DCP App? battery charge enable/disable status Network card power management Extended Battery Life/ All Day Battery Life. (ADBL) Dell Enhanced Performance Plans (User Selectable Thermal Tables for NTSC,...activating an external display using FnF8. Control Point System Manager Features - Dell Latitude Ultrabook, E-Family & Mobile Precision Reimage "How-To" Guide Appendix D Tables - Table B1 Category ...
Owner's Manual
Page 5
... 57 Removing The CPU Heatsink 57 Installing The CPU Heatsink 58 21 Processor 59 Removing The Processor 59 Installing The Processor 60 22 Graphics Card Heatsink 61 Removing The Graphics Card Heatsink 61 Installing The Graphics Card Heatsink 64 23 Graphics Card 65 Removing The Graphics Card 65 Installing The Graphics Card 66 24 ExpressCard Module 67 Removing The ExpressCard Module 67
... 57 Removing The CPU Heatsink 57 Installing The CPU Heatsink 58 21 Processor 59 Removing The Processor 59 Installing The Processor 60 22 Graphics Card Heatsink 61 Removing The Graphics Card Heatsink 61 Installing The Graphics Card Heatsink 64 23 Graphics Card 65 Removing The Graphics Card 65 Installing The Graphics Card 66 24 ExpressCard Module 67 Removing The ExpressCard Module 67

Owner's Manual
Page 61
Remove the keyboard. 6. Disconnect any antennas from the routing channels. 61 Remove the CPU fan. 10. Graphics Card Heatsink 22 Removing The Graphics Card Heatsink 1. Remove the optical drive. 7. Remove the any antennas connected to the installed wireless slots. 13. Remove the palm rest. 11. Remove the battery. 3. Remove the primary hard drive. 8. Remove the keyboard trim. 5. Remove the CPU heatsink. 12. Remove the secondary hard drive. 9. Follow the procedures in Before Working On Your Computer 2. Remove the base cover. 4.
Remove the keyboard. 6. Disconnect any antennas from the routing channels. 61 Remove the CPU fan. 10. Graphics Card Heatsink 22 Removing The Graphics Card Heatsink 1. Remove the optical drive. 7. Remove the any antennas connected to the installed wireless slots. 13. Remove the palm rest. 11. Remove the battery. 3. Remove the primary hard drive. 8. Remove the keyboard trim. 5. Remove the CPU heatsink. 12. Remove the secondary hard drive. 9. Follow the procedures in Before Working On Your Computer 2. Remove the base cover. 4.

Owner's Manual
Page 62
Disconnect the graphics card fan cable. 16. Remove the screw securing the graphics card heatsink in place. 62 14. Pull the antennas through the opening to the top of the computer. 15.
Disconnect the graphics card fan cable. 16. Remove the screw securing the graphics card heatsink in place. 62 14. Pull the antennas through the opening to the top of the computer. 15.

Owner's Manual
Page 63
Lift up the graphics card heatsink and remove from the computer. 63 Loosen the captive screws (1 > 2 > 3 > 4) on the heatsink. 18. 17.
Lift up the graphics card heatsink and remove from the computer. 63 Loosen the captive screws (1 > 2 > 3 > 4) on the heatsink. 18. 17.

Owner's Manual
Page 64
.... 3. Install the secondary hard drive. 12. Install the keyboard trim. 16. Connect the graphics card fan cable. 5. Connect the antennas to the routing channels. 7. Install the base cover. 17. Locate the heatsink compartment on the computer. 2. Secure ... the CPU heatsink. 9. Install the optical drive. 14. Follow the procedures in place. 4. Install the primary hard drive. 13. Tighten the screw securing the graphics card heatsink in After Working Inside Your Computer. 64 Install the palm rest. 10. Install the CPU fan. 11. Install the keyboard. 15. Push the antennas...
.... 3. Install the secondary hard drive. 12. Install the keyboard trim. 16. Connect the graphics card fan cable. 5. Connect the antennas to the routing channels. 7. Install the base cover. 17. Locate the heatsink compartment on the computer. 2. Secure ... the CPU heatsink. 9. Install the optical drive. 14. Follow the procedures in place. 4. Install the primary hard drive. 13. Tighten the screw securing the graphics card heatsink in After Working Inside Your Computer. 64 Install the palm rest. 10. Install the CPU fan. 11. Install the keyboard. 15. Push the antennas...

Owner's Manual
Page 65
Remove the keyboard trim. 5. Remove the keyboard. 6. Remove the primary hard drive. 8. Remove the secondary hard drive. 9. Remove the palm rest. 11. Remove the graphics card. 65 Remove the base cover. 4. Remove the CPU fan. 10. Remove the optical drive. 7. Remove the screws securing the graphics card in Before Working On Your Computer 2. Remove the CPU heatsink. 12. Graphics Card Removing The Graphics Card 1. Follow the procedures in place. 23 14. Remove the battery. 3. Remove the graphics card heat-sink 13.
Remove the keyboard trim. 5. Remove the keyboard. 6. Remove the primary hard drive. 8. Remove the secondary hard drive. 9. Remove the palm rest. 11. Remove the graphics card. 65 Remove the base cover. 4. Remove the CPU fan. 10. Remove the optical drive. 7. Remove the screws securing the graphics card in Before Working On Your Computer 2. Remove the CPU heatsink. 12. Graphics Card Removing The Graphics Card 1. Follow the procedures in place. 23 14. Remove the battery. 3. Remove the graphics card heat-sink 13.

Owner's Manual
Page 66
Install the CPU fan. 7. Install the optical drive. 10. Installing The Graphics Card 1. Install the keyboard trim. 12. Install the keyboard. 11. Install the base cover. 13. Install the secondary hard drive. 8. Follow the procedures in place. 3. Install the graphics card heatsink. 4. Install the battery. 14. Install the primary hard drive. 9. Install the palm rest. 6. Tighten the screws securing the graphics card in After Working Inside Your Computer. 66 Locate the graphics card slot on the computer. 2. Install the CPU heatsink. 5.
Install the CPU fan. 7. Install the optical drive. 10. Installing The Graphics Card 1. Install the keyboard trim. 12. Install the keyboard. 11. Install the base cover. 13. Install the secondary hard drive. 8. Follow the procedures in place. 3. Install the graphics card heatsink. 4. Install the battery. 14. Install the primary hard drive. 9. Install the palm rest. 6. Tighten the screws securing the graphics card in After Working Inside Your Computer. 66 Locate the graphics card slot on the computer. 2. Install the CPU heatsink. 5.

Owner's Manual
Page 83
... the keyboard trim. 6. Remove the optical drive. 8. Remove the WWAN card. 12. Remove the CPU fan. 15. Remove the graphics card heatsink. 19. Remove the graphics card. 20. Disconnect the coin-cell battery cable. 28 83 Remove the base cover. 5. Remove the secondary memory. 14. Remove the primary hard drive. 9. Remove the ... Input/Output board. 21. Remove the primary memory. 13. Remove the processor. 18. Follow the procedures in Before Working On Your Computer 2. Remove the WLAN card. 11.
... the keyboard trim. 6. Remove the optical drive. 8. Remove the WWAN card. 12. Remove the CPU fan. 15. Remove the graphics card heatsink. 19. Remove the graphics card. 20. Disconnect the coin-cell battery cable. 28 83 Remove the base cover. 5. Remove the secondary memory. 14. Remove the primary hard drive. 9. Remove the ... Input/Output board. 21. Remove the primary memory. 13. Remove the processor. 18. Follow the procedures in Before Working On Your Computer 2. Remove the WLAN card. 11.

Owner's Manual
Page 86
Tighten the screws securing the system board in After Working Inside Your Computer. Install the graphics card. 9. Install the processor. 11. Install the secondary memory. 15. Install the WWAN card. 17. Install the keyboard trim. 23. Follow the procedures in place. 3. Connect the wireless switch. 5. ...CPU fan. 14. Install the primary hard drive. 20. Install the keyboard. 22. Connect the DC-in the computer. 2. Install the graphics card heatsink. 10. Install the palm rest. 13. Install the optical drive. 21. Install the base cover. 24. Connect the coin-cell battery...
Tighten the screws securing the system board in After Working Inside Your Computer. Install the graphics card. 9. Install the processor. 11. Install the secondary memory. 15. Install the WWAN card. 17. Install the keyboard trim. 23. Follow the procedures in place. 3. Connect the wireless switch. 5. ...CPU fan. 14. Install the primary hard drive. 20. Install the keyboard. 22. Connect the DC-in the computer. 2. Install the graphics card heatsink. 10. Install the palm rest. 13. Install the optical drive. 21. Install the base cover. 24. Connect the coin-cell battery...


