
Important Information - Pen
Page 2
...pen head. Pen Usage Your computer uses several input devices. NOTE: If there is a digitizer failure, the pen tip must be replaced. To remove/insert the battery, loosen the screw cap. pen tip 5. The following table describes how to use the pen on any other models or on specific... Dell computers. 1. Buttons on the Pen Button eraser pen button left-click button Function pressing this button will erase the text written in the application pressing this button will act like a left -click pen button 4. Replacing the pen tip, resolves the problem ...
...pen head. Pen Usage Your computer uses several input devices. NOTE: If there is a digitizer failure, the pen tip must be replaced. To remove/insert the battery, loosen the screw cap. pen tip 5. The following table describes how to use the pen on any other models or on specific... Dell computers. 1. Buttons on the Pen Button eraser pen button left-click button Function pressing this button will erase the text written in the application pressing this button will act like a left -click pen button 4. Replacing the pen tip, resolves the problem ...

Owner's Manual
Page 11
Do not use only the battery designed for other Dell computers. 1. Connect any external devices, such as a port replicator, battery slice, or media base, and replace any cards, such as shown below, and then click Shut Down. • In Windows XP: Click Start → Turn Off Computer ... before turning on your operating system, press and hold the power button for about 4 seconds to the computer, use batteries designed for this particular Dell computer. If your computer and attached devices did not automatically turn them off when you connect any telephone or network cables...
Do not use only the battery designed for other Dell computers. 1. Connect any external devices, such as a port replicator, battery slice, or media base, and replace any cards, such as shown below, and then click Shut Down. • In Windows XP: Click Start → Turn Off Computer ... before turning on your operating system, press and hold the power button for about 4 seconds to the computer, use batteries designed for this particular Dell computer. If your computer and attached devices did not automatically turn them off when you connect any telephone or network cables...
Owner's Manual
Page 12
Turn on your computer and all attached devices to their electrical outlets. 5. Connect your computer. 12 Replace the battery. 4. CAUTION: To connect a network cable, first plug the cable into the network device and then plug it into the computer. 3.
Turn on your computer and all attached devices to their electrical outlets. 5. Connect your computer. 12 Replace the battery. 4. CAUTION: To connect a network cable, first plug the cable into the network device and then plug it into the computer. 3.

Owner's Manual
Page 20
Locate the Subscriber Identity Module (SIM) card slot in After Working Inside Your Computer. 20 Follow the procedures in the battery compartment. 2. Installing The Subscriber Identity Module (SIM )Card 1. Push the SIM card into the slot until it is fully engaged. 3. Replace the battery. 4.
Locate the Subscriber Identity Module (SIM) card slot in After Working Inside Your Computer. 20 Follow the procedures in the battery compartment. 2. Installing The Subscriber Identity Module (SIM )Card 1. Push the SIM card into the slot until it is fully engaged. 3. Replace the battery. 4.

Owner's Manual
Page 29
Place the keyboard on the palm rest and align the screw holes. 5. Follow the procedures in After Working Inside Your Computer. 29 Tighten the keyboard screws. 6. Install the battery. 8. Connect the keyboard data cable to the back of the keyboard. 3. Installing The Keyboard 1. Replace the adhesive tape to secure the keyboard data cable to the system board. 4. Connect the keyboard data cable to the back of the keyboard. 2. Peel the keyboard data cable away from the keyboard and remove. Install the keyboard trim. 7. 10.
Place the keyboard on the palm rest and align the screw holes. 5. Follow the procedures in After Working Inside Your Computer. 29 Tighten the keyboard screws. 6. Install the battery. 8. Connect the keyboard data cable to the back of the keyboard. 3. Installing The Keyboard 1. Replace the adhesive tape to secure the keyboard data cable to the system board. 4. Connect the keyboard data cable to the back of the keyboard. 2. Peel the keyboard data cable away from the keyboard and remove. Install the keyboard trim. 7. 10.
Owner's Manual
Page 89
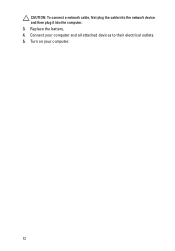
Remove the display bezel. Tighten the screws securing the display bezel in After Working Inside Your Computer. 89 Follow the procedures in place. 5. Install the battery. 7. Replace the screw covers. 6. Starting from the bottom edge, press downward on the computer. 2. Work your way around the sides and top edge. 4. Place the display bezel on the display bezel to engage the tabs. 3. Installing The Touchscreen Display Bezel 1. 9.
Remove the display bezel. Tighten the screws securing the display bezel in After Working Inside Your Computer. 89 Follow the procedures in place. 5. Install the battery. 7. Replace the screw covers. 6. Starting from the bottom edge, press downward on the computer. 2. Work your way around the sides and top edge. 4. Place the display bezel on the display bezel to engage the tabs. 3. Installing The Touchscreen Display Bezel 1. 9.
Owner's Manual
Page 94
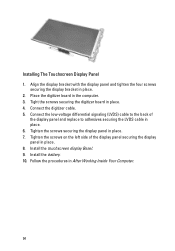
... board in place. 2. Tighten the screws on the left side of the display panel and replace to the back of the display panel securing the display panel in place. 4. Install the touchscreen display Bezel. 9. Install the battery. 10. Tight the screws securing the digitizer board in place. 8. Tighten the screws securing the...
... board in place. 2. Tighten the screws on the left side of the display panel and replace to the back of the display panel securing the display panel in place. 4. Install the touchscreen display Bezel. 9. Install the battery. 10. Tight the screws securing the digitizer board in place. 8. Tighten the screws securing the...
Owner's Manual
Page 99
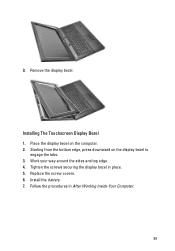
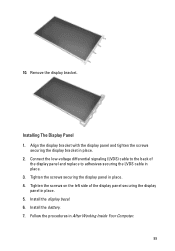
... bracket. Connect the low-voltage differential signaling (LVDS) cable to the back of the display panel securing the display panel in place. 5. Install the battery. 7. Align the display bracket with the display panel and tighten the screws securing the display bracket in place. 3. Tighten the screws securing the display ... Working Inside Your Computer. 99 Follow the procedures in place. 4. 10. Tighten the screws on the left side of the display panel and replace to adhesives securing the LVDS cable in place. 2. Installing The Display Panel 1. Install the display bezel. 6.
... bracket. Connect the low-voltage differential signaling (LVDS) cable to the back of the display panel securing the display panel in place. 5. Install the battery. 7. Align the display bracket with the display panel and tighten the screws securing the display bracket in place. 3. Tighten the screws securing the display ... Working Inside Your Computer. 99 Follow the procedures in place. 4. 10. Tighten the screws on the left side of the display panel and replace to adhesives securing the LVDS cable in place. 2. Installing The Display Panel 1. Install the display bezel. 6.
Owner's Manual
Page 109
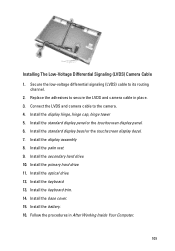
... the display assembly 8. Install the keyboard trim. 14. Install the secondary hard drive. 10. Install the primary hard drive. 11. Follow the procedures in place. 3. Replace the adhesives to secure the LVDS and camera cable in After Working Inside Your Computer. 109 Installing The Low-Voltage Differential Signaling (LVDS) Camera Cable... low-voltage differential signaling (LVDS) cable to the camera. 4. Install the standard display bezel or the touchscreen display bezel. 7. Install the keyboard. 13. Install the battery. 16.
... the display assembly 8. Install the keyboard trim. 14. Install the secondary hard drive. 10. Install the primary hard drive. 11. Follow the procedures in place. 3. Replace the adhesives to secure the LVDS and camera cable in After Working Inside Your Computer. 109 Installing The Low-Voltage Differential Signaling (LVDS) Camera Cable... low-voltage differential signaling (LVDS) cable to the camera. 4. Install the standard display bezel or the touchscreen display bezel. 7. Install the keyboard. 13. Install the battery. 16.


