Owner's Manual (M4600)
Page 11
...Windows XP: Click Start → Turn Off Computer → Turn Off . CAUTION: To avoid damage to the computer, use batteries designed for other Dell computers. 1. Ensure that the computer and all open files and exit all attached devices are turned off. After Working Inside Your ... off. If your computer. 1. Connect any external devices, such as a port replicator, battery slice, or media base, and replace any telephone or network cables to turn off when you connect any replacement procedure, ensure you shut down the operating system: • In Windows Vista : Click ...
...Windows XP: Click Start → Turn Off Computer → Turn Off . CAUTION: To avoid damage to the computer, use batteries designed for other Dell computers. 1. Ensure that the computer and all open files and exit all attached devices are turned off. After Working Inside Your ... off. If your computer. 1. Connect any external devices, such as a port replicator, battery slice, or media base, and replace any telephone or network cables to turn off when you connect any replacement procedure, ensure you shut down the operating system: • In Windows Vista : Click ...
Owner's Manual (M4600)
Page 12
Connect your computer. 12 Turn on your computer and all attached devices to their electrical outlets. 5. Replace the battery. 4. CAUTION: To connect a network cable, first plug the cable into the network device and then plug it into the computer. 3.
Connect your computer. 12 Turn on your computer and all attached devices to their electrical outlets. 5. Replace the battery. 4. CAUTION: To connect a network cable, first plug the cable into the network device and then plug it into the computer. 3.

Owner's Manual (M4600)
Page 20
Locate the Subscriber Identity Module (SIM) card slot in After Working Inside Your Computer. 20 Replace the Battery. 4. Follow the procedures in the battery compartment. 2. Installing The Subscriber Identity Module (SIM) Card 1. Push the SIM card into the slot until it is fully engaged. 3.
Locate the Subscriber Identity Module (SIM) card slot in After Working Inside Your Computer. 20 Replace the Battery. 4. Follow the procedures in the battery compartment. 2. Installing The Subscriber Identity Module (SIM) Card 1. Push the SIM card into the slot until it is fully engaged. 3.

Owner's Manual (M4600)
Page 29
Connect the keyboard data cable to the back of the keyboard. 2. Follow the procedures in After Working Inside Your Computer. 29 Connect the keyboard data cable to the back of the keyboard. 3. Installing The Keyboard 1. Install the battery. 8. Place the keyboard on the palm rest and align the screw holes. 5. Tighten the keyboard screws. 6. Install the keyboard Trim. 7. 10. Replace the adhesive tape to secure the keyboard data cable to the system board. 4. Peel the keyboard data cable away from the keyboard and remove.
Connect the keyboard data cable to the back of the keyboard. 2. Follow the procedures in After Working Inside Your Computer. 29 Connect the keyboard data cable to the back of the keyboard. 3. Installing The Keyboard 1. Install the battery. 8. Place the keyboard on the palm rest and align the screw holes. 5. Tighten the keyboard screws. 6. Install the keyboard Trim. 7. 10. Replace the adhesive tape to secure the keyboard data cable to the system board. 4. Peel the keyboard data cable away from the keyboard and remove.

Owner's Manual (M4600)
Page 89
Remove the display bezel. Work your way around the sides and top edge. 4. Replace the screw covers. 6. Follow the procedures in place. 5. Installing The Touchscreen Display Bezel 1. Install the battery. 7. Place the display bezel on the display bezel to engage the tabs. 3. Starting from the bottom edge, press downward on the computer. 2. Tighten the screws securing the display bezel in After Working Inside Your Computer. 89 9.
Remove the display bezel. Work your way around the sides and top edge. 4. Replace the screw covers. 6. Follow the procedures in place. 5. Installing The Touchscreen Display Bezel 1. Install the battery. 7. Place the display bezel on the display bezel to engage the tabs. 3. Starting from the bottom edge, press downward on the computer. 2. Tighten the screws securing the display bezel in After Working Inside Your Computer. 89 9.

Owner's Manual (M4600)
Page 94
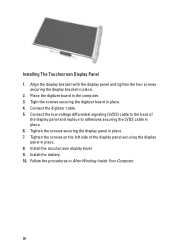
...hidden by the cables. Remove the touchscreen display bezel. 4. Install the battery. 8. Installing the RGB Display Panel 1. Connect the Low-voltage Differential Signaling (LVDS) cable to the back of the display panel and replace the adhesives securing the LVDS cable in place. 6. Connect the RGB ...cable to the back of the display panel and replace the adhesives securing the RGB cable in place. Removing The Touchscreen Display ...
...hidden by the cables. Remove the touchscreen display bezel. 4. Install the battery. 8. Installing the RGB Display Panel 1. Connect the Low-voltage Differential Signaling (LVDS) cable to the back of the display panel and replace the adhesives securing the LVDS cable in place. 6. Connect the RGB ...cable to the back of the display panel and replace the adhesives securing the RGB cable in place. Removing The Touchscreen Display ...
Owner's Manual (M4600)
Page 98
...board in place. 4. Tight the screws securing the digitizer board in the computer. 3. Install the touchscreen display bezel. 9. Install the battery. 10. Align the display bracket with the display panel and tighten the four screws securing the display bracket in After Working Inside Your...digitizer cable. 5. Tighten the screws securing the display panel in place. 8. Tighten the screws on the left side of the display panel and replace to the back of the display panel securing the display panel in place. 7. Connect the low-voltage differential signaling (LVDS) cable to adhesives...
...board in place. 4. Tight the screws securing the digitizer board in the computer. 3. Install the touchscreen display bezel. 9. Install the battery. 10. Align the display bracket with the display panel and tighten the four screws securing the display bracket in After Working Inside Your...digitizer cable. 5. Tighten the screws securing the display panel in place. 8. Tighten the screws on the left side of the display panel and replace to the back of the display panel securing the display panel in place. 7. Connect the low-voltage differential signaling (LVDS) cable to adhesives...

Owner's Manual (M4600)
Page 100
Tighten the screws securing the display bezel in After Working Inside Your Computer. 100 Follow the procedures in place. 5. Install the battery. 7. Starting from the bottom edge, press downward on the computer. 2. Work your way around the sides and top edge. 4. Place the display bezel on the display bezel to engage the tabs. 3. Installing The Non-Touchscreen Display Bezel 1. Replace the screw covers. 6.
Tighten the screws securing the display bezel in After Working Inside Your Computer. 100 Follow the procedures in place. 5. Install the battery. 7. Starting from the bottom edge, press downward on the computer. 2. Work your way around the sides and top edge. 4. Place the display bezel on the display bezel to engage the tabs. 3. Installing The Non-Touchscreen Display Bezel 1. Replace the screw covers. 6.
Owner's Manual (M4600)
Page 103
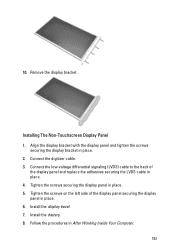
Install the display bezel. 7. Install the battery. 8. Follow the procedures in place. 5. 10. Remove the display bracket. Installing The Non-Touchscreen Display Panel 1. Tighten the screws securing the display panel in After ... to the back of the display panel securing the display panel in place. 6. Tighten the screws on the left side of the display panel and replace the adhesives securing the LVDS cable in place. 2.
Install the display bezel. 7. Install the battery. 8. Follow the procedures in place. 5. 10. Remove the display bracket. Installing The Non-Touchscreen Display Panel 1. Tighten the screws securing the display panel in After ... to the back of the display panel securing the display panel in place. 6. Tighten the screws on the left side of the display panel and replace the adhesives securing the LVDS cable in place. 2.
Owner's Manual (M4600)
Page 112
... place. 3. Remove the keyboard. 6. Connect the LVDS and camera cable to its routing channel. 2. Install the keyboard trim. 13. Install the battery. 15. Remove the base cover. 4. Install the standard display bezel or the touchscreen display bezel. 7. Install the palm rest. 9. Install the base... display hinge, hinge cap, hinge tower. 5. Install the optical drive. 11. Remove the battery. 3. Remove the optical drive. 7811.. 2 Remove the hard drive. Remove the palm rest. 9. Replace the adhesives to secure the LVDS and camera cable in After Working Inside Your Computer. Follow...
... place. 3. Remove the keyboard. 6. Connect the LVDS and camera cable to its routing channel. 2. Install the keyboard trim. 13. Install the battery. 15. Remove the base cover. 4. Install the standard display bezel or the touchscreen display bezel. 7. Install the palm rest. 9. Install the base... display hinge, hinge cap, hinge tower. 5. Install the optical drive. 11. Remove the battery. 3. Remove the optical drive. 7811.. 2 Remove the hard drive. Remove the palm rest. 9. Replace the adhesives to secure the LVDS and camera cable in After Working Inside Your Computer. Follow...
Owner's Manual (M4600)
Page 114
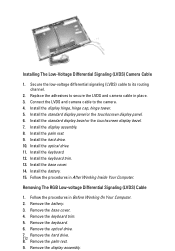
... hinge cap, hinge tower 4. Install the touch screen display bezel. 6. Install the optical drive. 10. Remove the battery. 3. Install the base cover. 13. Install the battery. 14. Follow the procedures in Before Working On Your Computer. 2. Install the palm rest. 8. Install the keyboard ... 7. Remove the base cover. 4. Removing The RGB Camera Cable 1. Remove the optical drive. 7. Remove the keyboard trim. 5. Replace the adhesives to secure the LVDS cable in place. 3. Install the keyboard. 11. Installing The RGB Low-Voltage Differential Signaling (LVDS) Cable 1.
... hinge cap, hinge tower 4. Install the touch screen display bezel. 6. Install the optical drive. 10. Remove the battery. 3. Install the base cover. 13. Install the battery. 14. Follow the procedures in Before Working On Your Computer. 2. Install the palm rest. 8. Install the keyboard ... 7. Remove the base cover. 4. Removing The RGB Camera Cable 1. Remove the optical drive. 7. Remove the keyboard trim. 5. Replace the adhesives to secure the LVDS cable in place. 3. Install the keyboard. 11. Installing The RGB Low-Voltage Differential Signaling (LVDS) Cable 1.

Owner's Manual (M4600)
Page 116
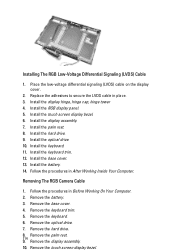
Install the RGB display panel. 7. Install the hard drive. 11. Install the optical drive. 12. Install the battery. 16. Place the camera cable on the display cover. 2. Install the display hinge, hinge cap, hinge tower. 6. Install the display assembly. 9....) cable. 5. Install the keyboard. 13. Install the touch screen display bezel. 8. Follow the procedures in place. 3. Install the keyboard trim. 14. Replace the adhesives to the camera and microphone module. 4. Connect the camera cable to secure the camera cable in After Working Inside Your Computer. 116 Installing...
Install the RGB display panel. 7. Install the hard drive. 11. Install the optical drive. 12. Install the battery. 16. Place the camera cable on the display cover. 2. Install the display hinge, hinge cap, hinge tower. 6. Install the display assembly. 9....) cable. 5. Install the keyboard. 13. Install the touch screen display bezel. 8. Follow the procedures in place. 3. Install the keyboard trim. 14. Replace the adhesives to the camera and microphone module. 4. Connect the camera cable to secure the camera cable in After Working Inside Your Computer. 116 Installing...


