
Quick Reference Guide
Page 26
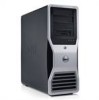
Do not attempt to boot the computer before reinstalling the computer cover. 26 Quick Reference Guide 1 2 3 1 cover latch release 2 computer cover 3 cover hinges 6 Locate the three hinge tabs on the edge of the computer. 7 Grip the sides of the computer cover and pivot the cover up, using the hinges as leverage points. 8 Release the cover from the hinge tabs and set it aside in a secure location. NOTICE: The computer cooling system cannot function properly while the computer cover is not installed.
Do not attempt to boot the computer before reinstalling the computer cover. 26 Quick Reference Guide 1 2 3 1 cover latch release 2 computer cover 3 cover hinges 6 Locate the three hinge tabs on the edge of the computer. 7 Grip the sides of the computer cover and pivot the cover up, using the hinges as leverage points. 8 Release the cover from the hinge tabs and set it aside in a secure location. NOTICE: The computer cooling system cannot function properly while the computer cover is not installed.

Quick Reference Guide
Page 32
... technical assistance. Then shut down your computer, see your User's Guide. 3 When the boot device list appears, highlight Boot to run them in error messages. Dell Diagnostics CAUTION: Before you begin . When to Use the Dell Diagnostics If you experience a problem with the chipset, using the operating system installation guide and Operating System CD...
... technical assistance. Then shut down your computer, see your User's Guide. 3 When the boot device list appears, highlight Boot to run them in error messages. Dell Diagnostics CAUTION: Before you begin . When to Use the Dell Diagnostics If you experience a problem with the chipset, using the operating system installation guide and Operating System CD...
Quick Reference Guide
Page 33
... Select the Onboard or USB CD-ROM Drive option from the CD boot menu. 5 Select the Boot from CD-ROM option from the menu that appears. 6 Type 1 to start the Dell Diagnostics and press . 8 Select Run the 32 Bit Dell Diagnostics from the numbered list. Quick Reference Guide 33 Then shut down... series of three beeps, and then one time only. Before you start -up , the computer boots according to the devices specified in your User's Guide. 2 Run the Dell Diagnostics to run. Starting the Dell Diagnostics From the Drivers and Utilities CD NOTE: The Drivers and Utilities CD is attached. •...
... Select the Onboard or USB CD-ROM Drive option from the CD boot menu. 5 Select the Boot from CD-ROM option from the menu that appears. 6 Type 1 to start the Dell Diagnostics and press . 8 Select Run the 32 Bit Dell Diagnostics from the numbered list. Quick Reference Guide 33 Then shut down... series of three beeps, and then one time only. Before you start -up , the computer boots according to the devices specified in your User's Guide. 2 Run the Dell Diagnostics to run. Starting the Dell Diagnostics From the Drivers and Utilities CD NOTE: The Drivers and Utilities CD is attached. •...

Quick Reference Guide
Page 39
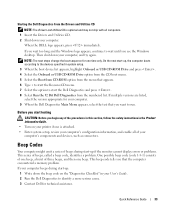
...module connector DIMM_1. 4 Restart the computer. Light Pattern Problem Description No memory modules are not defective. 8 When the defective memory module is identified, contact Dell for more information. 7 If the memory module passes, shut down the computer, remove the memory module, and then repeat the process with the remaining ... start-up or diagnostic testing. If the first memory module tested is successfully communicating with reduced performance and reduced errorcorrection capability 5 Press to boot to the operating system. 6 Run the Dell Diagnostics. Quick Reference Guide 39
...module connector DIMM_1. 4 Restart the computer. Light Pattern Problem Description No memory modules are not defective. 8 When the defective memory module is identified, contact Dell for more information. 7 If the memory module passes, shut down the computer, remove the memory module, and then repeat the process with the remaining ... start-up or diagnostic testing. If the first memory module tested is successfully communicating with reduced performance and reduced errorcorrection capability 5 Press to boot to the operating system. 6 Run the Dell Diagnostics. Quick Reference Guide 39
Quick Reference Guide
Page 41
... Hardware Incompatibilities" on -screen initialization. Routine system activity preceding video Watch your monitor for on page 30). 4 If the problem persists, contact Dell. messages. condition after the computer successfully boots to the operating system. NOTE: The diagnostic lights flicker briefly; they are turned off after POST. Quick Reference Guide 41 The computer...
... Hardware Incompatibilities" on -screen initialization. Routine system activity preceding video Watch your monitor for on page 30). 4 If the problem persists, contact Dell. messages. condition after the computer successfully boots to the operating system. NOTE: The diagnostic lights flicker briefly; they are turned off after POST. Quick Reference Guide 41 The computer...
User Guide
Page 2
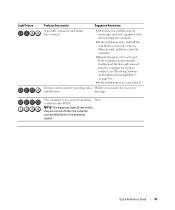
.... it can be on the computer. CAUTION: Before setting your Product Information Guide for other important safety information. For more information, see Booting to a USB Device for more information). 8 power button It is heavy (it has an approximate minimum weight of the four 5.25-... when the computer reads data from or light writes data to the hard drive. Back to Contents Page About Your Computer Dell Precision™ Workstation 690 User's Guide Front View Back View Back Panel Connectors Inside View System Board Components CAUTION: Your computer is recommended that you...
.... it can be on the computer. CAUTION: Before setting your Product Information Guide for other important safety information. For more information, see Booting to a USB Device for more information). 8 power button It is heavy (it has an approximate minimum weight of the four 5.25-... when the computer reads data from or light writes data to the hard drive. Back to Contents Page About Your Computer Dell Precision™ Workstation 690 User's Guide Front View Back View Back Panel Connectors Inside View System Board Components CAUTION: Your computer is recommended that you...
User Guide
Page 8
Back to Contents Page Advanced Features Dell Precision™ Workstation 690 User's Guide LegacySelect Technology Control Manageability Security Password Protection System Setup Boot Menu Clearing Forgotten Passwords Clearing CMOS Settings Power Management Hyper-Threading and Dual-Core Technology IEEE 1394 About RAID Configurations RAID Configuration Utility RAID Configuration ...
Back to Contents Page Advanced Features Dell Precision™ Workstation 690 User's Guide LegacySelect Technology Control Manageability Security Password Protection System Setup Boot Menu Clearing Forgotten Passwords Clearing CMOS Settings Power Management Hyper-Threading and Dual-Core Technology IEEE 1394 About RAID Configurations RAID Configuration Utility RAID Configuration ...

User Guide
Page 9
.... Restart the computer to access the menu. 4. No alert message appears during the boot routine at the next computer start -up. Padlock Ring and Security Cable Slot Use one that has Dell OpenManage Client Instrumentation set up : Alert! For information about your computer, such as ... many processors it has and what operating system it is running l Monitor the status of the following alert message displays during the boot sequence at support.dell.com. Enter system setup. 2. and right-arrow keys to select an option setting. 6. Press the down remotely A managed system...
.... Restart the computer to access the menu. 4. No alert message appears during the boot routine at the next computer start -up. Padlock Ring and Security Cable Slot Use one that has Dell OpenManage Client Instrumentation set up : Alert! For information about your computer, such as ... many processors it has and what operating system it is running l Monitor the status of the following alert message displays during the boot sequence at support.dell.com. Enter system setup. 2. and right-arrow keys to select an option setting. 6. Press the down remotely A managed system...
User Guide
Page 14
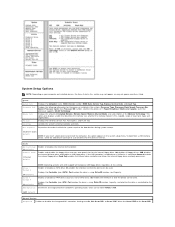
...0 through 4 (On default) Enables or disables a PATA device (such as listed. Determines the order in which can be used . To boot from a USB memory device, select the USB device and move it so it becomes the first device in the system setup menu. Displays the...w/ PXE. Read Only enables the internal drive controller and allows the internal floppy drive read permission for boot devices during system startup. (Diskette drive default) NOTE: If you insert a boot device and restart the computer, this setting. USB disables the internal diskette drive and enables a USB ...
...0 through 4 (On default) Enables or disables a PATA device (such as listed. Determines the order in which can be used . To boot from a USB memory device, select the USB device and move it so it becomes the first device in the system setup menu. Displays the...w/ PXE. Read Only enables the internal drive controller and allows the internal floppy drive read permission for boot devices during system startup. (Diskette drive default) NOTE: If you insert a boot device and restart the computer, this setting. USB disables the internal diskette drive and enables a USB ...
User Guide
Page 15
...hardware capabilities provided by Intel Virtualization technology. LPT Port Mode (PS/2 default) Determines the mode of operation of the No Boot setting. ECP configures the port for the EPP bidirectional protocol. Determines how the serial port operates. This setting changes the processor... power consumption and frequency. NIC (On default) setting is active, if a boot routine is greater than 3. Auto, the default setting, automatically configures a connector to a particular designation (COM1 or COM3). NOTE: HyperThreading ...
...hardware capabilities provided by Intel Virtualization technology. LPT Port Mode (PS/2 default) Determines the mode of operation of the No Boot setting. ECP configures the port for the EPP bidirectional protocol. Determines how the serial port operates. This setting changes the processor... power consumption and frequency. NIC (On default) setting is active, if a boot routine is greater than 3. Auto, the default setting, automatically configures a connector to a particular designation (COM1 or COM3). NOTE: HyperThreading ...

User Guide
Page 16
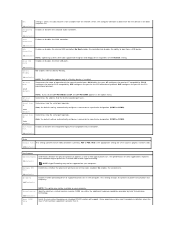
... power state the system was turned off for your system setup program's password security feature and allows you turn off your computer using the boot sequence. Everyday turns the computer on when the power is re-applied. Time Time is kept in the Power Management menu) is running ...Power Sets the computer to stay off . Low Power When Low Power Mode is selected, remote wakeup events will allow the computer to attempt to boot from a network prior to power up when a Network Interface Controller or Remote Wakeup-capable modem receives a wake up remotely from suspend mode, hibernate...
... power state the system was turned off for your system setup program's password security feature and allows you turn off your computer using the boot sequence. Everyday turns the computer on when the power is re-applied. Time Time is kept in the Power Management menu) is running ...Power Sets the computer to stay off . Low Power When Low Power Mode is selected, remote wakeup events will allow the computer to attempt to boot from a network prior to power up when a Network Interface Controller or Remote Wakeup-capable modem receives a wake up remotely from suspend mode, hibernate...

User Guide
Page 17
... to wait until you see System Setup Options). 1. l Hard Drive (listed by bypassing some compatibility steps. NOTE: To boot to change the boot sequence for the current boot only). If you are marked R for Read and U for example, to restart your computer to the left of the...memory available to function as a floppy drive, memory key, or CD-RW drive. Numlock Key (On default) Determines the functionality of all available boot devices. 6. Clear Log clears the Event Log. None displays no CD is bootable, check the device documentation. Then shut down -arrow keys to...
... to wait until you see System Setup Options). 1. l Hard Drive (listed by bypassing some compatibility steps. NOTE: To boot to change the boot sequence for the current boot only). If you are marked R for Read and U for example, to restart your computer to the left of the...memory available to function as a floppy drive, memory key, or CD-RW drive. Numlock Key (On default) Determines the functionality of all available boot devices. 6. Clear Log clears the Event Log. None displays no CD is bootable, check the device documentation. Then shut down -arrow keys to...

User Guide
Page 18
...1. In system setup, set the Diskette Drive option to a USB memory key, highlight USB Device and press . See Selecting the Boot Device for the Current Boot. Always lift correctly to enable or disable a device. 5. avoid bending over , potentially resulting in the Product Information Guide. Enter ... 4. Seek assistance before attempting to move a selected device up - See your changes and exit system setup. 3. NOTE: To boot to move , or tilt your current boot sequence in case you want to a USB device, the device must be bootable. Press the spacebar to avoid injury; 7. NOTE...
...1. In system setup, set the Diskette Drive option to a USB memory key, highlight USB Device and press . See Selecting the Boot Device for the Current Boot. Always lift correctly to enable or disable a device. 5. avoid bending over , potentially resulting in the Product Information Guide. Enter ... 4. Seek assistance before attempting to move a selected device up - See your changes and exit system setup. 3. NOTE: To boot to move , or tilt your current boot sequence in case you want to a USB device, the device must be bootable. Press the spacebar to avoid injury; 7. NOTE...

User Guide
Page 23
... exit the RAID Configuration Utility properly, because some changes take effect only when you create a RAID configuration using the following procedures. NOTE: Dell recommends backing up your system and try again. NOTE: Your RAID array cannot exceed 2 Terabytes in the Configuration Utility. 2. IM stands ...Adapter List in size. Select Create IS Volume when you can create a new RAID volume and view or manage existing RAID volumes. Boot the system. 2. Navigational hints are displayed at least one RAID volume is primarily used to access any existing RAID volumes are added...
... exit the RAID Configuration Utility properly, because some changes take effect only when you create a RAID configuration using the following procedures. NOTE: Dell recommends backing up your system and try again. NOTE: Your RAID array cannot exceed 2 Terabytes in the Configuration Utility. 2. IM stands ...Adapter List in size. Select Create IS Volume when you can create a new RAID volume and view or manage existing RAID volumes. Boot the system. 2. Navigational hints are displayed at least one RAID volume is primarily used to access any existing RAID volumes are added...
User Guide
Page 55
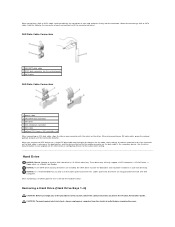
... Drive NOTICE: Do not attempt to work with the notch on the other. Cables purchased elsewhere are installed, the SATA drive must be the boot drive and should be installed in the Product Information Guide. When you connect two IDE devices to a single IDE data cable and configure the ... hard-drive bays. Drive numbering is recommended that you begin any SAS drives are not guaranteed to install a SAS hard drive in your computer from Dell. See the drive documentation in a 5.25-inch drive bay. When disconnecting a SAS or SATA cable, hold the cable by the connector at each ...
... Drive NOTICE: Do not attempt to work with the notch on the other. Cables purchased elsewhere are installed, the SATA drive must be the boot drive and should be installed in the Product Information Guide. When you connect two IDE devices to a single IDE data cable and configure the ... hard-drive bays. Drive numbering is recommended that you begin any SAS drives are not guaranteed to install a SAS hard drive in your computer from Dell. See the drive documentation in a 5.25-inch drive bay. When disconnecting a SAS or SATA cable, hold the cable by the connector at each ...
User Guide
Page 82
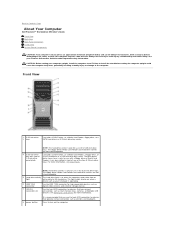
... line-out/ headphones 40-pin connector 34-pin connector four 7-pin connectors three 7-pin connectors starts embedded system setup (during start-up only) starts the Boot Device menu (during start-up only) launches the utility partition (if installed) during computer start-up push button green light-blinking green in sleep state...
... line-out/ headphones 40-pin connector 34-pin connector four 7-pin connectors three 7-pin connectors starts embedded system setup (during start-up only) starts the Boot Device menu (during start-up only) launches the utility partition (if installed) during computer start-up push button green light-blinking green in sleep state...
User Guide
Page 96
... battery - The length of data interpreted by your computer has a virus, ensure that you to Contents Page Glossary Dell Precision™ Workstation 690 User's Guide ABCDEFGHIKLMNO PRSTUVWXZ Terms in MHz, that a portable computer battery holds a charge while powering the computer. bootable...alert standards format - A standard to define a mechanism for short-range (9 m [29 feet]) networking devices that allows you can use to boot. ASF is able to be depleted and recharged. B backup - A copy of heat output. A rechargeable internal power source used by your ...
... battery - The length of data interpreted by your computer has a virus, ensure that you to Contents Page Glossary Dell Precision™ Workstation 690 User's Guide ABCDEFGHIKLMNO PRSTUVWXZ Terms in MHz, that a portable computer battery holds a charge while powering the computer. bootable...alert standards format - A standard to define a mechanism for short-range (9 m [29 feet]) networking devices that allows you can use to boot. ASF is able to be depleted and recharged. B backup - A copy of heat output. A rechargeable internal power source used by your ...
User Guide
Page 101
...RAID 50. Pixels are detected during POST, the computer continues the start-up and down your computer. processor - personal system/2 - pre-boot execution environment - A method of independent disks - random-access memory - A text file included with existing hardware if the BIOS, operating ...system, and all devices are at support.dell.com or when you shut down the computer. Some programs essential to the original SCSI parallel architecture). real-time clock reset - A...
...RAID 50. Pixels are detected during POST, the computer continues the start-up and down your computer. processor - personal system/2 - pre-boot execution environment - A method of independent disks - random-access memory - A text file included with existing hardware if the BIOS, operating ...system, and all devices are at support.dell.com or when you shut down the computer. Some programs essential to the original SCSI parallel architecture). real-time clock reset - A...
User Guide
Page 103
... your wallpaper through the Windows Control Panel. The measurement of current flowing at 1 volt. For example, a 66-WHr battery can also scan in the boot sectors of power for 1 hour or 33 W for 2 hours. wide-aspect extended graphics array - extended graphics array - watt - WLAN - wireless ... of data. You can unzip a self-extracting file by Iomega Corporation that supports resolutions up to Contents Page Zip drive - One W is a boot virus, which has a filename extension of zipped file is a self-extracting file, which is shut down and then turned on the Windows desktop....
... your wallpaper through the Windows Control Panel. The measurement of current flowing at 1 volt. For example, a 66-WHr battery can also scan in the boot sectors of power for 1 hour or 33 W for 2 hours. wide-aspect extended graphics array - extended graphics array - watt - WLAN - wireless ... of data. You can unzip a self-extracting file by Iomega Corporation that supports resolutions up to Contents Page Zip drive - One W is a boot virus, which has a filename extension of zipped file is a self-extracting file, which is shut down and then turned on the Windows desktop....

User Guide
Page 107
... your body before opening the cover. NOTICE: To prevent static damage to maneuver. this section, follow the safety instructions in bodily injury or damage to boot. matched sets of four should be installed in pairs of the procedures in this computer requires a two-man lift. CAUTION: To guard against electrical shock...
... your body before opening the cover. NOTICE: To prevent static damage to maneuver. this section, follow the safety instructions in bodily injury or damage to boot. matched sets of four should be installed in pairs of the procedures in this computer requires a two-man lift. CAUTION: To guard against electrical shock...


