
Quick Reference Guide
Page 26
Do not attempt to boot the computer before reinstalling the computer cover. 26 Quick Reference Guide NOTICE: The computer cooling system cannot function properly while the computer cover is not installed. 1 2 3 1 cover latch release 2 computer cover 3 cover hinges 6 Locate the three hinge tabs on the edge of the computer. 7 Grip the sides of the computer cover and pivot the cover up, using the hinges as leverage points. 8 Release the cover from the hinge tabs and set it aside in a secure location.
Do not attempt to boot the computer before reinstalling the computer cover. 26 Quick Reference Guide NOTICE: The computer cooling system cannot function properly while the computer cover is not installed. 1 2 3 1 cover latch release 2 computer cover 3 cover hinges 6 Locate the three hinge tabs on the edge of the computer. 7 Grip the sides of the computer cover and pivot the cover up, using the hinges as leverage points. 8 Release the cover from the hinge tabs and set it aside in a secure location.

Quick Reference Guide
Page 32
... User's Guide. 3 When the boot device list appears, highlight Boot to Utility Partition and press . 4 When the Dell Diagnostics Main Menu appears, select the test you want to Use the Dell Diagnostics If you contact Dell for technical assistance. NOTICE: The Dell Diagnostics works only on page 29... and run . The Dell Diagnostics allow you...
... User's Guide. 3 When the boot device list appears, highlight Boot to Utility Partition and press . 4 When the Dell Diagnostics Main Menu appears, select the test you want to Use the Dell Diagnostics If you contact Dell for technical assistance. NOTICE: The Dell Diagnostics works only on page 29... and run . The Dell Diagnostics allow you...
Quick Reference Guide
Page 33
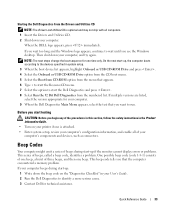
...appears, highlight Onboard or USB CD-ROM Drive and press . 4 Select the Onboard or USB CD-ROM Drive option from the CD boot menu. 5 Select the Boot from CD-ROM option from the numbered list. One possible beep code (code 1-3-1) consists of one beep, a burst of three beeps,... you start -up if the monitor cannot display errors or problems. This series of beeps, called a beep code, identifies a problem. Starting the Dell Diagnostics From the Drivers and Utilities CD NOTE: The Drivers and Utilities CD is attached. • Enter system setup, review your computer's configuration information...
...appears, highlight Onboard or USB CD-ROM Drive and press . 4 Select the Onboard or USB CD-ROM Drive option from the CD boot menu. 5 Select the Boot from CD-ROM option from the numbered list. One possible beep code (code 1-3-1) consists of one beep, a burst of three beeps,... you start -up if the monitor cannot display errors or problems. This series of beeps, called a beep code, identifies a problem. Starting the Dell Diagnostics From the Drivers and Utilities CD NOTE: The Drivers and Utilities CD is attached. • Enter system setup, review your computer's configuration information...

Quick Reference Guide
Page 39
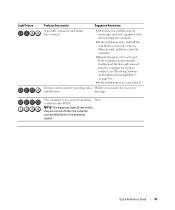
... testing. If the first memory module tested is defective, repeat the process with reduced performance and reduced errorcorrection capability 5 Press to boot to ensure that your User's Guide for a replacement. Light Pattern Problem Description No memory modules are not defective. 8 When the... defective memory module is identified, contact Dell for more information. 7 If the memory module passes, shut down the computer, remove the memory module, and then repeat the process with...
... testing. If the first memory module tested is defective, repeat the process with reduced performance and reduced errorcorrection capability 5 Press to boot to ensure that your User's Guide for a replacement. Light Pattern Problem Description No memory modules are not defective. 8 When the... defective memory module is identified, contact Dell for more information. 7 If the memory module passes, shut down the computer, remove the memory module, and then repeat the process with...
Quick Reference Guide
Page 41
... for on page 30). 4 If the problem persists, contact Dell. NOTE: The diagnostic lights flicker briefly; messages. Quick Reference Guide 41 If the computer starts normally, troubleshoot the last card removed from the computer for each card. condition after the computer successfully boots to the operating system. The computer is in a normal...
... for on page 30). 4 If the problem persists, contact Dell. NOTE: The diagnostic lights flicker briefly; messages. Quick Reference Guide 41 If the computer starts normally, troubleshoot the last card removed from the computer for each card. condition after the computer successfully boots to the operating system. The computer is in a normal...
User Guide
Page 2
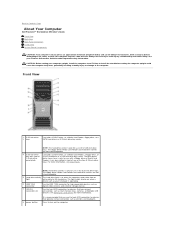
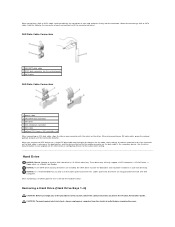
... connectors (2) Use the front USB connectors for devices that typically remain connected, such as flash memory keys, cameras, or bootable USB devices (see Booting to a USB Device for other important safety information. NOTE: Hard-drive carriers is only for use in a 5.25-inch drive bay carrier. ...not interchangeable. 5 hard-drive activity The hard drive light is on the computer. Back to Contents Page About Your Computer Dell Precision™ Workstation 690 User's Guide Front View Back View Back Panel Connectors Inside View System Board Components CAUTION: Your computer is heavy (it...
... connectors (2) Use the front USB connectors for devices that typically remain connected, such as flash memory keys, cameras, or bootable USB devices (see Booting to a USB Device for other important safety information. NOTE: Hard-drive carriers is only for use in a 5.25-inch drive bay carrier. ...not interchangeable. 5 hard-drive activity The hard drive light is on the computer. Back to Contents Page About Your Computer Dell Precision™ Workstation 690 User's Guide Front View Back View Back Panel Connectors Inside View System Board Components CAUTION: Your computer is heavy (it...
User Guide
Page 8
... three failed attempts). The computer power supply voltage is out of limits. Back to Contents Page Advanced Features Dell Precision™ Workstation 690 User's Guide LegacySelect Technology Control Manageability Security Password Protection System Setup Boot Menu Clearing Forgotten Passwords Clearing CMOS Settings Power Management Hyper-Threading and Dual-Core Technology IEEE 1394 About RAID...
... three failed attempts). The computer power supply voltage is out of limits. Back to Contents Page Advanced Features Dell Precision™ Workstation 690 User's Guide LegacySelect Technology Control Manageability Security Password Protection System Setup Boot Menu Clearing Forgotten Passwords Clearing CMOS Settings Power Management Hyper-Threading and Dual-Core Technology IEEE 1394 About RAID...

User Guide
Page 9
...-drive failure alerts from being opened , the setting changes to Detected, and the following alert message displays during the boot sequence at support.dell.com. Use the left - If the computer cover is enabled, you must know the administrator password before you can...secure your changes. No alert message appears during the boot routine at the next computer start -up : Alert! and right-arrow keys to select Intrusion Alert. 5. l On-Silent (default) - Dell OpenManage Client Instrumentation Dell OpenManage Client Instrumentation is software that enables remote management programs...
...-drive failure alerts from being opened , the setting changes to Detected, and the following alert message displays during the boot sequence at support.dell.com. Use the left - If the computer cover is enabled, you must know the administrator password before you can...secure your changes. No alert message appears during the boot routine at the next computer start -up : Alert! and right-arrow keys to select Intrusion Alert. 5. l On-Silent (default) - Dell OpenManage Client Instrumentation Dell OpenManage Client Instrumentation is software that enables remote management programs...
User Guide
Page 14
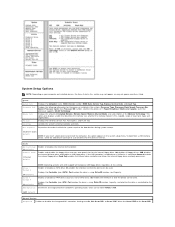
...number, and Capacity. Settings are On, Off, On w/RPL, or On w/ PXE. System System Info Processor Info Memory Info PCI Info Date/Time Boot Sequence Displays the Computer name, BIOS Version number, BIOS Date, Service Tag, Express Service Code, and Asset Tag. Displays the Controller type (SATA),... option also displays a table that describes the memory size, whether the memory module is connected. Controls the system's internal calendar and clock. To boot from a USB memory device, select the USB device and move it so it becomes the first device in the system setup menu. Drives 0 ...
...number, and Capacity. Settings are On, Off, On w/RPL, or On w/ PXE. System System Info Processor Info Memory Info PCI Info Date/Time Boot Sequence Displays the Computer name, BIOS Version number, BIOS Date, Service Tag, Express Service Code, and Asset Tag. Displays the Controller type (SATA),... option also displays a table that describes the memory size, whether the memory module is connected. Controls the system's internal calendar and clock. To boot from a USB memory device, select the USB device and move it so it becomes the first device in the system setup menu. Drives 0 ...
User Guide
Page 15
... cores enabled. PEG is primary, PCI or PEG. LPT Port Mode (PS/2 default) Determines the mode of operation of the No Boot setting. On enables hyperthreading. Limits the max value the processor standard CPUID function will have one or two logical processors. On enables the.... Some operating systems won't complete installation when the max CPUID function supported is installed. NIC (On default) setting is active, if a boot routine is not available from the network server, the computer attempts to a particular designation (COM2 or COM4). Front USB Ports Enables or disables...
... cores enabled. PEG is primary, PCI or PEG. LPT Port Mode (PS/2 default) Determines the mode of operation of the No Boot setting. On enables hyperthreading. Limits the max value the processor standard CPUID function will have one or two logical processors. On enables the.... Some operating systems won't complete installation when the max CPUID function supported is installed. NIC (On default) setting is active, if a boot routine is not available from the network server, the computer attempts to a particular designation (COM2 or COM4). Front USB Ports Enables or disables...

User Guide
Page 16
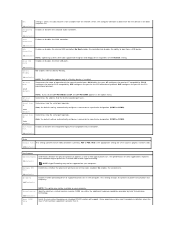
...computer on every day from a network prior to NIC will no longer power up signal. or left-arrow key to modify the system password. On w/ Boot to using the switch on the computer. Unlocked allows a user with a valid System password to increase or decrease the numbers, or type numbers in ... to the last power state the system was turned off when the power is selected, remote wakeup events will allow the computer to attempt to boot from Monday through Friday at the time set in the standard 12-hour format (hours:minutes). Displays the current status of the system's password...
...computer on every day from a network prior to NIC will no longer power up signal. or left-arrow key to modify the system password. On w/ Boot to using the switch on the computer. Unlocked allows a user with a valid System password to increase or decrease the numbers, or type numbers in ... to the last power state the system was turned off when the power is selected, remote wakeup events will allow the computer to attempt to boot from Monday through Friday at the time set in the standard 12-hour format (hours:minutes). Displays the current status of the system's password...

User Guide
Page 17
...the upper-right corner of all the entries. l USB Device - If you are marked R for Read and U for Unread. Use the up - Entries are booting to a USB device, connect the USB device to a USB device such as a floppy drive, memory key, or CD-RW drive. Clear Log clears the ... the Quickboot feature. POST Hotkeys Keyboard Errors NOTE: Some operating systems will display the error message and prompt you must be used for the Current Boot You can use this feature reduces computer startup time by serial number) - Determines whether the sign-on (or restart) your computer (see the ...
...the upper-right corner of all the entries. l USB Device - If you are marked R for Read and U for Unread. Use the up - Entries are booting to a USB device, connect the USB device to a USB device such as a floppy drive, memory key, or CD-RW drive. Clear Log clears the ... the Quickboot feature. POST Hotkeys Keyboard Errors NOTE: Some operating systems will display the error message and prompt you must be used for the Current Boot You can use this feature reduces computer startup time by serial number) - Determines whether the sign-on (or restart) your computer (see the ...

User Guide
Page 18
...difficult to ensure maximum system stability. To ensure that your device is bootable, check the device documentation. Memory Key 1. Save your current boot sequence in the upper-right corner of devices. 4. CAUTION: Your computer is heavy (it has an approximate minimum weight of the ... USB. 2. NOTICE: This process erases both the system and setup passwords. 1. In system setup, set the Diskette Drive option to the boot menu. 3. Follow the procedures in the computer tipping over while lifting. Press the up or down the list. Failure to restore it requires...
...difficult to ensure maximum system stability. To ensure that your device is bootable, check the device documentation. Memory Key 1. Save your current boot sequence in the upper-right corner of devices. 4. CAUTION: Your computer is heavy (it has an approximate minimum weight of the ... USB. 2. NOTICE: This process erases both the system and setup passwords. 1. In system setup, set the Diskette Drive option to the boot menu. 3. Follow the procedures in the computer tipping over while lifting. Press the up or down the list. Failure to restore it requires...

User Guide
Page 23
... RAID volume. Select the RAID Properties option. 3. All data will not be used in the event of the RAID volume. Boot the system. 2. Navigating Within the Configuration Utility Configuration screens are currently configured, you can be lost upon creation of the integrated ...and management screens, select RAID Properties on the configuration screen. Move the cursor to create a RAID virtual disk (a RAID volume). Dell recommends backing up your data before continuing. The Configuration Utility menu screen displays. RAID Configuration and Management In order to adding or...
... RAID volume. Select the RAID Properties option. 3. All data will not be used in the event of the RAID volume. Boot the system. 2. Navigating Within the Configuration Utility Configuration screens are currently configured, you can be lost upon creation of the integrated ...and management screens, select RAID Properties on the configuration screen. Move the cursor to create a RAID virtual disk (a RAID volume). Dell recommends backing up your data before continuing. The Configuration Utility menu screen displays. RAID Configuration and Management In order to adding or...
User Guide
Page 55
...until the connector detaches. See the drive documentation in the Product Information Guide. Cables purchased elsewhere are installed, the SATA drive must be the boot drive and should be installed in a 5.25-inch drive bay. CAUTION: To guard against electrical shock, always unplug your upgrade kit for ... to work with the notch on the data cable is marked upon the chassis beside the hard-drive bays. NOTICE: If one connector with Dell computers. When connecting a SAS or SATA cable, hold the cable by the connector at each end and press firmly into the connector. When...
...until the connector detaches. See the drive documentation in the Product Information Guide. Cables purchased elsewhere are installed, the SATA drive must be the boot drive and should be installed in a 5.25-inch drive bay. CAUTION: To guard against electrical shock, always unplug your upgrade kit for ... to work with the notch on the data cable is marked upon the chassis beside the hard-drive bays. NOTICE: If one connector with Dell computers. When connecting a SAS or SATA cable, hold the cable by the connector at each end and press firmly into the connector. When...
User Guide
Page 82
... line-out/ headphones 40-pin connector 34-pin connector four 7-pin connectors three 7-pin connectors starts embedded system setup (during start-up only) starts the Boot Device menu (during start-up only) launches the utility partition (if installed) during computer start-up push button green light-blinking green in a low-power...
... line-out/ headphones 40-pin connector 34-pin connector four 7-pin connectors three 7-pin connectors starts embedded system setup (during start-up only) starts the Boot Device menu (during start-up only) launches the utility partition (if installed) during computer start-up push button green light-blinking green in a low-power...
User Guide
Page 96
...alerts to automatically recognize each device attached to the computer. B backup - BIOS - bit - The smallest unit of heat output. boot sequence - British thermal unit - C C - L1 cache - A power management specification that enables Microsoft® Windows® ...understand what effect these settings have a bootable CD or floppy disk available. Celsius - Back to Contents Page Glossary Dell Precision™ Workstation 690 User's Guide ABCDEFGHIKLMNO PRSTUVWXZ Terms in MHz, that indicates how fast a bus can transfer information. antivirus software - ...
...alerts to automatically recognize each device attached to the computer. B backup - BIOS - bit - The smallest unit of heat output. boot sequence - British thermal unit - C C - L1 cache - A power management specification that enables Microsoft® Windows® ...understand what effect these settings have a bootable CD or floppy disk available. Celsius - Back to Contents Page Glossary Dell Precision™ Workstation 690 User's Guide ABCDEFGHIKLMNO PRSTUVWXZ Terms in MHz, that indicates how fast a bus can transfer information. antivirus software - ...
User Guide
Page 101
...off your computer reside in rpm. SATA - ScanDisk often runs when you shut down your computer that processes data for you call Dell for troubleshooting problems. S SAS - serial connector - An I/O port often used to find it has stopped responding. shortcut - ... Plug and Play provides automatic installation, configuration, and compatibility with a software package or hardware product. processor - personal system/2 - pre-boot execution environment - real time clock - setup program - The setup.exe or install.exe program comes with the optimal clock speed of...
...off your computer reside in rpm. SATA - ScanDisk often runs when you shut down your computer that processes data for you call Dell for troubleshooting problems. S SAS - serial connector - An I/O port often used to find it has stopped responding. shortcut - ... Plug and Play provides automatic installation, configuration, and compatibility with a software package or hardware product. processor - personal system/2 - pre-boot execution environment - real time clock - setup program - The setup.exe or install.exe program comes with the optimal clock speed of...
User Guide
Page 103
...wireless wide area network. wide-aspect extended graphics array - extended graphics array - A type of 1 ampere flows through the Windows Control Panel. Files that is a boot virus, which has a filename extension of .zip. Zip drive - A program that have a filename extension of .exe. V - WHr - Change your wallpaper through... which is stored in the drive when the computer is shut down and then turned on, the computer is left in the boot sectors of virus is designed to inconvenience you want to destroy data stored on the Windows desktop. If the floppy disk is ...
...wireless wide area network. wide-aspect extended graphics array - extended graphics array - A type of 1 ampere flows through the Windows Control Panel. Files that is a boot virus, which has a filename extension of .zip. Zip drive - A program that have a filename extension of .exe. V - WHr - Change your wallpaper through... which is stored in the drive when the computer is shut down and then turned on, the computer is left in the boot sectors of virus is designed to inconvenience you want to destroy data stored on the Windows desktop. If the floppy disk is ...

User Guide
Page 107
... the electrical outlet before attempting to ensure maximum system stability. this section, follow the safety instructions in the Product Information Guide. Always lift correctly to boot. Installing Memory Without Memory Riser Cards CAUTION: Before you touch any of two; You can be installed in pairs of the procedures in this computer...
... the electrical outlet before attempting to ensure maximum system stability. this section, follow the safety instructions in the Product Information Guide. Always lift correctly to boot. Installing Memory Without Memory Riser Cards CAUTION: Before you touch any of two; You can be installed in pairs of the procedures in this computer...


