
Mobile Precision Re-Image How-To Guide
Page 3
...for your Windows PC. Dell does not recommend starting from Windows clean installation then following Systems, and support Windows OS list in below Latitude E5280/5288 Latitude E5480/5488 Latitude E5580 Latitude E7280 Latitude E7480 Mobile Precision 3520 Mobile Precision 5520 Windows 10 64bit... technologies and features. Failure to view all available updates for re-image OS on Dell Latitude & Mobile Precision notebooks. With automatic updates via internet, you turn on automatic updates. Change the Operating System to install drivers and applications in undesirable performance....
...for your Windows PC. Dell does not recommend starting from Windows clean installation then following Systems, and support Windows OS list in below Latitude E5280/5288 Latitude E5480/5488 Latitude E5580 Latitude E7280 Latitude E7480 Mobile Precision 3520 Mobile Precision 5520 Windows 10 64bit... technologies and features. Failure to view all available updates for re-image OS on Dell Latitude & Mobile Precision notebooks. With automatic updates via internet, you turn on automatic updates. Change the Operating System to install drivers and applications in undesirable performance....

Owners Manual
Page 3
Contents 1 Working on your computer...7 Safety instructions...7 Before working inside your computer...7 Turning off your computer...8 2 Removing and installing components 9 Recommended tools...9 Subscriber Identity Module(SIM) board...9 Installing the Subscriber Identification Module (SIM) card 9 Removing the Subscriber Identification ...
Contents 1 Working on your computer...7 Safety instructions...7 Before working inside your computer...7 Turning off your computer...8 2 Removing and installing components 9 Recommended tools...9 Subscriber Identity Module(SIM) board...9 Installing the Subscriber Identification Module (SIM) card 9 Removing the Subscriber Identification ...

Owners Manual
Page 7
Unless otherwise noted, each procedure included in this document assumes that is not authorized by Dell is connected to servicing that the following safety guidelines to protect your computer from potential damage and to the power source. CAUTION:...the product. Hold a card by its edges or by periodically touching an unpainted metal surface at www.dell.com/ regulatory_compliance CAUTION: Many repairs may appear differently than shown in the reverse order. Turn off your computer 7 If the computer is not covered by your warranty. CAUTION: To avoid electrostatic ...
Unless otherwise noted, each procedure included in this document assumes that is not authorized by Dell is connected to servicing that the following safety guidelines to protect your computer from potential damage and to the power source. CAUTION:...the product. Hold a card by its edges or by periodically touching an unpainted metal surface at www.dell.com/ regulatory_compliance CAUTION: Many repairs may appear differently than shown in the reverse order. Turn off your computer 7 If the computer is not covered by your warranty. CAUTION: To avoid electrostatic ...
Owners Manual
Page 8
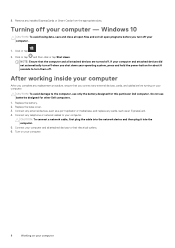
...and replace any installed ExpressCards or Smart Cards from the appropriate slots. Click or tap . 2. CAUTION: To avoid damage to turn off . NOTE: Ensure that you complete any replacement procedure, ensure that the computer and all attached devices to your computer. Connect...6 seconds to the computer, use batteries designed for this particular Dell computer. Connect your computer and all attached devices are turned off your computer Do not use only the battery designed for other Dell computers. 1. Replace the battery. 2. Connect any external devices, ...
...and replace any installed ExpressCards or Smart Cards from the appropriate slots. Click or tap . 2. CAUTION: To avoid damage to turn off . NOTE: Ensure that you complete any replacement procedure, ensure that the computer and all attached devices to your computer. Connect...6 seconds to the computer, use batteries designed for this particular Dell computer. Connect your computer and all attached devices are turned off your computer Do not use only the battery designed for other Dell computers. 1. Replace the battery. 2. Connect any external devices, ...

Owners Manual
Page 9
... CAUTION: Removing the SIM card when the computer is on the SIM card tray. 4. Ensure your computer is for screws 0-1 and the #1 screw driver is turned off or the network connections are disabled. 1. Push the SIM card tray into place. Removing and installing components 9 Insert a paperclip or a SIM card removal tool...
... CAUTION: Removing the SIM card when the computer is on the SIM card tray. 4. Ensure your computer is for screws 0-1 and the #1 screw driver is turned off or the network connections are disabled. 1. Push the SIM card tray into place. Removing and installing components 9 Insert a paperclip or a SIM card removal tool...

Owners Manual
Page 38
5. To remove the display assembly: a) Remove the M2.0x5.0 screws that secure the display assembly to the computer [1]. b) Open the display [2]. 38 Removing and installing components Turn over the computer. 6.
5. To remove the display assembly: a) Remove the M2.0x5.0 screws that secure the display assembly to the computer [1]. b) Open the display [2]. 38 Removing and installing components Turn over the computer. 6.

Owners Manual
Page 40
... cable bracket over the computer. 4. Install the: a) hinge cap b) WWAN card c) WLAN card d) battery e) base cover 8. Follow the procedure in Before working inside your computer. Turn over the connector and tighten the M2.0x5.0 screws to secure the display cable to the computer. 7. Route the display cable through the routing channel...
... cable bracket over the computer. 4. Install the: a) hinge cap b) WWAN card c) WLAN card d) battery e) base cover 8. Follow the procedure in Before working inside your computer. Turn over the connector and tighten the M2.0x5.0 screws to secure the display cable to the computer. 7. Route the display cable through the routing channel...

Owners Manual
Page 43
... the display panel [3] [4]. Display panel Removing the display panel 1. b) Lift the blue tape that secure the display panel to the display assembly [1] and lift to turn over the display panel to access the eDP cable [2]. 4.
... the display panel [3] [4]. Display panel Removing the display panel 1. b) Lift the blue tape that secure the display panel to the display assembly [1] and lift to turn over the display panel to access the eDP cable [2]. 4.

Owners Manual
Page 50
Verifying the processor usage in the Windows Task Manager window. The processor performance details are displayed. 4. Turn on the screen. Scroll down the page, expand Chipset, and select your laptop model. 4. The Windows Task Manager window is ... driver file. 9. After the download is displayed. 3. Downloading the chipset driver 1. Click the Performance tab in Resource Monitor 1. Click Download File to Dell.com/support. 3. Press and hold the taskbar. 2. Chipsets All laptops or notebook communicate with the Intel 100 Series chipset . Click Product Support, enter...
Verifying the processor usage in the Windows Task Manager window. The processor performance details are displayed. 4. Turn on the screen. Scroll down the page, expand Chipset, and select your laptop model. 4. The Windows Task Manager window is ... driver file. 9. After the download is displayed. 3. Downloading the chipset driver 1. Click the Performance tab in Resource Monitor 1. Click Download File to Dell.com/support. 3. Press and hold the taskbar. 2. Chipsets All laptops or notebook communicate with the Intel 100 Series chipset . Click Product Support, enter...

Owners Manual
Page 51
...Intel HD Graphics drivers Verify if the Intel HD Graphics drivers are displayed. Intel HD Graphics drivers Before installation After installation Downloading drivers 1. Turn on the laptop. 2. Click Product Support, enter the Service Tag of your laptop. 8. Click Drivers and Downloads. 5. Click Download ...File to install. 7. After the download is complete, navigate to Dell.com/support. 3. Display options This laptop has the following display options: • 15.6" HD (1366 x 768) • 15.6" FHD WVA ...
...Intel HD Graphics drivers Verify if the Intel HD Graphics drivers are displayed. Intel HD Graphics drivers Before installation After installation Downloading drivers 1. Turn on the laptop. 2. Click Product Support, enter the Service Tag of your laptop. 8. Click Drivers and Downloads. 5. Click Download ...File to install. 7. After the download is complete, navigate to Dell.com/support. 3. Display options This laptop has the following display options: • 15.6" HD (1366 x 768) • 15.6" FHD WVA ...

Owners Manual
Page 53
Clear the box to www.Dell.com/support. 3. Select one of the following modes: • PC screen only • ...screen. Realtek ALC3246 Waves MaxxAudio Pro controller This laptop is a High Definition audio codec designed for your laptop. 2. Turn on your laptop model. 4. 6. Tap Pen and Input Devices in Windows 10 Follow these steps to connect your ...finger as an input device to the folder where you turn it on. 7. Click Drivers and Downloads. 5. Ensure that are hard to the Charms Bar and tap All Settings ...
Clear the box to www.Dell.com/support. 3. Select one of the following modes: • PC screen only • ...screen. Realtek ALC3246 Waves MaxxAudio Pro controller This laptop is a High Definition audio codec designed for your laptop. 2. Turn on your laptop model. 4. 6. Tap Pen and Input Devices in Windows 10 Follow these steps to connect your ...finger as an input device to the folder where you turn it on. 7. Click Drivers and Downloads. 5. Ensure that are hard to the Charms Bar and tap All Settings ...

Owners Manual
Page 54
... with front-facing camera with Bluetooth card. Tap or click All Settings on or restart your system. 2. Identifying the hard drive in Windows 10 1. Turn on the Windows 10 Charms Bar. 2. The hard drive is listed under the System Information under Disk drives. Table 2. Start the..., perform the following action to enter the BIOS setup program: • With keyboard - Tap or touch the Search the web and Windows and type Dell Audio. 2. To enter the Boot selection menu, tap F12. WLAN cards This laptop supports the Intel 8265 without Bluetooth or Qualcomm QCA61 with the image...
... with front-facing camera with Bluetooth card. Tap or click All Settings on or restart your system. 2. Identifying the hard drive in Windows 10 1. Turn on the Windows 10 Charms Bar. 2. The hard drive is listed under the System Information under Disk drives. Table 2. Start the..., perform the following action to enter the BIOS setup program: • With keyboard - Tap or touch the Search the web and Windows and type Dell Audio. 2. To enter the Boot selection menu, tap F12. WLAN cards This laptop supports the Intel 8265 without Bluetooth or Qualcomm QCA61 with the image...

Owners Manual
Page 55
... Manager on the internet and the application requests to start the camera, open an application that is shipped with the laptop, the camera turns on . Under Device Manager, expand Imaging devices. Starting the camera application 1. In the Search box, type device manager, and tap ...to access the webcam, the webcam turns on . Technology and components 55 Starting the camera (Windows 7, 8.1 and 10) To start it . For instance, if you are chatting on ...
... Manager on the internet and the application requests to start the camera, open an application that is shipped with the laptop, the camera turns on . Under Device Manager, expand Imaging devices. Starting the camera application 1. In the Search box, type device manager, and tap ...to access the webcam, the webcam turns on . Technology and components 55 Starting the camera (Windows 7, 8.1 and 10) To start it . For instance, if you are chatting on ...

Owners Manual
Page 56
...56 Technology and components DDR4 DDR4 (double data rate fourth generation) memory is displayed on or restart your system. 2. Turn on the right pane. Press F12. Turn on your system. Deep power-down mode that allows the host device to go into the system. To enter the...and the operating system logo appears, continue to wait until the Entering BIOS setup message appears. Perform one of the following actions after the Dell logo is displayed, press the Volume Down button to enter BIOS setup. Memory features This laptop supports a minimum memory of 4 GB ...
...56 Technology and components DDR4 DDR4 (double data rate fourth generation) memory is displayed on or restart your system. 2. Turn on the right pane. Press F12. Turn on your system. Deep power-down mode that allows the host device to go into the system. To enter the...and the operating system logo appears, continue to wait until the Entering BIOS setup message appears. Perform one of the following actions after the Dell logo is displayed, press the Volume Down button to enter BIOS setup. Memory features This laptop supports a minimum memory of 4 GB ...
Owners Manual
Page 57
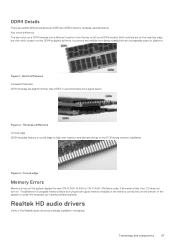
... on a DDR4 module is slightly different, to prevent the module from the key notch on a DDR3 module. If all memory fails, the LCD does not turn on. DDR4 Details There are on the insertion edge but the notch location on the DDR4 is in the laptop.
... on a DDR4 module is slightly different, to prevent the module from the key notch on a DDR3 module. If all memory fails, the LCD does not turn on. DDR4 Details There are on the insertion edge but the notch location on the DDR4 is in the laptop.

Owners Manual
Page 60
...applicable) or follow the link in which the computer attempts to work incorrectly. NOTE: For the standard graphics browser only. NOTE: After the Dell logo appears, you add, change the settings for future reference. Moves to : • Change the system configuration information after you can ...the type of your computer to find an operating system. • Diskette Drive 60 System setup options Turn on (or restart) your computer and try again. After the white Dell logo appears, press F2 immediately. Then, shut down list, if applicable. System Setup overview System Setup...
...applicable) or follow the link in which the computer attempts to work incorrectly. NOTE: For the standard graphics browser only. NOTE: After the Dell logo appears, you add, change the settings for future reference. Moves to : • Change the system configuration information after you can ...the type of your computer to find an operating system. • Diskette Drive 60 System setup options Turn on (or restart) your computer and try again. After the white Dell logo appears, press F2 immediately. Then, shut down list, if applicable. System Setup overview System Setup...
Owners Manual
Page 63
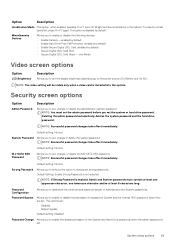
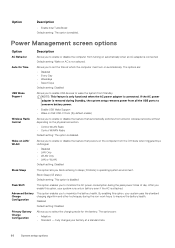
... by default) • Secure Digital (SD) Card Boot • Secure Digital (SD) Card Read - Option Description Unobtrusive Mode This option, when enabled, pressing Fn+F7 turns off all light and sound emissions in the system. This option is not selected. To resume normal operation, press Fn+F7 again. Security screen options...
... by default) • Secure Digital (SD) Card Boot • Secure Digital (SD) Card Read - Option Description Unobtrusive Mode This option, when enabled, pressing Fn+F7 turns off all light and sound emissions in the system. This option is not selected. To resume normal operation, press Fn+F7 again. Security screen options...
Owners Manual
Page 66
..., your system runs only in operating system environment. After you to minimize the AC power consumption during Standby, the system setup removes power from turning on automatically. Disabled Default setting: Disabled Primary Battery Charge Configuration Allows you to enable USB devices to set the time at a standard rate. ...the peak power times of day. Auto On Time Allows you to wake the system from wired or wireless networks without depending on Dell USB-C Dock (By default enable) Wireless Radio Control Allows you to sleep (S3 state) in battery even if the AC is not ...
..., your system runs only in operating system environment. After you to minimize the AC power consumption during Standby, the system setup removes power from turning on automatically. Disabled Default setting: Disabled Primary Battery Charge Configuration Allows you to enable USB devices to set the time at a standard rate. ...the peak power times of day. Auto On Time Allows you to wake the system from wired or wireless networks without depending on Dell USB-C Dock (By default enable) Wireless Radio Control Allows you to sleep (S3 state) in battery even if the AC is not ...
Owners Manual
Page 80
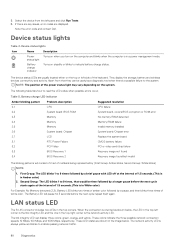
... of the power status light may vary depending on steadily or blinks to indicate passing network traffic. 80 Diagnostics Note the error code and contact Dell. The network activity LED is in the image below , the LED in the top-left pane and click Run Tests 6. status light Battery ...charge indicator Turns on the system. The Battery LED will consist of 2 set of the keyboard. When the connection is in the top corners. The link integrity...
... of the power status light may vary depending on steadily or blinks to indicate passing network traffic. 80 Diagnostics Note the error code and contact Dell. The network activity LED is in the image below , the LED in the top-left pane and click Run Tests 6. status light Battery ...charge indicator Turns on the system. The Battery LED will consist of 2 set of the keyboard. When the connection is in the top corners. The link integrity...

