Hardware Owners Manual
Page 7
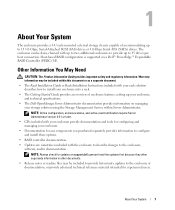
...a separate document. • The Rack Installation Guide or Rack Installation Instructions included with your rack solution describes how to install your enclosure into a rack. • The Getting Started Guide provides an overview of accommodating up to 45... drives per host connection. 1 About Your System The enclosure provides a 3-U rack-mounted external storage chassis capable of enclosure features, setting up your enclosure, and technical specifications. • The Dell...
...a separate document. • The Rack Installation Guide or Rack Installation Instructions included with your rack solution describes how to install your enclosure into a rack. • The Getting Started Guide provides an overview of accommodating up to 45... drives per host connection. 1 About Your System The enclosure provides a 3-U rack-mounted external storage chassis capable of enclosure features, setting up your enclosure, and technical specifications. • The Dell...
Hardware Owners Manual
Page 19
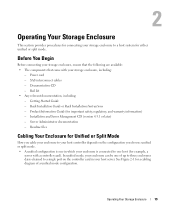
...daisy-chained to a single port on the controller card in your host server. Operating Your Storage Enclosure 19 Rack Installation Guide or Rack Installation Instructions - Before You Begin Before connecting your storage enclosure, ensure that the following are available: • The ...is connected to one of a unified mode configuration. See Figure 2-1 for example, a server with your storage enclosure, including: - Installation and Server Management CD (version 4.5.1 or later) - 2 Operating Your Storage Enclosure This section provides procedures for connecting your storage enclosure...
...daisy-chained to a single port on the controller card in your host server. Operating Your Storage Enclosure 19 Rack Installation Guide or Rack Installation Instructions - Before You Begin Before connecting your storage enclosure, ensure that the following are available: • The ...is connected to one of a unified mode configuration. See Figure 2-1 for example, a server with your storage enclosure, including: - Installation and Server Management CD (version 4.5.1 or later) - 2 Operating Your Storage Enclosure This section provides procedures for connecting your storage enclosure...
Hardware Owners Manual
Page 22
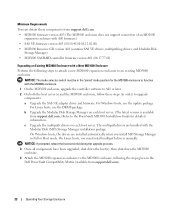
b Upgrade the Modular Disk Storage Manager on each host server. (The latest version is available from support.dell.com.) Refer to the PowerVault MD3000 Installation Guide for the MD1000 enclosure to function with the MD3000 enclosure. 1 On the MD3000 enclosure, upgrade the controller software to A01 or later. 2 On both the host server(s) and ...
b Upgrade the Modular Disk Storage Manager on each host server. (The latest version is available from support.dell.com.) Refer to the PowerVault MD3000 Installation Guide for the MD1000 enclosure to function with the MD3000 enclosure. 1 On the MD3000 enclosure, upgrade the controller software to A01 or later. 2 On both the host server(s) and ...
Hardware Owners Manual
Page 23
... later. b Upgrade the MD Storage Manager on an MD1000 expansion enclosure from support.dell.com). You must install the multipath driver manually. 5 Stop all MD1000 enclosure data before attempting the expansion. 1 While the MD1000 expansion enclosure is an error that was previously attached to the PowerVault MD3000 Installation Guide for an MD3000 enclosure, the physical disks of the...
... later. b Upgrade the MD Storage Manager on an MD1000 expansion enclosure from support.dell.com). You must install the multipath driver manually. 5 Stop all MD1000 enclosure data before attempting the expansion. 1 While the MD1000 expansion enclosure is an error that was previously attached to the PowerVault MD3000 Installation Guide for an MD3000 enclosure, the physical disks of the...

Getting Started Guide: (English, Brazilian Portuguese, and Spanish)
Page 6
...Owner's Manual. Warranty information may be included within this guide or if the system does not perform as a separate document. • The Rack Installation Instructions or Rack Installation Guide included with your rack solution describes how to install your system into a rack. • The Hardware ...This service may be offered in this document or as expected, see www.dell.com/training for configuring and managing your Product Information Guide. NOTE: Turn off the host server before installing and configuring the system. see your system for experienced users or technicians....
...Owner's Manual. Warranty information may be included within this guide or if the system does not perform as a separate document. • The Rack Installation Instructions or Rack Installation Guide included with your rack solution describes how to install your system into a rack. • The Hardware ...This service may be offered in this document or as expected, see www.dell.com/training for configuring and managing your Product Information Guide. NOTE: Turn off the host server before installing and configuring the system. see your system for experienced users or technicians....

Getting Started Guide: (English, Simplified Chinese, French, German, Greek, Hebrew, Polish, Russian, Turkish and Spanish)
Page 6
... document or as expected, see www.dell.com/training for the first time. 4 Getting Started With Your System This service may be included to provide last-minute updates to the system or documentation or advanced technical reference material intended for configuring and managing your Product Information Guide. Installation and Configuration CAUTION: Before performing...
... document or as expected, see www.dell.com/training for the first time. 4 Getting Started With Your System This service may be included to provide last-minute updates to the system or documentation or advanced technical reference material intended for configuring and managing your Product Information Guide. Installation and Configuration CAUTION: Before performing...
Getting Started Guide (English, Japanese, Korean, Simplified Chinese, and Traditional Chinese)
Page 6
...dell.com/training for more information. This section describes the steps to set up your system. • Release notes or readme files may be included within this guide or if the system does not perform as a separate document. • The Rack Installation Instructions or Rack Installation Guide... included with your rack solution describes how to install your system into a rack. • The Hardware ...
...dell.com/training for more information. This section describes the steps to set up your system. • Release notes or readme files may be included within this guide or if the system does not perform as a separate document. • The Rack Installation Instructions or Rack Installation Guide... included with your rack solution describes how to install your system into a rack. • The Hardware ...
Rack Installation Guide
Page 7
.... For complete safety information, see the Product Information Guide. CAUTION: After installing components in serious injury. the slide rails can pinch your responsibility to the floor, and that the full weight of a Dell rack. If you install the kit in a rack. Dell disclaims all applicable safety standards and local electric code requirements... into the rack, carefully extend the rail into a locking position, and then slide the component into or out of a rack; Rack Installation Guide 5 Safety Instructions Use the following precautions for rack stability and safety.
.... For complete safety information, see the Product Information Guide. CAUTION: After installing components in serious injury. the slide rails can pinch your responsibility to the floor, and that the full weight of a Dell rack. If you install the kit in a rack. Dell disclaims all applicable safety standards and local electric code requirements... into the rack, carefully extend the rail into a locking position, and then slide the component into or out of a rack; Rack Installation Guide 5 Safety Instructions Use the following precautions for rack stability and safety.

Rack Installation Guide
Page 8
... the rack. They do not have brakes. NOTE: For instructions on their casters. CAUTION: Do not install rack kit components designed for another system may occur. Installation Instructions This installation guide provides instructions for installing one or more systems in the Rack." Use extreme caution while moving the rack cabinet. Retract the leveling feet when...
... the rack. They do not have brakes. NOTE: For instructions on their casters. CAUTION: Do not install rack kit components designed for another system may occur. Installation Instructions This installation guide provides instructions for installing one or more systems in the Rack." Use extreme caution while moving the rack cabinet. Retract the leveling feet when...

Rack Installation Guide
Page 9
...felt-tip pen (to install stabilizers accordingly before installing components in a rack could cause the rack to other racks. Four-Post Rack Installation Before attempting this installation, read through this ...entire procedure carefully. See the documentation provided with the rack cabinet for instructions on racks joined to tip over . Rack Stabilizer Feet CAUTION: Before installing systems in bodily injury under certain circumstances. Failure to mark the mounting holes during installation) Rack Installation Guide...
...felt-tip pen (to install stabilizers accordingly before installing components in a rack could cause the rack to other racks. Four-Post Rack Installation Before attempting this installation, read through this ...entire procedure carefully. See the documentation provided with the rack cabinet for instructions on racks joined to tip over . Rack Stabilizer Feet CAUTION: Before installing systems in bodily injury under certain circumstances. Failure to mark the mounting holes during installation) Rack Installation Guide...
Rack Installation Guide
Page 10
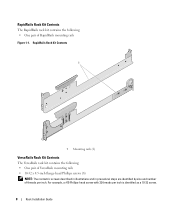
... (2) VersaRails Rack Kit Contents The VersaRails rack kit contains the following : • One pair of threads per inch is identified as a 10-32 screw. 8 Rack Installation Guide RapidRails Rack Kit Contents The RapidRails rack kit contains the following : • One pair of VersaRails mounting rails • 10-32 x 0.5-inch flange-head Phillips...
... (2) VersaRails Rack Kit Contents The VersaRails rack kit contains the following : • One pair of threads per inch is identified as a 10-32 screw. 8 Rack Installation Guide RapidRails Rack Kit Contents The RapidRails rack kit contains the following : • One pair of VersaRails mounting rails • 10-32 x 0.5-inch flange-head Phillips...

Rack Installation Guide
Page 11
Figure 1-2. VersaRails Rack Kit Contents 1 2 1 Mounting rails (2) 2 10-32 x 0.5-inch flange-head Phillips screws (8) Installation Tasks Installing a rack kit involves performing the following tasks (described in detail in subsequent sections) in their numbered order: 1 Removing the rack doors 2 Marking the rack 3 Installing the mounting rails in the rack • RapidRails installation • VersaRails installation 4 Installing the system in the rack 5 Replacing the rack doors Rack Installation Guide 9
Figure 1-2. VersaRails Rack Kit Contents 1 2 1 Mounting rails (2) 2 10-32 x 0.5-inch flange-head Phillips screws (8) Installation Tasks Installing a rack kit involves performing the following tasks (described in detail in subsequent sections) in their numbered order: 1 Removing the rack doors 2 Marking the rack 3 Installing the mounting rails in the rack • RapidRails installation • VersaRails installation 4 Installing the system in the rack 5 Replacing the rack doors Rack Installation Guide 9

Rack Installation Guide
Page 12
... the lowest available position in the rack. 10 Rack Installation Guide CAUTION: Because of the size and weight of the number marking on the rack. Marking...If you want, you can make a note of the rack cabinet doors, never attempt to remove or install them by horizontal lines and numbers in the rack. Rack cabinets may be marked by yourself. CAUTION: ...15.9 mm (0.625 inch) 15.9 mm (0.625 inch) 12.7 mm (0.5 inch) CAUTION: If you are installing more than one system, install the mounting rails so that meet EIA-310 standards have round or square holes. Removing the Rack Doors See the ...
... the lowest available position in the rack. 10 Rack Installation Guide CAUTION: Because of the size and weight of the number marking on the rack. Marking...If you want, you can make a note of the rack cabinet doors, never attempt to remove or install them by horizontal lines and numbers in the rack. Rack cabinets may be marked by yourself. CAUTION: ...15.9 mm (0.625 inch) 15.9 mm (0.625 inch) 12.7 mm (0.5 inch) CAUTION: If you are installing more than one system, install the mounting rails so that meet EIA-310 standards have round or square holes. Removing the Rack Doors See the ...

Rack Installation Guide
Page 13
This mark should indicates the system's upper edge on vertical rail Rack Installation Guide 11 Figure 1-4. Marking the Vertical Rails 1 1 Tape on the vertical rails (see Figure 1-3). 2 Place a second mark 132 mm (5.25 inches) above the first mark you are installing in a rack that meets EIA-310 standards). The bottom of each 1-U space is...
This mark should indicates the system's upper edge on vertical rail Rack Installation Guide 11 Figure 1-4. Marking the Vertical Rails 1 1 Tape on the vertical rails (see Figure 1-3). 2 Place a second mark 132 mm (5.25 inches) above the first mark you are installing in a rack that meets EIA-310 standards). The bottom of each 1-U space is...
Rack Installation Guide
Page 14
... top hole between the marks or tape you made on the mounting-bracket flange until the mounting hooks enter their square holes. Installing the Mounting Rails in the Rack Installing the RapidRails Mounting Rails 1 At the front of the rack cabinet, position one of the RapidRails mounting rails so that its mountingbracket... and the blue tab pops out and clicks. 4 Repeat step 1 through step 3 for the mounting rail on the other side of the rack. 12 Rack Installation Guide
... top hole between the marks or tape you made on the mounting-bracket flange until the mounting hooks enter their square holes. Installing the Mounting Rails in the Rack Installing the RapidRails Mounting Rails 1 At the front of the rack cabinet, position one of the RapidRails mounting rails so that its mountingbracket... and the blue tab pops out and clicks. 4 Repeat step 1 through step 3 for the mounting rail on the other side of the rack. 12 Rack Installation Guide

Rack Installation Guide
Page 15
... flange fits between the marks you made on the vertical rails (see Figure 1-6). Rack Installation Guide 13 Installing the RapidRails Mounting Rails 1 2 3 4 1 Mounting hooks 2 Blue tab 3 Front of rack 4 Mounting rail Installing the VersaRails Mounting Rails 1 At the front of the rack cabinet, position one of ...the mounting-bracket flange should align with the holes between the marks (or numbered location) on the front vertical rail. 2 Install two 10-32 x 0.5-inch flange-head Phillips screws in the mounting-bracket flange's topand bottom-holes to secure the mounting rail to...
... flange fits between the marks you made on the vertical rails (see Figure 1-6). Rack Installation Guide 13 Installing the RapidRails Mounting Rails 1 2 3 4 1 Mounting hooks 2 Blue tab 3 Front of rack 4 Mounting rail Installing the VersaRails Mounting Rails 1 At the front of the rack cabinet, position one of ...the mounting-bracket flange should align with the holes between the marks (or numbered location) on the front vertical rail. 2 Install two 10-32 x 0.5-inch flange-head Phillips screws in the mounting-bracket flange's topand bottom-holes to secure the mounting rail to...

Rack Installation Guide
Page 16
...the cabinet, pull back on the mounting-bracket flange until the mounting holes align with their respective holes on the back vertical rail. 4 Install two 10-32 x 0.5-inch flange-head Phillips screws in the back mounting-bracket flange's topand bottom-holes to secure the mounting rail ...rack. 6 Ensure that the mounting rails are mounted at the same position on the vertical rails on each side of rack Mounting rail 14 Rack Installation Guide Installing the VersaRails Mounting Rails 1 2 3 4 1 Mounting-bracket flange 3 2 10-32 x 0.5-inch flange-head 4 Phillips screws (4 per mounting rail) Front...
...the cabinet, pull back on the mounting-bracket flange until the mounting holes align with their respective holes on the back vertical rail. 4 Install two 10-32 x 0.5-inch flange-head Phillips screws in the back mounting-bracket flange's topand bottom-holes to secure the mounting rail ...rack. 6 Ensure that the mounting rails are mounted at the same position on the vertical rails on each side of rack Mounting rail 14 Rack Installation Guide Installing the VersaRails Mounting Rails 1 2 3 4 1 Mounting-bracket flange 3 2 10-32 x 0.5-inch flange-head 4 Phillips screws (4 per mounting rail) Front...

Rack Installation Guide
Page 17
...system in front of the system, never attempt to install the system in the mounting rails by yourself. Rack Installation Guide 15 CAUTION: Because of the size and weight of the mounting rails you are installing more than one system, install the first system in the lowest available position in... the rack. Figure 1-7. Installing the System in the Rack CAUTION: If you installed in the rack ...
...system in front of the system, never attempt to install the system in the mounting rails by yourself. Rack Installation Guide 15 CAUTION: Because of the size and weight of the mounting rails you are installing more than one system, install the first system in the lowest available position in... the rack. Figure 1-7. Installing the System in the Rack CAUTION: If you installed in the rack ...

Rack Installation Guide
Page 18
Figure 1-8. Removing the System from the mounting rails by yourself. Removing the System from the Rack CAUTION: Because of the size and weight of the system, never attempt to remove the system from the Rack 1 2 1 Mounting rails (2) 2 Thumbscrews (2) 3 3 Release button (2) 16 Rack Installation Guide To remove the system from the rack, perform the following procedure: 1 Turn off the system and attached peripherals, and disconnect the system from the electrical outlet.
Figure 1-8. Removing the System from the mounting rails by yourself. Removing the System from the Rack CAUTION: Because of the size and weight of the system, never attempt to remove the system from the Rack 1 2 1 Mounting rails (2) 2 Thumbscrews (2) 3 3 Release button (2) 16 Rack Installation Guide To remove the system from the rack, perform the following procedure: 1 Turn off the system and attached peripherals, and disconnect the system from the electrical outlet.

Rack Installation Guide
Page 19
... doors in the documentation provided with your system in a four-post rack cabinet. Rack Installation Guide 17 CAUTION: Because of the size and weight of the rack. 5 Place the system on a strong, stable surface. This completes the rack installation of your rack. 2 Disengage both thumbscrews on the front panel of the chassis. 3 Slowly... release buttons (blue) on each side of the system and slide the system completely out of the rack cabinet doors, never attempt to remove or install them by yourself.
... doors in the documentation provided with your system in a four-post rack cabinet. Rack Installation Guide 17 CAUTION: Because of the size and weight of the rack. 5 Place the system on a strong, stable surface. This completes the rack installation of your rack. 2 Disengage both thumbscrews on the front panel of the chassis. 3 Slowly... release buttons (blue) on each side of the system and slide the system completely out of the rack cabinet doors, never attempt to remove or install them by yourself.


