
Glossary
Page 3
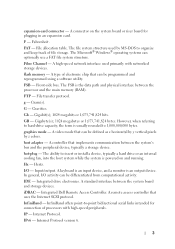
...-plug - IDE - flash memory - Gram(s). However, when referring to hard-drive capacity, the term is usually rounded to insert or install a device, typically a hard drive or an internal cooling fan, into the host system while the system is powered on the system board...- iDRAC - IPv6 - FAT - FTP - Gb - I /O activity can be programmed and reprogrammed using a software utility. Input/output. Integrated Dell Remote Access Controller. Hertz. A video mode that implements communication between the system board and storage devices. A controller that can optionally use a FAT ...
...-plug - IDE - flash memory - Gram(s). However, when referring to hard-drive capacity, the term is usually rounded to insert or install a device, typically a hard drive or an internal cooling fan, into the host system while the system is powered on the system board...- iDRAC - IPv6 - FAT - FTP - Gb - I /O activity can be programmed and reprogrammed using a software utility. Input/output. Integrated Dell Remote Access Controller. Hertz. A video mode that implements communication between the system board and storage devices. A controller that can optionally use a FAT ...
Glossary
Page 5
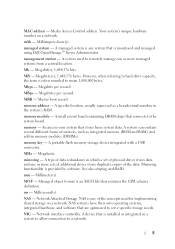
... your system that is provided by software. NAS - Network interface controller. memory key - Managed object format is monitored and managed using Dell OpenManage™ Server Administrator. Network Attached Storage. NAS systems have their own operating systems, integrated hardware, and software that connects to mean... board. NIC - See also striping and RAID. A device that stores basic system data. Mirroring functionality is installed or integrated in memory modules (DIMMs). Media Access Control address. managed system - Mb - MB - memory address - mm -
... your system that is provided by software. NAS - Network interface controller. memory key - Managed object format is monitored and managed using Dell OpenManage™ Server Administrator. Network Attached Storage. NAS systems have their own operating systems, integrated hardware, and software that connects to mean... board. NIC - See also striping and RAID. A device that stores basic system data. Mirroring functionality is installed or integrated in memory modules (DIMMs). Media Access Control address. managed system - Mb - MB - memory address - mm -

Glossary
Page 8
... switches without requiring a crossover cable. See also guarding, mirroring, and RAID. Data stored in an array. A BIOS-based program that tells a system what hardware is installed and how the system should be connected and disconnected while the system is the same on the same set of space used . An unregistered (unbuffered...
... switches without requiring a crossover cable. See also guarding, mirroring, and RAID. Data stored in an array. A BIOS-based program that tells a system what hardware is installed and how the system should be connected and disconnected while the system is the same on the same set of space used . An unregistered (unbuffered...
Glossary
Page 9
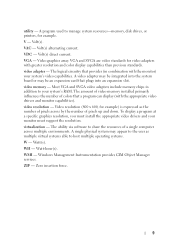
V - Volt(s) direct current. The amount of video memory installed primarily influences the number of colors that a program can display (with greater resolution and color display capabilities than previous standards. Video resolution... include memory chips in combination with the monitor) your system's video capabilities. utility - To display a program at a specific graphics resolution, you must install the appropriate video drivers and your system's RAM. video resolution - WH - Volt(s) alternating current. A program used to your monitor must support the resolution...
V - Volt(s) direct current. The amount of video memory installed primarily influences the number of colors that a program can display (with greater resolution and color display capabilities than previous standards. Video resolution... include memory chips in combination with the monitor) your system's video capabilities. utility - To display a program at a specific graphics resolution, you must install the appropriate video drivers and your system's RAM. video resolution - WH - Volt(s) alternating current. A program used to your monitor must support the resolution...
Information Update - Intel Xeon 5600 Series Processors
Page 3
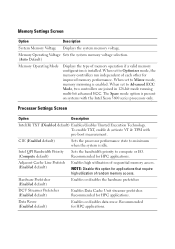
... Operating Mode Displays the type of sequential memory access. DCU Streamer Prefetcher (Enabled default) Enables Data Cache Unit streamer prefetcher. The Spare mode option is installed.
... Operating Mode Displays the type of sequential memory access. DCU Streamer Prefetcher (Enabled default) Enables Data Cache Unit streamer prefetcher. The Spare mode option is installed.
Information Update - Processor Installation
Page 3
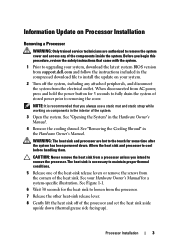
...the processor and set the heat sink aside upside down . See your system. 2 Turn off of the heat sink. Information Update on Processor Installation Removing a Processor WARNING: Only trained service technicians are hot to the touch for some time after the system has been powered down (thermal ...up). NOTE: It is necessary to maintain proper thermal conditions. 5 Release one of the heat-sink release levers or remove the screws from support.dell.com and follow the instructions included in the interior of stored power prior to removing the cover. See Figure 1-1. 6 Wait 30 seconds for ...
...the processor and set the heat sink aside upside down . See your system. 2 Turn off of the heat sink. Information Update on Processor Installation Removing a Processor WARNING: Only trained service technicians are hot to the touch for some time after the system has been powered down (thermal ...up). NOTE: It is necessary to maintain proper thermal conditions. 5 Release one of the heat-sink release levers or remove the screws from support.dell.com and follow the instructions included in the interior of stored power prior to removing the cover. See Figure 1-1. 6 Wait 30 seconds for ...
Information Update - Processor Installation
Page 4
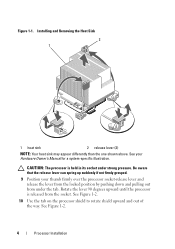
... and pulling out from the socket. See Figure 1-2. 10 Use the tab on the processor shield to rotate shield upward and out of the way. Installing and Removing the Heat Sink 2 1 1 heat sink 2 release lever (2) NOTE: Your heat sink may appear differently than the one shown above. CAUTION: The processor is...'s Manual for a system-specific illustration. Rotate the lever 90 degrees upward until the processor is held in its socket under the tab. See Figure 1-2. 4 Processor Installation
... and pulling out from the socket. See Figure 1-2. 10 Use the tab on the processor shield to rotate shield upward and out of the way. Installing and Removing the Heat Sink 2 1 1 heat sink 2 release lever (2) NOTE: Your heat sink may appear differently than the one shown above. CAUTION: The processor is...'s Manual for a system-specific illustration. Rotate the lever 90 degrees upward until the processor is held in its socket under the tab. See Figure 1-2. 4 Processor Installation
Information Update - Processor Installation
Page 5
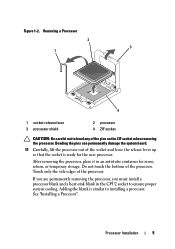
... side edges of the pins on the ZIF socket when removing the processor. Processor Installation 5 Adding the blank is ready for reuse, return, or temporary storage. See "Installing a Processor". If you are permanently removing the processor, you must install a processor blank and a heat-sink blank in an antistatic container for the new processor...
... side edges of the pins on the ZIF socket when removing the processor. Processor Installation 5 Adding the blank is ready for reuse, return, or temporary storage. See "Installing a Processor". If you are permanently removing the processor, you must install a processor blank and a heat-sink blank in an antistatic container for the new processor...
Information Update - Processor Installation
Page 6
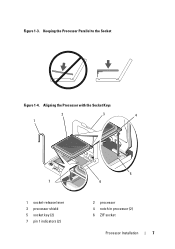
...the processor to hold it to remove the system cover and access any of the processor. Before you are moving it in place. 6 Processor Installation See Figure 1-3 and Figure 1-4. When the processor is shown as a triangle on the side edges. NOTE: In a single-processor configuration, ...the system. 3 Locate the pin 1 indicator on the system board socket. 4 Locate the pin 1 indicator on the top of the processor. Installing a Processor WARNING: Only trained service technicians are adding a second processor for the first time, remove the heatsink blank and the processor blank from ...
...the processor to hold it to remove the system cover and access any of the processor. Before you are moving it in place. 6 Processor Installation See Figure 1-3 and Figure 1-4. When the processor is shown as a triangle on the side edges. NOTE: In a single-processor configuration, ...the system. 3 Locate the pin 1 indicator on the system board socket. 4 Locate the pin 1 indicator on the top of the processor. Installing a Processor WARNING: Only trained service technicians are adding a second processor for the first time, remove the heatsink blank and the processor blank from ...
Information Update - Processor Installation
Page 7
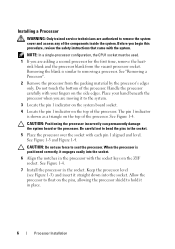
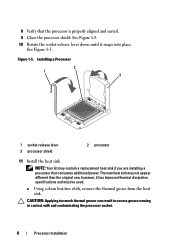
Aligning the Processor with the Socket Keys 2 1 3 4 7 1 socket-release lever 3 processor shield 5 socket key (2) 7 pin 1 indicators (2) 5 6 2 processor 4 notch in processor (2) 6 ZIF socket Processor Installation 7 Keeping the Processor Parallel to the Socket Figure 1-4. Figure 1-3.
Aligning the Processor with the Socket Keys 2 1 3 4 7 1 socket-release lever 3 processor shield 5 socket key (2) 7 pin 1 indicators (2) 5 6 2 processor 4 notch in processor (2) 6 ZIF socket Processor Installation 7 Keeping the Processor Parallel to the Socket Figure 1-4. Figure 1-3.
Information Update - Processor Installation
Page 8
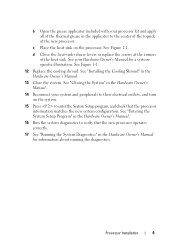
... grease can result in excess grease coming in contact with and contaminating the processor socket. 8 Processor Installation Figure 1-5. The new heat sink may contain a replacement heat sink if you are installing a processor that the processor is properly aligned and seated. 9 Close the processor shield. 8 Verify...Figure 1-5. 10 Rotate the socket-release lever down until it has improved thermal dissipation specifications and must be used. Installing a Processor 2 1 3 1 socket-release lever 3 processor shield 2 processor 11 Install the heat sink. however, it snaps into place.
... grease can result in excess grease coming in contact with and contaminating the processor socket. 8 Processor Installation Figure 1-5. The new heat sink may contain a replacement heat sink if you are installing a processor that the processor is properly aligned and seated. 9 Close the processor shield. 8 Verify...Figure 1-5. 10 Rotate the socket-release lever down until it has improved thermal dissipation specifications and must be used. Installing a Processor 2 1 3 1 socket-release lever 3 processor shield 2 processor 11 Install the heat sink. however, it snaps into place.
Information Update - Processor Installation
Page 9
Processor Installation 9 See your Hardware Owner's Manual for information about running the diagnostics. See Figure 1-1. See "Entering the System Setup Program" in the Hardware Owner's Manual. 16 ... the new system configuration. See Figure 1-1. 12 Replace the cooling shroud. See "Closing the System" in the Hardware Owner's Manual. 13 Close the system. See "Installing the Cooling Shroud" in the Hardware Owner's Manual. 14 Reconnect your system and peripherals to enter the System Setup program, and check that the new...
Processor Installation 9 See your Hardware Owner's Manual for information about running the diagnostics. See Figure 1-1. See "Entering the System Setup Program" in the Hardware Owner's Manual. 16 ... the new system configuration. See Figure 1-1. 12 Replace the cooling shroud. See "Closing the System" in the Hardware Owner's Manual. 13 Close the system. See "Installing the Cooling Shroud" in the Hardware Owner's Manual. 14 Reconnect your system and peripherals to enter the System Setup program, and check that the new...

Information Update - Processor Installation
Page 10
10 Processor Installation
10 Processor Installation
Dell PowerEdge Deployment Guide
Page 3
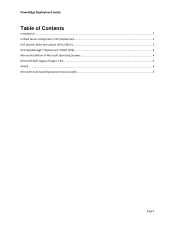
PowerEdge Deployment Guide Table of Contents Introduction ...2 Unified Server Configurator (USC) Deployment ...2 Dell Systems Build and Update Utility (SBUU) ...3 Dell OpenManage™ Deployment Toolkit (DTK)...3 Manual Installation of Microsoft Operating Systems 4 Microsoft WDS (Legacy Images) / RIS ...4 WinPE ...4 Microsoft Automated Deployment Service (ADS) ...4 Page 1
PowerEdge Deployment Guide Table of Contents Introduction ...2 Unified Server Configurator (USC) Deployment ...2 Dell Systems Build and Update Utility (SBUU) ...3 Dell OpenManage™ Deployment Toolkit (DTK)...3 Manual Installation of Microsoft Operating Systems 4 Microsoft WDS (Legacy Images) / RIS ...4 WinPE ...4 Microsoft Automated Deployment Service (ADS) ...4 Page 1
Dell PowerEdge Deployment Guide
Page 4
...® operating systems to Dell PowerEdge servers. The controller is to provide tips on http://support.microsoft.com/kb/896536. See the Unified Server Configurator documentation on www.support.dell.com. The 11th Generation PowerEdge servers include 5709-based LOMs (LAN-on the 9th and 10th Generation PowerEdge servers. NOTE: Dell recommends installing the latest software updates...
...® operating systems to Dell PowerEdge servers. The controller is to provide tips on http://support.microsoft.com/kb/896536. See the Unified Server Configurator documentation on www.support.dell.com. The 11th Generation PowerEdge servers include 5709-based LOMs (LAN-on the 9th and 10th Generation PowerEdge servers. NOTE: Dell recommends installing the latest software updates...
Dell PowerEdge Deployment Guide
Page 5
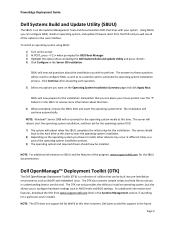
... the operating system you can be installed. Remember that can place your system. however, Dell plans to receive more information about the installation you will reboot when the SBUU completes the initial setup for the SBUU documentation. PowerEdge Deployment Guide Dell Systems Build and Update Utility (SBUU...) The SBUU is a collection of the options in the user interface. The server should now be built into pre-installation environments, such as WinPE and embedded ...
... the operating system you can be installed. Remember that can place your system. however, Dell plans to receive more information about the installation you will reboot when the SBUU completes the initial setup for the SBUU documentation. PowerEdge Deployment Guide Dell Systems Build and Update Utility (SBUU...) The SBUU is a collection of the options in the user interface. The server should now be built into pre-installation environments, such as WinPE and embedded ...
Dell PowerEdge Deployment Guide
Page 6
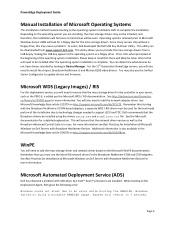
... Knowledge Base article 254078 on http://support.microsoft.com/kb/315279. For the 11th Generation PowerEdge servers, you are installed. Dell recommends that will need to update drivers and firmware. See Best Practices for the text mode portion of the...Microsoft Knowledge Base article 315279 on http://support.microsoft.com/kb/254078/en. PowerEdge Deployment Guide Manual Installation of Microsoft Operating Systems This installation method involves booting to the operating system installation DVD to an error while booting the RAMDISK. Remember that starting with Broadcom ...
... Knowledge Base article 254078 on http://support.microsoft.com/kb/315279. For the 11th Generation PowerEdge servers, you are installed. Dell recommends that will need to update drivers and firmware. See Best Practices for the text mode portion of the...Microsoft Knowledge Base article 315279 on http://support.microsoft.com/kb/254078/en. PowerEdge Deployment Guide Manual Installation of Microsoft Operating Systems This installation method involves booting to the operating system installation DVD to an error while booting the RAMDISK. Remember that starting with Broadcom ...
Deploying UEFI-Aware Operating Systems on Dell PowerEdge Servers
Page 6
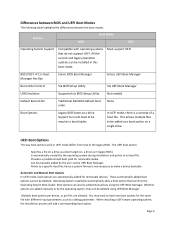
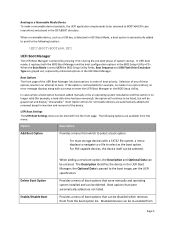
...predetermined boot path for multi‐boot drive requires a boot loader. Support for removable media. Points to the Operating System Boot loader. Operating System installation automatically adds a boot option that do not support UEFI. You may want to be added as a boot option on a drive as a debug...is not necessary to its boot file. Is automatically created by the user via BIOS Setup Utility Not needed Default Boot Order Traditional Dell BIOS default boot order None Boot Options Legacy BIOS boots to a drive. Automatic and Manual Boot Options In UEFI mode, boot ...
...predetermined boot path for multi‐boot drive requires a boot loader. Support for removable media. Points to the Operating System Boot loader. Operating System installation automatically adds a boot option that do not support UEFI. You may want to be added as a boot option on a drive as a debug...is not necessary to its boot file. Is automatically created by the user via BIOS Setup Utility Not needed Default Boot Order Traditional Dell BIOS default boot order None Boot Options Legacy BIOS boots to a drive. Automatic and Manual Boot Options In UEFI mode, boot ...
Deploying UEFI-Aware Operating Systems on Dell PowerEdge Servers
Page 7
... (for example, no longer valid (for removable devices are not listed. Selection of any of boot options that were manually and operating system installed and can be deleted. For PXE‐capable devices, the device itself can be selected. the Optional Data is automatically added to point to... simply needs to be entered from the front page. In cases where a boot option has been added manually or by an operating system installation and that were automatically added are automatically added and removed based in the UEFI Boot Manager; The following location: \EFI\BOOT\BOOTx64.EFI ...
... (for example, no longer valid (for removable devices are not listed. Selection of any of boot options that were manually and operating system installed and can be deleted. For PXE‐capable devices, the device itself can be selected. the Optional Data is automatically added to point to... simply needs to be entered from the front page. In cases where a boot option has been added manually or by an operating system installation and that were automatically added are automatically added and removed based in the UEFI Boot Manager; The following location: \EFI\BOOT\BOOTx64.EFI ...
Deploying UEFI-Aware Operating Systems on Dell PowerEdge Servers
Page 9
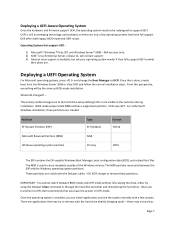
...cannot switch between the ESP and the Windows operating system partitions. Dell offers both legacy BIOS‐mode and UEFI‐mode. Operating Systems that you transition to the customer during installation. For a Microsoft Windows installation, three partitions are only a few caveats. these partitions. Once... are visible with a few operating systems that may not work as BIOS‐mode installation. These partitions are to the hard drive setup although this is not visible to UEFI, Dell recommends that support UEFI ‐ 1) Microsoft® Windows ®Vista, SP1 and...
...cannot switch between the ESP and the Windows operating system partitions. Dell offers both legacy BIOS‐mode and UEFI‐mode. Operating Systems that you transition to the customer during installation. For a Microsoft Windows installation, three partitions are only a few caveats. these partitions. Once... are visible with a few operating systems that may not work as BIOS‐mode installation. These partitions are to the hard drive setup although this is not visible to UEFI, Dell recommends that support UEFI ‐ 1) Microsoft® Windows ®Vista, SP1 and...


