

Dell Monitor Users Guide
Page 3
... 44 Using the Tilt, Swivel, and Vertical Extension 44 Rotating the Monitor 45 Adjusting the Rotation Display Settings of Your System 46 4 Troubleshooting 47 Self-Test 47 Built-in Diagnostics 48 Common Problems 49 Product Specific Problems 51 Contents | 3
... 44 Using the Tilt, Swivel, and Vertical Extension 44 Rotating the Monitor 45 Adjusting the Rotation Display Settings of Your System 46 4 Troubleshooting 47 Self-Test 47 Built-in Diagnostics 48 Common Problems 49 Product Specific Problems 51 Contents | 3

Dell Monitor Users Guide
Page 17
Pin Assignments VGA Connector Pin 15-pin Side of the Number Connected Signal Cable 1 Video-Red 2 Video-Green 3 Video-Blue 4 GND 5 Self-test 6 GND-R 7 GND-G 8 GND-B 9 Computer 5 V/3.3 V 10 GND-sync 11 GND 12 DDC data 13 H-sync 14 V-sync 15 DDC clock About Your Monitor | 17
Pin Assignments VGA Connector Pin 15-pin Side of the Number Connected Signal Cable 1 Video-Red 2 Video-Green 3 Video-Blue 4 GND 5 Self-test 6 GND-R 7 GND-G 8 GND-B 9 Computer 5 V/3.3 V 10 GND-sync 11 GND 12 DDC data 13 H-sync 14 V-sync 15 DDC clock About Your Monitor | 17

Dell Monitor Users Guide
Page 47
...and computer are properly connected but the monitor screen remains dark, run the monitor self-test by performing the following steps: 1 Turn off both your monitor is working correctly. To ensure proper Self-Test operation, remove all digital cables from the back of the computer. While in this ...section, follow the Safety Instructions. Self-Test Your monitor provides a self-test feature that allows you begin any of the procedures in self-test mode, the power LED remains white. Also, depending upon the selected input, one of the ...
...and computer are properly connected but the monitor screen remains dark, run the monitor self-test by performing the following steps: 1 Turn off both your monitor is working correctly. To ensure proper Self-Test operation, remove all digital cables from the back of the computer. While in this ...section, follow the Safety Instructions. Self-Test Your monitor provides a self-test feature that allows you begin any of the procedures in self-test mode, the power LED remains white. Also, depending upon the selected input, one of the ...

Dell Monitor Users Guide
Page 48
... 4 on the front panel simultaneously for any abnormalities. 7 Repeat steps 5 and 6 to red. 6 Inspect the display for 2 seconds. The monitor then goes into the self-test mode. 3 Press and hold Button 1 and Button 4 on the front panel again. 4 This box also appears during normal system operation, if the video cable becomes... dust particles on the surface of the screen). 2 Unplug the video cable(s) from the back of the screen changes to inspect the display in self-test mode.
... 4 on the front panel simultaneously for any abnormalities. 7 Repeat steps 5 and 6 to red. 6 Inspect the display for 2 seconds. The monitor then goes into the self-test mode. 3 Press and hold Button 1 and Button 4 on the front panel again. 4 This box also appears during normal system operation, if the video cable becomes... dust particles on the surface of the screen). 2 Unplug the video cable(s) from the back of the screen changes to inspect the display in self-test mode.
Dell Monitor Users Guide
Page 49
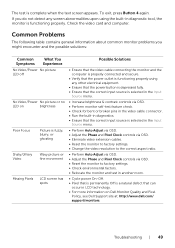
... the correct input source is selected in the Input Source menu. • Increase brightness & contrast controls via OSD. • Perform monitor self-test feature check. • Check for bent or broken pins in the video cable connector. • Run the built-in diagnostics. • Ensure... Quality and Pixel Policy, see Dell Support site at: http://www.dell.com/ support/monitors. Troubleshooting | 49 To exit, press Button 4 again. Check the video card and computer. The test is functioning properly using the built-in LCD technology. • For more information on brightness Poor Focus...
... the correct input source is selected in the Input Source menu. • Increase brightness & contrast controls via OSD. • Perform monitor self-test feature check. • Check for bent or broken pins in the video cable connector. • Run the built-in diagnostics. • Ensure... Quality and Pixel Policy, see Dell Support site at: http://www.dell.com/ support/monitors. Troubleshooting | 49 To exit, press Button 4 again. Check the video card and computer. The test is functioning properly using the built-in LCD technology. • For more information on brightness Poor Focus...

Dell Monitor Users Guide
Page 50
..., the positioning adjustments are not available. Horizontal/ Vertical Lines Screen has one or more information on Dell Monitor Quality and Pixel Policy, see Dell Support site at: http://www.dell.com/ support/monitors. Intermittent Problems Monitor malfunctions on & off is secure. • Check for ...check to determine if the scrambled screen appears in self-test mode. • Check for bent or broken pins in the video cable connector. • Run the built-in diagnostics. Issues smoke or sparks • Contact Dell immediately. Stuck-on Pixels LCD screen has bright spots...
..., the positioning adjustments are not available. Horizontal/ Vertical Lines Screen has one or more information on Dell Monitor Quality and Pixel Policy, see Dell Support site at: http://www.dell.com/ support/monitors. Intermittent Problems Monitor malfunctions on & off is secure. • Check for ...check to determine if the scrambled screen appears in self-test mode. • Check for bent or broken pins in the video cable connector. • Run the built-in diagnostics. Issues smoke or sparks • Contact Dell immediately. Stuck-on Pixels LCD screen has bright spots...