
Owner's Manual
Page 3
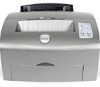
Dell™ Personal Laser Printer P1500 Paper support Top output bin Tray 1 Paper support Manual feed Paper guide Front output door Optional 250-sheet tray Operator panel lights Use this feature: ... tray 1 or the top output bin. Adjust the width of other media. Print on specialty media (for transparencies, labels, envelopes, and card stock. Increase your printer. Use for example, labels or card stock). Stack printed documents face down. Check the status of paper or other media. Support media in tray 1 and...
Dell™ Personal Laser Printer P1500 Paper support Top output bin Tray 1 Paper support Manual feed Paper guide Front output door Optional 250-sheet tray Operator panel lights Use this feature: ... tray 1 or the top output bin. Adjust the width of other media. Print on specialty media (for transparencies, labels, envelopes, and card stock. Increase your printer. Use for example, labels or card stock). Stack printed documents face down. Check the status of paper or other media. Support media in tray 1 and...

Owner's Manual
Page 4
...your User's Guide, click Start → Programs → Dell Printers → Dell Laser Printer P1500 → User's Guide. NOTE: You can use either a parallel cable or a USB cable, but do not use both. Accessing your User's Guide To access your printer into a properly grounded electrical outlet with the power cord (... connector Power switch Use this feature: When you want to: Parallel cable connector Connect your computer to your printer on or off. Power switch Turn your printer USB port if you are using a parallel cable. USB cable connector Connect your computer to your...
...your User's Guide, click Start → Programs → Dell Printers → Dell Laser Printer P1500 → User's Guide. NOTE: You can use either a parallel cable or a USB cable, but do not use both. Accessing your User's Guide To access your printer into a properly grounded electrical outlet with the power cord (... connector Power switch Use this feature: When you want to: Parallel cable connector Connect your computer to your printer on or off. Power switch Turn your printer USB port if you are using a parallel cable. USB cable connector Connect your computer to your...

Owner's Manual
Page 5
... own. Trademarks used in this text: Dell and DELL logo are registered trademarks of Dell Computer Corporation is strictly forbidden. FCC emissions... written permission of Microsoft Corporation. Dell Computer Corporation disclaims any manner whatsoever without notice. © 2003 Dell Computer Corporation. Notes, Notices, ... document to refer to Part 15 of Dell Computer Corporation; Refer to hardware or loss of data ...use of their products. Information in applicable FAR provisions: Dell Computer Corporation, One Dell Way, Round Rock, Texas, 78682, USA. UNITED ...
... own. Trademarks used in this text: Dell and DELL logo are registered trademarks of Dell Computer Corporation is strictly forbidden. FCC emissions... written permission of Microsoft Corporation. Dell Computer Corporation disclaims any manner whatsoever without notice. © 2003 Dell Computer Corporation. Notes, Notices, ... document to refer to Part 15 of Dell Computer Corporation; Refer to hardware or loss of data ...use of their products. Information in applicable FAR provisions: Dell Computer Corporation, One Dell Way, Round Rock, Texas, 78682, USA. UNITED ...
Owner's Manual
Page 9
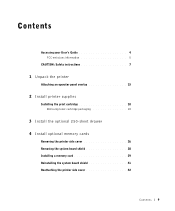
Contents Accessing your User's Guide 4 FCC emissions information 5 CAUTION: Safety instructions 7 1 Unpack the printer Attaching an operator panel overlay 15 2 Install printer supplies Installing the print cartridge 18 Removing toner cartridge packaging 18 3 Install the optional 250-sheet drawer 4 Install optional memory cards Removing the printer side cover 26 Removing the system board shield 28 Installing a memory card 29 Reinstalling the system board shield 31 Reattaching the printer side cover 32 Contents 9
Contents Accessing your User's Guide 4 FCC emissions information 5 CAUTION: Safety instructions 7 1 Unpack the printer Attaching an operator panel overlay 15 2 Install printer supplies Installing the print cartridge 18 Removing toner cartridge packaging 18 3 Install the optional 250-sheet drawer 4 Install optional memory cards Removing the printer side cover 26 Removing the system board shield 28 Installing a memory card 29 Reinstalling the system board shield 31 Reattaching the printer side cover 32 Contents 9

Owner's Manual
Page 10
... 50 Status Monitor 51 Printing Status window 51 Toner Re-order window 51 Dell Local Printer Setup Utility 52 Dell Printer Software Uninstall 52 Driver Profiler 53 Installing printer drivers 53 If you purchased your Dell printer and computer together . . . 53 If you purchased your Dell printer separately 54 Using Windows XP with a USB or parallel cable 54 Using...
... 50 Status Monitor 51 Printing Status window 51 Toner Re-order window 51 Dell Local Printer Setup Utility 52 Dell Printer Software Uninstall 52 Driver Profiler 53 Installing printer drivers 53 If you purchased your Dell printer and computer together . . . 53 If you purchased your Dell printer separately 54 Using Windows XP with a USB or parallel cable 54 Using...

Owner's Manual
Page 13
SECTION 1 Unpack the printer Attaching an operator panel overlay 1
SECTION 1 Unpack the printer Attaching an operator panel overlay 1

Owner's Manual
Page 14
...case you have the following items: Power cord Owner's Manual Overlay Drivers and Utilities CD Setup diagram • Setup diagram • Printer with toner cartridge installed • Power cord • Owner's Manual • Drivers and Utilities CD • Operator panel overlay (... of sunlight, humidity extremes, or temperature fluctuations - Make sure you need to open the printer cover, output door, and optional 250-sheet tray. A firm, level surface - www.dell.com/supplies | support.dell.com 1 Select a location for proper ventilation. • Provide the proper environment: -...
...case you have the following items: Power cord Owner's Manual Overlay Drivers and Utilities CD Setup diagram • Setup diagram • Printer with toner cartridge installed • Power cord • Owner's Manual • Drivers and Utilities CD • Operator panel overlay (... of sunlight, humidity extremes, or temperature fluctuations - Make sure you need to open the printer cover, output door, and optional 250-sheet tray. A firm, level surface - www.dell.com/supplies | support.dell.com 1 Select a location for proper ventilation. • Provide the proper environment: -...

Owner's Manual
Page 15
Unpack the printer 15 Attaching an operator panel overlay If you have a non-English operator panel overlay in your printer box and want to use it, peel it off, align it with the operator panel, and press it into place.
Unpack the printer 15 Attaching an operator panel overlay If you have a non-English operator panel overlay in your printer box and want to use it, peel it off, align it with the operator panel, and press it into place.

Owner's Manual
Page 17
SECTION 2 Install printer supplies Installing the print cartridge 2
SECTION 2 Install printer supplies Installing the print cartridge 2

Owner's Manual
Page 18
Cartridge handle 3 Remove the protective foam packaging from the toner cartridge. 18 Install printer supplies www.dell.com/supplies | support.dell.com Installing the print cartridge Removing toner cartridge packaging 1 Use the finger tab to pull down the printer cover. 2 Grasp the cartridge handle (behind the packaging tag in the illustration) and pull the toner cartridge straight up.
Cartridge handle 3 Remove the protective foam packaging from the toner cartridge. 18 Install printer supplies www.dell.com/supplies | support.dell.com Installing the print cartridge Removing toner cartridge packaging 1 Use the finger tab to pull down the printer cover. 2 Grasp the cartridge handle (behind the packaging tag in the illustration) and pull the toner cartridge straight up.

Owner's Manual
Page 19
NOTE: Do not touch the photoconductor drum on the bottom of the toner cartridge. 4 Pull off the plastic piece attached to the ends of the toner cartridge. 5 Gently shake the cartridge to distribute the toner evenly. Discard the plastic piece, foam and paper. Install printer supplies 19
NOTE: Do not touch the photoconductor drum on the bottom of the toner cartridge. 4 Pull off the plastic piece attached to the ends of the toner cartridge. 5 Gently shake the cartridge to distribute the toner evenly. Discard the plastic piece, foam and paper. Install printer supplies 19

Owner's Manual
Page 20
Do not force the cover closed. 20 Install printer supplies b Holding the cartridge by the handle, tilt the cartridge down on either side of the cartridge with the corresponding arrows in place. 7 Close the printer cover. If you cannot close the printer cover, make sure the toner cartridge is firmly in the printer. www.dell.com/supplies | support.dell.com 6 Insert the toner cartridge: a Align the colored arrows on the cartridge until it between the toner cartridge grooves. c Push down and guide it is positioned correctly.
Do not force the cover closed. 20 Install printer supplies b Holding the cartridge by the handle, tilt the cartridge down on either side of the cartridge with the corresponding arrows in place. 7 Close the printer cover. If you cannot close the printer cover, make sure the toner cartridge is firmly in the printer. www.dell.com/supplies | support.dell.com 6 Insert the toner cartridge: a Align the colored arrows on the cartridge until it between the toner cartridge grooves. c Push down and guide it is positioned correctly.

Owner's Manual
Page 22
Base Tray If you ordered this optional drawer, follow the instructions below to turn off the printer before installing it . 1 Remove the tray from the base. 2 Remove all packing material and tape from the tray and the base. 3 Place the base in the location you can purchase the optional 250-sheet drawer, which consists of a base and a tray. www.dell.com/supplies | support.dell.com To increase paper capacity, you have chosen for your printer. 22 Install the optional 250-sheet drawer NOTE: If you install the optional 250-sheet drawer at a later time, be sure to install it .
Base Tray If you ordered this optional drawer, follow the instructions below to turn off the printer before installing it . 1 Remove the tray from the base. 2 Remove all packing material and tape from the tray and the base. 3 Place the base in the location you can purchase the optional 250-sheet drawer, which consists of a base and a tray. www.dell.com/supplies | support.dell.com To increase paper capacity, you have chosen for your printer. 22 Install the optional 250-sheet drawer NOTE: If you install the optional 250-sheet drawer at a later time, be sure to install it .

Owner's Manual
Page 23
4 Align the printer with the front of the base and place it on top of the base. Make sure the base is firmly in place. Install the optional 250-sheet drawer 23
4 Align the printer with the front of the base and place it on top of the base. Make sure the base is firmly in place. Install the optional 250-sheet drawer 23

Owner's Manual
Page 24
For more information on configuring the 250-sheet drawer for printing, see "Configure paper trays" on page 61. 24 Install the optional 250-sheet drawer When you complete setting up the printer, print a menu settings page to verify the 250-sheet drawer is listed under Installed Features (see "Loading the optional 250-sheet tray" on loading the 250-sheet drawer, see page 66). www.dell.com/supplies | support.dell.com 5 Insert the tray. For more information on page 40.
For more information on configuring the 250-sheet drawer for printing, see "Configure paper trays" on page 61. 24 Install the optional 250-sheet drawer When you complete setting up the printer, print a menu settings page to verify the 250-sheet drawer is listed under Installed Features (see "Loading the optional 250-sheet tray" on loading the 250-sheet drawer, see page 66). www.dell.com/supplies | support.dell.com 5 Insert the tray. For more information on page 40.

Owner's Manual
Page 25
SECTION 4 Install optional memory cards Removing the printer side cover Removing the system board shield Installing a memory card Reinstalling the system board shield Reattaching the printer side cover 4
SECTION 4 Install optional memory cards Removing the printer side cover Removing the system board shield Installing a memory card Reinstalling the system board shield Reattaching the printer side cover 4

Owner's Manual
Page 26
www.dell.com/supplies | support.dell.com You can customize your printer memory capacity and connectivity by adding optional cards. Removing the printer side cover Before installing any memory options, you are installing memory cards sometime after setting up the printer, turn the printer off and unplug the power cord before continuing. CAUTION: If you must remove the printer side cover. 1 Open the printer front cover. 26 Install optional memory cards
www.dell.com/supplies | support.dell.com You can customize your printer memory capacity and connectivity by adding optional cards. Removing the printer side cover Before installing any memory options, you are installing memory cards sometime after setting up the printer, turn the printer off and unplug the power cord before continuing. CAUTION: If you must remove the printer side cover. 1 Open the printer front cover. 26 Install optional memory cards

Owner's Manual
Page 29
NOTICE: Memory cards are easily damaged by static electricity. Install optional memory cards 29 Touch something metal on the printer before you touch a memory card. 1 Complete the steps in either a printer memory card or a flash memory card. 3 Lift the system board shield up over the screws, slide it toward the front of the printer, and set it aside. Installing a memory card Follow the instructions in this section to install either connector. The system board has two connectors for optional memory cards. You can install a card in "Removing the system board shield" on page 28.
NOTICE: Memory cards are easily damaged by static electricity. Install optional memory cards 29 Touch something metal on the printer before you touch a memory card. 1 Complete the steps in either a printer memory card or a flash memory card. 3 Lift the system board shield up over the screws, slide it toward the front of the printer, and set it aside. Installing a memory card Follow the instructions in this section to install either connector. The system board has two connectors for optional memory cards. You can install a card in "Removing the system board shield" on page 28.

Owner's Manual
Page 30
Notches Connection points Avoid touching the connection points along the edge of the card with the notches on the connector. See page 31 for instructions. 30 Install optional memory cards Save the packaging. 3 Align the notches on each latch fits over the notch on the bottom of the card. www.dell.com/supplies | support.dell.com 2 Unpack the printer memory card. Latch Latch 4 Guide the card between the latches on each end of the connector and push the card firmly into the connector. 5 Make sure each end of the memory card. 6 Reattach the metal shield and side cover.
Notches Connection points Avoid touching the connection points along the edge of the card with the notches on the connector. See page 31 for instructions. 30 Install optional memory cards Save the packaging. 3 Align the notches on each latch fits over the notch on the bottom of the card. www.dell.com/supplies | support.dell.com 2 Unpack the printer memory card. Latch Latch 4 Guide the card between the latches on each end of the connector and push the card firmly into the connector. 5 Make sure each end of the memory card. 6 Reattach the metal shield and side cover.

Owner's Manual
Page 31
Reinstalling the system board shield 1 Align the shield over the bottom screws, slide it toward the back of the printer, and lower it down onto the screws. Install optional memory cards 31
Reinstalling the system board shield 1 Align the shield over the bottom screws, slide it toward the back of the printer, and lower it down onto the screws. Install optional memory cards 31


