
Information Update Dell Latitude 10 - ST2/ST2E
Page 1
... for Windows 8 PE: 1. Run the ADK command processor as an administrator. 4. ST2/ST2E Creating A Bootable USB Flash Drive Dell Latitude 10-ST2 and Dell Latitude 10-ST2E computers only support booting to the destination folder. For example, CopyPE x86 C:\Win8PE. For example, MakeWinPEMedia /UFD ...bit UEFI images. Creating a Bootable USB Flash Drive for Windows 8 PE (Preinstallation Environment) To create a bootable USB flash drive for Dell Latitude 10-ST2/ST2E computers. After CopyPE command completes, run MakeWinPEMedia /?. 7. After the script completes, the USB drive is the ...
... for Windows 8 PE: 1. Run the ADK command processor as an administrator. 4. ST2/ST2E Creating A Bootable USB Flash Drive Dell Latitude 10-ST2 and Dell Latitude 10-ST2E computers only support booting to the destination folder. For example, CopyPE x86 C:\Win8PE. For example, MakeWinPEMedia /UFD ...bit UEFI images. Creating a Bootable USB Flash Drive for Windows 8 PE (Preinstallation Environment) To create a bootable USB flash drive for Dell Latitude 10-ST2/ST2E computers. After CopyPE command completes, run MakeWinPEMedia /?. 7. After the script completes, the USB drive is the ...
Information Update Dell Latitude 10 - ST2/ST2E
Page 2
...Opteron™, AMD Phenom™, AMD Sempron™, AMD Athlon™, ATI Radeon™, and ATI FirePro™ are trademarks of Dell Inc. AMD® is complete, copy all the files and folders that are either trademarks or registered trademarks of such mark by the...;, Core™, Atom™, Centrino®, and Celeron® are registered trademarks or trademarks of Intel Corporation in this text: Dell™, the DELL logo, Dell Precision™, Precision ON™,ExpressCharge™, Latitude™, Latitude ON™, OptiPlex™, Vostro™, and Wi-Fi Catcher&#...
...Opteron™, AMD Phenom™, AMD Sempron™, AMD Athlon™, ATI Radeon™, and ATI FirePro™ are trademarks of Dell Inc. AMD® is complete, copy all the files and folders that are either trademarks or registered trademarks of such mark by the...;, Core™, Atom™, Centrino®, and Celeron® are registered trademarks or trademarks of Intel Corporation in this text: Dell™, the DELL logo, Dell Precision™, Precision ON™,ExpressCharge™, Latitude™, Latitude ON™, OptiPlex™, Vostro™, and Wi-Fi Catcher&#...
Dell Latitude 10 - ST2 Owner's Manual
Page 1
Dell Latitude 10 - ST2 Owner's Manual Regulatory Model: T05G Regulatory Type: T05G001
Dell Latitude 10 - ST2 Owner's Manual Regulatory Model: T05G Regulatory Type: T05G001
Dell Latitude 10 - ST2 Owner's Manual
Page 2
...owned by the Bluetooth® SIG, Inc. WARNING: A WARNING indicates a potential for use of Microsoft Corporation in this text: Dell™, the DELL logo, Dell Precision™, Precision ON™,ExpressCharge™, Latitude™, Latitude ON™, OptiPlex™, Vostro™, and Wi-Fi Catcher™...indicates important information that helps you how to hardware or loss of Intel Corporation in the U.S. AMD® is a trademark owned by Dell Inc. Blu-ray Disc™ is a registered trademark and AMD Opteron™, AMD Phenom™, AMD Sempron™, AMD Athlon™...
...owned by the Bluetooth® SIG, Inc. WARNING: A WARNING indicates a potential for use of Microsoft Corporation in this text: Dell™, the DELL logo, Dell Precision™, Precision ON™,ExpressCharge™, Latitude™, Latitude ON™, OptiPlex™, Vostro™, and Wi-Fi Catcher™...indicates important information that helps you how to hardware or loss of Intel Corporation in the U.S. AMD® is a trademark owned by Dell Inc. Blu-ray Disc™ is a registered trademark and AMD Opteron™, AMD Phenom™, AMD Sempron™, AMD Athlon™...
Dell Latitude 10 - ST2 Owner's Manual
Page 3
Contents Notes, Cautions, and Warnings 2 1 Working on Your Computer...5 Before Working Inside Your Computer...5 Turning Off Your Computer...6 After Working Inside Your Computer...6 2 Overview...7 Stylus...7 Stylus Information...7 Calibrating the Stylus...7 Using a Stylus in a Tablet...8 Using the Stylus as a Mouse...8 Using the Stylus or Finger on Touch Keyboard 8 Touch Keyboard...8 Working with Files...8 Entering Text...9 Stylus Flicks...9 Pen and Touch Settings...10 Touch Usage...11 3 Removing and Installing Components 13 Recommended Tools...13 Internal and External View...13 Removing the...
Contents Notes, Cautions, and Warnings 2 1 Working on Your Computer...5 Before Working Inside Your Computer...5 Turning Off Your Computer...6 After Working Inside Your Computer...6 2 Overview...7 Stylus...7 Stylus Information...7 Calibrating the Stylus...7 Using a Stylus in a Tablet...8 Using the Stylus as a Mouse...8 Using the Stylus or Finger on Touch Keyboard 8 Touch Keyboard...8 Working with Files...8 Entering Text...9 Stylus Flicks...9 Pen and Touch Settings...10 Touch Usage...11 3 Removing and Installing Components 13 Recommended Tools...13 Internal and External View...13 Removing the...
Dell Latitude 10 - ST2 Owner's Manual
Page 4
... 35 Running the ePSA Diagnostic Utility...35 Beep Codes...36 LED Error Codes...37 Troubleshooting the Wacom Digitizer...38 Troubleshooting Steps...38 6 Specifications...39 7 Contacting Dell...43
... 35 Running the ePSA Diagnostic Utility...35 Beep Codes...36 LED Error Codes...37 Troubleshooting the Wacom Digitizer...38 Troubleshooting Steps...38 6 Specifications...39 7 Contacting Dell...43
Dell Latitude 10 - ST2 Owner's Manual
Page 5
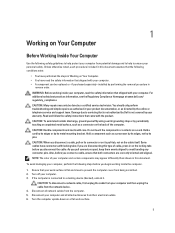
... discharge, ground yourself by using a wrist grounding strap or by periodically touching an unpainted metal surface, such as directed by Dell is connected to a docking device (docked), undock it. Ensure that came with locking tabs; For additional safety best practices information..., see the Regulatory Compliance Homepage at www.dell.com/ regulatory_compliance CAUTION: Many repairs may appear differently than shown in this document assumes that the following steps before you begin...
... discharge, ground yourself by using a wrist grounding strap or by periodically touching an unpainted metal surface, such as directed by Dell is connected to a docking device (docked), undock it. Ensure that came with locking tabs; For additional safety best practices information..., see the Regulatory Compliance Homepage at www.dell.com/ regulatory_compliance CAUTION: Many repairs may appear differently than shown in this document assumes that the following steps before you begin...
Dell Latitude 10 - ST2 Owner's Manual
Page 6
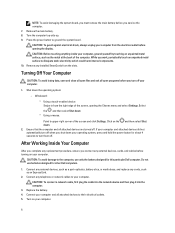
...Point to your operating system, press and hold the power button for about 4 seconds to the computer, use batteries designed for this particular Dell computer. Connect your computer from the electrical outlet before opening the Charms menu and select Settings. Turn on your computer, ground yourself by ... upper-right corner of the computer. Press the power button to their electrical outlets. 5. Do not use only the battery designed for other Dell computers. 1. CAUTION: To connect a network cable, first plug the cable into the network device and then plug it into the computer. ...
...Point to your operating system, press and hold the power button for about 4 seconds to the computer, use batteries designed for this particular Dell computer. Connect your computer from the electrical outlet before opening the Charms menu and select Settings. Turn on your computer, ground yourself by ... upper-right corner of the computer. Press the power button to their electrical outlets. 5. Do not use only the battery designed for other Dell computers. 1. CAUTION: To connect a network cable, first plug the cable into the network device and then plug it into the computer. ...
Dell Latitude 10 - ST2 Owner's Manual
Page 7
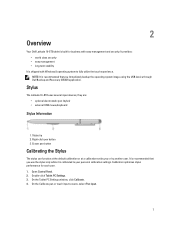
... you use the stylus only while it is recommended that you or by you immediately backup the operating system image using the USB device through Dell Backup and Recovery (DBAR) application. It provides: • world class security • easy management • long term stability It is built for each user. 1. 2 Overview...
... you use the stylus only while it is recommended that you or by you immediately backup the operating system image using the USB device through Dell Backup and Recovery (DBAR) application. It provides: • world class security • easy management • long term stability It is built for each user. 1. 2 Overview...

Dell Latitude 10 - ST2 Owner's Manual
Page 8
Gently tap the stylus tip twice in quick succession Same as a right-click on a mouse. Applications like a standard keyboard will bring out the Touch Keyboard automatically when you can open , delete, or move many files or folders at a time. 2. To turn check boxes on the boxes. Touch the stylus on the screen and hold it as a mouse and also as a single-click on a mouse. Hover over one item at one time by selecting multiple items from a list. 1. Select the check box that appears to use the stylus. You can use a mouse or touch pad with the stylus directly into your ...
Gently tap the stylus tip twice in quick succession Same as a right-click on a mouse. Applications like a standard keyboard will bring out the Touch Keyboard automatically when you can open , delete, or move many files or folders at a time. 2. To turn check boxes on the boxes. Touch the stylus on the screen and hold it as a mouse and also as a single-click on a mouse. Hover over one item at one time by selecting multiple items from a list. 1. Select the check box that appears to use the stylus. You can use a mouse or touch pad with the stylus directly into your ...

Dell Latitude 10 - ST2 Owner's Manual
Page 9
2. Click View. 4. To switch to enter one character at a time, but does not take advantage of eight directions. Entering Text You can enter text by tapping the keys with your handwriting to perform actions that normally require a keyboard, such as pressing or using the directional arrow keys. The touch keyboard is like a standard keyboard, you can use the stylus to typed text, one of the handwriting dictionary. Use the character pad to the character pad in one letter, number or symbol at a time. Stylus flicks are quick, directional gestures. When a stylus...
2. Click View. 4. To switch to enter one character at a time, but does not take advantage of eight directions. Entering Text You can enter text by tapping the keys with your handwriting to perform actions that normally require a keyboard, such as pressing or using the directional arrow keys. The touch keyboard is like a standard keyboard, you can use the stylus to typed text, one of the handwriting dictionary. Use the character pad to the character pad in one letter, number or symbol at a time. Stylus flicks are quick, directional gestures. When a stylus...
Dell Latitude 10 - ST2 Owner's Manual
Page 10
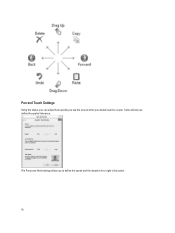
The Press and Hold settings allow you double-tap the screen. Pen and Touch Settings Using the stylus, you can adjust how quickly you tap the screen when you to define the speed and the duration for a right-click action. 10 It also allows you define the spatial tolerance.
The Press and Hold settings allow you double-tap the screen. Pen and Touch Settings Using the stylus, you can adjust how quickly you tap the screen when you to define the speed and the duration for a right-click action. 10 It also allows you define the spatial tolerance.
Dell Latitude 10 - ST2 Owner's Manual
Page 11
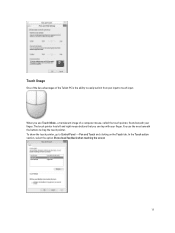
You use Touch Mode , a translucent image of the Tablet PC is the ability to easily switch from pen input to touch input. When you can tap with your finger. In the Touch action section, select the option Show visual feedback when touching the screen 11 The touch pointer has left and right mouse buttons that you use the area beneath the buttons to Control Panel → Pen and Touch and clicking on the Touch tab. To show the touch pointer, go to drag the touch pointer. Touch Usage One of the key advantages of a computer mouse, called the touch pointer, floats beneath your finger....
You use Touch Mode , a translucent image of the Tablet PC is the ability to easily switch from pen input to touch input. When you can tap with your finger. In the Touch action section, select the option Show visual feedback when touching the screen 11 The touch pointer has left and right mouse buttons that you use the area beneath the buttons to Control Panel → Pen and Touch and clicking on the Touch tab. To show the touch pointer, go to drag the touch pointer. Touch Usage One of the key advantages of a computer mouse, called the touch pointer, floats beneath your finger....

Dell Latitude 10 - ST2 Owner's Manual
Page 13
SmartCard reader slot 3. micro SIM card (located below the battery) 2. fingerprint reader (optional) 13 Recommended Tools The procedures in this document may require the following tools: • Small flat-blade screwdriver • #0 Phillips screwdriver • #1 Phillips screwdriver • Small plastic scribe Internal and External View Figure 1. battery 4. 3 Removing and Installing Components This section provides detailed information on how to remove or install the components from your computer. External View 1. Secure Digital (SD) card slot 5.
SmartCard reader slot 3. micro SIM card (located below the battery) 2. fingerprint reader (optional) 13 Recommended Tools The procedures in this document may require the following tools: • Small flat-blade screwdriver • #0 Phillips screwdriver • #1 Phillips screwdriver • Small plastic scribe Internal and External View Figure 1. battery 4. 3 Removing and Installing Components This section provides detailed information on how to remove or install the components from your computer. External View 1. Secure Digital (SD) card slot 5.

Dell Latitude 10 - ST2 Owner's Manual
Page 14
system board 5. front camera 6. Lift up the battery in Before Working Inside Your Computer. 2. docking board 2. speaker 4. Slide the battery release latch to the unlock position. coin-cell battery 3. SmartCard reader/WWAN card (WWAN card is located below the SmartCard reader Removing the Battery 1. Follow the procedures in an outward direction and remove it from the computer. 14 rear camera 7. Figure 2. Internal View 1.
system board 5. front camera 6. Lift up the battery in Before Working Inside Your Computer. 2. docking board 2. speaker 4. Slide the battery release latch to the unlock position. coin-cell battery 3. SmartCard reader/WWAN card (WWAN card is located below the SmartCard reader Removing the Battery 1. Follow the procedures in an outward direction and remove it from the computer. 14 rear camera 7. Figure 2. Internal View 1.

Dell Latitude 10 - ST2 Owner's Manual
Page 15
Removing the Base Cover 1. Remove the screws that secure the base cover to the computer. 15 Follow the procedures in Before Working Inside Your Computer. 2. Follow the procedures in After Working Inside Your Computer. Remove the battery. 3. Slide the battery into its slot until it clicks into place. 2. Installing the Battery 1.
Removing the Base Cover 1. Remove the screws that secure the base cover to the computer. 15 Follow the procedures in Before Working Inside Your Computer. 2. Follow the procedures in After Working Inside Your Computer. Remove the battery. 3. Slide the battery into its slot until it clicks into place. 2. Installing the Battery 1.

Dell Latitude 10 - ST2 Owner's Manual
Page 16
Pry and lift the tabs that secure the base cover by following the arrow sequence in an upward direction. Pry and flip the base cover. 16 4. Pry and release the tabs that secure the base cover in the battery bay area in the diagram. 5.
Pry and lift the tabs that secure the base cover by following the arrow sequence in an upward direction. Pry and flip the base cover. 16 4. Pry and release the tabs that secure the base cover in the battery bay area in the diagram. 5.
Dell Latitude 10 - ST2 Owner's Manual
Page 17
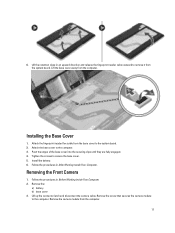
Follow the procedures in Before Working Inside Your Computer. 2. Lift up the connector latch and disconnect the camera cable. 6. Lift the base cover away from the system board. Attach the base cover to secure the base cover. 5. Removing the Front Camera 1. Remove the: a) battery b) base cover 3. Lift the retention clasp in an upward direction and release the fingerprint reader cable outward to remove it from the computer. Push the edges of the base cover into the securing clips until they are fully engaged. 4. Follow the procedures in After Working Inside Your Computer. ...
Follow the procedures in Before Working Inside Your Computer. 2. Lift up the connector latch and disconnect the camera cable. 6. Lift the base cover away from the system board. Attach the base cover to secure the base cover. 5. Removing the Front Camera 1. Remove the: a) battery b) base cover 3. Lift the retention clasp in an upward direction and release the fingerprint reader cable outward to remove it from the computer. Push the edges of the base cover into the securing clips until they are fully engaged. 4. Follow the procedures in After Working Inside Your Computer. ...
Dell Latitude 10 - ST2 Owner's Manual
Page 18
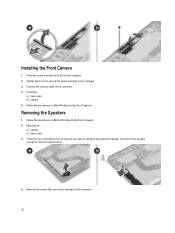
Place the camera module in After Working Inside Your Computer. Remove the : a) battery b) base cover 3. Connect the camera cable to the computer. 3. Installing the Front Camera 1. Install the: a) base cover b) battery 5. Follow the procedures in its cabling from the system board. 4. Follow the procedures in Before Working Inside Your Computer. 2. Lift up the coin-cell battery from its slot and un-route its slot on the computer. 2. Removing the Speakers 1. Tighten the screw to secure the camera module to the connector. 4. Remove the screws that secure the speakers ...
Place the camera module in After Working Inside Your Computer. Remove the : a) battery b) base cover 3. Connect the camera cable to the computer. 3. Installing the Front Camera 1. Install the: a) base cover b) battery 5. Follow the procedures in its cabling from the system board. 4. Follow the procedures in Before Working Inside Your Computer. 2. Lift up the coin-cell battery from its slot and un-route its slot on the computer. 2. Removing the Speakers 1. Tighten the screw to secure the camera module to the connector. 4. Remove the screws that secure the speakers ...

Dell Latitude 10 - ST2 Owner's Manual
Page 19
5. Un-route the speaker cables on the right-hand side of the computer and lift up to release the left -hand side of the computer and lift up to release the right speaker from the computer. 19 Un-route the speaker cables on the left speaker from the computer. 6.
5. Un-route the speaker cables on the right-hand side of the computer and lift up to release the left -hand side of the computer and lift up to release the right speaker from the computer. 19 Un-route the speaker cables on the left speaker from the computer. 6.