

User Guide
Page 3
... Controls 16 Monitor Specifications 19 Plug and Play Capability 28 Universal Serial Bus (USB) Interface 28 LCD Monitor Quality and Pixel Policy 29 Cleaning Your Monitor 30 3 Setting Up the Monitor 31 Connecting Your Monitor 31 Attaching the Cable Cover 33 Attaching the Stand 34 Organizing Your Cables 36 Connecting the Computer 36 Removing the Monitor Stand 37 Removing the Cable Cover 37 Wall Mounting (Optional 38 4 Operating the Monitor 39 Power On the Monitor 39 Using the Front Panel Controls 39 Using the On-Screen Display (OSD) Menu...
... Controls 16 Monitor Specifications 19 Plug and Play Capability 28 Universal Serial Bus (USB) Interface 28 LCD Monitor Quality and Pixel Policy 29 Cleaning Your Monitor 30 3 Setting Up the Monitor 31 Connecting Your Monitor 31 Attaching the Cable Cover 33 Attaching the Stand 34 Organizing Your Cables 36 Connecting the Computer 36 Removing the Monitor Stand 37 Removing the Cable Cover 37 Wall Mounting (Optional 38 4 Operating the Monitor 39 Power On the Monitor 39 Using the Front Panel Controls 39 Using the On-Screen Display (OSD) Menu...
User Guide
Page 7
... modification of this monitor. • Adhere to the power adapter as a plug-in device. Disconnecting Device The power cord is the disconnect device for life supporting system, surgical procedure system nor viewing digital mammography images. Refer servicing to qualified personnel only. • Users must not allow SIP/SOPs and the patient to disconnect the mains power. • Use only the power cord supplied with this monitor is not...
... modification of this monitor. • Adhere to the power adapter as a plug-in device. Disconnecting Device The power cord is the disconnect device for life supporting system, surgical procedure system nor viewing digital mammography images. Refer servicing to qualified personnel only. • Users must not allow SIP/SOPs and the patient to disconnect the mains power. • Use only the power cord supplied with this monitor is not...

User Guide
Page 14
14 | About Your Monitor DC Power Cable Power Adapter DP Cable HDMI Cable USB 2.0 Upstream Cable (Enables the USB Ports on the Monitor) • Drivers and Documentation Media • Quick Setup Guide • Safety, Environmental, and Regulatory Information • Factory Calibration Report
14 | About Your Monitor DC Power Cable Power Adapter DP Cable HDMI Cable USB 2.0 Upstream Cable (Enables the USB Ports on the Monitor) • Drivers and Documentation Media • Quick Setup Guide • Safety, Environmental, and Regulatory Information • Factory Calibration Report
User Guide
Page 15
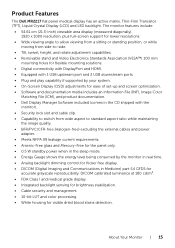
... display (measured diagonally). 1920 x 1080 resolution, plus full-screen support for lower resolutions. • Wide viewing angle to allow viewing from a sitting or standing position, or while moving from side-to-side. • Tilt, swivel, height, and rotate adjustment capabilities. • Removable stand and Video Electronics Standards Association (VESA™) 100 mm mounting holes for flexible mounting solutions. • Digital connectivity with DisplayPort and HDMI. • Equipped with 1 USB upstream port and 2 USB downstream ports. • Plug...
... display (measured diagonally). 1920 x 1080 resolution, plus full-screen support for lower resolutions. • Wide viewing angle to allow viewing from a sitting or standing position, or while moving from side-to-side. • Tilt, swivel, height, and rotate adjustment capabilities. • Removable stand and Video Electronics Standards Association (VESA™) 100 mm mounting holes for flexible mounting solutions. • Digital connectivity with DisplayPort and HDMI. • Equipped with 1 USB upstream port and 2 USB downstream ports. • Plug...
User Guide
Page 21
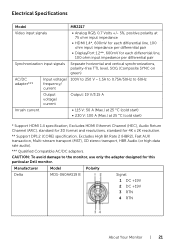
... V: 50 A (Max.) at 25 °C (cold start ) * Support HDMI 1.4 specification, Excludes HDMI Ethernet Channel (HEC), Audio Return Channel (ARC), standard for 3D format and resolutions, standard for this particular Dell monitor. Manufacturer Model Polarity Delta MDS-060AAS19 B Signal 1 DC +19V 2 DC +19V 3 RTN 4 RTN About Your Monitor | 21 Electrical Specifications Model MR2217 Video input signals • Analog RGB, 0.7 Volts +/- 5%, positive polarity at 25 °C (cold start ) • 230 V: 100 A (Max.) at 75...
... V: 50 A (Max.) at 25 °C (cold start ) * Support HDMI 1.4 specification, Excludes HDMI Ethernet Channel (HEC), Audio Return Channel (ARC), standard for 3D format and resolutions, standard for this particular Dell monitor. Manufacturer Model Polarity Delta MDS-060AAS19 B Signal 1 DC +19V 2 DC +19V 3 RTN 4 RTN About Your Monitor | 21 Electrical Specifications Model MR2217 Video input signals • Analog RGB, 0.7 Volts +/- 5%, positive polarity at 25 °C (cold start ) • 230 V: 100 A (Max.) at 75...

User Guide
Page 24
... in use. VESA Modes Horizontal Vertical Sync Sync Normal operation Active Active Video Active Power Indicator Green Active-off mode Switch off mode, the following table shows the power consumption and signaling of this automatic power saving feature. When any button is referred to as Power Save Mode*. Inactive Blanked Amber - - Power Management Modes If you have VESA's DPM™ compliance display card or software installed in your PC, the monitor can only be slightly different according to the connected input signal...
... in use. VESA Modes Horizontal Vertical Sync Sync Normal operation Active Active Video Active Power Indicator Green Active-off mode Switch off mode, the following table shows the power consumption and signaling of this automatic power saving feature. When any button is referred to as Power Save Mode*. Inactive Blanked Amber - - Power Management Modes If you have VESA's DPM™ compliance display card or software installed in your PC, the monitor can only be slightly different according to the connected input signal...

User Guide
Page 40
... On-Screen Display (OSD) and select the OSD Menu. Power (with power light indicator) The green light indicates the monitor is On and fully functional. OK 4 Use the Back button to go back to the main menu or exit the OSD main menu. Up 2 Use the Down button to adjust (decrease ranges) items in the OSD menu. Shortcut key/ Brightness/Contrast 3 Use the MENU button to adjust the image settings. Front Panel Button Description 1 Use the Up button to adjust (increase ranges) items in the OSD menu. 2 Use this button...
... On-Screen Display (OSD) and select the OSD Menu. Power (with power light indicator) The green light indicates the monitor is On and fully functional. OK 4 Use the Back button to go back to the main menu or exit the OSD main menu. Up 2 Use the Down button to adjust (decrease ranges) items in the OSD menu. Shortcut key/ Brightness/Contrast 3 Use the MENU button to adjust the image settings. Front Panel Button Description 1 Use the Up button to adjust (increase ranges) items in the OSD menu. 2 Use this button...

User Guide
Page 45
... HDMI connector. Operating the Monitor | 45 Select the HDMI input when you are using the DisplayPort (DP) connector. Press to select Auto Select, the monitor scans for available input sources. Auto Select VGA DP HDMI Color Press to select the DisplayPort input source. Use Color to select the HDMI input source. Press to adjust the color setting mode. Press to your monitor. Select the VGA input when you are using the analog (VGA) connector. Input Source Use the Input Source menu to select between the different video signals that may be connected...
... HDMI connector. Operating the Monitor | 45 Select the HDMI input when you are using the DisplayPort (DP) connector. Press to select Auto Select, the monitor scans for available input sources. Auto Select VGA DP HDMI Color Press to select the DisplayPort input source. Use Color to select the HDMI input source. Press to adjust the color setting mode. Press to your monitor. Select the VGA input when you are using the analog (VGA) connector. Input Source Use the Input Source menu to select between the different video signals that may be connected...
User Guide
Page 46
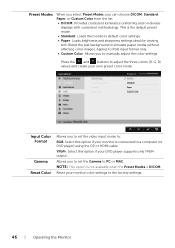
... your own preset color mode. This is DICOM. Reset your monitor color settings to adjust the three colors (R, G, B) values and create your monitor is connected to PC or MAC. Press the and buttons to the factory settings. 46 | Operating the Monitor NOTE: This option is not available when the Preset Modes is the default preset mode. • Standard: Loads the monitor's default color settings. • Paper: Loads brightness and sharpness settings ideal for viewing text.
... your own preset color mode. This is DICOM. Reset your monitor color settings to adjust the three colors (R, G, B) values and create your monitor is connected to PC or MAC. Press the and buttons to the factory settings. 46 | Operating the Monitor NOTE: This option is not available when the Preset Modes is the default preset mode. • Standard: Loads the monitor's default color settings. • Paper: Loads brightness and sharpness settings ideal for viewing text.

User Guide
Page 47
... Preset Modes is '100' (+). Horizontal Position Use or to adjust image. Use or to let the monitor turn off as the system sleeps; Maximum is DICOM or Standard. Reset Display Select this feature to your monitor to maintain stable brightness level and shorten cold startup time. Monitor Sleep Allows you to adjust your preference. Aspect Ratio Adjusts the image ratio to restore default display settings. NOTE: Horizontal Position and Vertical Position adjustments are only available for best image quality. Brightness...
... Preset Modes is '100' (+). Horizontal Position Use or to adjust image. Use or to let the monitor turn off as the system sleeps; Maximum is DICOM or Standard. Reset Display Select this feature to your monitor to maintain stable brightness level and shorten cold startup time. Monitor Sleep Allows you to adjust your preference. Aspect Ratio Adjusts the image ratio to restore default display settings. NOTE: Horizontal Position and Vertical Position adjustments are only available for best image quality. Brightness...

User Guide
Page 49
...: Unlock function- Users can choose a feature from Preset Modes, Brightness/Contrast, Auto Adjust, Input Source, Aspect Ratio, or Rotation and set it as a shortcut key. Lock function - Either soft lock (through the OSD menu) or hard lock (press and hold the button above the power button for 6 seconds). Reset Restores shortcut keys to the factory preset values. When Lock is selected, no user adjustments are locked. Reset all OSD settings to factory defaults. All buttons are allowed. Personalization Operating the Monitor...
...: Unlock function- Users can choose a feature from Preset Modes, Brightness/Contrast, Auto Adjust, Input Source, Aspect Ratio, or Rotation and set it as a shortcut key. Lock function - Either soft lock (through the OSD menu) or hard lock (press and hold the button above the power button for 6 seconds). Reset Restores shortcut keys to the factory preset values. When Lock is selected, no user adjustments are locked. Reset all OSD settings to factory defaults. All buttons are allowed. Personalization Operating the Monitor...
User Guide
Page 54
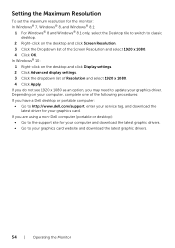
...; Go to http://www.dell.com/support, enter your service tag, and download the latest driver for the monitor: In Windows® 7, Windows® 8, and Windows® 8.1: 1 For Windows® 8 and Windows® 8.1 only, select the Desktop tile to switch to classic desktop. 2 Right-click on the desktop and click Display settings. 2 Click Advanced display settings. 3 Click the dropdown list of the Screen Resolution and select 1920 x 1080...
...; Go to http://www.dell.com/support, enter your service tag, and download the latest driver for the monitor: In Windows® 7, Windows® 8, and Windows® 8.1: 1 For Windows® 8 and Windows® 8.1 only, select the Desktop tile to switch to classic desktop. 2 Right-click on the desktop and click Display settings. 2 Click Advanced display settings. 3 Click the dropdown list of the Screen Resolution and select 1920 x 1080...
User Guide
Page 58
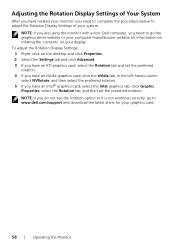
... are using the monitor with a non-Dell computer, you have an ATI graphics card, select the Rotation tab and set the preferred rotation. To adjust the Rotation Display Settings: 1 Right-click on the desktop and click Properties. 2 Select the Settings tab and click Advanced. 3 If you need to complete the procedure below to go to www.dell.com/support and download the latest driver...
... are using the monitor with a non-Dell computer, you have an ATI graphics card, select the Rotation tab and set the preferred rotation. To adjust the Rotation Display Settings: 1 Right-click on the desktop and click Properties. 2 Select the Settings tab and click Advanced. 3 If you need to complete the procedure below to go to www.dell.com/support and download the latest driver...

User Guide
Page 59
... screen. Also, depending upon the selected input, one of the procedures in self-test mode, the power LED remains green. Troubleshooting WARNING: Before you to check whether your computer and the monitor. 2 Unplug the video cable from the back of the computer. To ensure proper Self-Test operation, remove all digital cables from the back of computer. 3 Turn on -screen (against a black background), if the monitor cannot sense a video signal...
... screen. Also, depending upon the selected input, one of the procedures in self-test mode, the power LED remains green. Troubleshooting WARNING: Before you to check whether your computer and the monitor. 2 Unplug the video cable from the back of the computer. To ensure proper Self-Test operation, remove all digital cables from the back of computer. 3 Turn on -screen (against a black background), if the monitor cannot sense a video signal...

User Guide
Page 60
... the display in self-test mode. then turn On both your monitor and reconnect the video cable; To run the built-in diagnostics: 1 Ensure that helps you determine if the screen abnormality you use the previous procedure, check your video controller and computer, because your computer and video card. Built-in Diagnostics Your monitor has a built-in diagnostic tool that the screen is in red, green, blue, black, white and text screens.
... the display in self-test mode. then turn On both your monitor and reconnect the video cable; To run the built-in diagnostics: 1 Ensure that helps you determine if the screen abnormality you use the previous procedure, check your video controller and computer, because your computer and video card. Built-in Diagnostics Your monitor has a built-in diagnostic tool that the screen is in red, green, blue, black, white and text screens.
User Guide
Page 61
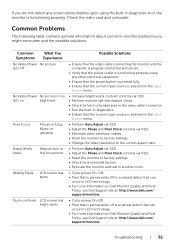
... the Input Source menu. • Increase brightness & contrast controls via OSD. • Perform monitor self-test feature check. • Check for bent or broken pins in the video cable connector. • Run the built-in diagnostics. • Ensure that the correct input source is selected in the Input Source menu. • Perform Auto Adjust via OSD. • Adjust the Phase and Pixel Clock controls via OSD. • Eliminate video extension cables. • Reset the monitor to factory settings. • Change the video resolution to...
... the Input Source menu. • Increase brightness & contrast controls via OSD. • Perform monitor self-test feature check. • Check for bent or broken pins in the video cable connector. • Run the built-in diagnostics. • Ensure that the correct input source is selected in the Input Source menu. • Perform Auto Adjust via OSD. • Adjust the Phase and Pixel Clock controls via OSD. • Eliminate video extension cables. • Reset the monitor to factory settings. • Change the video resolution to...
User Guide
Page 62
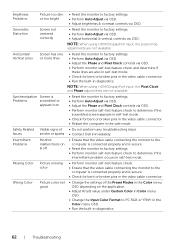
NOTE: When using HDMI/DisplayPort input, the Pixel Clock and Phase adjustments are not available. Intermittent Problems Monitor malfunctions on the application. • Adjust R/G/B value under Custom Color in Color menu OSD. • Change the Input Color Format to PC RGB or YPbPr in the Color menu OSD. • Run the built-in diagnostics. 62 | Troubleshooting Brightness Problems Picture too dim or too bright • Reset the monitor to factory settings. • Perform Auto Adjust via OSD. • Adjust horizontal & vertical controls via OSD. Geometric Distortion Screen not...
NOTE: When using HDMI/DisplayPort input, the Pixel Clock and Phase adjustments are not available. Intermittent Problems Monitor malfunctions on the application. • Adjust R/G/B value under Custom Color in Color menu OSD. • Change the Input Color Format to PC RGB or YPbPr in the Color menu OSD. • Run the built-in diagnostics. 62 | Troubleshooting Brightness Problems Picture too dim or too bright • Reset the monitor to factory settings. • Perform Auto Adjust via OSD. • Adjust horizontal & vertical controls via OSD. Geometric Distortion Screen not...

User Guide
Page 63
... to unlock (for more information, see Power Management Modes). • Alternatively, use (for more information, see Lock). • Check the signal source. Troubleshooting | 63 Product Specific Problems Specific Symptoms What You Experience Screen image is Image is too small centered on screen, but does not fill entire viewing area Cannot adjust the monitor with the buttons on the front panel OSD does not appear on the screen No Input Signal No picture, the when user LED light is controls are...
... to unlock (for more information, see Power Management Modes). • Alternatively, use (for more information, see Lock). • Check the signal source. Troubleshooting | 63 Product Specific Problems Specific Symptoms What You Experience Screen image is Image is too small centered on screen, but does not fill entire viewing area Cannot adjust the monitor with the buttons on the front panel OSD does not appear on the screen No Input Signal No picture, the when user LED light is controls are...
User Guide
Page 65
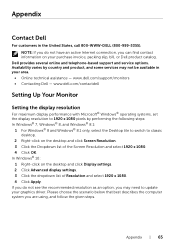
....dell.com/support/monitors • Contacting Dell - In Windows® 10: 1 Right-click on your graphics driver. If you do not have an active Internet connection, you can find contact information on the desktop and click Display settings. 2 Click Advanced display settings. 3 Click the dropdown list of the Screen Resolution and select 1920 x 1080. 4 Click OK. Dell provides several online and telephone-based support and service options...
....dell.com/support/monitors • Contacting Dell - In Windows® 10: 1 Right-click on your graphics driver. If you do not have an active Internet connection, you can find contact information on the desktop and click Display settings. 2 Click Advanced display settings. 3 Click the dropdown list of the Screen Resolution and select 1920 x 1080. 4 Click OK. Dell provides several online and telephone-based support and service options...
User Guide
Page 66
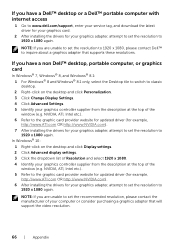
... will support the video resolution. 66 | Appendix NVIDIA, ATI, Intel etc.). 5 Refer to the graphic card provider website for updated driver (for example, http://www.ATI.com OR http://www.NVIDIA.com). 6 After installing the drivers for your graphics adapter, attempt to set the resolution to 1920 x 1080 again. In Windows® 10: 1 Right-click on the desktop and click Personalization. 3 Click Change Display Settings...
... will support the video resolution. 66 | Appendix NVIDIA, ATI, Intel etc.). 5 Refer to the graphic card provider website for updated driver (for example, http://www.ATI.com OR http://www.NVIDIA.com). 6 After installing the drivers for your graphics adapter, attempt to set the resolution to 1920 x 1080 again. In Windows® 10: 1 Right-click on the desktop and click Personalization. 3 Click Change Display Settings...


