Owners Manual
Page 3
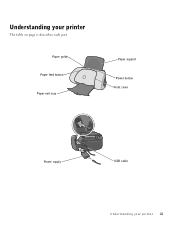
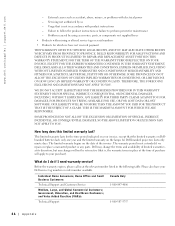
Understanding your printer iii Paper guide Paper feed button Paper exit tray Paper support Power button Front cover Power supply USB cable Understanding your printer The table on page iv describes each part.
Understanding your printer iii Paper guide Paper feed button Paper exit tray Paper support Power button Front cover Power supply USB cable Understanding your printer The table on page iv describes each part.

Owners Manual
Page 4
Stack paper as it exits the printer. iv Understanding your printer to a computer. Feed paper into the printer. Connect your printer Turn the printer on or off, or cancel a print job. Supply power to change cartridges. Load paper in the printer. Accessing your User's Guide To access your User's Guide: Click Start → Programs → Dell Printers →Dell Inkjet Printer J740 → View User's Guide. Open to the printer. Use the: Paper guide Paper support Power button Front cover Paper exit tray Paper feed button Power supply USB cable To: Make sure paper feeds ...
Stack paper as it exits the printer. iv Understanding your printer to a computer. Feed paper into the printer. Connect your printer Turn the printer on or off, or cancel a print job. Supply power to change cartridges. Load paper in the printer. Accessing your User's Guide To access your User's Guide: Click Start → Programs → Dell Printers →Dell Inkjet Printer J740 → View User's Guide. Open to the printer. Use the: Paper guide Paper support Power button Front cover Paper exit tray Paper feed button Power supply USB cable To: Make sure paper feeds ...

Owners Manual
Page 12
... maintenance and troubleshooting help. Understanding the printer software The printer software includes the: • Print Properties-helps you have not already done so, follow the instructions on your printer www.dell.com/supplies | support.dell.com Setting up the printer If you adjust print settings. For setup troubleshooting, see page 20. To open Print Properties: 1 With your document open, click File → Print. 2 In the Print dialog box, click Properties, Preferences, Options, or Setup (depending on your printer settings in Print Properties. The Print Properties screen...
... maintenance and troubleshooting help. Understanding the printer software The printer software includes the: • Print Properties-helps you have not already done so, follow the instructions on your printer www.dell.com/supplies | support.dell.com Setting up the printer If you adjust print settings. For setup troubleshooting, see page 20. To open Print Properties: 1 With your document open, click File → Print. 2 In the Print dialog box, click Properties, Preferences, Options, or Setup (depending on your printer settings in Print Properties. The Print Properties screen...

Owners Manual
Page 14
... tab: Printer Status (the tab that appears when you open the Dell Printer Solution Center) How To Troubleshooting Maintenance Contact Information Advanced You can: • Check the current printer status. • See what type of phone numbers. • Visit the Dell Web site. • Change printing status appearance options. • View software version information. 4 Learning about how to install a new ink cartridge. • View information about your printer NOTE: Some links will not work while a job is in...
... tab: Printer Status (the tab that appears when you open the Dell Printer Solution Center) How To Troubleshooting Maintenance Contact Information Advanced You can: • Check the current printer status. • See what type of phone numbers. • Visit the Dell Web site. • Change printing status appearance options. • View software version information. 4 Learning about how to install a new ink cartridge. • View information about your printer NOTE: Some links will not work while a job is in...

Owners Manual
Page 15
... Print Properties screen appears. 3 Click the Paper Setup tab, and then select the paper size you load one of these paper types, the printer detects the paper type and automatically adjusts the paper type settings and print resolution. The Print Properties screen appears. 3 From the Paper Type section on your printer 5 If you turn it off : 1 With your document open , click File → Print. 2 In the Print dialog box, click Properties, Preferences, Options, or Setup (depending on the Quality/Copies tab...
... Print Properties screen appears. 3 Click the Paper Setup tab, and then select the paper size you load one of these paper types, the printer detects the paper type and automatically adjusts the paper type settings and print resolution. The Print Properties screen appears. 3 From the Paper Type section on your printer 5 If you turn it off : 1 With your document open , click File → Print. 2 In the Print dialog box, click Properties, Preferences, Options, or Setup (depending on the Quality/Copies tab...
Owners Manual
Page 19
... to 15 minutes to adjust the settings. The printer paper exit tray can hold : • 150 sheets of paper • 25 sheets of labels • 1 transparency • 10 envelopes • 50 cards • 1 sheet of the Print Properties screen (Quality/Copies, Paper Setup, and Print Layout), confirm the selections. item. 5 Click OK or Print (depending on the program or operating system). Printing photos 1 Click Start → Programs → Dell Printers → Dell Inkjet Printer J740 → Dell Printer Solution Center. 2 Click the How To...
... to 15 minutes to adjust the settings. The printer paper exit tray can hold : • 150 sheets of paper • 25 sheets of labels • 1 transparency • 10 envelopes • 50 cards • 1 sheet of the Print Properties screen (Quality/Copies, Paper Setup, and Print Layout), confirm the selections. item. 5 Click OK or Print (depending on the program or operating system). Printing photos 1 Click Start → Programs → Dell Printers → Dell Inkjet Printer J740 → Dell Printer Solution Center. 2 Click the How To...

Owners Manual
Page 20
..., remove each photo as it exits the printer, and let it dry before stacking. NOTE: To create a fabric collage, you can repeat these steps using the same picture multiple times or using many different pictures. NOTE: Loading excess banner paper may cause a paper jam. NOTE: To apply the transfer to the Troubleshooting section in the User's Guide. Printing envelopes 1 Click Start → Programs → Dell Printers → Dell Inkjet Printer J740 → Dell Printer Solution Center. 2 Click...
..., remove each photo as it exits the printer, and let it dry before stacking. NOTE: To create a fabric collage, you can repeat these steps using the same picture multiple times or using many different pictures. NOTE: Loading excess banner paper may cause a paper jam. NOTE: To apply the transfer to the Troubleshooting section in the User's Guide. Printing envelopes 1 Click Start → Programs → Dell Printers → Dell Inkjet Printer J740 → Dell Printer Solution Center. 2 Click...

Owners Manual
Page 21
... help, see page 7. 2 With your document open, click File → Print. 3 From the I Want To menu, select Make a poster or put many pages on both sides of the paper 1 Load paper. Printing on transfers. Printing posters You can print a poster of an image that are not going to print have a circle and a bar symbol over the number and are open , click File → Print. 3 From the I Want To menu, click Print on a sheet. 4 Click Enlarge (Print...
... help, see page 7. 2 With your document open, click File → Print. 3 From the I Want To menu, select Make a poster or put many pages on both sides of the paper 1 Load paper. Printing on transfers. Printing posters You can print a poster of an image that are not going to print have a circle and a bar symbol over the number and are open , click File → Print. 3 From the I Want To menu, click Print on a sheet. 4 Click Enlarge (Print...

Owners Manual
Page 23
... Network Neighborhood. For Windows XP, click Start → Control Panel → Printers and Other Hardware → Printers and Faxes. 2 Click Add Printer to insert the server operating system CD. First, follow these instructions while you are at the second computer: 1 For Windows 2000, click Start → Settings → Printers. For Windows XP, click Start → Control Panel → Printers and Other Hardware → Printers and Faxes. 2 Right-click the Dell Inkjet Printer J740 icon. 3 For Windows 2000, click File Sharing...
... Network Neighborhood. For Windows XP, click Start → Control Panel → Printers and Other Hardware → Printers and Faxes. 2 Click Add Printer to insert the server operating system CD. First, follow these instructions while you are at the second computer: 1 For Windows 2000, click Start → Settings → Printers. For Windows XP, click Start → Control Panel → Printers and Other Hardware → Printers and Faxes. 2 Right-click the Dell Inkjet Printer J740 icon. 3 For Windows 2000, click File Sharing...
Owners Manual
Page 24
... General tab, click Print Test Page. For Windows XP, click Start → Control Panel → Printers and Other Hardware → Printers and Faxes. 2 Select the printer you may be prompted to install a printer driver. If no system driver is complete. 14 Using the printer When a test page prints successfully, printer installation is available, then you will need to provide a path to verify printer installation: 1 For Windows 2000, click Start → Settings → Printers. www.dell.com/supplies | support.dell.com 5 Click...
... General tab, click Print Test Page. For Windows XP, click Start → Control Panel → Printers and Other Hardware → Printers and Faxes. 2 Select the printer you may be prompted to install a printer driver. If no system driver is complete. 14 Using the printer When a test page prints successfully, printer installation is available, then you will need to provide a path to verify printer installation: 1 For Windows 2000, click Start → Settings → Printers. www.dell.com/supplies | support.dell.com 5 Click...

Owners Manual
Page 26
.... 1 Make sure the printer is busy. 16 Maintenance www.dell.com/supplies | support.dell.com Ordering supplies Your Dell Personal Inkjet Printer J740 comes with software installed to detect the ink levels in this section, read and follow the instructions on the screen or visit the Dell Web site at the loading position unless the printer is on your computer to print using the following cartridges: Item: Black cartridge Color cartridge Black high yield cartridge Part number: T0601 T0602 T0722 Replacing an ink cartridge...
.... 1 Make sure the printer is busy. 16 Maintenance www.dell.com/supplies | support.dell.com Ordering supplies Your Dell Personal Inkjet Printer J740 comes with software installed to detect the ink levels in this section, read and follow the instructions on the screen or visit the Dell Web site at the loading position unless the printer is on your computer to print using the following cartridges: Item: Black cartridge Color cartridge Black high yield cartridge Part number: T0601 T0602 T0722 Replacing an ink cartridge...
Owners Manual
Page 30
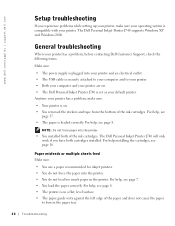
... your printer. For help , see page 7. • You load the paper correctly. www.dell.com/supplies | support.dell.com Setup troubleshooting If you have both of the ink cartridges. Paper misfeeds or multiple sheets feed Make sure: • You use a paper recommended for inkjet printers. • You do not force the paper into your printer and an electrical outlet. • The USB cable is loaded correctly. Anytime your default printer. The Dell Personal Inkjet Printer J740 supports Windows XP and Windows 2000. The Dell Personal Inkjet Printer J740 will only work if...
... your printer. For help , see page 7. • You load the paper correctly. www.dell.com/supplies | support.dell.com Setup troubleshooting If you have both of the ink cartridges. Paper misfeeds or multiple sheets feed Make sure: • You use a paper recommended for inkjet printers. • You do not force the paper into your printer and an electrical outlet. • The USB cable is loaded correctly. Anytime your default printer. The Dell Personal Inkjet Printer J740 supports Windows XP and Windows 2000. The Dell Personal Inkjet Printer J740 will only work if...
Owners Manual
Page 31
... Inkjet Printer J740 → Dell Printer Solution Center. b Click the Maintenance tab. Reconnect the power supply (refer to make sure: • You load the envelopes correctly. For Windows XP, click Start → Control Panel → Printers and Other Hardware → Printers and Faxes. To check printer status: a For Windows 2000, click Start → Settings → Printers. c Click Print a test page. Printer is not being held or paused. Troubleshooting 21 For help, see "Removing and reinstalling the printer software" on . • Restart your setup documentation). Turn...
... Inkjet Printer J740 → Dell Printer Solution Center. b Click the Maintenance tab. Reconnect the power supply (refer to make sure: • You load the envelopes correctly. For Windows XP, click Start → Control Panel → Printers and Other Hardware → Printers and Faxes. To check printer status: a For Windows 2000, click Start → Settings → Printers. c Click Print a test page. Printer is not being held or paused. Troubleshooting 21 For help, see "Removing and reinstalling the printer software" on . • Restart your setup documentation). Turn...

Owners Manual
Page 32
...: Error messages Use this section to understand printer software error messages on . Message: Paper Jam Printer Cover Open Ink Low Paper Out Cartridge Error Other messages Go to remove it is too far into the printer: 1 Open the front cover, and then pull the paper out. 22 Troubleshooting www.dell.com/supplies | support.dell.com More troubleshooting Refer to the User's Guide if you cannot reach the paper because it . 3 Press Power to turn the printer back on your computer screen. To clear a paper jam: 1 Press Power to turn the printer off...
...: Error messages Use this section to understand printer software error messages on . Message: Paper Jam Printer Cover Open Ink Low Paper Out Cartridge Error Other messages Go to remove it is too far into the printer: 1 Open the front cover, and then pull the paper out. 22 Troubleshooting www.dell.com/supplies | support.dell.com More troubleshooting Refer to the User's Guide if you cannot reach the paper because it . 3 Press Power to turn the printer back on your computer screen. To clear a paper jam: 1 Press Power to turn the printer off...

Owners Manual
Page 35
...Start → Programs → Dell Printers → Dell Inkjet Printer J740 → Uninstall Dell J740. 2 Follow the instructions on . 3 Send your computer before reinstalling the printer software. 4 Insert the Dell Personal Inkjet Printer J740 Drivers and Utilities CD. If there is not functioning properly or if a communications error message appears when you try to print. Other error messages 1 Press Power to step 6. 6 Reinstall the color cartridge and remove the black ink cartridge. 7 Close the front cover. If the error message displays again, replace the black cartridge with a new...
...Start → Programs → Dell Printers → Dell Inkjet Printer J740 → Uninstall Dell J740. 2 Follow the instructions on . 3 Send your computer before reinstalling the printer software. 4 Insert the Dell Personal Inkjet Printer J740 Drivers and Utilities CD. If there is not functioning properly or if a communications error message appears when you try to print. Other error messages 1 Press Power to step 6. 6 Reinstall the color cartridge and remove the black ink cartridge. 7 Close the front cover. If the error message displays again, replace the black cartridge with a new...
Owners Manual
Page 46
..., U.S.A.) Luxembourg International Access Code: 00 Country Code: 352 Mexico International Access Code: 00 Country Code: 52 Website: support.euro.dell.com E-mail: tech_be@dell.com Technical Support (Brussels, Belgium) Home/Small Business Sales (Brussels, Belgium) Corporate Sales (Brussels, Belgium) Customer Care (Brussels, Belgium) Fax (Brussels, Belgium) Switchboard (Brussels, Belgium) Customer Technical Support Sales Customer Service Main Area Codes, Local Numbers, and Toll-Free Numbers 512 728-4093...
..., U.S.A.) Luxembourg International Access Code: 00 Country Code: 352 Mexico International Access Code: 00 Country Code: 52 Website: support.euro.dell.com E-mail: tech_be@dell.com Technical Support (Brussels, Belgium) Home/Small Business Sales (Brussels, Belgium) Corporate Sales (Brussels, Belgium) Customer Care (Brussels, Belgium) Fax (Brussels, Belgium) Switchboard (Brussels, Belgium) Customer Technical Support Sales Customer Service Main Area Codes, Local Numbers, and Toll-Free Numbers 512 728-4093...
Owners Manual
Page 52
... Canada come with missing or altered service tags or serial numbers • Products for which warranty you purchased, see the invoice that accompanied your -our end-user customer's-Dellbranded hardware products, including Dell-branded peripheral products. This limited warranty does not cover: • Software, including the operating system and software added to perform preventive maintenance - Usage that result from: - Failure...
... Canada come with missing or altered service tags or serial numbers • Products for which warranty you purchased, see the invoice that accompanied your -our end-user customer's-Dellbranded hardware products, including Dell-branded peripheral products. This limited warranty does not cover: • Software, including the operating system and software added to perform preventive maintenance - Usage that result from: - Failure...
Owners Manual
Page 56
...USE, OR FOR LOST DATA OR LOST SOFTWARE. This limited warranty lasts for the time period indicated on your invoice, except that is not in the following table. The limited warranty begins on the lamps for which we repair or replace a warranted product or any changes will apply to perform preventive maintenance - Dell may change... EXCLUSION MAY NOT APPLY TO YOU. Problems caused by using accessories, parts, or components not supplied by us • Products with missing or altered service tags or serial numbers • Products for Dell-branded projectors lasts only ninety days.
...USE, OR FOR LOST DATA OR LOST SOFTWARE. This limited warranty lasts for the time period indicated on your invoice, except that is not in the following table. The limited warranty begins on the lamps for which we repair or replace a warranted product or any changes will apply to perform preventive maintenance - Dell may change... EXCLUSION MAY NOT APPLY TO YOU. Problems caused by using accessories, parts, or components not supplied by us • Products with missing or altered service tags or serial numbers • Products for Dell-branded projectors lasts only ninety days.
Owners Manual
Page 60
.... 72.381.189/0001-10)/ Dell Commercial do Sul - RS - Making a Claim Claims must always supply proof of purchase, indicating name and address of the seller, date of purchase, model and serial number, name and address of the customer, and details of one year from Dell's repair/replacement center. www.dell.com/supplies | support.dell.com One-Year End-User Manufacturer Guarantee (Latin America and the...
.... 72.381.189/0001-10)/ Dell Commercial do Sul - RS - Making a Claim Claims must always supply proof of purchase, indicating name and address of the seller, date of purchase, model and serial number, name and address of the customer, and details of one year from Dell's repair/replacement center. www.dell.com/supplies | support.dell.com One-Year End-User Manufacturer Guarantee (Latin America and the...

Owners Manual
Page 66
...Paper feed button, iv paper guide, iv Paper Jam message, 22 paper jam, clearing, 22 paper support, iv paper type sensor, 5 parts, iii photo cards loading, 8 photo paper loading, 8 photos printing, 9 postcards loading, 8 Power button, iv power supply, iv Print Properties, 2 printer overview, 1 printer software installing, 25 removing, 25 printers, sharing, 12 printing banner, 10 cards, 10 envelopes, 10 mirror images, 10 on both sides of the paper, 11 photos, 9 posters, 11 transparencies, 11 projects banner, 10 mirror images and iron-on transfers, 10 poster, 11 transparencies, 11 R removing ink...
...Paper feed button, iv paper guide, iv Paper Jam message, 22 paper jam, clearing, 22 paper support, iv paper type sensor, 5 parts, iii photo cards loading, 8 photo paper loading, 8 photos printing, 9 postcards loading, 8 Power button, iv power supply, iv Print Properties, 2 printer overview, 1 printer software installing, 25 removing, 25 printers, sharing, 12 printing banner, 10 cards, 10 envelopes, 10 mirror images, 10 on both sides of the paper, 11 photos, 9 posters, 11 transparencies, 11 projects banner, 10 mirror images and iron-on transfers, 10 poster, 11 transparencies, 11 R removing ink...


