Dell™ Technology Guide
Page 7
Shadow Storage 77 Reducing Hard Drive Space Used by Shadow Storage 78 Solid-State Drive (SSD 78 Installing Drivers for Media Drives 79 Determining Whether a Device Driver is the Source of a Device Problem 79 Replacing a Driver With a Previous Version of the Driver 79 Using the Drivers and ...Utilities Media to Reinstall a Driver 80 Manually Reinstalling a Driver 80 Drive Problems 81 Optical Drive Problems 82 Hard Drive Problems 82 Working with RAID 83 RAID Level ...
Shadow Storage 77 Reducing Hard Drive Space Used by Shadow Storage 78 Solid-State Drive (SSD 78 Installing Drivers for Media Drives 79 Determining Whether a Device Driver is the Source of a Device Problem 79 Replacing a Driver With a Previous Version of the Driver 79 Using the Drivers and ...Utilities Media to Reinstall a Driver 80 Manually Reinstalling a Driver 80 Drive Problems 81 Optical Drive Problems 82 Hard Drive Problems 82 Working with RAID 83 RAID Level ...
Dell™ Technology Guide
Page 78
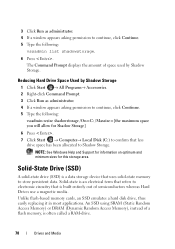
... this storage area. Unlike flash-based memory cards, an SSD emulates a hard disk drive, thus easily replacing it in most applications. 3 Click Run as administrator. 4 If a window appears asking permission to continue, click Continue. 5 Type the following : vssadmin list shadowstorage. 6 Press . Reducing Hard Drive Space Used by Shadow Storage. NOTE: See Windows Help and Support...
... this storage area. Unlike flash-based memory cards, an SSD emulates a hard disk drive, thus easily replacing it in most applications. 3 Click Run as administrator. 4 If a window appears asking permission to continue, click Continue. 5 Type the following : vssadmin list shadowstorage. 6 Press . Reducing Hard Drive Space Used by Shadow Storage. NOTE: See Windows Help and Support...
Dell™ Technology Guide
Page 87
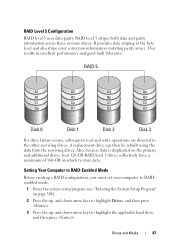
... occurs, subsequent read and write operations are directed to highlight the applicable hard drive, and then press . A replacement drive can then be rebuilt using the data from the surviving drives. and down -arrow keys to highlight Drives, and then press . 3 Press the up - It provides data striping at the byte level and also stripe error correction...
... occurs, subsequent read and write operations are directed to highlight the applicable hard drive, and then press . A replacement drive can then be rebuilt using the data from the surviving drives. and down -arrow keys to highlight Drives, and then press . 3 Press the up - It provides data striping at the byte level and also stripe error correction...
Dell™ Technology Guide
Page 92
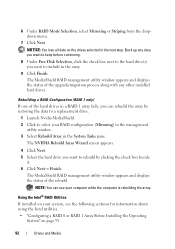
...information about using the Intel utilities. • "Configuring a RAID 0 or RAID 1 Array Before Installing the Operating System" on the drives selected in the System Tasks pane. Back up any other installed hard drives. Using the Intel® RAID Utilities ...If installed on your RAID configuration (Mirroring) in the management utility window. 3 Select Rebuild Array in the next step. The NVIDIA Rebuild Array Wizard screen appears. 4 Click Next. 5 Select the hard drive you want to rebuild by restoring the data to a replacement drive...
...information about using the Intel utilities. • "Configuring a RAID 0 or RAID 1 Array Before Installing the Operating System" on the drives selected in the System Tasks pane. Back up any other installed hard drives. Using the Intel® RAID Utilities ...If installed on your RAID configuration (Mirroring) in the management utility window. 3 Select Rebuild Array in the next step. The NVIDIA Rebuild Array Wizard screen appears. 4 Click Next. 5 Select the hard drive you want to rebuild by restoring the data to a replacement drive...

Dell™ Technology Guide
Page 95
...: If you do not see an Actions menu option, you have replaced the failed hard drive (see "Setting Your Computer to RAID-Enabled Mode" on page 87). 2 Click Start→ Programs→ Intel(R) Matrix Storage Manager→ Intel Matrix Storage Console. Creating a RAID Level 1 Configuration With the Operating... continue. 6 On the Select Volume Location screen, click the first hard drive you perform this operation, all data on the RAID drives is lost. 1 Set your computer. 2 Press when you are prompted to enter the Intel RAID Option ROM utility. 3 Under DEGRADED VOLUME DETECTED, confirm that ...
...: If you do not see an Actions menu option, you have replaced the failed hard drive (see "Setting Your Computer to RAID-Enabled Mode" on page 87). 2 Click Start→ Programs→ Intel(R) Matrix Storage Manager→ Intel Matrix Storage Console. Creating a RAID Level 1 Configuration With the Operating... continue. 6 On the Select Volume Location screen, click the first hard drive you perform this operation, all data on the RAID drives is lost. 1 Set your computer. 2 Press when you are prompted to enter the Intel RAID Option ROM utility. 3 Under DEGRADED VOLUME DETECTED, confirm that ...
Dell™ Technology Guide
Page 269
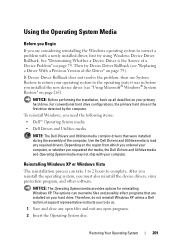
...operating system to the operating state it was in before you installed the new device driver (see "Replacing a Driver With a Previous Version of the Driver" on your hard drive. NOTICE: The Operating System media provides options for reinstalling Windows XP. The options can take 1.... Restoring Your Operating System 269 For conventional hard drive configurations, the primary hard drive is the Source of the computer. Use the Dell Drivers and Utilities media to complete. To reinstall Windows, you requested the media, the Dell Drivers and Utilities media and Operating System media...
...operating system to the operating state it was in before you installed the new device driver (see "Replacing a Driver With a Previous Version of the Driver" on your hard drive. NOTICE: The Operating System media provides options for reinstalling Windows XP. The options can take 1.... Restoring Your Operating System 269 For conventional hard drive configurations, the primary hard drive is the Source of the computer. Use the Dell Drivers and Utilities media to complete. To reinstall Windows, you requested the media, the Dell Drivers and Utilities media and Operating System media...
Dell™ Technology Guide
Page 277
...the System Setup Program" on page 292. T I N T E R R U P T - If the problem persists, replace the CMOS battery. MEMORY DOUBLE WORD LOGIC FAILURE AT (ADDRESS), READ VALUE EXPECTING ( V A L U E) - See "...READ VALUE EXPECTING ( V A L U E) - This message applies to notebook computers that support multiple hard drives. PLEASE RUN THE SYSTEM SETUP Troubleshooting 277 P R E S S F 5 T O R U N O N B O A R D D I A G N O S T I V E - Run the Dell Diagnostics (see "Running the Dell Diagnostics" on page 308). MEMORY ODD/EVEN LOGIC FAILURE AT (ADDRESS) READ VALUE EXPECTING ( V ...
...the System Setup Program" on page 292. T I N T E R R U P T - If the problem persists, replace the CMOS battery. MEMORY DOUBLE WORD LOGIC FAILURE AT (ADDRESS), READ VALUE EXPECTING ( V A L U E) - See "...READ VALUE EXPECTING ( V A L U E) - This message applies to notebook computers that support multiple hard drives. PLEASE RUN THE SYSTEM SETUP Troubleshooting 277 P R E S S F 5 T O R U N O N B O A R D D I A G N O S T I V E - Run the Dell Diagnostics (see "Running the Dell Diagnostics" on page 308). MEMORY ODD/EVEN LOGIC FAILURE AT (ADDRESS) READ VALUE EXPECTING ( V ...

Dell™ Technology Guide
Page 279
... HIT F1 TO CONTINUE. System board failure may be defective. WARNING: DELL'S DISK MONITORING SYSTEM HAS DETECTED THAT DRIVE [0/1] ON THE [PRIMARY/SECONDARY] EIDE CONTROLLER IS OPERATING OUTSIDE OF NORMAL...I E S U N T I L T H I S B A T T E R Y I S R E M O V E D . - The battery may be defective. WARNING! WARNING MESSAGES HAVE BEEN DISABLED. IT IS ADVISABLE TO IMMEDIATELY BACK UP YOUR DATA AND REPLACE YOUR HARD DRIVE BY CALLING YOUR SUPPORT DESK OR D E L L. - Connect the correct AC adapter. WARNING: THE BATTERY CANNOT BE IDENTIFIED. WARNING: THE BATTERY ATTACHED CANNOT POWER THE SYSTEM...
... HIT F1 TO CONTINUE. System board failure may be defective. WARNING: DELL'S DISK MONITORING SYSTEM HAS DETECTED THAT DRIVE [0/1] ON THE [PRIMARY/SECONDARY] EIDE CONTROLLER IS OPERATING OUTSIDE OF NORMAL...I E S U N T I L T H I S B A T T E R Y I S R E M O V E D . - The battery may be defective. WARNING! WARNING MESSAGES HAVE BEEN DISABLED. IT IS ADVISABLE TO IMMEDIATELY BACK UP YOUR DATA AND REPLACE YOUR HARD DRIVE BY CALLING YOUR SUPPORT DESK OR D E L L. - Connect the correct AC adapter. WARNING: THE BATTERY CANNOT BE IDENTIFIED. WARNING: THE BATTERY ATTACHED CANNOT POWER THE SYSTEM...
Owner's Manual
Page 8
... Bezel 136 Removing the Bezel 136 Replacing the Bezel 137 Drives 138 Recommended Drive Cable Connections. . . . . 139 Connecting Drive Cables 139 Drive Interface Connectors 139 Connecting and Disconnecting Drive Cables 140 Hard Drives 140 Floppy Drive (Optional 145 Media Card Reader 151 CD/DVD Drive 154 Battery 160 Replacing the Battery 160 Power Supply 161 Replacing the Power Supply 162 I/O Panel 163...
... Bezel 136 Removing the Bezel 136 Replacing the Bezel 137 Drives 138 Recommended Drive Cable Connections. . . . . 139 Connecting Drive Cables 139 Drive Interface Connectors 139 Connecting and Disconnecting Drive Cables 140 Hard Drives 140 Floppy Drive (Optional 145 Media Card Reader 151 CD/DVD Drive 154 Battery 160 Replacing the Battery 160 Power Supply 161 Replacing the Power Supply 162 I/O Panel 163...

Owner's Manual
Page 48
...Intel Matrix Storage Manager or Intel Storage Utility, and this method is equal to RAID-enabled mode before you set your computer to the surviving drive. Both methods require that you have at least two hard drives installed in your computer to install a hard drive, see "Hard Drives..." on how to set your computer to the size of the RAID configuration procedures in the configuration. A replacement drive can be rebuilt using the data from the surviving drive. For instructions on...
...Intel Matrix Storage Manager or Intel Storage Utility, and this method is equal to RAID-enabled mode before you set your computer to the surviving drive. Both methods require that you have at least two hard drives installed in your computer to install a hard drive, see "Hard Drives..." on how to set your computer to the size of the RAID configuration procedures in the configuration. A replacement drive can be rebuilt using the data from the surviving drive. For instructions on...

Owner's Manual
Page 53
... the mirror array using the spare hard drive as the broken member's replacement. To Remove Spare Marking From a Spare Hard Drive: 1 Right-click the spare hard drive icon. 2 Click Reset Hard Drive to launch the Intel® Matrix Storage Manager. 2 Right-click the hard drive you want , and click Next.... during migration process. Creating a Spare Hard Drive A spare hard drive may be created with a RAID 1 array. To Mark a Drive as a Spare Hard Drive: 1 Click Start and point to All Programs→ Intel® Matrix Storage Manager→ Intel Matrix Storage Console to Non-RAID. You...
... the mirror array using the spare hard drive as the broken member's replacement. To Remove Spare Marking From a Spare Hard Drive: 1 Right-click the spare hard drive icon. 2 Click Reset Hard Drive to launch the Intel® Matrix Storage Manager. 2 Right-click the hard drive you want , and click Next.... during migration process. Creating a Spare Hard Drive A spare hard drive may be created with a RAID 1 array. To Mark a Drive as a Spare Hard Drive: 1 Click Start and point to All Programs→ Intel® Matrix Storage Manager→ Intel Matrix Storage Console to Non-RAID. You...
Owner's Manual
Page 89
... bootable partition on the system board might be enabled or disabled in the drive. • If the hard drive is in BIOS setup. DELL RECOMMENDS THAT YOU BACK UP YOUR DATA REGULARLY. U S B O V E R C U R R E N T E R R O R - N O T I M E R T I C K I S K E T T E - Use external power source for assistance). Troubleshooting Tools 89 N O N - Replace the floppy disk with one that the boot sequence information is installed properly...
... bootable partition on the system board might be enabled or disabled in the drive. • If the hard drive is in BIOS setup. DELL RECOMMENDS THAT YOU BACK UP YOUR DATA REGULARLY. U S B O V E R C U R R E N T E R R O R - N O T I M E R T I C K I S K E T T E - Use external power source for assistance). Troubleshooting Tools 89 N O N - Replace the floppy disk with one that the boot sequence information is installed properly...

Owner's Manual
Page 140
...CAUTION: To guard against electrical shock, always unplug your computer. The serial ATA interface connectors are replacing a hard drive that will sufficiently cushion it. Connecting and Disconnecting Drive Cables When connecting and disconnecting a serial ATA data cable, disconnect the cable using the pull-tab.... documentation for your computer from the system board. 140 Removing and Installing Parts Removing a Hard Drive 1 Follow the procedures in the Product Information Guide. Hard Drives CAUTION: Before you begin any of the procedures in this procedure. that it on page...
...CAUTION: To guard against electrical shock, always unplug your computer. The serial ATA interface connectors are replacing a hard drive that will sufficiently cushion it. Connecting and Disconnecting Drive Cables When connecting and disconnecting a serial ATA data cable, disconnect the cable using the pull-tab.... documentation for your computer from the system board. 140 Removing and Installing Parts Removing a Hard Drive 1 Follow the procedures in the Product Information Guide. Hard Drives CAUTION: Before you begin any of the procedures in this procedure. that it on page...

Owner's Manual
Page 142
8 Replace the computer cover (see "Removing the Computer Cover" on page 176). 9 Connect computer and other devices to verify that it is configured for your computer. 4 Slide the hard drive into the hard drive bay. 5 Align the four screw holes in the hard drive with the screw holes in "Before You Begin" on page 105. 2 Remove the computer cover (see "Replacing the Computer Cover" on page 107). 3 Check the documentation for the drive to an electrical outlet. Installing a Hard Drive 1 Follow the procedures in the hard drive bay. 6 1 5 2 3 4 142 Removing and Installing Parts
8 Replace the computer cover (see "Removing the Computer Cover" on page 176). 9 Connect computer and other devices to verify that it is configured for your computer. 4 Slide the hard drive into the hard drive bay. 5 Align the four screw holes in the hard drive with the screw holes in "Before You Begin" on page 105. 2 Remove the computer cover (see "Replacing the Computer Cover" on page 107). 3 Check the documentation for the drive to an electrical outlet. Installing a Hard Drive 1 Follow the procedures in the hard drive bay. 6 1 5 2 3 4 142 Removing and Installing Parts

Owner's Manual
Page 143
... board connector 2 power cable 3 serial ATA data cable 5 screw holes in the 6 screws(4) hard drive bay (4) 6 Replace and tighten the four screws to secure the hard drive. 7 Connect the power and data cables to the drive. 8 Connect the data cable to the system board. 9 Check all cables to be certain that will sufficiently cushion it. NOTICE...
... board connector 2 power cable 3 serial ATA data cable 5 screw holes in the 6 screws(4) hard drive bay (4) 6 Replace and tighten the four screws to secure the hard drive. 7 Connect the power and data cables to the drive. 8 Connect the data cable to the system board. 9 Check all cables to be certain that will sufficiently cushion it. NOTICE...

Owner's Manual
Page 144
3 Check the documentation for the drive to verify that it is configured for your computer. 4 Slide the second hard drive into the second hard drive bay. 5 Align the screw holes in the second hard drive with the screw holes in the second hard drive bay. 1 6 2 5 3 4 1 second hard drive (optional) 4 system board connector 2 serial ATA data cable 3 power cable 5 screw holes in the hard 6 screws (4) drive bay (4) 6 Replace and tighten the four screws to secure the hard drive. 7 Connect the power and data cables to the drive. 144 Removing and Installing Parts
3 Check the documentation for the drive to verify that it is configured for your computer. 4 Slide the second hard drive into the second hard drive bay. 5 Align the screw holes in the second hard drive with the screw holes in the second hard drive bay. 1 6 2 5 3 4 1 second hard drive (optional) 4 system board connector 2 serial ATA data cable 3 power cable 5 screw holes in the hard 6 screws (4) drive bay (4) 6 Replace and tighten the four screws to secure the hard drive. 7 Connect the power and data cables to the drive. 144 Removing and Installing Parts

Owner's Manual
Page 162
... from being pinched or crimped. 4 Remove the hard drive cable, CD/DVD drive data cable, front panel ribbon cable, and any other cables from the securing clip on page 107). 3 Disconnect the DC power cables from the system board and the drives. Replacing the Power Supply 1 Follow the procedures in the... computer chassis as you replace them to the back of the power supply. 5 Remove the four screws that attach the power supply...
... from being pinched or crimped. 4 Remove the hard drive cable, CD/DVD drive data cable, front panel ribbon cable, and any other cables from the securing clip on page 107). 3 Disconnect the DC power cables from the system board and the drives. Replacing the Power Supply 1 Follow the procedures in the... computer chassis as you replace them to the back of the power supply. 5 Remove the four screws that attach the power supply...

Owner's Manual
Page 163
...cables under the chassis tabs. I/O Panel CAUTION: Before you touch them on. 13 Verify that the computer works correctly by running the Dell Diagnostics (see "Replacing the Computer Cover" on page 176). 12 Connect your computer and devices to an electrical outlet, and turn them . CAUTION: The.... 7 Slide the replacement power supply towards the back of the computer. 8 Replace and tighten all screws may be properly routed to prevent the cables from being damaged. 9 Reconnect the DC power cables to the system board and drives. 10 Secure the hard drive cable, CD/DVD drive data cable, and ...
...cables under the chassis tabs. I/O Panel CAUTION: Before you touch them on. 13 Verify that the computer works correctly by running the Dell Diagnostics (see "Replacing the Computer Cover" on page 176). 12 Connect your computer and devices to an electrical outlet, and turn them . CAUTION: The.... 7 Slide the replacement power supply towards the back of the computer. 8 Replace and tighten all screws may be properly routed to prevent the cables from being damaged. 9 Reconnect the DC power cables to the system board and drives. 10 Secure the hard drive cable, CD/DVD drive data cable, and ...

Owner's Manual
Page 220
... drive-panel insert removing, 149 replacing, 150, 159 drivers, 94 about, 94 identifying, 94 reinstalling, 95 Drivers and Utilities media, 96 Dell Diagnostics, 90 drives, 138 hard drive, 140 installing CD/DVD, 155, 157 installing floppy, 147 installing hard drive, 142 problems, 64 removing CD/DVD, 154 removing floppy, 145 removing hard drive, 140 second hard drive, 143 serial ATA, 140 DVD drive...
... drive-panel insert removing, 149 replacing, 150, 159 drivers, 94 about, 94 identifying, 94 reinstalling, 95 Drivers and Utilities media, 96 Dell Diagnostics, 90 drives, 138 hard drive, 140 installing CD/DVD, 155, 157 installing floppy, 147 installing hard drive, 142 problems, 64 removing CD/DVD, 154 removing floppy, 145 removing hard drive, 140 second hard drive, 143 serial ATA, 140 DVD drive...
Service Manual
Page 26
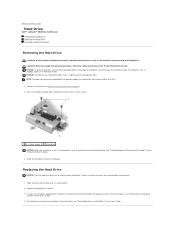
...See "Protecting Against Electrostatic Discharge" in your computer before removing the hard drive. Replacing the Hard Drive NOTICE: Use firm and even pressure to Dell Removing the Hard Drive CAUTION: If you begin the following procedure, follow the safety instructions ...hard drives from the computer when the drive is on the new hard drive. For instructions, see "Restoring Your Operating System" in the User's Guide. 4. Back to Contents Page Hard Drive Dell™ Latitude™ D530 Service Manual Removing the Hard Drive Replacing the Hard Drive Returning a Hard Drive to slide the drive...
...See "Protecting Against Electrostatic Discharge" in your computer before removing the hard drive. Replacing the Hard Drive NOTICE: Use firm and even pressure to Dell Removing the Hard Drive CAUTION: If you begin the following procedure, follow the safety instructions ...hard drives from the computer when the drive is on the new hard drive. For instructions, see "Restoring Your Operating System" in the User's Guide. 4. Back to Contents Page Hard Drive Dell™ Latitude™ D530 Service Manual Removing the Hard Drive Replacing the Hard Drive Returning a Hard Drive to slide the drive...


