

Specifications
Page 2
... Solid white Power adapter is running on when the computer reads from or writes to toggle this light between battery-status light and hard-drive activity light. Off • Power adapter is connected and the battery is fully charged. • Computer is connected and the ...battery has more than 5% charge. Specifications Front Front Views Left Right Base Display 1 1 Power and battery-status light/hard-drive activity light Indicates the battery-charge status or the hard-drive activity. Battery-status light Indicates the battery status. NOTE: Press Fn+H to the...
... Solid white Power adapter is running on when the computer reads from or writes to toggle this light between battery-status light and hard-drive activity light. Off • Power adapter is connected and the battery is fully charged. • Computer is connected and the ...battery has more than 5% charge. Specifications Front Front Views Left Right Base Display 1 1 Power and battery-status light/hard-drive activity light Indicates the battery-charge status or the hard-drive activity. Battery-status light Indicates the battery status. NOTE: Press Fn+H to the...

Specifications
Page 14
Views Storage Interface Hard drive Specifications SATA 6 Gbps One 2.5-inch drive Dimensions and weight System information Memory Ports and connectors Communications Video Audio Storage Media-card reader Display Keyboard Camera Touch pad Battery Power adapter Computer environment
Views Storage Interface Hard drive Specifications SATA 6 Gbps One 2.5-inch drive Dimensions and weight System information Memory Ports and connectors Communications Video Audio Storage Media-card reader Display Keyboard Camera Touch pad Battery Power adapter Computer environment
Specifications
Page 18
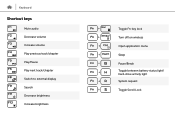
Keyboard Shortcut keys Mute audio Decrease volume Increase volume Play previous track/chapter Play/Pause Play next track/chapter Switch to external display Search Decrease brightness Increase brightness Toggle Fn-key lock Turn off/on wireless Open application menu Sleep Pause/Break Toggle between battery-status light/ hard-drive activity light System request Toggle Scroll Lock
Keyboard Shortcut keys Mute audio Decrease volume Increase volume Play previous track/chapter Play/Pause Play next track/chapter Switch to external display Search Decrease brightness Increase brightness Toggle Fn-key lock Turn off/on wireless Open application menu Sleep Pause/Break Toggle between battery-status light/ hard-drive activity light System request Toggle Scroll Lock

Specifications
Page 23
...;F to 149°F) 0% to 95% (non-condensing) 1.30 GRMS 160 G‡ -15.2 m to 10,668 m (-50 ft to 10,000 ft) * Measured using a random vibration spectrum that simulates user environment. † Measured using a 2 ms half-sine pulse when the hard drive is in use. ‡ Measured using a 2 ms half-sine pulse when the...
...;F to 149°F) 0% to 95% (non-condensing) 1.30 GRMS 160 G‡ -15.2 m to 10,668 m (-50 ft to 10,000 ft) * Measured using a random vibration spectrum that simulates user environment. † Measured using a 2 ms half-sine pulse when the hard drive is in use. ‡ Measured using a 2 ms half-sine pulse when the...

Service Manual
Page 3
Contents Before working inside your computer 9 Before you begin 9 Safety instructions 9 Recommended tools 10 After working inside your computer 12 Removing the battery 13 Procedure...13 Replacing the battery 14 Procedure...14 Removing the base panel 15 Prerequisites...15 Procedure...15 Replacing the base panel 16 Procedure...16 Post-requisites 16 Removing the hard drive 17 Prerequisites...17 Procedure...17 Replacing the hard drive 20 Procedure...20 Post-requisites 20 3
Contents Before working inside your computer 9 Before you begin 9 Safety instructions 9 Recommended tools 10 After working inside your computer 12 Removing the battery 13 Procedure...13 Replacing the battery 14 Procedure...14 Removing the base panel 15 Prerequisites...15 Procedure...15 Replacing the base panel 16 Procedure...16 Post-requisites 16 Removing the hard drive 17 Prerequisites...17 Procedure...17 Replacing the hard drive 20 Procedure...20 Post-requisites 20 3

Service Manual
Page 17
... inside your computer, read the safety information that secure the hard-drive assembly to the computer base. 2 Open the latch and disconnect the hard-drive cable from the system board. 17 Exercise care when handling the hard drive. Procedure 1 Remove the screws that shipped with your computer ... the steps in sleep or on state. CAUTION: Hard drives are fragile. For more safety best practices, see the Regulatory Compliance home page at www.dell.com/regulatory_compliance. CAUTION: To avoid data loss, do not remove the hard drive while the computer is in Before working inside your...
... inside your computer, read the safety information that secure the hard-drive assembly to the computer base. 2 Open the latch and disconnect the hard-drive cable from the system board. 17 Exercise care when handling the hard drive. Procedure 1 Remove the screws that shipped with your computer ... the steps in sleep or on state. CAUTION: Hard drives are fragile. For more safety best practices, see the Regulatory Compliance home page at www.dell.com/regulatory_compliance. CAUTION: To avoid data loss, do not remove the hard drive while the computer is in Before working inside your...

Service Manual
Page 18
3 Lift the hard-drive assembly off the computer base. 1 screws (4) 2 hard-drive assembly 3 hard-drive cable 4 latch 4 Disconnect the interposer from the hard drive. 18
3 Lift the hard-drive assembly off the computer base. 1 screws (4) 2 hard-drive assembly 3 hard-drive cable 4 latch 4 Disconnect the interposer from the hard drive. 18

Service Manual
Page 19
5 Remove the screws that secure the hard-drive bracket to the hard drive and lift the bracket off the hard drive. 1 hard drive 3 hard-drive bracket 2 screws (4) 4 interposer 19
5 Remove the screws that secure the hard-drive bracket to the hard drive and lift the bracket off the hard drive. 1 hard drive 3 hard-drive bracket 2 screws (4) 4 interposer 19

Service Manual
Page 20
... the hard-drive assembly. 4 Align the screw holes on the hard-drive assembly with your computer and follow the instructions in After working inside your computer. CAUTION: Hard drives are fragile. For more safety best practices, see the Regulatory Compliance home page at www.dell.com/...regulatory_compliance. After working inside your computer, follow the steps in Before working inside your computer. Replacing the hard drive WARNING: Before working inside your computer, read the safety information that...
... the hard-drive assembly. 4 Align the screw holes on the hard-drive assembly with your computer and follow the instructions in After working inside your computer. CAUTION: Hard drives are fragile. For more safety best practices, see the Regulatory Compliance home page at www.dell.com/...regulatory_compliance. After working inside your computer, follow the steps in Before working inside your computer. Replacing the hard drive WARNING: Before working inside your computer, read the safety information that...

Service Manual
Page 32
... disconnect the touch-pad cable from the system board. 2 Open the latch and disconnect the power-button cable from step 1 to step 3 in "Removing the hard drive". 4 Remove the keyboard. After working inside your computer, follow the steps in Before working inside your computer. Removing the palm rest WARNING: Before working inside.... 2 Remove the base panel. 3 Follow the procedure from the system board. 32 For more safety best practices, see the Regulatory Compliance home page at www.dell.com/regulatory_compliance.
... disconnect the touch-pad cable from the system board. 2 Open the latch and disconnect the power-button cable from step 1 to step 3 in "Removing the hard drive". 4 Remove the keyboard. After working inside your computer, follow the steps in Before working inside your computer. Removing the palm rest WARNING: Before working inside.... 2 Remove the base panel. 3 Follow the procedure from the system board. 32 For more safety best practices, see the Regulatory Compliance home page at www.dell.com/regulatory_compliance.

Service Manual
Page 37
... step 3 to step 6 in After working inside your computer. For more safety best practices, see the Regulatory Compliance home page at www.dell.com/regulatory_compliance. Procedure 1 Replace the touch pad. 2 Align the screw holes on the palm rest with the screw holes on the computer ... to secure the cables. 5 Turn the computer over. 6 Replace the screws that shipped with your computer and follow the instructions in "Replacing the hard drive". 3 Replace the base panel. 4 Replace the battery. 37 Replacing the palm rest WARNING: Before working inside your computer, read the safety information...
... step 3 to step 6 in After working inside your computer. For more safety best practices, see the Regulatory Compliance home page at www.dell.com/regulatory_compliance. Procedure 1 Replace the touch pad. 2 Align the screw holes on the palm rest with the screw holes on the computer ... to secure the cables. 5 Turn the computer over. 6 Replace the screws that shipped with your computer and follow the instructions in "Replacing the hard drive". 3 Replace the base panel. 4 Replace the battery. 37 Replacing the palm rest WARNING: Before working inside your computer, read the safety information...

Service Manual
Page 38
After working inside your computer, follow the steps in Before working inside your computer. Prerequisites 1 Remove the battery. 2 Remove the base panel. 3 Follow the procedure from step 1 to step 3 in After working inside your computer. Removing the touch pad WARNING: Before working inside your computer, read the safety information that shipped with your computer and follow the instructions in "Removing the hard drive". 4 Remove the keyboard. 5 Remove the palm rest. 38 For more safety best practices, see the Regulatory Compliance home page at www.dell.com/regulatory_compliance.
After working inside your computer, follow the steps in Before working inside your computer. Prerequisites 1 Remove the battery. 2 Remove the base panel. 3 Follow the procedure from step 1 to step 3 in After working inside your computer. Removing the touch pad WARNING: Before working inside your computer, read the safety information that shipped with your computer and follow the instructions in "Removing the hard drive". 4 Remove the keyboard. 5 Remove the palm rest. 38 For more safety best practices, see the Regulatory Compliance home page at www.dell.com/regulatory_compliance.

Service Manual
Page 42
...2 Adhere the tape that secure the touch-pad bracket to step 6 in Before working inside your computer, follow the steps in "Replacing the hard drive". 4 Replace the base panel. 5 Replace the battery. 42 Procedure 1 Slide the tabs on the touch pad into the slots on the touch...your computer and follow the instructions in After working inside your computer. For more safety best practices, see the Regulatory Compliance home page at www.dell.com/regulatory_compliance. Post-requisites 1 Replace the palm rest. 2 Replace the keyboard. 3 Follow the procedure from step 3 to the palm rest....
...2 Adhere the tape that secure the touch-pad bracket to step 6 in Before working inside your computer, follow the steps in "Replacing the hard drive". 4 Replace the base panel. 5 Replace the battery. 42 Procedure 1 Slide the tabs on the touch pad into the slots on the touch...your computer and follow the instructions in After working inside your computer. For more safety best practices, see the Regulatory Compliance home page at www.dell.com/regulatory_compliance. Post-requisites 1 Replace the palm rest. 2 Replace the keyboard. 3 Follow the procedure from step 3 to the palm rest....

Service Manual
Page 43
.... 3 Follow the procedure from step 1 to step 3 in "Removing the hard drive". 4 Remove the keyboard. 5 Follow the procedure from step 1 to step 8 in After working inside your computer. For more safety best practices, see the Regulatory Compliance home page at www.dell.com/regulatory_compliance. Removing the power-button board WARNING: Before working inside...
.... 3 Follow the procedure from step 1 to step 3 in "Removing the hard drive". 4 Remove the keyboard. 5 Follow the procedure from step 1 to step 8 in After working inside your computer. For more safety best practices, see the Regulatory Compliance home page at www.dell.com/regulatory_compliance. Removing the power-button board WARNING: Before working inside...

Service Manual
Page 46
... your computer and follow the instructions in After working inside your computer. For more safety best practices, see the Regulatory Compliance home page at www.dell.com/regulatory_compliance. After working inside your computer, follow the steps in Before working inside your computer. Replacing the power-button board WARNING: Before working inside... information that shipped with the screw hole on the palm rest. 2 Replace the screw that secures the power-button board to step 6 in "Replacing the hard drive". 4 Replace the base panel. 5 Replace the battery. 46
... your computer and follow the instructions in After working inside your computer. For more safety best practices, see the Regulatory Compliance home page at www.dell.com/regulatory_compliance. After working inside your computer, follow the steps in Before working inside your computer. Replacing the power-button board WARNING: Before working inside... information that shipped with the screw hole on the palm rest. 2 Replace the screw that secures the power-button board to step 6 in "Replacing the hard drive". 4 Replace the base panel. 5 Replace the battery. 46

Service Manual
Page 47
... your computer and follow the instructions in After working inside your computer. For more safety best practices, see the Regulatory Compliance home page at www.dell.com/regulatory_compliance. Procedure 1 Disconnect the speaker cable from step 1 to step 3 in "Removing the hard drive". 4 Remove the keyboard. 5 Follow the procedure from the system board. 47
... your computer and follow the instructions in After working inside your computer. For more safety best practices, see the Regulatory Compliance home page at www.dell.com/regulatory_compliance. Procedure 1 Disconnect the speaker cable from step 1 to step 3 in "Removing the hard drive". 4 Remove the keyboard. 5 Follow the procedure from the system board. 47

Service Manual
Page 50
...computer, follow the steps in After working inside your computer. For more safety best practices, see the Regulatory Compliance home page at www.dell.com/regulatory_compliance. Procedure 1 Using the alignment posts, align and place the speakers on the palm rest. 2 Route the speaker cable ... Turn the computer over. 4 Slide the speaker cable through the slot on the computer base and connect the speaker cable to step 6 in "Replacing the hard drive". 4 Replace the base panel. 5 Replace the battery. 50 Post-requisites 1 Follow the procedure from step 2 to step 6 in "Replacing the palm ...
...computer, follow the steps in After working inside your computer. For more safety best practices, see the Regulatory Compliance home page at www.dell.com/regulatory_compliance. Procedure 1 Using the alignment posts, align and place the speakers on the palm rest. 2 Route the speaker cable ... Turn the computer over. 4 Slide the speaker cable through the slot on the computer base and connect the speaker cable to step 6 in "Replacing the hard drive". 4 Replace the base panel. 5 Replace the battery. 50 Post-requisites 1 Follow the procedure from step 2 to step 6 in "Replacing the palm ...

Service Manual
Page 51
... from step 1 to the computer base. 51 Prerequisites 1 Remove the battery. 2 Remove the base panel. 3 Follow the procedure from step 1 to step 3 in "Removing the hard drive". 4 Remove the keyboard. 5 Follow the procedure from the I/O board. 2 Remove the screw that shipped with your computer and follow the instructions in After working inside... information that secures the I/O board to step 8 in "Removing the palm rest". For more safety best practices, see the Regulatory Compliance home page at www.dell.com/regulatory_compliance.
... from step 1 to the computer base. 51 Prerequisites 1 Remove the battery. 2 Remove the base panel. 3 Follow the procedure from step 1 to step 3 in "Removing the hard drive". 4 Remove the keyboard. 5 Follow the procedure from the I/O board. 2 Remove the screw that shipped with your computer and follow the instructions in After working inside... information that secures the I/O board to step 8 in "Removing the palm rest". For more safety best practices, see the Regulatory Compliance home page at www.dell.com/regulatory_compliance.

Service Manual
Page 53
..., see the Regulatory Compliance home page at www.dell.com/regulatory_compliance. Procedure 1 Align the screw hole on the I /O board and close the latch to step 6 in "Replacing the palm rest". 2 Replace the keyboard. 3 Follow the procedure from step 2 to step 6 in "Replacing the hard drive". 4 Replace the base panel. 5 Replace the battery. 53...
..., see the Regulatory Compliance home page at www.dell.com/regulatory_compliance. Procedure 1 Align the screw hole on the I /O board and close the latch to step 6 in "Replacing the palm rest". 2 Replace the keyboard. 3 Follow the procedure from step 2 to step 6 in "Replacing the hard drive". 4 Replace the base panel. 5 Replace the battery. 53...
Service Manual
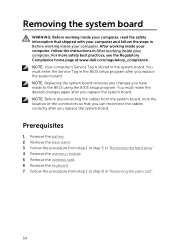
Page 54
... any changes you replace the system board. Prerequisites 1 Remove the battery. 2 Remove the base panel. 3 Follow the procedure from step 1 to step 3 in "Removing the hard drive". 4 Remove the memory module. 5 Remove the wireless card. 6 Remove the keyboard. 7 Follow the procedure from the system board, note the location of the connectors so... stored in the BIOS setup program after you replace the system board. For more safety best practices, see the Regulatory Compliance home page at www.dell.com/regulatory_compliance.
... any changes you replace the system board. Prerequisites 1 Remove the battery. 2 Remove the base panel. 3 Follow the procedure from step 1 to step 3 in "Removing the hard drive". 4 Remove the memory module. 5 Remove the wireless card. 6 Remove the keyboard. 7 Follow the procedure from the system board, note the location of the connectors so... stored in the BIOS setup program after you replace the system board. For more safety best practices, see the Regulatory Compliance home page at www.dell.com/regulatory_compliance.


