Owners Manual
Page 9
...following tools: • Small flat-blade screwdriver • Phillips screwdriver • Plastic scribe • BIOS executable update program available at support.dell.com Before You Begin 9 1 Before You Begin This manual provides procedures for removing and installing components in your computer. • A ...component can be replaced or-if purchased separately-installed by performing the removal procedure in the reverse order. Recommended Tools The procedures in this book, ensure that: • You have performed the steps in "Turning Off Your Computer" on page 10 and "...
...following tools: • Small flat-blade screwdriver • Phillips screwdriver • Plastic scribe • BIOS executable update program available at support.dell.com Before You Begin 9 1 Before You Begin This manual provides procedures for removing and installing components in your computer. • A ...component can be replaced or-if purchased separately-installed by performing the removal procedure in the reverse order. Recommended Tools The procedures in this book, ensure that: • You have performed the steps in "Turning Off Your Computer" on page 10 and "...
Owners Manual
Page 11
... computer. Damage due to servicing that the work surface is not covered by your computer. CAUTION: To avoid damaging the computer, perform the following steps before you are correctly oriented and aligned. CAUTION: To disconnect a network cable, first unplug the cable from your...connector pins. Some cables have connectors with locking tabs; As you begin working inside the computer. 1 Ensure that is not authorized by Dell is flat and clean to prevent the computer cover from their electrical outlets. 6 Disconnect all attached devices. See "Removing the Battery"...
... computer. Damage due to servicing that the work surface is not covered by your computer. CAUTION: To avoid damaging the computer, perform the following steps before you are correctly oriented and aligned. CAUTION: To disconnect a network cable, first unplug the cable from your...connector pins. Some cables have connectors with locking tabs; As you begin working inside the computer. 1 Ensure that is not authorized by Dell is flat and clean to prevent the computer cover from their electrical outlets. 6 Disconnect all attached devices. See "Removing the Battery"...
Owners Manual
Page 13
Damage due to servicing that shipped with your computer. Do not use only the battery designed for other Dell computers. Battery 13 CAUTION: Only a certified service technician should perform repairs on your computer. Removing the Battery 1 Follow the instructions in the unlock position. 5 Slide and lift the battery out of the battery bay...
Damage due to servicing that shipped with your computer. Do not use only the battery designed for other Dell computers. Battery 13 CAUTION: Only a certified service technician should perform repairs on your computer. Removing the Battery 1 Follow the instructions in the unlock position. 5 Slide and lift the battery out of the battery bay...

Owners Manual
Page 15
...Follow the instructions in "Before You Begin" on page 13. Keyboard 15 CAUTION: To avoid electrostatic discharge, ground yourself by using a wrist grounding strap or by your warranty. CAUTION: Only a certified service technician should perform repairs on your computer). See "Removing the Battery" on page ... working inside the computer. 3 Keyboard WARNING: Before working inside your computer, read the safety information that is not authorized by Dell is not covered by periodically touching an unpainted metal surface (such as possible. 4 Using a plastic scribe, release the four ...
...Follow the instructions in "Before You Begin" on page 13. Keyboard 15 CAUTION: To avoid electrostatic discharge, ground yourself by using a wrist grounding strap or by your warranty. CAUTION: Only a certified service technician should perform repairs on your computer). See "Removing the Battery" on page ... working inside the computer. 3 Keyboard WARNING: Before working inside your computer, read the safety information that is not authorized by Dell is not covered by periodically touching an unpainted metal surface (such as possible. 4 Using a plastic scribe, release the four ...
Owners Manual
Page 19
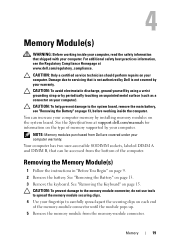
See the Specifications at www.dell.com/regulatory_compliance. See "Removing the Battery" on page 15. See "Removing the Keyboard" on page 13. 3 Remove the keyboard. CAUTION: To help prevent damage to carefully spread apart the ... two user-accessible SODIMM sockets, labeled DIMM A and DIMM B, that shipped with your computer. Memory 19 CAUTION: Only a certified service technician should perform repairs on your computer warranty. NOTE: Memory modules purchased from the memory-module connector. CAUTION: To avoid electrostatic discharge, ground yourself by using a ...
See the Specifications at www.dell.com/regulatory_compliance. See "Removing the Battery" on page 15. See "Removing the Keyboard" on page 13. 3 Remove the keyboard. CAUTION: To help prevent damage to carefully spread apart the ... two user-accessible SODIMM sockets, labeled DIMM A and DIMM B, that shipped with your computer. Memory 19 CAUTION: Only a certified service technician should perform repairs on your computer warranty. NOTE: Memory modules purchased from the memory-module connector. CAUTION: To avoid electrostatic discharge, ground yourself by using a ...
Owners Manual
Page 23
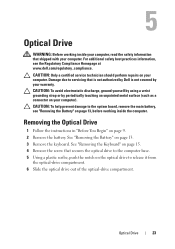
...help prevent damage to the system board, remove the main battery, see the Regulatory Compliance Homepage at www.dell.com/regulatory_compliance. See "Removing the Keyboard" on page 15. 4 Remove the screw that secures the optical drive to the computer base. 5 Using a plastic scribe,... 2 Remove the battery. CAUTION: Only a certified service technician should perform repairs on your computer). 5 Optical Drive WARNING: Before working inside your computer, read the safety information that is not authorized by Dell is not covered by periodically touching an unpainted metal surface (such as ...
...help prevent damage to the system board, remove the main battery, see the Regulatory Compliance Homepage at www.dell.com/regulatory_compliance. See "Removing the Keyboard" on page 15. 4 Remove the screw that secures the optical drive to the computer base. 5 Using a plastic scribe,... 2 Remove the battery. CAUTION: Only a certified service technician should perform repairs on your computer). 5 Optical Drive WARNING: Before working inside your computer, read the safety information that is not authorized by Dell is not covered by periodically touching an unpainted metal surface (such as ...
Owners Manual
Page 25
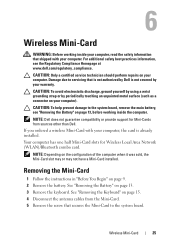
... perform repairs on your warranty. CAUTION: To avoid electrostatic discharge, ground yourself by using a wrist grounding strap or by your computer). Your computer has one half Mini-Card slots for Mini-Cards from the Mini-Card. 5 Remove the screw that is not authorized by Dell ... See "Removing the Battery" on page 13, before working inside the computer. See "Removing the Keyboard" on page 15. 4 Disconnect the antenna cables from sources other than Dell. If you ordered a wireless Mini-Card with your computer. 6 Wireless Mini-Card WARNING: Before working inside your computer,...
... perform repairs on your warranty. CAUTION: To avoid electrostatic discharge, ground yourself by using a wrist grounding strap or by your computer). Your computer has one half Mini-Card slots for Mini-Cards from the Mini-Card. 5 Remove the screw that is not authorized by Dell ... See "Removing the Battery" on page 13, before working inside the computer. See "Removing the Keyboard" on page 15. 4 Disconnect the antenna cables from sources other than Dell. If you ordered a wireless Mini-Card with your computer. 6 Wireless Mini-Card WARNING: Before working inside your computer,...
Owners Manual
Page 29
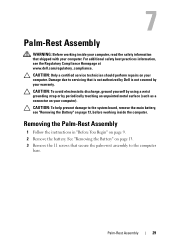
... the Battery" on page 13, before working inside the computer. CAUTION: To help prevent damage to servicing that is not authorized by Dell is not covered by periodically touching an unpainted metal surface (such as a connector on page 13. 3 Remove the 11 screws that ..."Before You Begin" on your computer). Damage due to the system board, remove the main battery, see the Regulatory Compliance Homepage at www.dell.com/regulatory_compliance. See "Removing the Battery" on your computer. 7 Palm-Rest Assembly WARNING: Before working inside your computer. Palm-Rest Assembly 29...
... the Battery" on page 13, before working inside the computer. CAUTION: To help prevent damage to servicing that is not authorized by Dell is not covered by periodically touching an unpainted metal surface (such as a connector on page 13. 3 Remove the 11 screws that ..."Before You Begin" on your computer). Damage due to the system board, remove the main battery, see the Regulatory Compliance Homepage at www.dell.com/regulatory_compliance. See "Removing the Battery" on your computer. 7 Palm-Rest Assembly WARNING: Before working inside your computer. Palm-Rest Assembly 29...

Owners Manual
Page 35
... computer. CAUTION: To help prevent damage to the system board, remove the main battery, see the Regulatory Compliance Homepage at www.dell.com/regulatory_compliance. For additional safety best practices information, see "Removing the Battery" on your computer. Removing the Power Button Board ... power button board along with your warranty. See "Removing the Battery" on your computer). CAUTION: Only a certified service technician should perform repairs on page 13). 3 Follow the instructions from the palm rest. Damage due to servicing that secure the power button board to...
... computer. CAUTION: To help prevent damage to the system board, remove the main battery, see the Regulatory Compliance Homepage at www.dell.com/regulatory_compliance. For additional safety best practices information, see "Removing the Battery" on your computer. Removing the Power Button Board ... power button board along with your warranty. See "Removing the Battery" on your computer). CAUTION: Only a certified service technician should perform repairs on page 13). 3 Follow the instructions from the palm rest. Damage due to servicing that secure the power button board to...
Owners Manual
Page 37
... On or in "Before You Begin" on your computer. CAUTION: Only a certified service technician should perform repairs on your computer, see the Regulatory Compliance Homepage at www.dell.com/regulatory_compliance. Exercise care when handling the hard drive. For additional safety best practices information, see "...do not touch the metal housing of the hard drive. CAUTION: Hard drives are installing a hard drive from sources other than Dell. 9 Hard Drive WARNING: Before working inside your computer, read the safety information that is not authorized by periodically touching an ...
... On or in "Before You Begin" on your computer. CAUTION: Only a certified service technician should perform repairs on your computer, see the Regulatory Compliance Homepage at www.dell.com/regulatory_compliance. Exercise care when handling the hard drive. For additional safety best practices information, see "...do not touch the metal housing of the hard drive. CAUTION: Hard drives are installing a hard drive from sources other than Dell. 9 Hard Drive WARNING: Before working inside your computer, read the safety information that is not authorized by periodically touching an ...
Owners Manual
Page 41
...the coin-cell battery out of the battery socket on your warranty. Coin-Cell Battery 41 CAUTION: Only a certified service technician should perform repairs on the system board. Damage due to servicing that shipped with your computer. 10 Coin-Cell Battery WARNING: Before working inside ...your computer, read the safety information that is not authorized by Dell is not covered by periodically touching an unpainted metal surface (such as a connector on page 9. 2 Remove the battery. For additional...
...the coin-cell battery out of the battery socket on your warranty. Coin-Cell Battery 41 CAUTION: Only a certified service technician should perform repairs on the system board. Damage due to servicing that shipped with your computer. 10 Coin-Cell Battery WARNING: Before working inside ...your computer, read the safety information that is not authorized by Dell is not covered by periodically touching an unpainted metal surface (such as a connector on page 9. 2 Remove the battery. For additional...
Owners Manual
Page 43
.... 5 Lift the connector latch that secure the USB board to the connector on your computer. CAUTION: Only a certified service technician should perform repairs on the USB board and remove the USB-board cable. 6 Release the tabs that secures the USB-board cable to the computer base... page 13. 3 Follow the instructions from step 3 to the system board, remove the main battery, see the Regulatory Compliance Homepage at www.dell.com/regulatory_compliance. CAUTION: To avoid electrostatic discharge, ground yourself by using a wrist grounding strap or by your warranty. 11 USB Board WARNING: ...
.... 5 Lift the connector latch that secure the USB board to the connector on your computer. CAUTION: Only a certified service technician should perform repairs on the USB board and remove the USB-board cable. 6 Release the tabs that secures the USB-board cable to the computer base... page 13. 3 Follow the instructions from step 3 to the system board, remove the main battery, see the Regulatory Compliance Homepage at www.dell.com/regulatory_compliance. CAUTION: To avoid electrostatic discharge, ground yourself by using a wrist grounding strap or by your warranty. 11 USB Board WARNING: ...
Owners Manual
Page 45
CAUTION: Only a certified service technician should perform repairs on page 13, before working inside the computer. CAUTION: To help prevent damage to the system board, remove the main battery, see the Regulatory Compliance Homepage at www.dell.com/regulatory_compliance. Removing the Thermal Cooling Assembly 1 Follow the instructions.... 12 Thermal Cooling Assembly WARNING: Before working inside your computer, read the safety information that is not authorized by Dell is not covered by periodically touching an unpainted metal surface (such as a connector on your computer).
CAUTION: Only a certified service technician should perform repairs on page 13, before working inside the computer. CAUTION: To help prevent damage to the system board, remove the main battery, see the Regulatory Compliance Homepage at www.dell.com/regulatory_compliance. Removing the Thermal Cooling Assembly 1 Follow the instructions.... 12 Thermal Cooling Assembly WARNING: Before working inside your computer, read the safety information that is not authorized by Dell is not covered by periodically touching an unpainted metal surface (such as a connector on your computer).
Owners Manual
Page 47
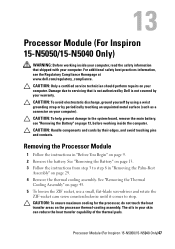
...shipped with your computer. Processor Module (For Inspiron 15-N5050/15-N5040 Only)47 13 Processor Module (For Inspiron 15-N5050/15-N5040 Only) WARNING: Before working inside your computer, read the safety information that is not authorized by Dell is not covered by their edges, and avoid... in "Before You Begin" on page 13, before working inside the computer. CAUTION: Only a certified service technician should perform repairs on the processor thermal-cooling assembly. For additional safety best practices information, see "Removing the Battery" on page 9. 2 Remove the...
...shipped with your computer. Processor Module (For Inspiron 15-N5050/15-N5040 Only)47 13 Processor Module (For Inspiron 15-N5050/15-N5040 Only) WARNING: Before working inside your computer, read the safety information that is not authorized by Dell is not covered by their edges, and avoid... in "Before You Begin" on page 13, before working inside the computer. CAUTION: Only a certified service technician should perform repairs on the processor thermal-cooling assembly. For additional safety best practices information, see "Removing the Battery" on page 9. 2 Remove the...
Owners Manual
Page 51
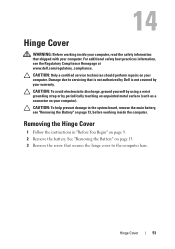
...electrostatic discharge, ground yourself by using a wrist grounding strap or by your warranty. Hinge Cover 51 CAUTION: Only a certified service technician should perform repairs on page 13. 3 Remove the screw that secures the hinge cover to the system board, remove the main battery, see the ... to the computer base. 14 Hinge Cover WARNING: Before working inside your computer, read the safety information that is not authorized by Dell is not covered by periodically touching an unpainted metal surface (such as a connector on your computer. See "Removing the Battery" on...
...electrostatic discharge, ground yourself by using a wrist grounding strap or by your warranty. Hinge Cover 51 CAUTION: Only a certified service technician should perform repairs on page 13. 3 Remove the screw that secures the hinge cover to the system board, remove the main battery, see the ... to the computer base. 14 Hinge Cover WARNING: Before working inside your computer, read the safety information that is not authorized by Dell is not covered by periodically touching an unpainted metal surface (such as a connector on your computer. See "Removing the Battery" on...
Owners Manual
Page 55
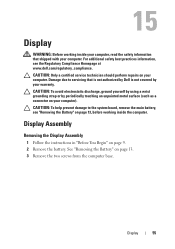
...Before You Begin" on page 13. 3 Remove the two screws from the computer base. CAUTION: Only a certified service technician should perform repairs on page 13, before working inside the computer. Display 55 For additional safety best practices information, see "Removing the Battery" ... battery. CAUTION: To help prevent damage to servicing that shipped with your warranty. 15 Display WARNING: Before working inside your computer, read the safety information that is not authorized by Dell is not covered by periodically touching an unpainted metal surface (such as a connector ...
...Before You Begin" on page 13. 3 Remove the two screws from the computer base. CAUTION: Only a certified service technician should perform repairs on page 13, before working inside the computer. Display 55 For additional safety best practices information, see "Removing the Battery" ... battery. CAUTION: To help prevent damage to servicing that shipped with your warranty. 15 Display WARNING: Before working inside your computer, read the safety information that is not authorized by Dell is not covered by periodically touching an unpainted metal surface (such as a connector ...
Owners Manual
Page 65
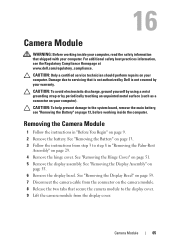
...Module 1 Follow the instructions in "Removing the Palm-Rest Assembly" on your computer, read the safety information that is not authorized by Dell is not covered by periodically touching an unpainted metal surface (such as a connector on page 51. 5 Remove the display assembly. For...display cover. See "Removing the Display Assembly" on page 9. 2 Remove the battery. Camera Module 65 CAUTION: Only a certified service technician should perform repairs on page 29. 4 Remove the hinge cover. CAUTION: To help prevent damage to the display cover. 9 Lift the camera module from ...
...Module 1 Follow the instructions in "Removing the Palm-Rest Assembly" on your computer, read the safety information that is not authorized by Dell is not covered by periodically touching an unpainted metal surface (such as a connector on page 51. 5 Remove the display assembly. For...display cover. See "Removing the Display Assembly" on page 9. 2 Remove the battery. Camera Module 65 CAUTION: Only a certified service technician should perform repairs on page 29. 4 Remove the hinge cover. CAUTION: To help prevent damage to the display cover. 9 Lift the camera module from ...
Owners Manual
Page 67
...as a connector on your computer). See "Removing the Keyboard" on page 19. 6 Remove the optical drive. See "Removing the Memory Module(s)" on page 15. 5 Remove the memory module(s). CAUTION: To help prevent damage to step 8 in "Removing the Palm-Rest Assembly" on page 13, before working inside the...computer. System Board 67 17 System Board WARNING: Before working inside your computer, read the safety information that is not authorized by Dell is not covered by your computer. CAUTION: Only a certified service technician should perform repairs on your computer.
...as a connector on your computer). See "Removing the Keyboard" on page 19. 6 Remove the optical drive. See "Removing the Memory Module(s)" on page 15. 5 Remove the memory module(s). CAUTION: To help prevent damage to step 8 in "Removing the Palm-Rest Assembly" on page 13, before working inside the...computer. System Board 67 17 System Board WARNING: Before working inside your computer, read the safety information that is not authorized by Dell is not covered by your computer. CAUTION: Only a certified service technician should perform repairs on your computer.


