
Service Manual
Page 2
... Preset Display Modes 10 4.3 Power Supply Requirements 11 4.3.1 Input Requirements 11 4.3.2 Output Requirements 11 4.4 PANEL SPECIFICATION 11 4.4.1 Panel Feature 11 4.4.2 Display Characteristics 11 4.4.3 Optical Characteristics 12 4.4.4 Parameter guide line for CCFL Inverter 12 5. MONITOR SPECIFICATIONS 4 2. DELL E173FP Service Manual Table of Contents Table of Contents 2 1. Schematic 18 6.1 Main Board 18 6.2 Inverter/Power Board 23 2 LCD MONITOR DESCRIPTION...
... Preset Display Modes 10 4.3 Power Supply Requirements 11 4.3.1 Input Requirements 11 4.3.2 Output Requirements 11 4.4 PANEL SPECIFICATION 11 4.4.1 Panel Feature 11 4.4.2 Display Characteristics 11 4.4.3 Optical Characteristics 12 4.4.4 Parameter guide line for CCFL Inverter 12 5. MONITOR SPECIFICATIONS 4 2. DELL E173FP Service Manual Table of Contents Table of Contents 2 1. Schematic 18 6.1 Main Board 18 6.2 Inverter/Power Board 23 2 LCD MONITOR DESCRIPTION...
Service Manual
Page 4
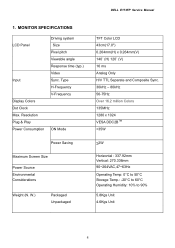
Resolution Plug & Play Power Consumption Driving system Size Pixel pitch Viewable angle Response time (typ.) Video Sync. Type H-Frequency V-Frequency ON Mode Power Saving Maximum Screen Size Power Source Environmental Considerations Weight (N. W.) Packaged Unpackaged TFT Color LCD 43cm(17.0") 0.264mm(H) x 0.264mm(V) 140˚ (H) 120˚ (V) 16 ms Analog Only H/V TTL Separate and Composite Sync. 30kHz - 80kHz 56-75Hz Over 16.2 million Colors 135MHz 1280 x 1024 VESA DDC2BTM DELL E173FP Service Manual 1. MONITOR SPECIFICATIONS LCD Panel Input Display Colors Dot Clock Max.
Resolution Plug & Play Power Consumption Driving system Size Pixel pitch Viewable angle Response time (typ.) Video Sync. Type H-Frequency V-Frequency ON Mode Power Saving Maximum Screen Size Power Source Environmental Considerations Weight (N. W.) Packaged Unpackaged TFT Color LCD 43cm(17.0") 0.264mm(H) x 0.264mm(V) 140˚ (H) 120˚ (V) 16 ms Analog Only H/V TTL Separate and Composite Sync. 30kHz - 80kHz 56-75Hz Over 16.2 million Colors 135MHz 1280 x 1024 VESA DDC2BTM DELL E173FP Service Manual 1. MONITOR SPECIFICATIONS LCD Panel Input Display Colors Dot Clock Max.

Service Manual
Page 6
...Power Indicator: Green - Power Saving mode. Power Button: When pressed, the monitor enters the off . Control Buttons A. DELL E173FP Service Manual 3. Press to your personal preferences. - Power On mode. Buttons for the OSD menu (On-Screen-display) B. Orange - Power On/Off Button and indicator 6 By changing these ...Button C. Press again to the video card. - Connect the video cable from the monitor to restore normal status. - The other control buttons are located at front panel of the monitor. Press the power button to turn on or off mode, and the LED turns blank...
...Power Indicator: Green - Power Saving mode. Power Button: When pressed, the monitor enters the off . Control Buttons A. DELL E173FP Service Manual 3. Press to your personal preferences. - Power On mode. Buttons for the OSD menu (On-Screen-display) B. Orange - Power On/Off Button and indicator 6 By changing these ...Button C. Press again to the video card. - Connect the video cable from the monitor to restore normal status. - The other control buttons are located at front panel of the monitor. Press the power button to turn on or off mode, and the LED turns blank...

Service Manual
Page 7
... the Brightness / Contrast setting window using Brightness button. Press the - Press the SELECT/MENU button to select the highlighted function. DELL E173FP Service Manual 3.3 ADJUSTING THE PICTURE To set the OSD menu, perform the following steps: Briefly press the SELCT / MENU button ...to mark the desired icon. Positioning). or + button to activate the OSD menu. Brightness Setting the brightness of the display With this function you change the brightness of bright colour tones. 7 The corresponding setting window (here: Positioning) is highlighted. The first ...
... the Brightness / Contrast setting window using Brightness button. Press the - Press the SELECT/MENU button to select the highlighted function. DELL E173FP Service Manual 3.3 ADJUSTING THE PICTURE To set the OSD menu, perform the following steps: Briefly press the SELCT / MENU button ...to mark the desired icon. Positioning). or + button to activate the OSD menu. Brightness Setting the brightness of the display With this function you change the brightness of bright colour tones. 7 The corresponding setting window (here: Positioning) is highlighted. The first ...

Service Manual
Page 8
DELL E173FP Service Manual Adjusting size and position Calling the Positioning setting window H-Position Adjusting the horizontal position With this function you move the picture to the left or to the right. Blue preset =5700Kcolour of the LCD display, it's 6500K; You can change the colour ...colour of the OSD menu Position With this function you move the picture up or down . Vertical Setting the vertical position of the LCD display, it 's 9300K; Calling the Image setting window Auto Adjust Auto adjust will produce best image automatically, The information of " Auto...
DELL E173FP Service Manual Adjusting size and position Calling the Positioning setting window H-Position Adjusting the horizontal position With this function you move the picture to the left or to the right. Blue preset =5700Kcolour of the LCD display, it's 6500K; You can change the colour ...colour of the OSD menu Position With this function you move the picture up or down . Vertical Setting the vertical position of the LCD display, it 's 9300K; Calling the Image setting window Auto Adjust Auto adjust will produce best image automatically, The information of " Auto...

Service Manual
Page 9
OSD Hold Time DELL E173FP Service Manual Setting the display duration of the OSD menu With this function you select Yes to lock OSD, NO to unlock it. OSD Lock Setting the display of OSD are reset to 60 seconds. With this function you select a value from 0 to the factory settings without a setting being made...
OSD Hold Time DELL E173FP Service Manual Setting the display duration of the OSD menu With this function you select Yes to lock OSD, NO to unlock it. OSD Lock Setting the display of OSD are reset to 60 seconds. With this function you select a value from 0 to the factory settings without a setting being made...

Service Manual
Page 10
Input/Output Specification 4.1 Input Signal Connector 4.1.1 Analog D-SUB Connector DELL E173FP Service Manual 10 5 9 4 8 3 7 2 6 1 17 16 15 14 13 12 11 Pin Meaning Pin 1 Video input red 9 2 Video input green 10 3 Video input blue 11 4 ...1152 x 864 1280 x 1024 1280 x 1024 For ergonomic reasons, a screen resolution of 60 Hz. 10 Sync DDC Clock 4.2 Factory Preset Display Modes The following are the most frequently used (active matrix) an LCD monitor provides a totally flicker-free picture even with a refresh rate of 1280 x 1024 pixels is recommended. 4.
Input/Output Specification 4.1 Input Signal Connector 4.1.1 Analog D-SUB Connector DELL E173FP Service Manual 10 5 9 4 8 3 7 2 6 1 17 16 15 14 13 12 11 Pin Meaning Pin 1 Video input red 9 2 Video input green 10 3 Video input blue 11 4 ...1152 x 864 1280 x 1024 1280 x 1024 For ergonomic reasons, a screen resolution of 60 Hz. 10 Sync DDC Clock 4.2 Factory Preset Display Modes The following are the most frequently used (active matrix) an LCD monitor provides a totally flicker-free picture even with a refresh rate of 1280 x 1024 pixels is recommended. 4.

Service Manual
Page 15
DELL E173FP Service Manual 1) MCU Initializes. 2) Is the EEprom blank? 3) Program the EEprom by default values. 4) Get the PWM value of back ... out an interrupt request? 14) Wake up the scalar. 15) Are there any signals coming mode. 18) Process the OSD display. 19) Read the keyboard. Scalar initializes. 10) In standby mode? 11) Update the lifetime of brightness from analog port? 16... AUTO and SELECT keys pressed? 8) Enter factory mode. 9) Save the power key status into standby mode after the message disappears. 17) Program the scalar to be able to green color. And go into EEprom.
DELL E173FP Service Manual 1) MCU Initializes. 2) Is the EEprom blank? 3) Program the EEprom by default values. 4) Get the PWM value of back ... out an interrupt request? 14) Wake up the scalar. 15) Are there any signals coming mode. 18) Process the OSD display. 19) Read the keyboard. Scalar initializes. 10) In standby mode? 11) Update the lifetime of brightness from analog port? 16... AUTO and SELECT keys pressed? 8) Enter factory mode. 9) Save the power key status into standby mode after the message disappears. 17) Program the scalar to be able to green color. And go into EEprom.

Service Manual
Page 29
... bars? Check Power switch is disconnected? Measured U101 pin44=5V? Check U105 pin3=5V, P105 pin2=3.3V? Yes. 8.2 Trouble Shooting 8.2.1 Main Board 1) No display Measured CN104 pin 5 = 5 V? DELL E173FP Service Manual No DC Level Check Power board, is show Connected the Signal cable again, Check LED status. If Replace "MAIN-BOARD", Please re...
... bars? Check Power switch is disconnected? Measured U101 pin44=5V? Check U105 pin3=5V, P105 pin2=3.3V? Yes. 8.2 Trouble Shooting 8.2.1 Main Board 1) No display Measured CN104 pin 5 = 5 V? DELL E173FP Service Manual No DC Level Check Power board, is show Connected the Signal cable again, Check LED status. If Replace "MAIN-BOARD", Please re...

User Guide
Page 1
...IBM is a registered trademark of Microsoft Corporation; Other trademarks and trade names may be used in this text: Dell and the DELL logo are registered trademarks of International Business Machines Corporation; Microsoft, Windows, and Windows NT are trademarks of Adobe ...determined that this product meets the ENERGY STAR guidelines for energy efficiency. Contents: Dell™ E173FP Flat Panel Color Monitor User's Guide Preface Introduction Setup Using the Display Troubleshooting Specifications Appendix Information in this document is subject to either the entitles claiming ...
...IBM is a registered trademark of Microsoft Corporation; Other trademarks and trade names may be used in this text: Dell and the DELL logo are registered trademarks of International Business Machines Corporation; Microsoft, Windows, and Windows NT are trademarks of Adobe ...determined that this product meets the ENERGY STAR guidelines for energy efficiency. Contents: Dell™ E173FP Flat Panel Color Monitor User's Guide Preface Introduction Setup Using the Display Troubleshooting Specifications Appendix Information in this document is subject to either the entitles claiming ...
User Guide
Page 2
... is intended for anyone who uses the Dell E173FP Color Monitor. These blocks are notes, notices, and cautions, and they are as follows: NOTE: A NOTE indicates important information that supports this document. In such cases, the specific presentation of your computer system. Back to Contents Page It describes the display's features, setup, and operation.
... is intended for anyone who uses the Dell E173FP Color Monitor. These blocks are notes, notices, and cautions, and they are as follows: NOTE: A NOTE indicates important information that supports this document. In such cases, the specific presentation of your computer system. Back to Contents Page It describes the display's features, setup, and operation.

User Guide
Page 3
... reliability at a maximum resolution of up to 1280x1024 pixels, this Active Matrix TFT LCD monitor is ideal for purchasing the Dell E173FP 17-inch Flat Panel Display. Front View Back View Bottom View Side View Back to Contents Page Introduction: Dell™ E173FP Flat Panel Color Monitor User's Guide Overview • Graphics Overview Thank you for word processing, e-mail...
... reliability at a maximum resolution of up to 1280x1024 pixels, this Active Matrix TFT LCD monitor is ideal for purchasing the Dell E173FP 17-inch Flat Panel Display. Front View Back View Bottom View Side View Back to Contents Page Introduction: Dell™ E173FP Flat Panel Color Monitor User's Guide Overview • Graphics Overview Thank you for word processing, e-mail...
User Guide
Page 4
Back to Contents Page Setup: Dell™E173FP Flat Panel Color Monitor User's Guide Tilt Base Attaching the Cables Attaching the optional Dell™ Soundbar Positioning the Display Maintenance Back to Contents Page
Back to Contents Page Setup: Dell™E173FP Flat Panel Color Monitor User's Guide Tilt Base Attaching the Cables Attaching the optional Dell™ Soundbar Positioning the Display Maintenance Back to Contents Page
User Guide
Page 5
Back to Contents Page Using the Display: Dell™ E173FP Flat Panel Color Monitor User's Guide Setting the Optimal Resolution Controls and Indicators Back to Contents Page
Back to Contents Page Using the Display: Dell™ E173FP Flat Panel Color Monitor User's Guide Setting the Optimal Resolution Controls and Indicators Back to Contents Page
User Guide
Page 6
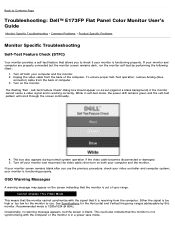
...turn on the screen indicating that it is receiving from the computer. Cannot Display This Video Mode This means that the monitor cannot synchronize with the computer or the monitor is in self-test mode, the power LED remains green and the self-...' dialog box should appear on the monitor. Back to Contents Page Troubleshooting: Dell™ E173FP Flat Panel Color Monitor User's Guide Monitor Specific Troubleshooting • Common Problems • Product Specific Problems Monitor Specific Troubleshooting Self-Test Feature Check (STFC) Your monitor provides a self-test feature that allows...
...turn on the screen indicating that it is receiving from the computer. Cannot Display This Video Mode This means that the monitor cannot synchronize with the computer or the monitor is in self-test mode, the power LED remains green and the self-...' dialog box should appear on the monitor. Back to Contents Page Troubleshooting: Dell™ E173FP Flat Panel Color Monitor User's Guide Monitor Specific Troubleshooting • Common Problems • Product Specific Problems Monitor Specific Troubleshooting Self-Test Feature Check (STFC) Your monitor provides a self-test feature that allows...

User Guide
Page 7
...-test mode Check for bent or broken pins on the D-sub cable. Perform monitor reset Push 'Auto Adjust' button Adjust 'Phase' and 'Clock' controls via OSD Perform monitor self-test feature check to preset display modes. Boot up in proper video mode, please refer to determine if scrambled.... Poor Focus Picture is in the 'Safe mode' COMMON SYMPTOMS No Video/ Power LED off These are pixels that occurs in LCD technology Brightness Problems Geometric Distortion Picture too dim or too bright Screen not centered correctly Horizontal/Vertical Screen has one or more Lines lines...
...-test mode Check for bent or broken pins on the D-sub cable. Perform monitor reset Push 'Auto Adjust' button Adjust 'Phase' and 'Clock' controls via OSD Perform monitor self-test feature check to preset display modes. Boot up in proper video mode, please refer to determine if scrambled.... Poor Focus Picture is in the 'Safe mode' COMMON SYMPTOMS No Video/ Power LED off These are pixels that occurs in LCD technology Brightness Problems Geometric Distortion Picture too dim or too bright Screen not centered correctly Horizontal/Vertical Screen has one or more Lines lines...

User Guide
Page 9
TFT LCD Diagonal 17 inches (432.0 mm) Horizontal 13.3 inches (337.9 mm) Vertical 10.6 inches (270.3 mm) 0.264 x 0.264 mm 120° (vertical) typical, 140° (horizontal) typical 250 ... Optimal preset resolution Highest preset resolution 31 kHz to 80 kHz (automatic) 56 Hz to Contents Page Specifications: Dell™ E173FP Flat Panel Color Monitor User's Guide General • Flat Panel • Resolution • Preset Display Modes • Electrical • Physical Characteristics • Environmental • Power Management Modes • Pin Assignments • Plug and...
TFT LCD Diagonal 17 inches (432.0 mm) Horizontal 13.3 inches (337.9 mm) Vertical 10.6 inches (270.3 mm) 0.264 x 0.264 mm 120° (vertical) typical, 140° (horizontal) typical 250 ... Optimal preset resolution Highest preset resolution 31 kHz to 80 kHz (automatic) 56 Hz to Contents Page Specifications: Dell™ E173FP Flat Panel Color Monitor User's Guide General • Flat Panel • Resolution • Preset Display Modes • Electrical • Physical Characteristics • Environmental • Power Management Modes • Pin Assignments • Plug and...

User Guide
Page 10
Dell guarantees image size and centering for all preset modes listed in the following table. Preset Display Modes Display Mode DOS 720 x 400 VGA 640 x 480 VESA 640 x 480 VESA 800 x 600 VESA 800 x 600 VESA 1024 x 768 VESA 1024 x 768 VESA 1152 x 864 ...
Dell guarantees image size and centering for all preset modes listed in the following table. Preset Display Modes Display Mode DOS 720 x 400 VGA 640 x 480 VESA 640 x 480 VESA 800 x 600 VESA 800 x 600 VESA 1024 x 768 VESA 1024 x 768 VESA 1152 x 864 ...

User Guide
Page 12
...m (40,000 ft) 137 BTU/hour max 116 BTU/hour typical Power Management Modes If you have VESA's DPMS compliant display card or software installed in your PC, the display can automatically reduce its power consumption when not in use. V-sync Yes No -- sync Yes No -- If input from ...keyboard, mouse or other input devices is detected, the display will automatically "wake up". The following table shows the power consumption and signaling of this automatic power saving feature: VESA's Mode ON Power Saving ...
...m (40,000 ft) 137 BTU/hour max 116 BTU/hour typical Power Management Modes If you have VESA's DPMS compliant display card or software installed in your PC, the display can automatically reduce its power consumption when not in use. V-sync Yes No -- sync Yes No -- If input from ...keyboard, mouse or other input devices is detected, the display will automatically "wake up". The following table shows the power consumption and signaling of this automatic power saving feature: VESA's Mode ON Power Saving ...

User Guide
Page 13
... 4 GND 5 Self-test 6 GND-R 7 GND-G 8 GND-B 9 PC5V 10 GND-sync 11 GND 12 DDC data 13 H - The display automatically provides the computer system with its Extended Display Identification Data (EDID) using Display Data Channel (DDC) protocols so the system can select different settings, but in any Plug and Play-compatible system.... Back to Contents Page sync 14 V-sync 15 DDC clock Plug and Play Capability You can install the display in most cases display installation is automatic. If desired, the user can configure itself and optimize the...
... 4 GND 5 Self-test 6 GND-R 7 GND-G 8 GND-B 9 PC5V 10 GND-sync 11 GND 12 DDC data 13 H - The display automatically provides the computer system with its Extended Display Identification Data (EDID) using Display Data Channel (DDC) protocols so the system can select different settings, but in any Plug and Play-compatible system.... Back to Contents Page sync 14 V-sync 15 DDC clock Plug and Play Capability You can install the display in most cases display installation is automatic. If desired, the user can configure itself and optimize the...


