
Owner's Manual
Page 6
Cards 69 Drive Panels 73 Removing the Drive Panel 74 Removing the Drive-Panel Insert 75 Replacing the Drive-Panel Insert 75 Replacing the Drive Panel 76 Drives 76 IDE Drive Addressing 77 Connecting Drive Cables 77 Drive Interface Connectors 78 Power Cable Connector 78 Connecting and Disconnecting Drive Cables 79 Hard Drive 79 Removing a Hard Drive 80 Installing a Hard Drive 81 Adding a Second Hard Drive (optional 82 Floppy Drive 83 Removing a Floppy Drive 83...
Cards 69 Drive Panels 73 Removing the Drive Panel 74 Removing the Drive-Panel Insert 75 Replacing the Drive-Panel Insert 75 Replacing the Drive Panel 76 Drives 76 IDE Drive Addressing 77 Connecting Drive Cables 77 Drive Interface Connectors 78 Power Cable Connector 78 Connecting and Disconnecting Drive Cables 79 Hard Drive 79 Removing a Hard Drive 80 Installing a Hard Drive 81 Adding a Second Hard Drive (optional 82 Floppy Drive 83 Removing a Floppy Drive 83...
Owner's Manual
Page 29
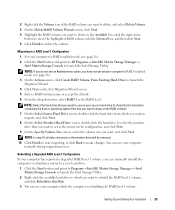
...Degraded RAID Level 1 Configuration If your computer has reported a degraded RAID level 1 volume, you can manually rebuild the computer's redundancy mirror to a new hard drive: 1 Click the Start button and point to Programs→ Intel(R) Matrix Storage Manager→ Intel Matrix Storage Console to launch the Intel Storage Utility....which you want to rebuild the RAID level 1 volume, and click Rebuild to this Disk. 3 You can use your source hard drive (it should be removed. 10 Click Finish to start migrating, or click Back to make changes. 2 Right-click the Volume icon of the RAID ...
...Degraded RAID Level 1 Configuration If your computer has reported a degraded RAID level 1 volume, you can manually rebuild the computer's redundancy mirror to a new hard drive: 1 Click the Start button and point to Programs→ Intel(R) Matrix Storage Manager→ Intel Matrix Storage Console to launch the Intel Storage Utility....which you want to rebuild the RAID level 1 volume, and click Rebuild to this Disk. 3 You can use your source hard drive (it should be removed. 10 Click Finish to start migrating, or click Back to make changes. 2 Right-click the Volume icon of the RAID ...
Owner's Manual
Page 33
...C R O S O F T O U T L O O K ® E X P R E S S S E C U R I T Y S E T T I C S - CHECK THE TELEPHONE LINE CONNECTION - NOTE: Connect the modem to All Programs, and then click Modem Helper. Hard drive problems RUN CHECK DISK - 1 Click the Start button and click My Computer. 2 Right-click Local Disk C:. 3 Click Properties. 4 Click the Tools tab. 5 Under Error-checking... on the modem. (The jack has either a green label or a connector-shaped icon next to it to remove the checkmark. E-Mail, Modem, and Internet Problems CAUTION: Before you cannot open your e-mail attachments: 1 In...
...C R O S O F T O U T L O O K ® E X P R E S S S E C U R I T Y S E T T I C S - CHECK THE TELEPHONE LINE CONNECTION - NOTE: Connect the modem to All Programs, and then click Modem Helper. Hard drive problems RUN CHECK DISK - 1 Click the Start button and click My Computer. 2 Right-click Local Disk C:. 3 Click Properties. 4 Click the Tools tab. 5 Under Error-checking... on the modem. (The jack has either a green label or a connector-shaped icon next to it to remove the checkmark. E-Mail, Modem, and Internet Problems CAUTION: Before you cannot open your e-mail attachments: 1 In...

Owner's Manual
Page 48
...Memory" on page 66). • If the problem persists, contact Dell for technical assistance. Memory modules are detected. If the computer starts normally, reinstall an additional module. A possible floppy drive or hard drive failure has Reseat all USB devices, check cable connections, and then ...data cables and restart occurred. Suggested Resolution If the problem persists, contact Dell for technical assistance. 48 Advanced Troubleshooting Continue until you have two or more memory modules installed, remove the modules, reinstall one module (see "DDR2 Memory Overview" on page...
...Memory" on page 66). • If the problem persists, contact Dell for technical assistance. Memory modules are detected. If the computer starts normally, reinstall an additional module. A possible floppy drive or hard drive failure has Reseat all USB devices, check cable connections, and then ...data cables and restart occurred. Suggested Resolution If the problem persists, contact Dell for technical assistance. 48 Advanced Troubleshooting Continue until you have two or more memory modules installed, remove the modules, reinstall one module (see "DDR2 Memory Overview" on page...

Owner's Manual
Page 49
... assistance. Advanced Troubleshooting 49 If the computer starts normally, troubleshoot the last card removed from the computer for resource conflicts (see "System Setup" on page 103) to boot from the hard drive, CD drive, and DVD drive (see "System Board Components" on page 65). • If there is ...an error message on your computer Owner's Manual). 4 If the problem persists, contact Dell for each card. check system setup (see "Resolving ...
... assistance. Advanced Troubleshooting 49 If the computer starts normally, troubleshoot the last card removed from the computer for resource conflicts (see "System Setup" on page 103) to boot from the hard drive, CD drive, and DVD drive (see "System Board Components" on page 65). • If there is ...an error message on your computer Owner's Manual). 4 If the problem persists, contact Dell for each card. check system setup (see "Resolving ...

Owner's Manual
Page 54
... operating state without affecting data files. • Dell PC Restore by Symantec restores your computer. Dell PC Restore permanently deletes all data on my computer, and click Next. Manually Reinstalling Drivers 1 After copying the required driver files to your hard drive, click the Start button and right-click My Computer...operating system in the Search Results list. 4 In the Hardware Troubleshooter list, click I need to resolve a hardware conflict on the hard drive and removes any applications installed after you can use the Hardware Troubleshooter to resolve the incompatibility.
... operating state without affecting data files. • Dell PC Restore by Symantec restores your computer. Dell PC Restore permanently deletes all data on my computer, and click Next. Manually Reinstalling Drivers 1 After copying the required driver files to your hard drive, click the Start button and right-click My Computer...operating system in the Search Results list. 4 In the Hardware Troubleshooter list, click I need to resolve a hardware conflict on the hard drive and removes any applications installed after you can use the Hardware Troubleshooter to resolve the incompatibility.

Owner's Manual
Page 56
... tab. 5 Ensure that appears, click Restore. 4 On the next screen, click Confirm. Use Dell PC Restore by Symantec NOTE: Dell PC Restore is not available in all data on the hard drive and removes any files or programs until the system restoration is complete. 1 Click the Start button, point to... process takes approximately 6-10 minutes to proceed with less than 200 MB of free hard-disk space available, System Restore is automatically disabled. including data files-are permanently deleted from the hard drive. Enabling System Restore If you undo the last system restore, save and close all...
... tab. 5 Ensure that appears, click Restore. 4 On the next screen, click Confirm. Use Dell PC Restore by Symantec NOTE: Dell PC Restore is not available in all data on the hard drive and removes any files or programs until the system restoration is complete. 1 Click the Start button, point to... process takes approximately 6-10 minutes to proceed with less than 200 MB of free hard-disk space available, System Restore is automatically disabled. including data files-are permanently deleted from the hard drive. Enabling System Restore If you undo the last system restore, save and close all...

Owner's Manual
Page 57
... shut down the computer. Because the computer is available as indicated by the increased value for PC Restore does not exist on as a local administrator. Removing Dell PC Restore NOTICE: Removing Dell PC Restore from the hard drive permanently deletes the PC Restore utility from the hard drive, you cannot ever recall it to reboot the computer.
... shut down the computer. Because the computer is available as indicated by the increased value for PC Restore does not exist on as a local administrator. Removing Dell PC Restore NOTICE: Removing Dell PC Restore from the hard drive permanently deletes the PC Restore utility from the hard drive, you cannot ever recall it to reboot the computer.

Owner's Manual
Page 62
...from or writes data to attach headphones and most kinds of the vents. Instead, perform an operating system shutdown. 5 USB 2.0 connectors (2) 6 hard-drive activity light 7 vents 8 power button 9 headphone connector 10 diagnostic lights (4) 11 Service Tag Use the front USB connectors for devices that there ...Use only a dry cloth to clean the vent area to avoid water damage to help you access the Dell Support website or call technical support. 60 Removing and Installing Parts Use to identify your computer when you troubleshoot a computer problem based on booting to ensure...
...from or writes data to attach headphones and most kinds of the vents. Instead, perform an operating system shutdown. 5 USB 2.0 connectors (2) 6 hard-drive activity light 7 vents 8 power button 9 headphone connector 10 diagnostic lights (4) 11 Service Tag Use the front USB connectors for devices that there ...Use only a dry cloth to clean the vent area to avoid water damage to help you access the Dell Support website or call technical support. 60 Removing and Installing Parts Use to identify your computer when you troubleshoot a computer problem based on booting to ensure...
Owner's Manual
Page 66
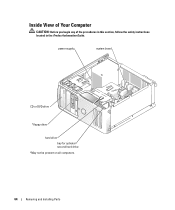
Inside View of Your Computer CAUTION: Before you begin any of the procedures in this section, follow the safety instructions located in the Product Information Guide. power supply system board CD or DVD drive *floppy drive hard drive bay for optional second hard drive *May not be present on all computers. 64 Removing and Installing Parts
Inside View of Your Computer CAUTION: Before you begin any of the procedures in this section, follow the safety instructions located in the Product Information Guide. power supply system board CD or DVD drive *floppy drive hard drive bay for optional second hard drive *May not be present on all computers. 64 Removing and Installing Parts
Owner's Manual
Page 78
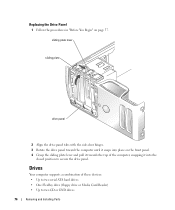
... sliding plate lever sliding plate drive panel 2 Align the drive panel tabs with the side-door hinges. 3 Rotate the drive panel toward the computer until it snaps into the closed position to two CD or DVD drives 76 Removing and Installing Parts Drives Your computer supports a combination ...of the computer, snapping it towards the top of these devices: • Up to two serial ATA hard drives • One FlexBay drive (floppy drive or Media Card Reader) • ...
... sliding plate lever sliding plate drive panel 2 Align the drive panel tabs with the side-door hinges. 3 Rotate the drive panel toward the computer until it snaps into the closed position to two CD or DVD drives 76 Removing and Installing Parts Drives Your computer supports a combination ...of the computer, snapping it towards the top of these devices: • Up to two serial ATA hard drives • One FlexBay drive (floppy drive or Media Card Reader) • ...

Owner's Manual
Page 79
Serial ATA hard drives should be connected to the system board. Removing and Installing Parts 77 Connecting Drive Cables When you install a drive, you connect two IDE devices to a single IDE interface cable and configure them for the cable select setting, the device attached to ... and a data cable-to the back of the drive and to the connectors labeled "SATA0" or "SATA1" on the system board. CD/DVD drive(s) FlexBay for optional floppy drive or Media Card Reader hard drive bay for second hard drive (optional) Connect CD/DVD drives to the middle connector on the interface cable is ...
Serial ATA hard drives should be connected to the system board. Removing and Installing Parts 77 Connecting Drive Cables When you install a drive, you connect two IDE devices to a single IDE interface cable and configure them for the cable select setting, the device attached to ... and a data cable-to the back of the drive and to the connectors labeled "SATA0" or "SATA1" on the system board. CD/DVD drive(s) FlexBay for optional floppy drive or Media Card Reader hard drive bay for second hard drive (optional) Connect CD/DVD drives to the middle connector on the interface cable is ...

Owner's Manual
Page 81
...the cable by the black connector at each end. that contains data you want to keep, back up your files before removing the cover. Hard Drive CAUTION: Before you are keyed for correct insertion; Instead, set it . Check the documentation for your computer from the ... in this procedure. Like IDE connectors, the serial ATA interface connectors are replacing a hard drive that is configured for the drive to the drive, do not set the drive on the other connector. Removing and Installing Parts 79 CAUTION: To guard against electrical shock, always unplug your computer....
...the cable by the black connector at each end. that contains data you want to keep, back up your files before removing the cover. Hard Drive CAUTION: Before you are keyed for correct insertion; Instead, set it . Check the documentation for your computer from the ... in this procedure. Like IDE connectors, the serial ATA interface connectors are replacing a hard drive that is configured for the drive to the drive, do not set the drive on the other connector. Removing and Installing Parts 79 CAUTION: To guard against electrical shock, always unplug your computer....

Owner's Manual
Page 82
Removing a Hard Drive 1 Follow the procedures in the blue tabs on page 57. 2 Disconnect the power and hard-drive cables from the drive. serial ATA data cable power cable 3 Press in "Before You Begin" on each side of the drive towards each other and slide the drive up and out of the computer. tabs (2) hard drive 80 Removing and Installing Parts
Removing a Hard Drive 1 Follow the procedures in the blue tabs on page 57. 2 Disconnect the power and hard-drive cables from the drive. serial ATA data cable power cable 3 Press in "Before You Begin" on each side of the drive towards each other and slide the drive up and out of the computer. tabs (2) hard drive 80 Removing and Installing Parts

Owner's Manual
Page 83
NOTE: If your replacement hard drive does not have the plastic guide bracket attached, remove the bracket from the old drive by unsnapping it is configured for your computer. drive bracket rails (2) 3 Gently slide the drive into place until you hear a click or feel the drive securely installed. 4 Connect the power and hard-drive cables to the drive. 5 Check all connectors...
NOTE: If your replacement hard drive does not have the plastic guide bracket attached, remove the bracket from the old drive by unsnapping it is configured for your computer. drive bracket rails (2) 3 Gently slide the drive into place until you hear a click or feel the drive securely installed. 4 Connect the power and hard-drive cables to the drive. 5 Check all connectors...

Owner's Manual
Page 84
... this section, follow the safety instructions located in upper bay hard drive bay 6 Connect a power cable to the drive. 7 Connect the data cable to the drive and to the system board (see page 65). 82 Removing and Installing Parts secondary hard drive in lower bay rail tabs (2) primary hard drive in the Product Information Guide. NOTICE: To connect a network...
... this section, follow the safety instructions located in upper bay hard drive bay 6 Connect a power cable to the drive. 7 Connect the data cable to the drive and to the system board (see page 65). 82 Removing and Installing Parts secondary hard drive in lower bay rail tabs (2) primary hard drive in the Product Information Guide. NOTICE: To connect a network...
Owner's Manual
Page 105
... to 35,000 ft) System Setup Overview Use system setup as follows: • To change the system configuration information after you add, change, or remove any hardware in your computer work incorrectly. Environmental (continued) Altitude: Operating Storage -15.2 to 3048 m (-50 to 10,000 ft) -15.2 to...DELL™ logo is displayed, you must watch for this F2 prompt appears, press immediately. If you press before you are an expert computer user, do not change a user-selectable option such as the user password • To read the current amount of memory or set the type of hard drive...
... to 35,000 ft) System Setup Overview Use system setup as follows: • To change the system configuration information after you add, change, or remove any hardware in your computer work incorrectly. Environmental (continued) Altitude: Operating Storage -15.2 to 3048 m (-50 to 10,000 ft) -15.2 to...DELL™ logo is displayed, you must watch for this F2 prompt appears, press immediately. If you press before you are an expert computer user, do not change a user-selectable option such as the user password • To read the current amount of memory or set the type of hard drive...

Owner's Manual
Page 136
..., 9 error messages diagnostic lights, 47 troubleshooting, 34 F Files and Settings Transfer Wizard, 30 Flex Bay drive Media Card Reader, 59 floppy drive installing, 85 removing, 83 H hard drive activity light, 60 installing, 81 installing second, 82 problems, 33 removing, 80 hardware Dell Diagnostics, 50 Hardware Troubleshooter, 53 headphone connector, 60 Help and Support Center, 11 help file...
..., 9 error messages diagnostic lights, 47 troubleshooting, 34 F Files and Settings Transfer Wizard, 30 Flex Bay drive Media Card Reader, 59 floppy drive installing, 85 removing, 83 H hard drive activity light, 60 installing, 81 installing second, 82 problems, 33 removing, 80 hardware Dell Diagnostics, 50 Hardware Troubleshooter, 53 headphone connector, 60 Help and Support Center, 11 help file...
Owner's Manual
Page 137
...setting up, 21 Network Setup Wizard, 22 O operating system reinstalling Windows XP, 54 P password clearing, 109 jumper, 109 PCI cards installing, 70 removing, 72 playing CDs and DVDs, 16 power button, 60 connector, 61 conserving, 22 hibernate mode, 23, 25 managing, 22 options, 23 options, ...13 problems battery, 31 blue screen, 37 CD drive, 32 CD-RW drive, 32 computer crashes, 36-37 computer stops responding, 36 problems (continued) Dell Diagnostics, 50 diagnostic lights, 47 drives, 31 DVD drive, 32 e-mail, 33 error messages, 34 general, 36 hard drive, 33 Internet, 33 keyboard, 36 Media Card ...
...setting up, 21 Network Setup Wizard, 22 O operating system reinstalling Windows XP, 54 P password clearing, 109 jumper, 109 PCI cards installing, 70 removing, 72 playing CDs and DVDs, 16 power button, 60 connector, 61 conserving, 22 hibernate mode, 23, 25 managing, 22 options, 23 options, ...13 problems battery, 31 blue screen, 37 CD drive, 32 CD-RW drive, 32 computer crashes, 36-37 computer stops responding, 36 problems (continued) Dell Diagnostics, 50 diagnostic lights, 47 drives, 31 DVD drive, 32 e-mail, 33 error messages, 34 general, 36 hard drive, 33 Internet, 33 keyboard, 36 Media Card ...

Service Manual
Page 2
...Dimension™ 3100/E310 Computer Dell™ Dimension™ 3100/E310 Service Manual Front View of Computer Back View of Computer Front View of space between all vents and any of speakers. Press to the system. Instead, perform an operating system shutdown. Use the lights to help you connect occasionally, such as printers and keyboards. 6 hard-drive... as joysticks or cameras. It is recommended that you use the power button to remove the cover. Can contain an optional floppy drive or optional Media Card Reader. 5 USB 2.0 connectors (2) Use the front USB connectors...
...Dimension™ 3100/E310 Computer Dell™ Dimension™ 3100/E310 Service Manual Front View of Computer Back View of Computer Front View of space between all vents and any of speakers. Press to the system. Instead, perform an operating system shutdown. Use the lights to help you connect occasionally, such as printers and keyboards. 6 hard-drive... as joysticks or cameras. It is recommended that you use the power button to remove the cover. Can contain an optional floppy drive or optional Media Card Reader. 5 USB 2.0 connectors (2) Use the front USB connectors...


