Owner's Manual
Page 1
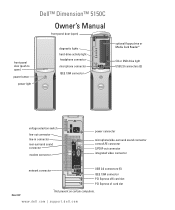
Dell™ Dimension™ 5150C Owner's Manual front-panel door (open) front-panel door (push to open) power button power light diagnostic lights hard-drive activity light headphone connector microphone ... network connector USB 2.0 connectors (5) IEEE 1394 connector PCI Express x16 card slot PCI Express x1 card slot Model DHP *Not present on certain computers. www.dell.com | support.dell.com
Dell™ Dimension™ 5150C Owner's Manual front-panel door (open) front-panel door (push to open) power button power light diagnostic lights hard-drive activity light headphone connector microphone ... network connector USB 2.0 connectors (5) IEEE 1394 connector PCI Express x16 card slot PCI Express x1 card slot Model DHP *Not present on certain computers. www.dell.com | support.dell.com

Owner's Manual
Page 2
... other than its own. A03 All rights reserved. Intel, Pentium, Intel SpeedStep, and Celeron are registered trademarks of Dell Inc.; Dell Inc. Microsoft, Windows, and Outlook are registered trademarks of your computer. Trademarks used in this document is strictly forbidden...document to change without the written permission of data and tells you purchased a Dell™ n Series computer, any proprietary interest in this text: Dell, the DELL logo, Inspiron, Dell Precision, Dimension, OptiPlex, Latitude, PowerEdge, PowerVault, PowerApp, DellNet, and PowerConnect are not ...
... other than its own. A03 All rights reserved. Intel, Pentium, Intel SpeedStep, and Celeron are registered trademarks of Dell Inc.; Dell Inc. Microsoft, Windows, and Outlook are registered trademarks of your computer. Trademarks used in this document is strictly forbidden...document to change without the written permission of data and tells you purchased a Dell™ n Series computer, any proprietary interest in this text: Dell, the DELL logo, Inspiron, Dell Precision, Dimension, OptiPlex, Latitude, PowerEdge, PowerVault, PowerApp, DellNet, and PowerConnect are not ...
Owner's Manual
Page 3
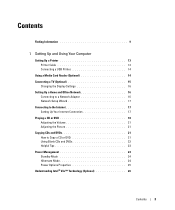
Contents Finding Information 9 1 Setting Up and Using Your Computer Setting Up a Printer 13 Printer Cable 13 Connecting a USB Printer 14 Using a Media Card Reader (Optional 14 Connecting a TV (Optional 15 Changing the Display Settings 16 Setting Up a Home and Office Network 16 Connecting to a Network Adapter 16 Network Setup Wizard 17 Connecting to the Internet 17 Setting Up Your Internet Connection 17 Playing a CD or DVD 18 Adjusting the Volume 21 Adjusting the Picture 21 Copying CDs and DVDs 21 How to Copy a CD or DVD 21 Using Blank CDs and DVDs 22 Helpful Tips 23 Power ...
Contents Finding Information 9 1 Setting Up and Using Your Computer Setting Up a Printer 13 Printer Cable 13 Connecting a USB Printer 14 Using a Media Card Reader (Optional 14 Connecting a TV (Optional 15 Changing the Display Settings 16 Setting Up a Home and Office Network 16 Connecting to a Network Adapter 16 Network Setup Wizard 17 Connecting to the Internet 17 Setting Up Your Internet Connection 17 Playing a CD or DVD 18 Adjusting the Volume 21 Adjusting the Picture 21 Copying CDs and DVDs 21 How to Copy a CD or DVD 21 Using Blank CDs and DVDs 22 Helpful Tips 23 Power ...

Owner's Manual
Page 4
Using Intel® Viiv™ Quick Resume Technology (Optional 26 Enabling the QRT Feature in System Setup 27 Enabling the QRT feature in the Operating system 27 Hyper-Threading 27 2 Solving Problems Troubleshooting Tips 29 Battery Problems 29 Drive Problems 29 CD and DVD drive problems 30 Hard drive problems 31 E-Mail, Modem, and Internet Problems 31 Error Messages 32 Media Card Reader Problems 33 IEEE 1394 Device Problems 33 Keyboard Problems 34 Lockups and Software Problems 34 The computer does not start up 34 The computer stops responding 35 A program stops responding 35...
Using Intel® Viiv™ Quick Resume Technology (Optional 26 Enabling the QRT Feature in System Setup 27 Enabling the QRT feature in the Operating system 27 Hyper-Threading 27 2 Solving Problems Troubleshooting Tips 29 Battery Problems 29 Drive Problems 29 CD and DVD drive problems 30 Hard drive problems 31 E-Mail, Modem, and Internet Problems 31 Error Messages 32 Media Card Reader Problems 33 IEEE 1394 Device Problems 33 Keyboard Problems 34 Lockups and Software Problems 34 The computer does not start up 34 The computer stops responding 35 A program stops responding 35...
Owner's Manual
Page 5
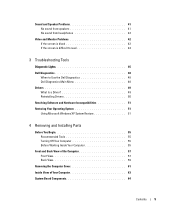
... Problems 42 If the screen is blank 42 If the screen is difficult to read 43 3 Troubleshooting Tools Diagnostic Lights 45 Dell Diagnostics 48 When to Use the Dell Diagnostics 48 Dell Diagnostics Main Menu 48 Drivers 49 What Is a Driver 49 Reinstalling Drivers 50 Resolving Software and Hardware Incompatibilities 51 Restoring Your...
... Problems 42 If the screen is blank 42 If the screen is difficult to read 43 3 Troubleshooting Tools Diagnostic Lights 45 Dell Diagnostics 48 When to Use the Dell Diagnostics 48 Dell Diagnostics Main Menu 48 Drivers 49 What Is a Driver 49 Reinstalling Drivers 50 Resolving Software and Hardware Incompatibilities 51 Restoring Your...
Owner's Manual
Page 6
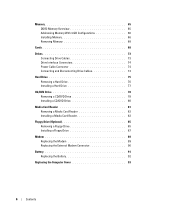
Memory 65 DDR2 Memory Overview 65 Addressing Memory With 4-GB Configurations 66 Installing Memory 66 Removing Memory 68 Cards 68 Drives 73 Connecting Drive Cables 73 Drive Interface Connectors 74 Power Cable Connector 74 Connecting and Disconnecting Drive Cables 74 Hard Drive 75 Removing a Hard Drive 76 Installing a Hard Drive 77 CD/DVD Drive 78 Removing a CD/DVD Drive 78 Installing a CD/DVD Drive 80 Media Card Reader 81 Removing a Media Card Reader 82 Installing a Media Card Reader 83 Floppy Drive (Optional 85 Removing a Floppy Drive 85 Installing a Floppy Drive 87 ...
Memory 65 DDR2 Memory Overview 65 Addressing Memory With 4-GB Configurations 66 Installing Memory 66 Removing Memory 68 Cards 68 Drives 73 Connecting Drive Cables 73 Drive Interface Connectors 74 Power Cable Connector 74 Connecting and Disconnecting Drive Cables 74 Hard Drive 75 Removing a Hard Drive 76 Installing a Hard Drive 77 CD/DVD Drive 78 Removing a CD/DVD Drive 78 Installing a CD/DVD Drive 80 Media Card Reader 81 Removing a Media Card Reader 82 Installing a Media Card Reader 83 Floppy Drive (Optional 85 Removing a Floppy Drive 85 Installing a Floppy Drive 87 ...

Owner's Manual
Page 7
Only 110 Definition of "Dell-Installed" Software and Peripherals 110 Definition of "Third-Party" Software and Peripherals 110 FCC Notices (U.S. Only 110 FCC Class B 110 Contacting Dell 111 Index 129 Contents 7 5 Appendix Specifications 95 System Setup 99 Overview 99 Entering System Setup 100 System Setup Options 102 Boot Sequence 105 Clearing Forgotten Passwords 107 Clearing CMOS Settings 108 Cleaning Your Computer 108 Computer, Keyboard, and Monitor 108 Mouse 109 CDs and DVDs 109 Dell Technical Support Policy (U.S.
Only 110 Definition of "Dell-Installed" Software and Peripherals 110 Definition of "Third-Party" Software and Peripherals 110 FCC Notices (U.S. Only 110 FCC Class B 110 Contacting Dell 111 Index 129 Contents 7 5 Appendix Specifications 95 System Setup 99 Overview 99 Entering System Setup 100 System Setup Options 102 Boot Sequence 105 Clearing Forgotten Passwords 107 Clearing CMOS Settings 108 Cleaning Your Computer 108 Computer, Keyboard, and Monitor 108 Mouse 109 CDs and DVDs 109 Dell Technical Support Policy (U.S.

Owner's Manual
Page 9
only) • Safety instructions • Regulatory information • Ergonomics information • End User License Agreement Find it Here Dell™ Product Information Guide • How to set up my computer Setup Diagram Finding Information 9 NOTE: Additional information may not be available for your computer. What Are You Looking For? • Warranty information • Terms and Conditions (U.S. Finding Information NOTE: Some features may ship with your computer or in certain countries.
only) • Safety instructions • Regulatory information • Ergonomics information • End User License Agreement Find it Here Dell™ Product Information Guide • How to set up my computer Setup Diagram Finding Information 9 NOTE: Additional information may not be available for your computer. What Are You Looking For? • Warranty information • Terms and Conditions (U.S. Finding Information NOTE: Some features may ship with your computer or in certain countries.
Owner's Manual
Page 10
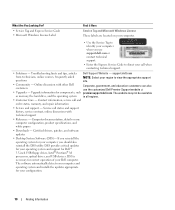
... the operating system for your call and order status, warranty, and repair information • Service and support - Upgrade information for Dell™ 3.5-inch USB floppy drives, Intel® Pentium® M processors, optical drives, and USB devices. Troubleshooting hints and ... be available as memory, the hard drive, and the operating system in all regions. • Customer Care - support.dell.com NOTE: Select your Dell computer. Contact information, service call when contacting technical support. • Solutions - Certified drivers, patches, and software updates ...
... the operating system for your call and order status, warranty, and repair information • Service and support - Upgrade information for Dell™ 3.5-inch USB floppy drives, Intel® Pentium® M processors, optical drives, and USB devices. Troubleshooting hints and ... be available as memory, the hard drive, and the operating system in all regions. • Customer Care - support.dell.com NOTE: Select your Dell computer. Contact information, service call when contacting technical support. • Solutions - Certified drivers, patches, and software updates ...

Owner's Manual
Page 11
Finding Information 11 What Are You Looking For? • How to use Windows XP • Documentation for my computer • Documentation for devices (such as a modem) Find it Here Windows Help and Support Center 1 Click the Start button and click Help and Support. 2 Type a word or phrase that describes your problem and click the arrow icon. 3 Click the topic that describes your problem. 4 Follow the instructions on the screen.
Finding Information 11 What Are You Looking For? • How to use Windows XP • Documentation for my computer • Documentation for devices (such as a modem) Find it Here Windows Help and Support Center 1 Click the Start button and click Help and Support. 2 Type a word or phrase that describes your problem and click the arrow icon. 3 Click the topic that describes your problem. 4 Follow the instructions on the screen.

Owner's Manual
Page 12
12 Finding Information
12 Finding Information

Owner's Manual
Page 13
Setting Up and Using Your Computer Setting Up a Printer NOTICE: Complete the operating system setup before you connect a printer to the computer. • Load paper and install the toner or ink cartridge. • Contact the printer manufacturer for technical assistance. Setting Up and Using Your Computer 13 See the documentation that it is compatible with your printer. Printer Cable Your printer connects to your computer, the cable may not come with a printer cable, so if you purchased your computer with the printer for setup information, including how to: • Obtain and ...
Setting Up and Using Your Computer Setting Up a Printer NOTICE: Complete the operating system setup before you connect a printer to the computer. • Load paper and install the toner or ink cartridge. • Contact the printer manufacturer for technical assistance. Setting Up and Using Your Computer 13 See the documentation that it is compatible with your printer. Printer Cable Your printer connects to your computer, the cable may not come with a printer cable, so if you purchased your computer with the printer for setup information, including how to: • Obtain and ...
Owner's Manual
Page 14
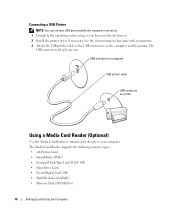
Connecting a USB Printer NOTE: You can connect USB devices while the computer is turned on the computer and the printer. The Media Card Reader supports the following memory types: • xD-Picture Card • SmartMedia (SMC) • CompactFlash Type I and II (CF I/II) • MicroDrive Card • SecureDigital Card (SD) • MultiMediaCard (MMC) • Memory Stick (MS/MS Pro) 14 Setting Up and Using Your Computer See the documentation that came with your computer. USB connector on computer USB printer cable USB connector on printer Using a Media Card Reader (Optional)...
Connecting a USB Printer NOTE: You can connect USB devices while the computer is turned on the computer and the printer. The Media Card Reader supports the following memory types: • xD-Picture Card • SmartMedia (SMC) • CompactFlash Type I and II (CF I/II) • MicroDrive Card • SecureDigital Card (SD) • MultiMediaCard (MMC) • Memory Stick (MS/MS Pro) 14 Setting Up and Using Your Computer See the documentation that came with your computer. USB connector on computer USB printer cable USB connector on printer Using a Media Card Reader (Optional)...

Owner's Manual
Page 15
For information on installing a Media Card Reader, see "Installing a Media Card Reader" on the back of the computer. 3 Connect the other end of the S-video cable to determine the proper orientation for insertion. 2 Slide the media or card into the appropriate slot until it is completely seated in "Before You Begin" on page 55. 2 Connect one end of the S-video cable to the TV-OUT connector on page 83. Check the card orientation and try again. If you must have a video card that has TV-out functionality and an S-video cable, which is not included with your computer. 1 Follow the procedures ...
For information on installing a Media Card Reader, see "Installing a Media Card Reader" on the back of the computer. 3 Connect the other end of the S-video cable to determine the proper orientation for insertion. 2 Slide the media or card into the appropriate slot until it is completely seated in "Before You Begin" on page 55. 2 Connect one end of the S-video cable to the TV-OUT connector on page 83. Check the card orientation and try again. If you must have a video card that has TV-out functionality and an S-video cable, which is not included with your computer. 1 Follow the procedures ...

Owner's Manual
Page 16
Do not plug a network cable into a telephone wall jack. 1 Connect the network cable to the network adapter connector on the monitor. 2 Enable clone mode or extended desktop mode in the Help and Support Center (click the Start button, click Help and Support, click User and system guides, click Device guides, and then click the guide for your computer. Insert the cable until it clicks into place, and then gently pull it to ensure that it is secure. 2 Connect the other , effectively doubling the amount of viewable work space. Do not plug the network cable into the modem connector ...
Do not plug a network cable into a telephone wall jack. 1 Connect the network cable to the network adapter connector on the monitor. 2 Enable clone mode or extended desktop mode in the Help and Support Center (click the Start button, click Help and Support, click User and system guides, click Device guides, and then click the guide for your computer. Insert the cable until it clicks into place, and then gently pull it to ensure that it is secure. 2 Connect the other , effectively doubling the amount of viewable work space. Do not plug the network cable into the modem connector ...

Owner's Manual
Page 17
Network Setup Wizard The Microsoft® Windows® XP operating system provides a Network Setup Wizard to guide you through the process of the following Internet connection options: • Dial-up connections that provide Internet access through a telephone line. Connecting to All Programs→ Accessories→ Communications, and then click Network Setup Wizard. 2 On the welcome screen, click Next. 3 Click Checklist for setup instructions. Dial-up connection, connect a telephone line to the telephone wall jack before you are using a dial-up connections are considerably ...
Network Setup Wizard The Microsoft® Windows® XP operating system provides a Network Setup Wizard to guide you through the process of the following Internet connection options: • Dial-up connections that provide Internet access through a telephone line. Connecting to All Programs→ Accessories→ Communications, and then click Network Setup Wizard. 2 On the welcome screen, click Next. 3 Click Checklist for setup instructions. Dial-up connection, connect a telephone line to the telephone wall jack before you are using a dial-up connections are considerably ...

Owner's Manual
Page 18
The New Connection Wizard appears. 3 Click Connect to the Internet. 4 In the next window, click the appropriate option: • If you do not have an ISP and want to complete the setup. Otherwise, follow the instructions on the screen to select one, click Choose from a list of Internet service providers (ISPs). • If you have already obtained setup information from your ISP but have successfully connected in the center of connection to select, contact your ISP. 6 Click the appropriate option under How do you want to connect to the Internet?, and then click Next. 7 Use the ...
The New Connection Wizard appears. 3 Click Connect to the Internet. 4 In the next window, click the appropriate option: • If you do not have an ISP and want to complete the setup. Otherwise, follow the instructions on the screen to select one, click Choose from a list of Internet service providers (ISPs). • If you have already obtained setup information from your ISP but have successfully connected in the center of connection to select, contact your ISP. 6 Click the appropriate option under How do you want to connect to the Internet?, and then click Next. 7 Use the ...

Owner's Manual
Page 19
NOTE: Ensure that came with your computer. 4 Press the eject button or gently push in the tray. To format CDs for storing data, to create music CDs, or to copy CDs, see the CD software that you follow all copyright laws when you create CDs. Setting Up and Using Your Computer 19
NOTE: Ensure that came with your computer. 4 Press the eject button or gently push in the tray. To format CDs for storing data, to create music CDs, or to copy CDs, see the CD software that you follow all copyright laws when you create CDs. Setting Up and Using Your Computer 19

Owner's Manual
Page 20
Pause. Pause. Fast reverse. Move backward within the current track. Move forward within the current track. For more information on playing CDs or DVDs, click Help on the CD or DVD player (if available). 20 Setting Up and Using Your Computer Eject. Fast forward. Go to the previous track. Stop. A CD player includes the following basic buttons: Stop. Go to the previous title or chapter. Go to the next track. Play. Go to the next title or chapter. A DVD player includes the following basic buttons: Play.
Pause. Pause. Fast reverse. Move backward within the current track. Move forward within the current track. For more information on playing CDs or DVDs, click Help on the CD or DVD player (if available). 20 Setting Up and Using Your Computer Eject. Fast forward. Go to the previous track. Stop. A CD player includes the following basic buttons: Stop. Go to the previous title or chapter. Go to the next track. Play. Go to the next title or chapter. A DVD player includes the following basic buttons: Play.
Owner's Manual
Page 21
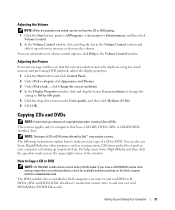
... DVD-writable drives installed in the Volume Control column and slide it up important data. NOTE: The types of CD or DVD drives offered by Dell™ may not read DVD+/-R, DVD+/-RW and DVD+R DL (dual layer) media, but cannot write to make an exact copy of the window. ...button, point to All Programs → Accessories→ Entertainment, and then click Volume Control. 2 In the Volume Control window, click and drag the bar in Dell computers can also use Sonic DigitalMedia for available software patches on volume control options, click Help in the upper-right corner of a CD or DVD...
... DVD-writable drives installed in the Volume Control column and slide it up important data. NOTE: The types of CD or DVD drives offered by Dell™ may not read DVD+/-R, DVD+/-RW and DVD+R DL (dual layer) media, but cannot write to make an exact copy of the window. ...button, point to All Programs → Accessories→ Entertainment, and then click Volume Control. 2 In the Volume Control window, click and drag the bar in Dell computers can also use Sonic DigitalMedia for available software patches on volume control options, click Help in the upper-right corner of a CD or DVD...
