
User Manual
Page 2
PRECAUTIONS Information for users applicable in United States of America 1 Installation 1 Power connection 1 Maintenance 1 Transporting the monitor 1 GETTING STARTED Package contents 2 Monitor installation 2 Identifying parts and controls 3 Working with OSD Group 3 Customizing Your Monitor 3 Hotkeys 4 Function Keys Operation 4 OSD Icon List 5 Troubleshooting 6 Technical Features and Specifications 7
PRECAUTIONS Information for users applicable in United States of America 1 Installation 1 Power connection 1 Maintenance 1 Transporting the monitor 1 GETTING STARTED Package contents 2 Monitor installation 2 Identifying parts and controls 3 Working with OSD Group 3 Customizing Your Monitor 3 Hotkeys 4 Function Keys Operation 4 OSD Icon List 5 Troubleshooting 6 Technical Features and Specifications 7
User Manual
Page 3
.../base, then remove the base from the power supply if: 5.1 You will not use the monitor for an extended period. 5.2 The cable is damaged or frayed. 5.3 The monitor has been dropped or the cabinet damaged. 5.4 A distinct change in United States of the screen with a mild detergent solution. Power connection 1.Use the correct power cord for wall mounting or packaging only. FOR LAMP SPECIFIC DISPOSAL INFORMATION CHECK WWW.LAMPRECYCLE.ORG. Maintenance 1.Clean...
.../base, then remove the base from the power supply if: 5.1 You will not use the monitor for an extended period. 5.2 The cable is damaged or frayed. 5.3 The monitor has been dropped or the cabinet damaged. 5.4 A distinct change in United States of the screen with a mild detergent solution. Power connection 1.Use the correct power cord for wall mounting or packaging only. FOR LAMP SPECIFIC DISPOSAL INFORMATION CHECK WWW.LAMPRECYCLE.ORG. Maintenance 1.Clean...
User Manual
Page 4
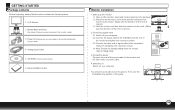
Analog Signal Cable 5. If not, see the picture. LCD Monitor 2. Power Cord (plug may vary according to the monitor model) 3. CD-ROM (contains user manual) 6 .Quick Installation Guide Monitor installation 1.Setting up the monitor 1.1 Take out the monitor, stand and monitor base from the package. 1.2 Place the monitor base on the desk and then slide the neck into the slots of base. (Make sure the direction of the neck is correct.) 1.3 Hold the monitor and then slide the monitor into the...
Analog Signal Cable 5. If not, see the picture. LCD Monitor 2. Power Cord (plug may vary according to the monitor model) 3. CD-ROM (contains user manual) 6 .Quick Installation Guide Monitor installation 1.Setting up the monitor 1.1 Take out the monitor, stand and monitor base from the package. 1.2 Place the monitor base on the desk and then slide the neck into the slots of base. (Make sure the direction of the neck is correct.) 1.3 Hold the monitor and then slide the monitor into the...
User Manual
Page 5
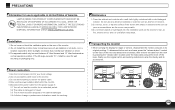
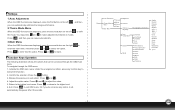
Identifying parts and controls 1. Working with OSD Group You can identify the function of a button through the corresponding icon displayed on the pop-up window of the LED light on the power button determines the monitor state. There are used for multiple tasks. Press button to change the display modes. The following images show that you use the "AUTO ADJUSTMENT" function. Important: In addition, we strongly recommend that the buttons on the pop...
Identifying parts and controls 1. Working with OSD Group You can identify the function of a button through the corresponding icon displayed on the pop-up window of the LED light on the power button determines the monitor state. There are used for multiple tasks. Press button to change the display modes. The following images show that you use the "AUTO ADJUSTMENT" function. Important: In addition, we strongly recommend that the buttons on the pop...
User Manual
Page 6
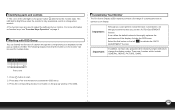
... . 4. Press E , and then you can be accessed through the OSD menu: 1. Press or E to execute the function. 2. Return to enter into the option. Power Auto-Adjustment Theme Mode Menu Main Menu General Movie Picture Game Brightness Contrast OSD Menu Language 17 Lauguages control menu Color Temperature System Recall User/Red User/Green User/Blue Cool Warm White Balance Horizontal Position Vertical Position Phase Clock DDC/CI DCR Demo Information English Deutsch Français Italiano Español 繁...
... . 4. Press E , and then you can be accessed through the OSD menu: 1. Press or E to execute the function. 2. Return to enter into the option. Power Auto-Adjustment Theme Mode Menu Main Menu General Movie Picture Game Brightness Contrast OSD Menu Language 17 Lauguages control menu Color Temperature System Recall User/Red User/Green User/Blue Cool Warm White Balance Horizontal Position Vertical Position Phase Clock DDC/CI DCR Demo Information English Deutsch Français Italiano Español 繁...

User Manual
Page 7
... contrast ratio, and present more RATIO colorful screen. - 5 - OSD MENU LANGUAGE COLOR TEMPERATURE SYSTEM * Select your own preference of language of OSD menu. * Select the setting of screen color-Cool, Warm or User. * Cool: Select the setting of screen color to be bluish white. * Warm: Select the setting of the input signal. RECALL * Reset monitor parameters back to be reddish white. * Adjust the mechanical specifications regarding the display. (White Balance, Clock, Phase, DDC/CI, DCR, DEMO, Horizontal Position, Vertical Position, Information) WHITE BALANCE * Adjust...
... contrast ratio, and present more RATIO colorful screen. - 5 - OSD MENU LANGUAGE COLOR TEMPERATURE SYSTEM * Select your own preference of language of OSD menu. * Select the setting of screen color-Cool, Warm or User. * Cool: Select the setting of screen color to be bluish white. * Warm: Select the setting of the input signal. RECALL * Reset monitor parameters back to be reddish white. * Adjust the mechanical specifications regarding the display. (White Balance, Clock, Phase, DDC/CI, DCR, DEMO, Horizontal Position, Vertical Position, Information) WHITE BALANCE * Adjust...
User Manual
Page 8
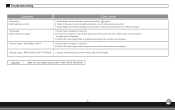
... display setup is under VESA 1366 X 768 at 60Hz - 6 - Troubleshooting Symptom 1.No picture 2.LED indicator is not lit. 1.No picture 2.LED indicator is set correctly. Check if the monitor is turned on the keyboard to wake up the computer). 3 Check if the video signal cable is not in power saving mode (move the mouse or press a key on (press the button again). 2. Check if the power cord is properly connected to the monitor and power outlet. 3 .Check...
... display setup is under VESA 1366 X 768 at 60Hz - 6 - Troubleshooting Symptom 1.No picture 2.LED indicator is not lit. 1.No picture 2.LED indicator is set correctly. Check if the monitor is turned on the keyboard to wake up the computer). 3 Check if the video signal cable is not in power saving mode (move the mouse or press a key on (press the button again). 2. Check if the power cord is properly connected to the monitor and power outlet. 3 .Check...
User Manual
Page 9
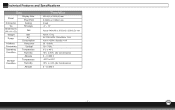
Technical Features and Specifications Item Panel Display Size Pixel Pitch Connector Analog Tilt Dimensions (W x H x D) Tilt Angle Net Weight Power Net AC Consumption Interface Frequency Horizontal Vertical Operating Condition Temperature Humidity Altitude Storage Condition Temperature Humidity Altitude Description 409.8(H) x 230.4(V) mm 0.300(H) x 0.300(V) mm D-sub -5° ~ 15° About 440.4(W) x 353.6(H) x 200.0 (D) mm About 3.3 kg AC 100~240V, 50Hz/60Hz, 1.2A Active:
Technical Features and Specifications Item Panel Display Size Pixel Pitch Connector Analog Tilt Dimensions (W x H x D) Tilt Angle Net Weight Power Net AC Consumption Interface Frequency Horizontal Vertical Operating Condition Temperature Humidity Altitude Storage Condition Temperature Humidity Altitude Description 409.8(H) x 230.4(V) mm 0.300(H) x 0.300(V) mm D-sub -5° ~ 15° About 440.4(W) x 353.6(H) x 200.0 (D) mm About 3.3 kg AC 100~240V, 50Hz/60Hz, 1.2A Active:


