
User Manual
Page 2
TABLE OF CONTENTS FOR YOUR SAFETY 1 SAFETY PRECAUTIONS 2 SPECIAL NOTES ON LCD MONITORS 3 BEFORE YOU OPERATE THE MONITOR 3 FEATURES 3 PACKING LIST 3 INSTALLATION INSTRUCTIONS 4 CONTROLS AND CONNECTORS 5 ADJUSTING THE VIEWING ANGLE 6 OPERATING INSTRUCTIONS 7 GENERAL INSTRUCTIONS 7 HOW TO ADJUST A SETTING 9 ADJUSTING THE PICTURE 10-11 PLUG AND PLAY 12 TECHNICAL SUPPORT(FAQ 13-14 ERROR MESSAGE & POSSIBLE SOLUTION 15 APPENDIX 16 SPECIFICATIONS 16-17 FACTORY PRESET TIMING TABLE 18 CONNECTOR PIN ASSIGNMENT 18
TABLE OF CONTENTS FOR YOUR SAFETY 1 SAFETY PRECAUTIONS 2 SPECIAL NOTES ON LCD MONITORS 3 BEFORE YOU OPERATE THE MONITOR 3 FEATURES 3 PACKING LIST 3 INSTALLATION INSTRUCTIONS 4 CONTROLS AND CONNECTORS 5 ADJUSTING THE VIEWING ANGLE 6 OPERATING INSTRUCTIONS 7 GENERAL INSTRUCTIONS 7 HOW TO ADJUST A SETTING 9 ADJUSTING THE PICTURE 10-11 PLUG AND PLAY 12 TECHNICAL SUPPORT(FAQ 13-14 ERROR MESSAGE & POSSIBLE SOLUTION 15 APPENDIX 16 SPECIFICATIONS 16-17 FACTORY PRESET TIMING TABLE 18 CONNECTOR PIN ASSIGNMENT 18
User Manual
Page 3
..., and if not installed and used in a particular installation. WARNING: To prevent fire or shock hazard, do not expose the monitor to qualified personnel only. 1 Dangerously high voltages are designed to provide reasonable protection against harmful interference in accordance with the limits for...a Class B digital device, pursuant to which the receiver is encouraged to try to operate the equipment. 2. Before operating the monitor, please read this equipment. If this equipment does cause harmful interference to this manual thoroughly. Shielded interface cables and AC power cord...
..., and if not installed and used in a particular installation. WARNING: To prevent fire or shock hazard, do not expose the monitor to qualified personnel only. 1 Dangerously high voltages are designed to provide reasonable protection against harmful interference in accordance with the limits for...a Class B digital device, pursuant to which the receiver is encouraged to try to operate the equipment. 2. Before operating the monitor, please read this equipment. If this equipment does cause harmful interference to this manual thoroughly. Shielded interface cables and AC power cord...

User Manual
Page 4
... • Slots and openings in a bookcase or cabinet unless proper ventilation is equipped with a three-pronged grounded plug, a plug with the monitor. Do not place the monitor near water, e.g. If you are not sure of the type of power source indicated on a wall or shelf, use an adapter to service...the equipment and shall be sure these openings are provided for long period of the cabinet are not blocked or covered. Do not place the monitor on an unstable cart, stand, or table. Overloading can injure a person and cause serious damage to protect it will not be operated ...
... • Slots and openings in a bookcase or cabinet unless proper ventilation is equipped with a three-pronged grounded plug, a plug with the monitor. Do not place the monitor near water, e.g. If you are not sure of the type of power source indicated on a wall or shelf, use an adapter to service...the equipment and shall be sure these openings are provided for long period of the cabinet are not blocked or covered. Do not place the monitor on an unstable cart, stand, or table. Overloading can injure a person and cause serious damage to protect it will not be operated ...

User Manual
Page 5
...pixels of the time. • Due to replace parts. Owner's Manual 3. Signal Cable 3 BEFORE YOU OPERATE THE MONITOR FEATURES • 18.5" (470 mm) Wide ScreenTFT Color LCD Monitor • Crisp, Clear Display for Windows • Recommended Resolutions: 1366x768@60Hz • Ergonomic Design • Space...Saving, Compact Case Design PACKAGE LIST The product package should include the following symptoms are normal with LCD monitor and do not indicate a problem. SPECIAL NOTES ON LCD MONITORS The following items: 1. NOTES • Due to make sure the flicker disappears. • You may...
...pixels of the time. • Due to replace parts. Owner's Manual 3. Signal Cable 3 BEFORE YOU OPERATE THE MONITOR FEATURES • 18.5" (470 mm) Wide ScreenTFT Color LCD Monitor • Crisp, Clear Display for Windows • Recommended Resolutions: 1366x768@60Hz • Ergonomic Design • Space...Saving, Compact Case Design PACKAGE LIST The product package should include the following symptoms are normal with LCD monitor and do not indicate a problem. SPECIAL NOTES ON LCD MONITORS The following items: 1. NOTES • Due to make sure the flicker disappears. • You may...

User Manual
Page 6
Connect the AC-power cord into your LCD monitor's power input socket, The AC-power cord may be connected to either 100/120V AC or 220/240V AC voltage area (No user adjustment is ... either a wall power outlet or the power outlet socket on your PC, depending on the type of power cord supplied with your area. 2. This LCD monitor has an External universal power supply that the power cord is required.) 3. Make sure that allows operation in your LCD...
Connect the AC-power cord into your LCD monitor's power input socket, The AC-power cord may be connected to either 100/120V AC or 220/240V AC voltage area (No user adjustment is ... either a wall power outlet or the power outlet socket on your PC, depending on the type of power cord supplied with your area. 2. This LCD monitor has an External universal power supply that the power cord is required.) 3. Make sure that allows operation in your LCD...

User Manual
Page 7
CONTROLS AND CONNECTORS SIGNAL CABLE Connecting the Signal Cable: Plug the Signal Cable one end of the AC power cord to the LCD monitor's AC input socket, and the other end to Wall outlet. Power Cable 2. Connecting the Power Cord: Plug one end to LCD monitor's "DSUB-Input" socket , the other end to the computer's VGA port and tighten the two screws on the cable connector. Caution: If the AC outlet is not grounded (with three holes), install the proper grounding adapter (not supplied). 1 2 Figure 2 Connecting Cables 1. Signal Cable
CONTROLS AND CONNECTORS SIGNAL CABLE Connecting the Signal Cable: Plug the Signal Cable one end of the AC power cord to the LCD monitor's AC input socket, and the other end to Wall outlet. Power Cable 2. Connecting the Power Cord: Plug one end to LCD monitor's "DSUB-Input" socket , the other end to the computer's VGA port and tighten the two screws on the cable connector. Caution: If the AC outlet is not grounded (with three holes), install the proper grounding adapter (not supplied). 1 2 Figure 2 Connecting Cables 1. Signal Cable

User Manual
Page 8
It may cause damage or break the LCD screen. • Careful attention is recommended to look at the full face of the monitor, then adjust the monitor's angle to 20°. ADJUSTING THE VIEWING ANGLE • For optimal viewing it is required not to catch your own preference. • Hold the stand so you do not topple the monitor when you change the monitor's angle. • You are able to adjust the monitor's angle from -5° to your fingers or hands when you change the angle. 6 Figure 3 NOTES • Do not touch the LCD screen when you change the angle.
It may cause damage or break the LCD screen. • Careful attention is recommended to look at the full face of the monitor, then adjust the monitor's angle to 20°. ADJUSTING THE VIEWING ANGLE • For optimal viewing it is required not to catch your own preference. • Hold the stand so you do not topple the monitor when you change the monitor's angle. • You are able to adjust the monitor's angle from -5° to your fingers or hands when you change the angle. 6 Figure 3 NOTES • Do not touch the LCD screen when you change the angle.
User Manual
Page 9
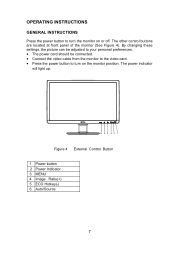
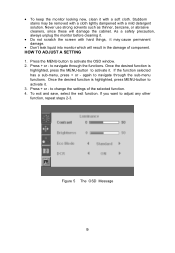
The other control buttons are located at front panel of the monitor (See Figure 4). Image Ratio(+) 5. Power button 2 Power Indicator 3. ECO Hotkey(-) 6. The power indicator will light up. 6 54 32 1 Figure 4 External Control Button 1. By changing these ...settings, the picture can be adjusted to your personal preferences. • The power cord should be connected. • Connect the video cable from the monitor to the video card. • Press the power button to turn on or off. OPERATING INSTRUCTIONS GENERAL INSTRUCTIONS Press the power button to turn the...
The other control buttons are located at front panel of the monitor (See Figure 4). Image Ratio(+) 5. Power button 2 Power Indicator 3. ECO Hotkey(-) 6. The power indicator will light up. 6 54 32 1 Figure 4 External Control Button 1. By changing these ...settings, the picture can be adjusted to your personal preferences. • The power cord should be connected. • Connect the video cable from the monitor to the video card. • Press the power button to turn on or off. OPERATING INSTRUCTIONS GENERAL INSTRUCTIONS Press the power button to turn the...
User Manual
Page 10
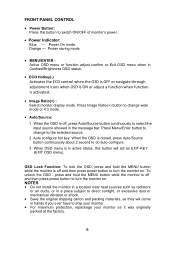
... mode. OSD Lock Function: To lock the OSD, press and hold the MENU button while the monitor is in active status, this button to switch ON/OFF of monitor's power. • Power Indicator: Blue - Orange - Press Image Ratio(+) button to change to the selected source. 2. When the OSD is off and then... press power button to turn the monitor on . To unlock the OSD - NOTES • Do not install the monitor in a location near heat sources such as radiators or air ducts, or in a place subject to direct sunlight, or...
... mode. OSD Lock Function: To lock the OSD, press and hold the MENU button while the monitor is in active status, this button to switch ON/OFF of monitor's power. • Power Indicator: Blue - Orange - Press Image Ratio(+) button to change to the selected source. 2. When the OSD is off and then... press power button to turn the monitor on . To unlock the OSD - NOTES • Do not install the monitor in a location near heat sources such as radiators or air ducts, or in a place subject to direct sunlight, or...
User Manual
Page 11
...-menu functions. to activate it with a soft cloth. To exit and save, select the exit function. Figure 5 The OSD Message 9 • To keep the monitor looking new, clean it . 3. If the function selected has a sub-menu, press + or - Stubborn stains may cause permanent damage. • Don't leak liquid ... will damage the cabinet. Press the MENU-button to adjust any other function, repeat steps 2-3. As a safety precaution, always unplug the monitor before cleaning it. • Do not scratch the screen with a mild detergent solution. If you want to activate the OSD window. 2. Once the ...
...-menu functions. to activate it with a soft cloth. To exit and save, select the exit function. Figure 5 The OSD Message 9 • To keep the monitor looking new, clean it . 3. If the function selected has a sub-menu, press + or - Stubborn stains may cause permanent damage. • Don't leak liquid ... will damage the cabinet. Press the MENU-button to adjust any other function, repeat steps 2-3. As a safety precaution, always unplug the monitor before cleaning it. • Do not scratch the screen with a mild detergent solution. If you want to activate the OSD window. 2. Once the ...

User Manual
Page 12
... Backlight Adjustment Contrast Contrast from Digital-register. Adjust Picture Phase to reduce Vertical-Line noise. Adjust the horizontal position of the picture. Image Ratio Enable monitor wide mode or 4:3 mode 10
... Backlight Adjustment Contrast Contrast from Digital-register. Adjust Picture Phase to reduce Vertical-Line noise. Adjust the horizontal position of the picture. Image Ratio Enable monitor wide mode or 4:3 mode 10

User Manual
Page 14
...power outlet of personal computer: Please use VDE 0602, 0625, 0821 approval power cord in European counties. 12 This reduces the monitor's internal power supply consumption. The display is restored by the Video Electronics Standards Association (VESA) and The Swedish Confederation Employees (NUTEK..., 250V, having standard CEE-22 female configuration. The host can request EDID information over the DDC2B channel. This monitor meets the Green monitor standards as set consisting of DDC used, communicate additional information about its display capabilities. The voltage rating for the ...
...power outlet of personal computer: Please use VDE 0602, 0625, 0821 approval power cord in European counties. 12 This reduces the monitor's internal power supply consumption. The display is restored by the Video Electronics Standards Association (VESA) and The Swedish Confederation Employees (NUTEK..., 250V, having standard CEE-22 female configuration. The host can request EDID information over the DDC2B channel. This monitor meets the Green monitor standards as set consisting of DDC used, communicate additional information about its display capabilities. The voltage rating for the ...
User Manual
Page 15
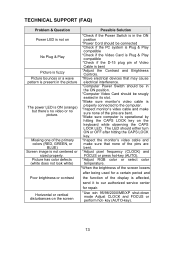
...key (AUTO). *Adjust RGB color or select color temperature. *When the brightness of the screen lowers after hitting the CAPS LOCK key. *Inspect the monitor's video cable and make sure none of the primary colors (RED, GREEN, or BLUE) Screen image is ON (orange) but there's no video ... Brightness Controls. *Move electrical devices that none of the pins are bent. *Make sure computer is affected, send it to the computer. *Inspect monitor's video cable and make sure that may cause electrical interference. *Computer Power Switch should be in the ON position. *Computer Video Card should be ...
...key (AUTO). *Adjust RGB color or select color temperature. *When the brightness of the screen lowers after hitting the CAPS LOCK key. *Inspect the monitor's video cable and make sure none of the primary colors (RED, GREEN, or BLUE) Screen image is ON (orange) but there's no video ... Brightness Controls. *Move electrical devices that none of the pins are bent. *Make sure computer is affected, send it to the computer. *Inspect monitor's video cable and make sure that may cause electrical interference. *Computer Power Switch should be in the ON position. *Computer Video Card should be ...


