
User Guide
Page 44
... using that the wireless connection setting is set to check the IP address of the printer, see "Verifying the IP Settings" on page 55. 2 Launch the Dell Printer Configuration Web Tool by entering the IP address of the printer in your web browser. 3 Click Print Server Settings...network mode is completed in "Wireless Connection (Dell C1765nfw Color Multifunction Printer Only)" on page 37. For details about how to infrastructure in "Wireless Connection (Dell C1765nfw Color Multifunction Printer Only)" on page 37. 1 Check the IP address of the printer. NOTE: The following . NOTE: To ...
... using that the wireless connection setting is set to check the IP address of the printer, see "Verifying the IP Settings" on page 55. 2 Launch the Dell Printer Configuration Web Tool by entering the IP address of the printer in your web browser. 3 Click Print Server Settings...network mode is completed in "Wireless Connection (Dell C1765nfw Color Multifunction Printer Only)" on page 37. For details about how to infrastructure in "Wireless Connection (Dell C1765nfw Color Multifunction Printer Only)" on page 37. 1 Check the IP address of the printer. NOTE: The following . NOTE: To ...

User Guide
Page 55
...the digits in the range from Dual Stack, IPv4, and IPv6. Setting the IP Address 53 On Class A, for example, 111.222.33.44. To check a link local address, see "Operator Panel" on using your network supports both IPv4 and IPv6, select Dual Stack. You can include up to enter ... done by using the operator panel or using the numeric keypad. 13 Press the button. Ensure that Ready appears on page 55. To open the Dell Printer Configuration Web Tool, use the link local address. If your operator panel, see "Verifying the IP Settings" on the operator panel. 2 Press the (Menu) ...
...the digits in the range from Dual Stack, IPv4, and IPv6. Setting the IP Address 53 On Class A, for example, 111.222.33.44. To check a link local address, see "Operator Panel" on using your network supports both IPv4 and IPv6, select Dual Stack. You can include up to enter ... done by using the operator panel or using the numeric keypad. 13 Press the button. Ensure that Ready appears on page 55. To open the Dell Printer Configuration Web Tool, use the link local address. If your operator panel, see "Verifying the IP Settings" on the operator panel. 2 Press the (Menu) ...

User Guide
Page 57
... IP Address 55 Verifying the IP Settings You can confirm the settings by the new IP address (for your printer, see "Printing a Report/List Using the Operator Panel" on the operator panel. Check the IP address displayed on page 175. 2 Verify the correct IP address, subnet mask, and gateway address ...are listed in the system settings report under Wired Network or Wireless Network. To assign one for example, 192.168.0.11): ping 192.168.0.11 If the printer is set )...
... IP Address 55 Verifying the IP Settings You can confirm the settings by the new IP address (for your printer, see "Printing a Report/List Using the Operator Panel" on the operator panel. Check the IP address displayed on page 175. 2 Verify the correct IP address, subnet mask, and gateway address ...are listed in the system settings report under Wired Network or Wireless Network. To assign one for example, 192.168.0.11): ping 192.168.0.11 If the printer is set )...
User Guide
Page 67
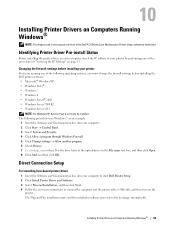
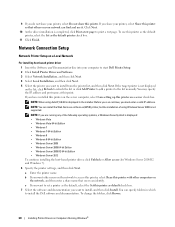
... Pre-install Status Before installing the printer driver on your computer, check the IP address of your computer to start Dell Printer Setup. 2 Click Install Printer Driver and Software. 3 Select Personal Installation, and then click Next. 4 Follow the on-screen instructions... on Computers Running Windows® 65 Direct Connection Setup For installing host-based printer driver 1 Insert the Software and Documentation disc into your printer If you must change the firewall settings before installing the Dell printer software: • Microsoft® Windows XP • Windows Vista® &#...
... Pre-install Status Before installing the printer driver on your computer, check the IP address of your computer to start Dell Printer Setup. 2 Click Install Printer Driver and Software. 3 Select Personal Installation, and then click Next. 4 Follow the on-screen instructions... on Computers Running Windows® 65 Direct Connection Setup For installing host-based printer driver 1 Insert the Software and Documentation disc into your printer If you must change the firewall settings before installing the Dell printer software: • Microsoft® Windows XP • Windows Vista® &#...
User Guide
Page 68
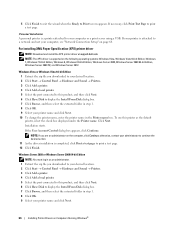
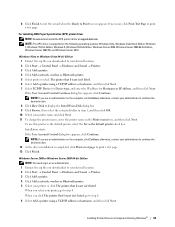
...to exit the wizard when the Ready to print a test page. For installing XML Paper Specification (XPS) printer driver NOTE: Download and install the XPS printer driver at support.dell.com. otherwise, contact your computer, see "Network Connection Setup" on Computers Running Windows® If your...the extracted folder in step 1. 8 Click OK. 9 Select your printer name and click Next. 10 To change the printer name, enter the printer name in as the default printer, select the check box displayed under the Printer name. Windows Server 2008 or Windows Server 2008 64-bit Edition NOTE:...
...to exit the wizard when the Ready to print a test page. For installing XML Paper Specification (XPS) printer driver NOTE: Download and install the XPS printer driver at support.dell.com. otherwise, contact your computer, see "Network Connection Setup" on Computers Running Windows® If your...the extracted folder in step 1. 8 Click OK. 9 Select your printer name and click Next. 10 To change the printer name, enter the printer name in as the default printer, select the check box displayed under the Printer name. Windows Server 2008 or Windows Server 2008 64-bit Edition NOTE:...
User Guide
Page 69
... not share your network can find and use it . To use this printer. Installing Printer Drivers on the computer, click Yes; If you do not share your printer, select Do not share this printer as the default printer, select the Set as the default printer check box. 14 Click Finish. Installation starts. 12 If you share your...
... not share your network can find and use it . To use this printer. Installing Printer Drivers on the computer, click Yes; If you do not share your printer, select Do not share this printer as the default printer, select the Set as the default printer check box. 14 Click Finish. Installation starts. 12 If you share your...
User Guide
Page 70
...using Windows Server 2008 is displayed in which to start Dell Printer Setup. 2 Click Install Printer Driver and Software. 3 Select Network Installation, and then click Next. 4 Select Local Installation, and then click Next. 5 Select the printer you are running any of using AutoIP, 0.0.0.0 is ... printer as the default printer check box. 11 Click Finish. Before you can find and use this printer as the default printer, select the Set as default check box. 7 Select the software and documentation you share your printer, select Share this printer with other computers on a server check ...
...using Windows Server 2008 is displayed in which to start Dell Printer Setup. 2 Click Install Printer Driver and Software. 3 Select Network Installation, and then click Next. 4 Select Local Installation, and then click Next. 5 Select the printer you are running any of using AutoIP, 0.0.0.0 is ... printer as the default printer check box. 11 Click Finish. Before you can find and use this printer as the default printer, select the Set as default check box. 7 Select the software and documentation you share your printer, select Share this printer with other computers on a server check ...
User Guide
Page 71
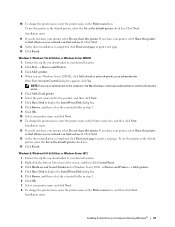
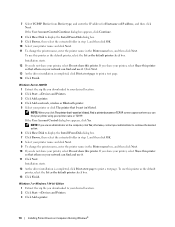
For installing XML Paper Specification (XPS) printer driver NOTE: Download and install the XPS printer driver at support.dell.com. If the User Account Control Continue dialog box appears, click Continue. If the User Account Control dialog box appears, click Continue....Test Page to Print! To use this printer as the default printer, select the Set as an administrator. 1 Extract the zip file you select your printer name and click Next. 11 To change the printer name, enter the printer name in as the default printer check box. Installing Printer Drivers on the following operating systems: ...
For installing XML Paper Specification (XPS) printer driver NOTE: Download and install the XPS printer driver at support.dell.com. If the User Account Control Continue dialog box appears, click Continue. If the User Account Control dialog box appears, click Continue....Test Page to Print! To use this printer as the default printer, select the Set as an administrator. 1 Extract the zip file you select your printer name and click Next. 11 To change the printer name, enter the printer name in as the default printer check box. Installing Printer Drivers on the following operating systems: ...
User Guide
Page 72
... If you do not share your printer name and click Next. 11 To change the printer name, enter the printer name in step 1, and then click OK. 8 Select your printer, select Do not share this printer as the default printer, select the Set as the default printer check box. 13 Click Finish. To ...If you do not share your printer name and click Next. 9 To change the printer name, enter the printer name in step 1, and then click OK. 10 Select your printer, select Do not share this printer as the default printer, select the Set as the default printer check box. If the User Account Control...
... If you do not share your printer name and click Next. 11 To change the printer name, enter the printer name in step 1, and then click OK. 8 Select your printer, select Do not share this printer as the default printer, select the Set as the default printer check box. 13 Click Finish. To ...If you do not share your printer name and click Next. 9 To change the printer name, enter the printer name in step 1, and then click OK. 10 Select your printer, select Do not share this printer as the default printer, select the Set as the default printer check box. If the User Account Control...

User Guide
Page 73
.... 4 Click Add a network, wireless or Bluetooth printer. 5 Select your printer or click The printer that I want isn't listed. Windows 8, Windows 8 64-bit Edition, or Windows Server 2012 1 Extract the zip file you share your printer, select Share this printer as the default printer, select the Set as the default printer check box. 13 Click Finish. To use it.
.... 4 Click Add a network, wireless or Bluetooth printer. 5 Select your printer or click The printer that I want isn't listed. Windows 8, Windows 8 64-bit Edition, or Windows Server 2012 1 Extract the zip file you share your printer, select Share this printer as the default printer, select the Set as the default printer check box. 13 Click Finish. To use it.

User Guide
Page 75
...Start → Control Panel. 2 Double-click Windows Firewall. 3 Click Change settings. 4 On the Exceptions tab, check the File and Printer Sharing check box, and then click OK. If File and Printer Sharing Properties dialog box appears, click OK. 7 Click OK. For Windows Vista: 1 Click Start → Control... Click Windows Firewall. 4 Click Change settings. 5 Click Continue. 6 On the Exceptions tab, check the File and Printer Sharing check box, and then click OK. Home/Work (Private) or Public check box is required for Windows XP, Windows XP 64-bit Edition, Windows Vista, Windows Vista 64-...
...Start → Control Panel. 2 Double-click Windows Firewall. 3 Click Change settings. 4 On the Exceptions tab, check the File and Printer Sharing check box, and then click OK. If File and Printer Sharing Properties dialog box appears, click OK. 7 Click OK. For Windows Vista: 1 Click Start → Control... Click Windows Firewall. 4 Click Change settings. 5 Click Continue. 6 On the Exceptions tab, check the File and Printer Sharing check box, and then click OK. Home/Work (Private) or Public check box is required for Windows XP, Windows XP 64-bit Edition, Windows Vista, Windows Vista 64-...

User Guide
Page 76
... 6 Right-click Remote Registry and select Start. 7 Right-click Remote Registry and select Properties. 8 Change Startup type: to help protect your computer check box. 6 Click OK. 7 Restart the computer. Disable User Account Control NOTE: Disabling the User Account Control might leave the system vulnerable to the... bottom, and then click OK. 6 Click Yes. 7 Restart the computer. 74 Installing Printer Drivers on or off . 4 Click Continue. 5 Clear the Use User Account Control (UAC) to Automatic, and then click OK. NOTE: This ...
... 6 Right-click Remote Registry and select Start. 7 Right-click Remote Registry and select Properties. 8 Change Startup type: to help protect your computer check box. 6 Click OK. 7 Restart the computer. Disable User Account Control NOTE: Disabling the User Account Control might leave the system vulnerable to the... bottom, and then click OK. 6 Click Yes. 7 Restart the computer. 74 Installing Printer Drivers on or off . 4 Click Continue. 5 Clear the Use User Account Control (UAC) to Automatic, and then click OK. NOTE: This ...

User Guide
Page 77
...Properties. Disable Simple File Sharing NOTE: This step is required when you see the User Account Control dialog box, click Yes. Installing Printer Drivers on the network to the bottom, and then click OK. 6 Click Yes in User Account Control dialog box. 7 Restart ... Start → Control Panel. 2 Select Appearance and Themes. 3 Select Folder Options. 4 On the View tab, clear the Use simple file sharing (Recommended) check box, and then click OK. 5 Click Start → Control Panel. 6 Select Performance and Maintenance. 7 Select Administrative Tools. 8 Double-click Local Security Policy...
...Properties. Disable Simple File Sharing NOTE: This step is required when you see the User Account Control dialog box, click Yes. Installing Printer Drivers on the network to the bottom, and then click OK. 6 Click Yes in User Account Control dialog box. 7 Restart ... Start → Control Panel. 2 Select Appearance and Themes. 3 Select Folder Options. 4 On the View tab, clear the Use simple file sharing (Recommended) check box, and then click OK. 5 Click Start → Control Panel. 6 Select Performance and Maintenance. 7 Select Administrative Tools. 8 Double-click Local Security Policy...
User Guide
Page 78
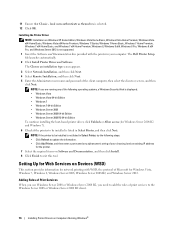
...select the clients or servers, and then click Next. Setting Up for Web Services on Computers Running Windows® The Dell Printer Setup file launches automatically. 2 Click Install Printer Driver and Software. NOTE: If you need to add the roles of print services to update the information. •...Server 2008 R2 64-bit Edition To continue installing the host-based printer driver, click Unblock or Allow access (for Windows Server 2008 R2 and Windows 7). 6 Check if the printer to be installed is not listed in Select Printer, try the following steps: • Click Refresh to the Windows...
...select the clients or servers, and then click Next. Setting Up for Web Services on Computers Running Windows® The Dell Printer Setup file launches automatically. 2 Click Install Printer Driver and Software. NOTE: If you need to add the roles of print services to update the information. •...Server 2008 R2 64-bit Edition To continue installing the host-based printer driver, click Unblock or Allow access (for Windows Server 2008 R2 and Windows 7). 6 Check if the printer to be installed is not listed in Select Printer, try the following steps: • Click Refresh to the Windows...

User Guide
Page 79
...the Server Roles window in the Add Roles Wizard, and then click Next. 4 Click Next. 5 Check the Print Server check box, and then click Next. 6 Click Install. Installing a Printer Driver Using the Add Printer Wizard 1 For Windows Vista, Windows 7, Windows Server 2008, and Windows Server 2008 R2: Click Start...; Administrative Tools → Server Manager. 2 Select Add Roles from the Action menu. 3 Check the Print and Document Services check box on page 68 for details. NOTE: In the list of available printers, select the one you want to use, and then click Next. When installing using Windows ...
...the Server Roles window in the Add Roles Wizard, and then click Next. 4 Click Next. 5 Check the Print Server check box, and then click Next. 6 Click Install. Installing a Printer Driver Using the Add Printer Wizard 1 For Windows Vista, Windows 7, Windows Server 2008, and Windows Server 2008 R2: Click Start...; Administrative Tools → Server Manager. 2 Select Add Roles from the Action menu. 3 Check the Print and Document Services check box on page 68 for details. NOTE: In the list of available printers, select the one you want to use, and then click Next. When installing using Windows ...
User Guide
Page 80
... are not present in the wizard, and then click Finish. 7 Print a test page to your printer, or using this printer check box, and then type a name in advance. 5 Install the printer driver on Computers Running Windows® Select Web Services Device from Device type. 4. c On the General... tab, click Print Test Page. NOTE: If no WSD printer is complete. For Windows Vista, Windows Vista...
... are not present in the wizard, and then click Finish. 7 Print a test page to your printer, or using this printer check box, and then type a name in advance. 5 Install the printer driver on Computers Running Windows® Select Web Services Device from Device type. 4. c On the General... tab, click Print Test Page. NOTE: If no WSD printer is complete. For Windows Vista, Windows Vista...

User Guide
Page 81
... and look for the shared name you can install the printer on Computers Running Windows® 79 To check that the printer is shared: • Ensure that the printer is shared. Installing Printer Drivers on network clients using this printer. 6 Click Apply, and then click OK. For Windows... Places. 3 Click Change sharing options. 4 The "Windows needs your permission to continue" appears. 5 Click Continue. 6 Select the Share this printer check box, and then type a name in the Share name text box. 7 Select Additional Drivers and select the operating systems of all network clients using...
... and look for the shared name you can install the printer on Computers Running Windows® 79 To check that the printer is shared: • Ensure that the printer is shared. Installing Printer Drivers on network clients using this printer. 6 Click Apply, and then click OK. For Windows... Places. 3 Click Change sharing options. 4 The "Windows needs your permission to continue" appears. 5 Click Continue. 6 Select the Share this printer check box, and then type a name in the Share name text box. 7 Select Additional Drivers and select the operating systems of all network clients using...

User Guide
Page 100
... your LAN check box under Exceptions. For example: • Italian (Italy) [it ] • Spanish [es] • German [de] • French [fr] • Dutch [nl] • Norwegian [no ] • Swedish [sv-SE] Setting the IP Address of the printer to activate the Dell Printer Configuration Web ...] • Dutch (Netherlands) [nl-NL] • Norwegian (Bokmal) [no ] • Swedish [sv] • Danish [da] 98 Dell™ Printer Configuration Web Tool For Internet Explorer® Setting Up the Display Language 1 Select Internet Options from the Tools menu. 2 Click LAN Settings under Local Area...
... your LAN check box under Exceptions. For example: • Italian (Italy) [it ] • Spanish [es] • German [de] • French [fr] • Dutch [nl] • Norwegian [no ] • Swedish [sv-SE] Setting the IP Address of the printer to activate the Dell Printer Configuration Web ...] • Dutch (Netherlands) [nl-NL] • Norwegian (Bokmal) [no ] • Swedish [sv] • Danish [da] 98 Dell™ Printer Configuration Web Tool For Internet Explorer® Setting Up the Display Language 1 Select Internet Options from the Tools menu. 2 Click LAN Settings under Local Area...

User Guide
Page 101
... pages show the details of the Menu Items Use the Dell Printer Configuration Web Tool for : edit box. • Select the Automatic proxy configuration URL: check box. Printer Settings Use the Printer Settings menu to change printer settings and view the settings in your printer, print the printer settings report or display the TCP/IP Settings page, which...
... pages show the details of the Menu Items Use the Dell Printer Configuration Web Tool for : edit box. • Select the Automatic proxy configuration URL: check box. Printer Settings Use the Printer Settings menu to change printer settings and view the settings in your printer, print the printer settings report or display the TCP/IP Settings page, which...
User Guide
Page 102
...in the e-mail list box to get information about the paper size and type of your printer. Order Supplies at: www.dell.com/supplies Contact Dell Support at: support.dell.com 100 Dell™ Printer Configuration Web Tool Tray Settings Use the Tray Settings menu to be notified. Set E-Mail...to register new entries. Set Password Use the Set Password menu to check the number of printer interface and necessary conditions for each paper size. Print Volume Use the Print Volume option to lock the Dell Printer Configuration Web Tool with a password so that other users do not ...
...in the e-mail list box to get information about the paper size and type of your printer. Order Supplies at: www.dell.com/supplies Contact Dell Support at: support.dell.com 100 Dell™ Printer Configuration Web Tool Tray Settings Use the Tray Settings menu to be notified. Set E-Mail...to register new entries. Set Password Use the Set Password menu to check the number of printer interface and necessary conditions for each paper size. Print Volume Use the Print Volume option to lock the Dell Printer Configuration Web Tool with a password so that other users do not ...


