User Guide
Page 1
.... Reproduction of this material in any proprietary interest in trademarks and trade names other than its own. Dell Inc. Dell B2360d-dn Laser Printer User's Guide May 2012 www.dell.com | support.dell.com Trademarks Information in this document is strictly forbidden. is subject to the entities claiming the marks and names of their products. Other...
.... Reproduction of this material in any proprietary interest in trademarks and trade names other than its own. Dell Inc. Dell B2360d-dn Laser Printer User's Guide May 2012 www.dell.com | support.dell.com Trademarks Information in this document is strictly forbidden. is subject to the entities claiming the marks and names of their products. Other...
User Guide
Page 2
... of the indicator and Sleep button lights 12 Using the Embedded Web Server...12 Additional printer setup 14 Installing internal options...14 Installing hardware options...19 Attaching cables...20 Setting up the printer software...21 Networking...23 Verifying printer setup...28 Loading paper and specialty media 30 Setting the paper size and type...
... of the indicator and Sleep button lights 12 Using the Embedded Web Server...12 Additional printer setup 14 Installing internal options...14 Installing hardware options...19 Attaching cables...20 Setting up the printer software...21 Networking...23 Verifying printer setup...28 Loading paper and specialty media 30 Setting the paper size and type...
User Guide
Page 3
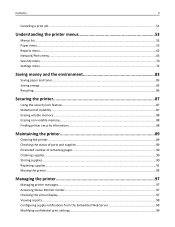
......87 Statement of Volatility...87 Erasing volatile memory...88 Erasing non‑volatile memory...88 Finding printer security information...88 Maintaining the printer 89 Cleaning the printer...89 Checking the status of parts and supplies 89 Estimated number of remaining pages 90 Ordering... supplies...90 Storing supplies...90 Replacing supplies...91 Moving the printer...95 Managing the printer 97 Managing printer messages...97 Accessing Status Monitor Center...97 Checking the virtual display...97 Viewing reports...98 Configuring supply ...
......87 Statement of Volatility...87 Erasing volatile memory...88 Erasing non‑volatile memory...88 Finding printer security information...88 Maintaining the printer 89 Cleaning the printer...89 Checking the status of parts and supplies 89 Estimated number of remaining pages 90 Ordering... supplies...90 Storing supplies...90 Replacing supplies...91 Moving the printer...95 Managing the printer 97 Managing printer messages...97 Accessing Status Monitor Center...97 Checking the virtual display...97 Viewing reports...98 Configuring supply ...

User Guide
Page 4
... Restoring factory default settings...100 Creating a printer control panel PIN...100 Clearing jams 102 Avoiding jams...102 Understanding jam messages and locations 103 Jam, front door [20y.xx]...104 Jam, rear door [... Jam, pull tray 1. Push down blue flap. [23y.xx 109 Jam, tray [x] [24y.xx]...111 Jam, MP feeder [250.xx]...111 Troubleshooting 113 Understanding the printer messages...113 Solving printer problems...121 Solving print problems...127 Embedded Web Server does not open 149 Contacting technical support...150 Appendix 151 Index...153
... Restoring factory default settings...100 Creating a printer control panel PIN...100 Clearing jams 102 Avoiding jams...102 Understanding jam messages and locations 103 Jam, front door [20y.xx]...104 Jam, rear door [... Jam, pull tray 1. Push down blue flap. [23y.xx 109 Jam, tray [x] [24y.xx]...111 Jam, MP feeder [250.xx]...111 Troubleshooting 113 Understanding the printer messages...113 Solving printer problems...121 Solving print problems...127 Embedded Web Server does not open 149 Contacting technical support...150 Appendix 151 Index...153

User Guide
Page 5
... the front of injury from the electrical outlet before inspecting it . To reduce the risk of the tray until it clicks into the printer. The safety features of explosion if a lithium battery is designed, tested, and approved to abrasion or stress. Safety information 5 Safety ... manufacturer's components. Do not place or use of other devices attached to a service representative. CAUTION-POTENTIAL INJURY: This product uses a laser. You must understand the section in your fingers are properly installed in their marked plug-in this product is adequate clearance around it ....
... the front of injury from the electrical outlet before inspecting it . To reduce the risk of the tray until it clicks into the printer. The safety features of explosion if a lithium battery is designed, tested, and approved to abrasion or stress. Safety information 5 Safety ... manufacturer's components. Do not place or use of other devices attached to a service representative. CAUTION-POTENTIAL INJURY: This product uses a laser. You must understand the section in your fingers are properly installed in their marked plug-in this product is adequate clearance around it ....
User Guide
Page 7
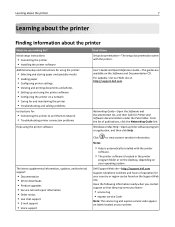
...desktop, depending on your operating system. For updates, visit our Web site at http://support.dell.com. Learning about the printer 7 Learning about the printer Finding information about the printer What are available on the Support Web site. Networking Guide-Open the Software and Documentation CD...or region can be found on the Software and Documentation CD. From the list of operation for Printer and Software Documentation under the Pubs folder. Dell Support Web site-http://support.dell.com Support telephone numbers and hours of publications, click the Networking Guide link.
...desktop, depending on your operating system. For updates, visit our Web site at http://support.dell.com. Learning about the printer 7 Learning about the printer Finding information about the printer What are available on the Support Web site. Networking Guide-Open the Software and Documentation CD...or region can be found on the Software and Documentation CD. From the list of operation for Printer and Software Documentation under the Pubs folder. Dell Support Web site-http://support.dell.com Support telephone numbers and hours of publications, click the Networking Guide link.
User Guide
Page 8
...: The Product Information Guide may not be available in select retail stores. If you looking for? • Software and Drivers-Certified drivers for my printer and installers for Dell printer software • Readme files-Last‑minute technical changes, or advanced technical reference materials for experienced users or technicians • Supplies and accessories...
...: The Product Information Guide may not be available in select retail stores. If you looking for? • Software and Drivers-Certified drivers for my printer and installers for Dell printer software • Readme files-Last‑minute technical changes, or advanced technical reference materials for experienced users or technicians • Supplies and accessories...

User Guide
Page 9
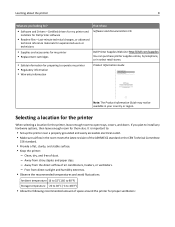
For instructions on installing the optional tray, see "Installing an optional tray" on page 19. You can configure your printer by adding one optional 550‑sheet tray. Keep all other trays closed until needed. Learning about the printer 9 1 Right side 30 cm (12 in.) 2 Front 51 cm (20 in.) 3 Left side 20 cm (8 in.) 4 Rear 20 cm (8 in.) 5 Top 30 cm (12 in.) Printer configurations CAUTION-POTENTIAL INJURY: To reduce the risk of equipment instability, load each tray separately.
For instructions on installing the optional tray, see "Installing an optional tray" on page 19. You can configure your printer by adding one optional 550‑sheet tray. Keep all other trays closed until needed. Learning about the printer 9 1 Right side 30 cm (12 in.) 2 Front 51 cm (20 in.) 3 Left side 20 cm (8 in.) 4 Rear 20 cm (8 in.) 5 Top 30 cm (12 in.) Printer configurations CAUTION-POTENTIAL INJURY: To reduce the risk of equipment instability, load each tray separately.

User Guide
Page 10
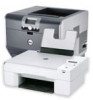
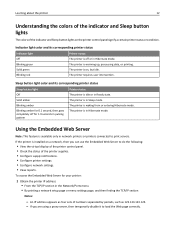
Learning about the printer 10 1 Printer control panel 2 Paper stop 3 Standard bin 4 Front door release button 5 Controller board access door 6 Standard 250‑sheet tray 7 Optional 550‑sheet tray 8 50‑sheet multipurpose feeder 9 Front door
Learning about the printer 10 1 Printer control panel 2 Paper stop 3 Standard bin 4 Front door release button 5 Controller board access door 6 Standard 250‑sheet tray 7 Optional 550‑sheet tray 8 50‑sheet multipurpose feeder 9 Front door

User Guide
Page 11
...is in the Ready state. • Pressing the button while navigating within the menus returns the printer control panel to the previous screen. 9 Indicator light Determine the status of the printer. Release the button when the value you want appears. 8 Back button Return to the top‑...numeric values, press and hold an arrow button to scroll through the settings. Notes: 2 Display • The menus are available only when the printer is indicated by an asterisk (*). • Save the displayed value as the new user default setting. 7 Left arrow button • Scroll through...
...is in the Ready state. • Pressing the button while navigating within the menus returns the printer control panel to the previous screen. 9 Indicator light Determine the status of the printer. Release the button when the value you want appears. 8 Back button Return to the top‑...numeric values, press and hold an arrow button to scroll through the settings. Notes: 2 Display • The menus are available only when the printer is indicated by an asterisk (*). • Save the displayed value as the new user default setting. 7 Left arrow button • Scroll through...
User Guide
Page 12
... the Embedded Web Server for 0.1 second, then goes completely off or in Ready state. The printer is warming up, processing data, or printing. Blinking amber for your printer: 1 Obtain the printer IP address: • From the TCP/IP section in Hibernate mode. Using the Embedded Web...Web page correctly. An IP address appears as 123.123.123.123. - The printer requires user intervention. The printer is in network printers or printers connected to print servers. Learning about the printer 12 Understanding the colors of the indicator and Sleep button lights The colors of ...
... the Embedded Web Server for 0.1 second, then goes completely off or in Ready state. The printer is warming up, processing data, or printing. Blinking amber for your printer: 1 Obtain the printer IP address: • From the TCP/IP section in Hibernate mode. Using the Embedded Web...Web page correctly. An IP address appears as 123.123.123.123. - The printer requires user intervention. The printer is in network printers or printers connected to print servers. Learning about the printer 12 Understanding the colors of the indicator and Sleep button lights The colors of ...

User Guide
Page 13
The Embedded Web Server page appears. Learning about the printer 13 2 Open a Web browser, and then type the printer IP address in the address field. 3 Press Enter.
The Embedded Web Server page appears. Learning about the printer 13 2 Open a Web browser, and then type the printer IP address in the address field. 3 Press Enter.

User Guide
Page 14
...or connectors. If you have any other devices attached to locate the appropriate connector. Available internal options Memory cards • Printer memory • Flash memory • Fonts Note: Some internal options are easily damaged by static electricity. Warning-Potential Damage:... Controller board electronic components are available only in select printer models. Touch a metal surface on the printer before touching any cables going into the printer. Accessing the controller board CAUTION-SHOCK HAZARD: If you are accessing the ...
...or connectors. If you have any other devices attached to locate the appropriate connector. Available internal options Memory cards • Printer memory • Flash memory • Fonts Note: Some internal options are easily damaged by static electricity. Warning-Potential Damage:... Controller board electronic components are available only in select printer models. Touch a metal surface on the printer before touching any cables going into the printer. Accessing the controller board CAUTION-SHOCK HAZARD: If you are accessing the ...

User Guide
Page 15
...touch the connection points along the edge of the card. An optional memory card can be purchased separately and attached to the printer, then turn the printer off as well, and unplug any controller board electronic components or connectors. For more information, see "Accessing the controller board" ...on the printer before continuing. Doing so may cause damage. Touch a metal surface on page 14. 2 Unpack the memory card. Warning-Potential Damage...
...touch the connection points along the edge of the card. An optional memory card can be purchased separately and attached to the printer, then turn the printer off as well, and unplug any controller board electronic components or connectors. For more information, see "Accessing the controller board" ...on the printer before continuing. Doing so may cause damage. Touch a metal surface on page 14. 2 Unpack the memory card. Warning-Potential Damage...
User Guide
Page 16
For more information, see "Updating available options in the printer driver to make them available for print jobs. Note: When the printer software and any hardware options are installed, it may be necessary to manually add the options in the printer driver" on the connector. 1 2 4 Push the memory card straight into the connector, and then push the card toward the controller board wall until it clicks into place. 1 2 5 Close the controller board access door. Additional printer setup 16 3 Align the notch (1) on the memory card with the ridge (2) on page 22.
For more information, see "Updating available options in the printer driver to make them available for print jobs. Note: When the printer software and any hardware options are installed, it may be necessary to manually add the options in the printer driver" on the connector. 1 2 4 Push the memory card straight into the connector, and then push the card toward the controller board wall until it clicks into place. 1 2 5 Close the controller board access door. Additional printer setup 16 3 Align the notch (1) on the memory card with the ridge (2) on page 22.

User Guide
Page 17
...board electronic components are accessing the controller board or installing optional hardware or memory devices sometime after setting up the printer, then turn them off , and unplug the power cord from the electrical outlet before touching any cables going into the... printer. Additional printer setup 17 Installing an optional card CAUTION-SHOCK HAZARD: If you have other devices attached to the printer, then turn the printer off as well, and unplug any controller board electronic components or connectors...
...board electronic components are accessing the controller board or installing optional hardware or memory devices sometime after setting up the printer, then turn them off , and unplug the power cord from the electrical outlet before touching any cables going into the... printer. Additional printer setup 17 Installing an optional card CAUTION-SHOCK HAZARD: If you have other devices attached to the printer, then turn the printer off as well, and unplug any controller board electronic components or connectors...
User Guide
Page 18
... options are installed, it may cause damage to make them available for print jobs. For more information, see "Updating available options in the printer driver to the card and the controller board. Note: The entire length of the card may be necessary to manually add the options in ...the printer driver" on the card must touch and be flushed against the controller board. 5 Close the controller board access door. Additional printer setup 18 4 Push the card firmly into place as shown in the illustration.
... options are installed, it may cause damage to make them available for print jobs. For more information, see "Updating available options in the printer driver to the card and the controller board. Note: The entire length of the card may be necessary to manually add the options in ...the printer driver" on the card must touch and be flushed against the controller board. 5 Close the controller board access door. Additional printer setup 18 4 Push the card firmly into place as shown in the illustration.

User Guide
Page 19
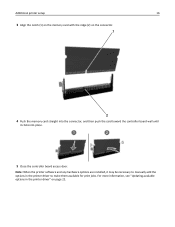
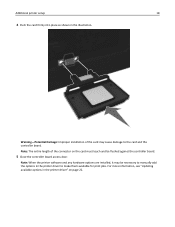
... 19 Installing hardware options Installing an optional tray CAUTION-SHOCK HAZARD: If you have any other devices attached to the printer, then turn the printer off the printer using the power switch, and then unplug the power cord from the electrical outlet. 2 Unpack the tray, and then remove any packing material. ...3 Remove the tray from the base. 2 1 2 4 Remove any cables going into the printer. 1 Turn off , and unplug the power cord from inside the tray. 5 Insert the tray into the base. 6 Place the tray near the...
... 19 Installing hardware options Installing an optional tray CAUTION-SHOCK HAZARD: If you have any other devices attached to the printer, then turn the printer off the printer using the power switch, and then unplug the power cord from the electrical outlet. 2 Unpack the tray, and then remove any packing material. ...3 Remove the tray from the base. 2 1 2 4 Remove any cables going into the printer. 1 Turn off , and unplug the power cord from inside the tray. 5 Insert the tray into the base. 6 Place the tray near the...
User Guide
Page 20
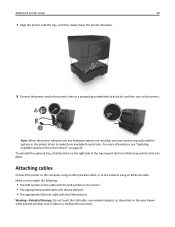
... appropriate parallel cable with the parallel port • The appropriate Ethernet cable with the tray, and then slowly lower the printer into place. Additional printer setup 20 7 Align the printer with the Ethernet port Warning-Potential Damage: Do not touch the USB cable, any hardware options are installed, you may ...need to manually add the options in the printer driver" on page 22. To uninstall the optional tray, slide the latch on the right side of the tray toward the front of ...
... appropriate parallel cable with the parallel port • The appropriate Ethernet cable with the tray, and then slowly lower the printer into place. Additional printer setup 20 7 Align the printer with the Ethernet port Warning-Potential Damage: Do not touch the USB cable, any hardware options are installed, you may ...need to manually add the options in the printer driver" on page 22. To uninstall the optional tray, slide the latch on the right side of the tray toward the front of ...
User Guide
Page 21
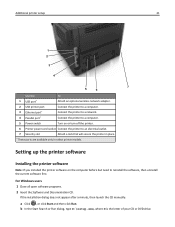
...5 6 Use the To 1 USB port* Attach an optional wireless network adapter. 2 USB printer port Connect the printer to a computer. 3 Ethernet port* Connect the printer to a network. 4 Parallel port* Connect the printer to a computer. 5 Power switch Turn on the computer before but need to an electrical...secure the printer in place. * These ports are available only in select printer models. Setting up the printer software Installing the printer software Note: If you installed the printer software on or turn off the printer. 6 Printer power cord socket Connect the printer to ...
...5 6 Use the To 1 USB port* Attach an optional wireless network adapter. 2 USB printer port Connect the printer to a computer. 3 Ethernet port* Connect the printer to a network. 4 Parallel port* Connect the printer to a computer. 5 Power switch Turn on the computer before but need to an electrical...secure the printer in place. * These ports are available only in select printer models. Setting up the printer software Installing the printer software Note: If you installed the printer software on or turn off the printer. 6 Printer power cord socket Connect the printer to ...


