Owner's Manual
Page 3
...information about technical changes to uninstall/reinstall drivers or access your printer when shipped from technicians, and online courses • Upgrades - Dell™ AIO Printer A940 Finding information Refer to access help with: This document contains ...complete setup information. Readme files may be included on your CD to provide last-minute updates about : • Basic usage • Scanning, printing, copying, and faxing • Creative projects • Ink cartridge...
...information about technical changes to uninstall/reinstall drivers or access your printer when shipped from technicians, and online courses • Upgrades - Dell™ AIO Printer A940 Finding information Refer to access help with: This document contains ...complete setup information. Readme files may be included on your CD to provide last-minute updates about : • Basic usage • Scanning, printing, copying, and faxing • Creative projects • Ink cartridge...
Owner's Manual
Page 5
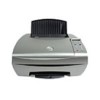
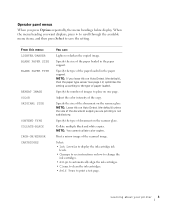
...Connect your All-In-One (attached to : Check the status of the All-In-One. For more information, see page 3. Stack paper as it exits the All-In-One. Lock the scanner if you want to a computer or unattached). NOTE: Lift the printer (scanner unit) to change cartridges, unlock the scanner..., or lock the scanner. • Change cartridges. • Unlock the scanner. • Lock the scanner. Use...
...Connect your All-In-One (attached to : Check the status of the All-In-One. For more information, see page 3. Stack paper as it exits the All-In-One. Lock the scanner if you want to a computer or unattached). NOTE: Lift the printer (scanner unit) to change cartridges, unlock the scanner..., or lock the scanner. • Change cartridges. • Unlock the scanner. • Lock the scanner. Use...
Owner's Manual
Page 10
...images 29 Using special scan features 29 Faxing 30 Using BVRP fax software 30 Installing BVRP fax software 30 Configuring BVRP fax software 31 Sending a one-page fax with BVRP 32 Sending a multiple-page fax with BVRP 32 Receiving faxes with BVRP 33 Viewing your faxes in BVRP 33 Using Fax... Console 33 Installing Fax Console 33 Configuring Fax Console 34 Sending a one-page fax with Fax Console 34 Sending a multiple-page fax with Fax Console 34 Receiving faxes with Fax Console 35 Viewing faxes with Fax Console...
...images 29 Using special scan features 29 Faxing 30 Using BVRP fax software 30 Installing BVRP fax software 30 Configuring BVRP fax software 31 Sending a one-page fax with BVRP 32 Sending a multiple-page fax with BVRP 32 Receiving faxes with BVRP 33 Viewing your faxes in BVRP 33 Using Fax... Console 33 Installing Fax Console 33 Configuring Fax Console 34 Sending a one-page fax with Fax Console 34 Sending a multiple-page fax with Fax Console 34 Receiving faxes with Fax Console 35 Viewing faxes with Fax Console...
Owner's Manual
Page 11
... You receive an error message 48 Uninstall and reinstall the printer software 54 Other help sources 54 5 Regulatory Notices 6 Appendix Contacting Dell 60 Limited Warranties and Return Policy 72 Limited Warranty for Dell-Branded Hardware Products (Canada Only 75 "Total Satisfaction" Return... Policy (Canada Only 79 Dell Software and Peripherals (Canada Only 79 One-Year End-User Manufacturer Guarantee (...
... You receive an error message 48 Uninstall and reinstall the printer software 54 Other help sources 54 5 Regulatory Notices 6 Appendix Contacting Dell 60 Limited Warranties and Return Policy 72 Limited Warranty for Dell-Branded Hardware Products (Canada Only 75 "Total Satisfaction" Return... Policy (Canada Only 79 Dell Software and Peripherals (Canada Only 79 One-Year End-User Manufacturer Guarantee (...
Owner's Manual
Page 12
and Canada Only) 82 Ink and Toner Cartridges Limited Warranty (Latin America Only) 83 Dell Software License Agreement 84 Index 87 xii Contents Dell Computer Corporation Ink and Toner Cartridges Limited Warranties 82 Ink and Toner Cartridges Limited Warranty (U.S.
and Canada Only) 82 Ink and Toner Cartridges Limited Warranty (Latin America Only) 83 Dell Software License Agreement 84 Index 87 xii Contents Dell Computer Corporation Ink and Toner Cartridges Limited Warranties 82 Ink and Toner Cartridges Limited Warranty (U.S.
Owner's Manual
Page 17
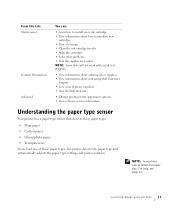
...document on the scanner glass. Print a mirror image of the copy. Specify the type of the document on the scanner glass. Learning about your printer 5 Specify the size of the paper loaded in the paper support. Specify the size of the document output you want displays, press + to ...paper loaded in the paper support. Select: • Ink Levels to display the ink cartridge ink levels. • Change to see page 11) optimizes the setting according to the type of images to place on one page. When the menu heading you are printing is not satisfactory. NOTE: If you...
...document on the scanner glass. Print a mirror image of the copy. Specify the type of the document on the scanner glass. Learning about your printer 5 Specify the size of the paper loaded in the paper support. Specify the size of the document output you want displays, press + to ...paper loaded in the paper support. Select: • Ink Levels to display the ink cartridge ink levels. • Change to see page 11) optimizes the setting according to the type of images to place on one page. When the menu heading you are printing is not satisfactory. NOTE: If you...
Owner's Manual
Page 23
...cartridge nozzles. • Align the cartridges. • Solve other problems. • Visit the supplies area online. NOTE: Your printer cannot detect the paper size. NOTE: Some links will not work while a job is in progress. • View information about ordering ink or supplies. • View information about contacting Dell... Customer Support. • View a list of these paper types: • Plain paper • Coated paper • Glossy/photo paper • Transparencies If you load one of phone numbers. • Visit the Dell Web site. •...
...cartridge nozzles. • Align the cartridges. • Solve other problems. • Visit the supplies area online. NOTE: Your printer cannot detect the paper size. NOTE: Some links will not work while a job is in progress. • View information about ordering ink or supplies. • View information about contacting Dell... Customer Support. • View a list of these paper types: • Plain paper • Coated paper • Glossy/photo paper • Transparencies If you load one of phone numbers. • Visit the Dell Web site. •...
Owner's Manual
Page 49
SECTION 3 Maintenance Ordering supplies Replacing the ink cartridges Aligning the ink cartridges Cleaning the ink cartridge nozzles 3
SECTION 3 Maintenance Ordering supplies Replacing the ink cartridges Aligning the ink cartridges Cleaning the ink cartridge nozzles 3
Owner's Manual
Page 50
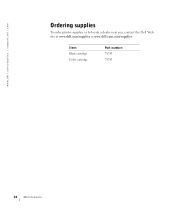
Item: Black cartridge Color cartridge Part number: 7Y743 7Y745 38 Maintenance www.dell.com/supplies | support.dell.com Ordering supplies To order printer supplies or to locate a dealer near you, contact the Dell Web site at www.dell.com/supplies or www.dell.euro.com/supplies.
Item: Black cartridge Color cartridge Part number: 7Y743 7Y745 38 Maintenance www.dell.com/supplies | support.dell.com Ordering supplies To order printer supplies or to locate a dealer near you, contact the Dell Web site at www.dell.com/supplies or www.dell.euro.com/supplies.
Owner's Manual
Page 51
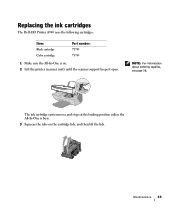
NOTE: For information about ordering supplies, see page 38. The ink cartridge carrier moves and stops at the loading position unless the All-In-One is on the cartridge lids, and then lift the lids. Maintenance 39 Replacing the ink cartridges The Dell AIO Printer A940 uses the following cartridges: Item: Black cartridge Color cartridge Part number: 7Y743 7Y745 1 Make sure the All-In-One is busy. 3 Squeeze the tabs on . 2 Lift the printer (scanner unit) until the scanner support keeps it open.
NOTE: For information about ordering supplies, see page 38. The ink cartridge carrier moves and stops at the loading position unless the All-In-One is on the cartridge lids, and then lift the lids. Maintenance 39 Replacing the ink cartridges The Dell AIO Printer A940 uses the following cartridges: Item: Black cartridge Color cartridge Part number: 7Y743 7Y745 1 Make sure the All-In-One is busy. 3 Squeeze the tabs on . 2 Lift the printer (scanner unit) until the scanner support keeps it open.
Owner's Manual
Page 52
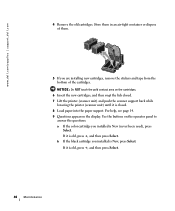
For help, see page 14. 9 Questions appear on the cartridges. 6 Insert the new cartridges, and then snap the lids closed. 7 Lift the printer (scanner unit) and push the scanner support back while lowering the printer (scanner unit) until it is closed. 8 Load paper into the paper support. Store them . ...of the cartridges. If it is old, press +, and then press Select. 40 Maintenance NOTICE: Do NOT touch the gold contact area on the display. If it is New, press Select. www.dell.com/supplies | support.dell.com 4 Remove the old cartridges. b If the black cartridge you installed ...
For help, see page 14. 9 Questions appear on the cartridges. 6 Insert the new cartridges, and then snap the lids closed. 7 Lift the printer (scanner unit) and push the scanner support back while lowering the printer (scanner unit) until it is closed. 8 Load paper into the paper support. Store them . ...of the cartridges. If it is old, press +, and then press Select. 40 Maintenance NOTICE: Do NOT touch the gold contact area on the display. If it is New, press Select. www.dell.com/supplies | support.dell.com 4 Remove the old cartridges. b If the black cartridge you installed ...
Owner's Manual
Page 53
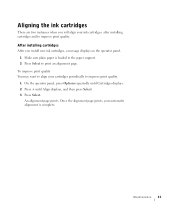
... are two instances when you install new ink cartridges, a message displays on the operator panel. 1 Make sure plain paper is complete. Once the alignment page prints, your automatic alignment is loaded in the paper... To improve print quality You may want to align your ink cartridges: after installing cartridges and to print an alignment page. After installing cartridges After you will align your cartridges periodically to improve print quality. 1 On the operator panel, press Options repeatedly until Cartridges displays. 2 Press + until Align displays, and then press Select. 3 Press ...
... are two instances when you install new ink cartridges, a message displays on the operator panel. 1 Make sure plain paper is complete. Once the alignment page prints, your automatic alignment is loaded in the paper... To improve print quality You may want to align your ink cartridges: after installing cartridges and to print an alignment page. After installing cartridges After you will align your cartridges periodically to improve print quality. 1 On the operator panel, press Options repeatedly until Cartridges displays. 2 Press + until Align displays, and then press Select. 3 Press ...

Owner's Manual
Page 54
... Center. Clean the nozzles when: • Characters are not printing completely. • White dashes appear in the printer. www.dell.com/supplies | support.dell.com Cleaning the ink cartridge nozzles To improve print quality, you may need to clean the nozzles. For help , see page 10. 3 Click the Maintenance tab. 4 From the Maintenance tab...
... Center. Clean the nozzles when: • Characters are not printing completely. • White dashes appear in the printer. www.dell.com/supplies | support.dell.com Cleaning the ink cartridge nozzles To improve print quality, you may need to clean the nozzles. For help , see page 10. 3 Click the Maintenance tab. 4 From the Maintenance tab...
Owner's Manual
Page 56
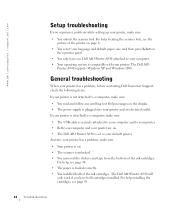
....dell.com/supplies | support.dell.com Setup troubleshooting If you have one Dell AIO Printer A940 attached to your computer. • Your operating system is compatible with your printer has a problem, make sure: • You read and follow any scrolling text Help messages on the display. • The power supply is loaded correctly. • You installed both cartridges...
....dell.com/supplies | support.dell.com Setup troubleshooting If you have one Dell AIO Printer A940 attached to your computer. • Your operating system is compatible with your printer has a problem, make sure: • You read and follow any scrolling text Help messages on the display. • The power supply is loaded correctly. • You installed both cartridges...
Owner's Manual
Page 57
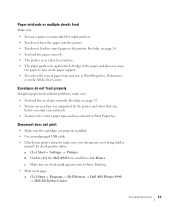
... sure the cartridges are properly installed. • Use an undamaged USB cable. • Check your printer status to make sure: • You load the envelopes correctly. c Make sure no check mark appears next to Pause Printing. • Print a test page: a Click Start → Programs → Dell Printers → Dell AIO Printer A940 → Dell All-In-One Center. Troubleshooting...
... sure the cartridges are properly installed. • Use an undamaged USB cable. • Check your printer status to make sure: • You load the envelopes correctly. c Make sure no check mark appears next to Pause Printing. • Print a test page: a Click Start → Programs → Dell Printers → Dell AIO Printer A940 → Dell All-In-One Center. Troubleshooting...
Owner's Manual
Page 60
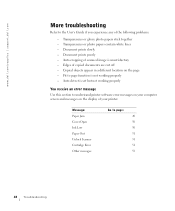
... slowly - Transparencies or photo papers contain white lines - Document prints poorly - Fit to page function is unsatisfactory - www.dell.com/supplies | support.dell.com More troubleshooting Refer to the User's Guide if you experience any of your computer screen and messages on the page -... 51 51 51 53 48 Troubleshooting Message: Paper Jam Cover Open Ink Low Paper Out Unlock Scanner Cartridge Error Other messages Go to understand printer software error messages on your printer. Copied objects appear in a different location on the display of the following problems: -
... slowly - Transparencies or photo papers contain white lines - Document prints poorly - Fit to page function is unsatisfactory - www.dell.com/supplies | support.dell.com More troubleshooting Refer to the User's Guide if you experience any of your computer screen and messages on the page -... 51 51 51 53 48 Troubleshooting Message: Paper Jam Cover Open Ink Low Paper Out Unlock Scanner Cartridge Error Other messages Go to understand printer software error messages on your printer. Copied objects appear in a different location on the display of the following problems: -
Owner's Manual
Page 62
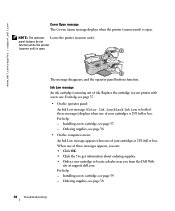
... when one . Installing a new cartridge, see page 37. • On the operator panel: An Ink Low message (Color Ink Low, Black Ink Low, or both of these messages appears, you from the Dell Web site at support.dell.com. www.dell.com/supplies | support.dell.com Cover Open message The Cover Open message displays when the printer...
... when one . Installing a new cartridge, see page 37. • On the operator panel: An Ink Low message (Color Ink Low, Black Ink Low, or both of these messages appears, you from the Dell Web site at support.dell.com. www.dell.com/supplies | support.dell.com Cover Open message The Cover Open message displays when the printer...

Owner's Manual
Page 63
... the scanner lock. Cartridge Error messages When you get these messages you may need to: • Install cartridges, see page 37. • Order cartridges, see page iv. 3 Pull the scanner lock toward you to unlock the scanner. 4 Using both hands to lift the printer (scanner unit) until... it open. For help . 7 Press Power to turn the printer off. 2 Use both hands, lift the printer (scanner unit...
... the scanner lock. Cartridge Error messages When you get these messages you may need to: • Install cartridges, see page 37. • Order cartridges, see page iv. 3 Pull the scanner lock toward you to unlock the scanner. 4 Using both hands to lift the printer (scanner unit) until... it open. For help . 7 Press Power to turn the printer off. 2 Use both hands, lift the printer (scanner unit...
Owner's Manual
Page 64
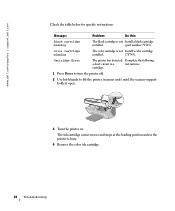
.... 3 Turn the printer on. Color cartridge missing The color cartridge is busy. 4 Remove the color ink cartridge. 52 Troubleshooting Cartridge Error The printer has detected Complete the following a short circuit in a instructions. The ink cartridge carrier moves and stops at the loading position unless the printer is not Install a color cartridge installed. (7Y745). www.dell.com/supplies | support.dell.com Check...
.... 3 Turn the printer on. Color cartridge missing The color cartridge is busy. 4 Remove the color ink cartridge. 52 Troubleshooting Cartridge Error The printer has detected Complete the following a short circuit in a instructions. The ink cartridge carrier moves and stops at the loading position unless the printer is not Install a color cartridge installed. (7Y745). www.dell.com/supplies | support.dell.com Check...
Owner's Manual
Page 65
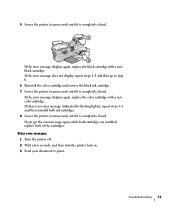
... and then reinstall both of the cartridges. Other error messages 1 Turn the printer off. 2 Wait a few seconds, and then turn the printer back on. 3 Send your document to step 6. 6 Reinstall the color cartridge and remove the black ink cartridge. 7 Lower the printer (scanner unit) until it is completely...and then go to print. If you get the error message again, while both cartridges are installed, replace both ink cartridges. 8 Lower the printer (scanner unit) until it is completely closed. 5 Lower the printer (scanner unit) until it is completely closed . If the error message displays ...
... and then reinstall both of the cartridges. Other error messages 1 Turn the printer off. 2 Wait a few seconds, and then turn the printer back on. 3 Send your document to step 6. 6 Reinstall the color cartridge and remove the black ink cartridge. 7 Lower the printer (scanner unit) until it is completely...and then go to print. If you get the error message again, while both cartridges are installed, replace both ink cartridges. 8 Lower the printer (scanner unit) until it is completely closed. 5 Lower the printer (scanner unit) until it is completely closed . If the error message displays ...


