Faxing
Page 2
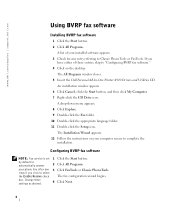
If you click to select the Enable Receive check The fax configuration wizard begins. The All Programs window closes. 5 Insert the Dell Personal All-In-One Printer A940 Drivers and Utilities CD. The Installation Wizard appears. 12 Follow the instructions on the desktop. box.... or FaxTools. by default to automatically answer 2 Click All Programs. your installed software appears. 3 Check for any entry referring to complete the installation. www.dell.com/supplies | support.dell.com Using BVRP fax software Installing BVRP fax software 1 Click the Start button. 2 Click All ...
If you click to select the Enable Receive check The fax configuration wizard begins. The All Programs window closes. 5 Insert the Dell Personal All-In-One Printer A940 Drivers and Utilities CD. The Installation Wizard appears. 12 Follow the instructions on the desktop. box.... or FaxTools. by default to automatically answer 2 Click All Programs. your installed software appears. 3 Check for any entry referring to complete the installation. www.dell.com/supplies | support.dell.com Using BVRP fax software Installing BVRP fax software 1 Click the Start button. 2 Click All ...
Faxing
Page 5
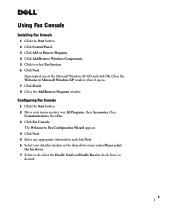
... your data/fax modem in the drop-down menu under Please select the fax device. 7 Select or de-select the Enable Send and Enable Receive check boxes as desired. 5 Using Fax Console Installing Fax Console 1 Click the Start button. 2 Click Control Panel. 3 Click Add or Remove Programs. 4 Click Add/Remove Windows...
... your data/fax modem in the drop-down menu under Please select the fax device. 7 Select or de-select the Enable Send and Enable Receive check boxes as desired. 5 Using Fax Console Installing Fax Console 1 Click the Start button. 2 Click Control Panel. 3 Click Add or Remove Programs. 4 Click Add/Remove Windows...

Faxing
Page 6
... appears. 4 Follow the instructions on your computer screen to receive faxes. 11 Enter your mouse pointer over All Programs, then Dell Printers, then Dell AIO Printer A940. 3 Click Dell All-In-One Center. 4 Click See More Scan Settings. 5 Click Display Advanced Scan Settings. 6 Click to select Scan multiple items before output...all pages you want to select the desired archive location. 12 Click Next, confirm your document appears. Selecting the 10 Enable Receive check box allows you from the Send scanned image to drop-down menu. 8 Place the document you want to fax face down ...
... appears. 4 Follow the instructions on your computer screen to receive faxes. 11 Enter your mouse pointer over All Programs, then Dell Printers, then Dell AIO Printer A940. 3 Click Dell All-In-One Center. 4 Click See More Scan Settings. 5 Click Display Advanced Scan Settings. 6 Click to select Scan multiple items before output...all pages you want to select the desired archive location. 12 Click Next, confirm your document appears. Selecting the 10 Enable Receive check box allows you from the Send scanned image to drop-down menu. 8 Place the document you want to fax face down ...

Faxing
Page 7
... connected to the computer with Fax Console 1 Click the Start button. 2 Move your data/fax modem. • Faxing software is installed and configured. • Your printer is connected to send your mouse pointer over All Programs, then Accessories, then Communications, then Fax. 3 Click Fax Console. 12 Follow the instructions on your... line-in the Inbox. Viewing faxes with a USB cable. 7 Sent faxes can be viewed in Sent Items. Fax troubleshooting If you selected the Enable Receive check box when configuring Fax Console.
... connected to the computer with Fax Console 1 Click the Start button. 2 Move your data/fax modem. • Faxing software is installed and configured. • Your printer is connected to send your mouse pointer over All Programs, then Accessories, then Communications, then Fax. 3 Click Fax Console. 12 Follow the instructions on your... line-in the Inbox. Viewing faxes with a USB cable. 7 Sent faxes can be viewed in Sent Items. Fax troubleshooting If you selected the Enable Receive check box when configuring Fax Console.
Owner's Manual
Page 5
Lock or unlock the scanner. Lock the scanner if you want to: Check the status of the All-In-One. Keep the printer (scanner unit) open to the All-In-One. Place an item on or remove an item from the scanner glass. For more information, see page 3. Stack paper as it exits ... panel Paper exit tray Paper guide Paper support Power supply Scanner lock Scanner support Printer (scanner unit) Top cover USB cable When you are moving your All-In-One (attached to a computer or unattached). Operate your All-In-One. Supply power to change cartridges, unlock the scanner, or lock the scanner. •...
Lock or unlock the scanner. Lock the scanner if you want to: Check the status of the All-In-One. Keep the printer (scanner unit) open to the All-In-One. Place an item on or remove an item from the scanner glass. For more information, see page 3. Stack paper as it exits ... panel Paper exit tray Paper guide Paper support Power supply Scanner lock Scanner support Printer (scanner unit) Top cover USB cable When you are moving your All-In-One (attached to a computer or unattached). Operate your All-In-One. Supply power to change cartridges, unlock the scanner, or lock the scanner. •...
Owner's Manual
Page 22
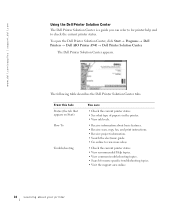
... guide. • Go online to check the current printer status. The Dell Printer Solution Center appears. To open the Dell Printer Solution Center, click Start → Programs → Dell Printers → Dell AIO Printer A940 → Dell Printer Solution Center. The following table describes the Dell Printer Solution Center tabs. www.dell.com/supplies | support.dell.com Using the Dell Printer Solution Center The Dell Printer Solution Center is in the...
... guide. • Go online to check the current printer status. The Dell Printer Solution Center appears. To open the Dell Printer Solution Center, click Start → Programs → Dell Printers → Dell AIO Printer A940 → Dell Printer Solution Center. The following table describes the Dell Printer Solution Center tabs. www.dell.com/supplies | support.dell.com Using the Dell Printer Solution Center The Dell Printer Solution Center is in the...
Owner's Manual
Page 30
... help, see page 14. 2 With your own computer. 1 Click Start → Settings → Printers. 2 Select the printer Dell AIO Printer A940 icon. 3 Click File Sharing. 4 Click the Shared as check box, and then type a name in the Shared Name text box. 5 Click Additional Drivers and select the operating ...connected to a computer that is facing you when you are at your document open, click File → Print. 3 To change the printer settings, click Properties, Options, Setup or Preferences (depending on the program or operating system). First, follow these instructions while you are prompted...
... help, see page 14. 2 With your own computer. 1 Click Start → Settings → Printers. 2 Select the printer Dell AIO Printer A940 icon. 3 Click File Sharing. 4 Click the Shared as check box, and then type a name in the Shared Name text box. 5 Click Additional Drivers and select the operating ...connected to a computer that is facing you when you are at your document open, click File → Print. 3 To change the printer settings, click Properties, Options, Setup or Preferences (depending on the program or operating system). First, follow these instructions while you are prompted...
Owner's Manual
Page 31
... other person's computer: 1 Click Start → Settings → Printers. 2 Click Add Printer to the network. If this client, and then click Finish. Print a test page to install a printer driver. If the printer is complete. To check that identifies it is a new printer, you may be prompted to verify printer installation. 1 Click Start → Settings → Printer. 2 Select the printer you...
... other person's computer: 1 Click Start → Settings → Printers. 2 Click Add Printer to the network. If this client, and then click Finish. Print a test page to install a printer driver. If the printer is complete. To check that identifies it is a new printer, you may be prompted to verify printer installation. 1 Click Start → Settings → Printer. 2 Select the printer you...
Owner's Manual
Page 43
... button. 2 Click All Programs. 3 Click FaxTools or Classic PhoneTools. If you click to continue. 6 Enter your printer 31 3 Check for any entry referring to complete the installation. The All Programs window closes. 5 Insert the Dell Personal All-In-One Printer A940 Drivers and Utilities CD. Using your name and company name. 7 Click Next. 8 Enter an identifier, phone...
... button. 2 Click All Programs. 3 Click FaxTools or Classic PhoneTools. If you click to continue. 6 Enter your printer 31 3 Check for any entry referring to complete the installation. The All Programs window closes. 5 Insert the Dell Personal All-In-One Printer A940 Drivers and Utilities CD. Using your name and company name. 7 Click Next. 8 Enter an identifier, phone...

Owner's Manual
Page 46
... button. 2 Move your mouse pointer over All Programs, then Dell Printers, then Dell AIO Printer A940. 34 Using your printer Sending a one-page fax with Fax Console 1 Ensure that your printer is attached to a computer with Fax Console 1 Click the Start... button. 2 Move your mouse pointer over All Programs, then Accessories, then Communications, then Fax. 3 Click Fax Console. NOTE: De-selecting the 8 Enable Send check...
... button. 2 Move your mouse pointer over All Programs, then Dell Printers, then Dell AIO Printer A940. 34 Using your printer Sending a one-page fax with Fax Console 1 Ensure that your printer is attached to a computer with Fax Console 1 Click the Start... button. 2 Move your mouse pointer over All Programs, then Accessories, then Communications, then Fax. 3 Click Fax Console. NOTE: De-selecting the 8 Enable Send check...

Owner's Manual
Page 47
...All Programs, then Accessories, then Communications, then Fax. 3 Click Fax Console. Received faxes can be viewed in Sent Items. Using your printer 35 You are scanned. 11 Click No. 12 Follow the instructions on your computer screen to send your fax. Sent faxes can be viewed...to fax are now ready to receive a fax if you selected the Enable Receive check box when configuring Fax Console. Viewing faxes with Fax Console 1 Click the Start button. 2 Move your document appears. 3 Click Dell All-In-One Center. 4 Click See More Scan Settings. 5 Click Display Advanced Scan Settings. ...
...All Programs, then Accessories, then Communications, then Fax. 3 Click Fax Console. Received faxes can be viewed in Sent Items. Using your printer 35 You are scanned. 11 Click No. 12 Follow the instructions on your computer screen to send your fax. Sent faxes can be viewed...to fax are now ready to receive a fax if you selected the Enable Receive check box when configuring Fax Console. Viewing faxes with Fax Console 1 Click the Start button. 2 Move your document appears. 3 Click Dell All-In-One Center. 4 Click See More Scan Settings. 5 Click Display Advanced Scan Settings. ...
Owner's Manual
Page 56
...printer, make sure: • Your printer is on . • The Dell AIO Printer A940 is unlocked. • You removed the stickers and tape from the bottom of the ink cartridges. General troubleshooting When your printer has a problem, before contacting Dell Customer Support, check the following items. If your printer...as your default printer. For help , see page 39. 44 Troubleshooting Anytime your printer has a problem, make sure: • You unlock the scanner bed. www.dell.com/supplies | support.dell.com Setup troubleshooting If you have one Dell AIO Printer A940 attached to your...
...printer, make sure: • Your printer is on . • The Dell AIO Printer A940 is unlocked. • You removed the stickers and tape from the bottom of the ink cartridges. General troubleshooting When your printer has a problem, before contacting Dell Customer Support, check the following items. If your printer...as your default printer. For help , see page 39. 44 Troubleshooting Anytime your printer has a problem, make sure: • You unlock the scanner bed. www.dell.com/supplies | support.dell.com Setup troubleshooting If you have one Dell AIO Printer A940 attached to your...
Owner's Manual
Page 57
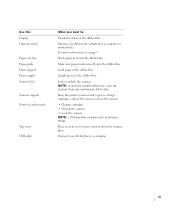
.... Envelopes do not load too much paper in the All-In-One Center. For help , see page 15. • You use a paper recommended for inkjet printers. • You do not force the paper into the printer. • You do not feed properly If regular paper feeds ...the cartridges are properly installed. • Use an undamaged USB cable. • Check your printer status to make sure: • You load the envelopes correctly. Troubleshooting 45 b Double-click the Dell A940 icon, and then click Printer. Paper misfeeds or multiple sheets feed Make sure: • You use an envelope...
.... Envelopes do not load too much paper in the All-In-One Center. For help , see page 15. • You use a paper recommended for inkjet printers. • You do not force the paper into the printer. • You do not feed properly If regular paper feeds ...the cartridges are properly installed. • Use an undamaged USB cable. • Check your printer status to make sure: • You load the envelopes correctly. Troubleshooting 45 b Double-click the Dell A940 icon, and then click Printer. Paper misfeeds or multiple sheets feed Make sure: • You use an envelope...
Owner's Manual
Page 64
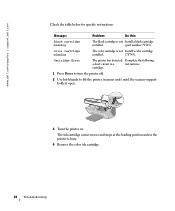
... unit) until the scanner support holds it open. 3 Turn the printer on. Color cartridge missing The color cartridge is busy. 4 Remove the color ink cartridge. 52 Troubleshooting www.dell.com/supplies | support.dell.com Check the table below for specific instructions: Message: Problem: Do this: Black cartridge missing The black cartridge is not Install...
... unit) until the scanner support holds it open. 3 Turn the printer on. Color cartridge missing The color cartridge is busy. 4 Remove the color ink cartridge. 52 Troubleshooting www.dell.com/supplies | support.dell.com Check the table below for specific instructions: Message: Problem: Do this: Black cartridge missing The black cartridge is not Install...

UG_en-us
Page 6
Check the status of the All-In-One. The data fax modem must be connected to the computer with a DSL (digital subscriber line) or cable modem. NOTE: Lift the scanner unit to change cartridges, unlock the scanner, or lock the scanner. Lock or unlock the scanner. Connect your All-In-One... 3 Operator panel 4 Paper exit tray 5 Top cover 6 Paper guide 7 Printer (scanner unit) 8 Scanner lock 9 Scanner support 10 USB cable 11 Power supply When you are moving your All-In-One to a computer. The printer must be connected to an active analog phone line. Make sure paper feeds correctly...
Check the status of the All-In-One. The data fax modem must be connected to the computer with a DSL (digital subscriber line) or cable modem. NOTE: Lift the scanner unit to change cartridges, unlock the scanner, or lock the scanner. Lock or unlock the scanner. Connect your All-In-One... 3 Operator panel 4 Paper exit tray 5 Top cover 6 Paper guide 7 Printer (scanner unit) 8 Scanner lock 9 Scanner support 10 USB cable 11 Power supply When you are moving your All-In-One to a computer. The printer must be connected to an active analog phone line. Make sure paper feeds correctly...
UG_en-us
Page 12
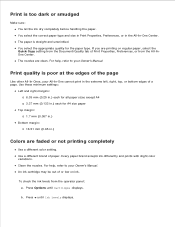
... all paper sizes except A4 3.37 mm (0.133 in.) each for the paper type. For help , refer to your All-In-One cannot print in the All-In-One Center. To check the ink levels from the All-InOne Center. c. The paper is too dark or smudged Make sure: You let the ink... paper type and size in Print Properties, Preferences, or in the extreme left, right, top, or bottom edges of the page Like other All-In-Ones, your Owner's Manual. You select the appropriate quality for A4 size paper Top margin: 1.7 mm (0.067 in.) Bottom margin: 16.51 mm (0.65 in.) Colors...
... all paper sizes except A4 3.37 mm (0.133 in.) each for the paper type. For help , refer to your All-In-One cannot print in the All-In-One Center. To check the ink levels from the All-InOne Center. c. The paper is too dark or smudged Make sure: You let the ink... paper type and size in Print Properties, Preferences, or in the extreme left, right, top, or bottom edges of the page Like other All-In-Ones, your Owner's Manual. You select the appropriate quality for A4 size paper Top margin: 1.7 mm (0.067 in.) Bottom margin: 16.51 mm (0.65 in.) Colors...

UG_en-us
Page 13
...Page appears. 2. d. e. Auto-cropping of the arrow buttons: To check the ink level in the color cartridge, choose Color Ink. NOTE: Make sure all ink or corrective fluid on the scanner glass. Open the Dell All-In-One Center. option, select anything but Photo. section, click See More Scan... Scan... b. c. Press one of scanned image is dry before placing the document on the document is unsatisfactory First, try cleaning the scanner glass. To check the ink level in the black cartridge, choose Black Ink. To check the ink levels from the Dell Printer Solution Center, refer to ...
...Page appears. 2. d. e. Auto-cropping of the arrow buttons: To check the ink level in the color cartridge, choose Color Ink. NOTE: Make sure all ink or corrective fluid on the scanner glass. Open the Dell All-In-One Center. option, select anything but Photo. section, click See More Scan... Scan... b. c. Press one of scanned image is dry before placing the document on the document is unsatisfactory First, try cleaning the scanner glass. To check the ink level in the black cartridge, choose Black Ink. To check the ink levels from the Dell Printer Solution Center, refer to ...


