User Guide
Page 1
... for property damage, personal injury, or death. Bluetooth is strictly forbidden. Dell™ Photo All-In-One Printer 966 User's Guide To order ink or supplies from Dell: 1. Finding Information Faxing About Your Printer Understanding the Software Understanding the Operator Installing the Dell 966 Internal Panel Menus Wireless/Ethernet Adapter Loading Paper and Originals Maintenance Printing...
... for property damage, personal injury, or death. Bluetooth is strictly forbidden. Dell™ Photo All-In-One Printer 966 User's Guide To order ink or supplies from Dell: 1. Finding Information Faxing About Your Printer Understanding the Software Understanding the Operator Installing the Dell 966 Internal Panel Menus Wireless/Ethernet Adapter Loading Paper and Originals Maintenance Printing...
User Guide
Page 9
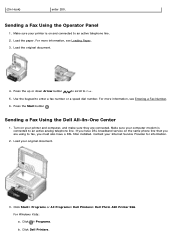
...are using to an active analog telephone line. Press the Start button . Click Start® Programs or All Programs® Dell Printers® Dell Photo AIO Printer 966. For more information, see Loading Paper. 3. Make sure your computer modem is on the same phone line that you ...are connected. Click ® Programs. b. Sending a Fax Using the Operator Panel 1. Click Dell Printers. Make sure your original document. 3. Press the...
...are using to an active analog telephone line. Press the Start button . Click Start® Programs or All Programs® Dell Printers® Dell Photo AIO Printer 966. For more information, see Loading Paper. 3. Make sure your computer modem is on the same phone line that you ...are connected. Click ® Programs. b. Sending a Fax Using the Operator Panel 1. Click Dell Printers. Make sure your original document. 3. Press the...

User Guide
Page 10
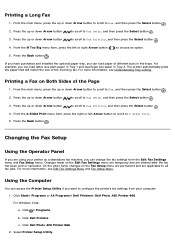
... enter up or down Arrow button to go to be sent. The Print dialog box opens. 2. Make sure your original document. 3. Select Dell All-In-One Center. To send a multiple-page fax, click Advanced, select the Scan multiple items before output check box, and then click...screen asks if there is on the screen. Click OK, and then follow the instructions on and connected to multiple recipients at once. Click Dell Photo AIO Printer 966. 4. Load your printer is more information, see Entering a Fax Number. 5. For more than one page. First, customize your fax ...
... enter up or down Arrow button to go to be sent. The Print dialog box opens. 2. Make sure your original document. 3. Select Dell All-In-One Center. To send a multiple-page fax, click Advanced, select the Scan multiple items before output check box, and then click...screen asks if there is on the screen. Click OK, and then follow the instructions on and connected to multiple recipients at once. Click Dell Photo AIO Printer 966. 4. Load your printer is more information, see Entering a Fax Number. 5. For more than one page. First, customize your fax ...
User Guide
Page 16
...Printing, and then press the Select button . 4. Press the Back button . Click Start® Programs or All Programs® Dell Printers® Dell Photo AIO Printer 966. Press the Back button . For more information, see Understanding Tray Linking. Press the up or down Arrow button to scroll ...cleared after the fax has been sent or cancelled. For more information, see Edit Fax Settings Menu and Fax Setup Menu. Click Dell Photo AIO Printer 966. 2. Select Printer Setup Utility. On the other hand, changes on the Fax Setup menu are permanent and are using your computer....
...Printing, and then press the Select button . 4. Press the Back button . Click Start® Programs or All Programs® Dell Printers® Dell Photo AIO Printer 966. Press the Back button . For more information, see Understanding Tray Linking. Press the up or down Arrow button to scroll ...cleared after the fax has been sent or cancelled. For more information, see Edit Fax Settings Menu and Fax Setup Menu. Click Dell Photo AIO Printer 966. 2. Select Printer Setup Utility. On the other hand, changes on the Fax Setup menu are permanent and are using your computer....

User Guide
Page 21
.... A few important things to note: If the printer is connected to a computer or not) must install a DSL filter on the printer you use the Save Photos to Computer function or the Print Files mode.
.... A few important things to note: If the printer is connected to a computer or not) must install a DSL filter on the printer you use the Save Photos to Computer function or the Print Files mode.

User Guide
Page 22
...upper connector), and do not connect a DSL (digital subscriber line) or ISDN (integrated services digital network) to direct your document or photo flat while you insert a memory card containing digital pictures. slots NOTE: The LCD only displays JPG files found on the memory card,...Switzerland), you use . Use it . NOTE: Do not connect additional devices to work correctly. Remove the blue plug before use support.dell.com or contact technical support. bottom connector), and then insert the supplied yellow terminator for additional devices NOTE: If the phone communication is...
...upper connector), and do not connect a DSL (digital subscriber line) or ISDN (integrated services digital network) to direct your document or photo flat while you insert a memory card containing digital pictures. slots NOTE: The LCD only displays JPG files found on the memory card,...Switzerland), you use . Use it . NOTE: Do not connect additional devices to work correctly. Remove the blue plug before use support.dell.com or contact technical support. bottom connector), and then insert the supplied yellow terminator for additional devices NOTE: If the phone communication is...
User Guide
Page 23
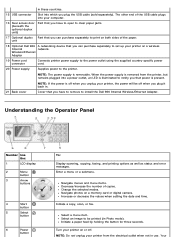
...the printer, but remains plugged into a power outlet, an LED is removed from the electrical outlet when not in use. unit 18 Optional Dell 966 A networking device that power is present. 21 Back cover NOTE: If the power is removable. Cover that you can purchase separately to set...up your computer. 16 Rear access door (beneath the optional duplex unit) Part that you have to remove to install the Dell 966 Internal Wireless/Ethernet Adapter. Navigate photos on a wireless Internal network. in these countries. 15 USB connector Slot into which you have to open to clear paper jams...
...the printer, but remains plugged into a power outlet, an LED is removed from the electrical outlet when not in use. unit 18 Optional Dell 966 A networking device that power is present. 21 Back cover NOTE: If the power is removable. Cover that you can purchase separately to set...up your computer. 16 Rear access door (beneath the optional duplex unit) Part that you have to remove to install the Dell 966 Internal Wireless/Ethernet Adapter. Navigate photos on a wireless Internal network. in these countries. 15 USB connector Slot into which you have to open to clear paper jams...

User Guide
Page 25
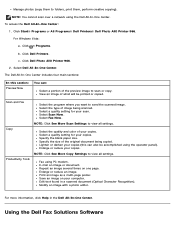
Allows you want to print or copy. Select where you to display, manage, edit, print, and scan photos from your memory card or USB memory key to adjust printer settings. Printing Preferences- Memory Card Manager- Warns you to your computer. Select the quantity ... to send the scanned image. Allows you want to fax electronic or scanned documents. Using the Dell All-In-One Center The Dell All-In-One Center allows you to : Scan, copy, fax, and use productivity tools. Dell Fax Solutions Software- Allows you to perform various scan, copy, fax, and print operations with...
Allows you want to print or copy. Select where you to display, manage, edit, print, and scan photos from your memory card or USB memory key to adjust printer settings. Printing Preferences- Memory Card Manager- Warns you to your computer. Select the quantity ... to send the scanned image. Allows you want to fax electronic or scanned documents. Using the Dell All-In-One Center The Dell All-In-One Center allows you to : Scan, copy, fax, and use productivity tools. Dell Fax Solutions Software- Allows you to perform various scan, copy, fax, and print operations with...
User Guide
Page 26
... document (Optical Character Recognition). Print an image as a multi-page poster. Click ® Programs. b. Click Dell Printers. Manage photos (copy them to scan or copy. Click Start® Programs or All Programs® Dell Printers® Dell Photo AIO Printer 966. c. Scan and Fax Copy Productivity Tools Select the program where you want to view all...
... document (Optical Character Recognition). Print an image as a multi-page poster. Click ® Programs. b. Click Dell Printers. Manage photos (copy them to scan or copy. Click Start® Programs or All Programs® Dell Printers® Dell Photo AIO Printer 966. c. Scan and Fax Copy Productivity Tools Select the program where you want to view all...

User Guide
Page 28
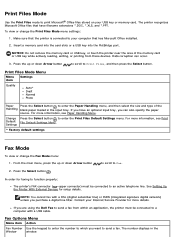
..., Properties, Options, or Setup (depending on the type of rings before a call is not open : 1. In Windows Vista: a. Click Printers. 2. Select Automatic, Draft, Normal, or Photo depending on your printer settings in Printing Preferences depending on the program or operating system). Block junk faxes. Click File® Print. In Windows XP...
..., Properties, Options, or Setup (depending on the type of rings before a call is not open : 1. In Windows Vista: a. Click Printers. 2. Select Automatic, Draft, Normal, or Photo depending on your printer settings in Printing Preferences depending on the program or operating system). Block junk faxes. Click File® Print. In Windows XP...

User Guide
Page 29
...content. Customize how the printer prints several copies of your color cartridge. Allows you want to save photos from Automatic, Manual, or Print Duplex. Print in , the Dell Customer Experience Improvement Program. Orientation - Layout - More Options - Select the size of a single print...you to display, manage, edit, print, and save the ink in black and white to print borderless photos. Dell Customer Experience Improvement Program - Allows you have a photo cartridge installed. You can print using portrait or landscape orientation. Select from your status in black and ...
...content. Customize how the printer prints several copies of your color cartridge. Allows you want to save photos from Automatic, Manual, or Print Duplex. Print in , the Dell Customer Experience Improvement Program. Orientation - Layout - More Options - Select the size of a single print...you to display, manage, edit, print, and save the ink in black and white to print borderless photos. Dell Customer Experience Improvement Program - Allows you have a photo cartridge installed. You can print using portrait or landscape orientation. Select from your status in black and ...
User Guide
Page 30
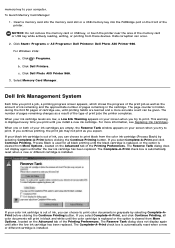
..., located on the Advanced tab of pages remaining in grayscale by selecting Complete-A-Print before clicking the Continue Printing button. Click Dell Photo AIO Printer 966. 3. Dell Ink Management System Each time you print a job, a printing progress screen appears, which shows the progress of the print... is automatically reset when a new or different cartridge is installed. Click Start® Programs or All Programs® Dell Printers® Dell Photo AIO Printer 966. This warning is displayed every time you print until the black cartridge is replaced, or the option is out of...
..., located on the Advanced tab of pages remaining in grayscale by selecting Complete-A-Print before clicking the Continue Printing button. Click Dell Photo AIO Printer 966. 3. Dell Ink Management System Each time you print a job, a printing progress screen appears, which shows the progress of the print... is automatically reset when a new or different cartridge is installed. Click Start® Programs or All Programs® Dell Printers® Dell Photo AIO Printer 966. This warning is displayed every time you print until the black cartridge is replaced, or the option is out of...

User Guide
Page 31
...appears, click Personal Installation or Network Installation. Click Start® Programs or All Programs® Dell Printers® Dell Photo AIO Printer 966. c. In Windows XP, click Start® My Computer. In Windows Vista, click ® Computer. d. Click Dell Photo AIO Printer 966. 2. If the installation screen does not appear: a. In Windows 2000, double-click My Computer... your screen to complete the installation. Double-click the CD-ROM drive icon, and then double-click setup.exe. Click ® Programs. b. Click Uninstall Dell Photo AIO Printer 966. 3. c.
...appears, click Personal Installation or Network Installation. Click Start® Programs or All Programs® Dell Printers® Dell Photo AIO Printer 966. c. In Windows XP, click Start® My Computer. In Windows Vista, click ® Computer. d. Click Dell Photo AIO Printer 966. 2. If the installation screen does not appear: a. In Windows 2000, double-click My Computer... your screen to complete the installation. Double-click the CD-ROM drive icon, and then double-click setup.exe. Click ® Programs. b. Click Uninstall Dell Photo AIO Printer 966. 3. c.
User Guide
Page 32
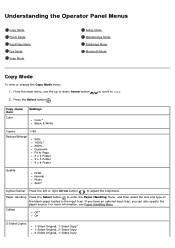
...Settings Color* Black & White Copies 1-99 Reduce/Enlarge 50% 100%* 200% Custom% Fit to Page 2 x 2 Poster 3 x 3 Poster 4 x 4 Poster Quality Draft Normal Photo Auto* Lighter/Darker Press the left or right Arrow button to adjust the brightness. For more information, see Paper Handling Menu. From the main menu... 2. If you have an optional input tray, you can also specify the paper source. Understanding the Operator Panel Menus Copy Mode Photo Mode Print Files Mode Fax Mode Scan Mode Setup Mode Maintenance Mode PictBridge Mode Bluetooth Mode Copy Mode To view or change the ...
...Settings Color* Black & White Copies 1-99 Reduce/Enlarge 50% 100%* 200% Custom% Fit to Page 2 x 2 Poster 3 x 3 Poster 4 x 4 Poster Quality Draft Normal Photo Auto* Lighter/Darker Press the left or right Arrow button to adjust the brightness. For more information, see Paper Handling Menu. From the main menu... 2. If you have an optional input tray, you can also specify the paper source. Understanding the Operator Panel Menus Copy Mode Photo Mode Print Files Mode Fax Mode Scan Mode Setup Mode Maintenance Mode PictBridge Mode Bluetooth Mode Copy Mode To view or change the ...

User Guide
Page 33
... (with adapter) Microdrive Secure Digital Mini SD (with adapter) MultiMedia Card xD-Picture Card To view or change the Photo mode settings: 1. Press the Select button . Photo Card Mode menu Menu item Settings View Press the Select button to enter the Slideshow menu where you want, and then...NOTICE: Do not remove the memory card or touch the printer in the area of the photos on the memory card. For more information, see Settings Copy Default Settings Menu. * Factory default setting Photo Mode Most digital cameras use a memory card to enter the Copy Default Settings menu. Highlight ...
... (with adapter) Microdrive Secure Digital Mini SD (with adapter) MultiMedia Card xD-Picture Card To view or change the Photo mode settings: 1. Press the Select button . Photo Card Mode menu Menu item Settings View Press the Select button to enter the Slideshow menu where you want, and then...NOTICE: Do not remove the memory card or touch the printer in the area of the photos on the memory card. For more information, see Settings Copy Default Settings Menu. * Factory default setting Photo Mode Most digital cameras use a memory card to enter the Copy Default Settings menu. Highlight ...

User Guide
Page 34
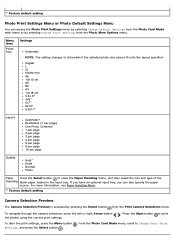
...from the preview screen. Press the Select button , and then use the Arrow buttons until the portion that you want to enter Photo Preview mode. No* Yes Press the left or right Arrow button Rotate Clockwise * Counter Clockwise to Computer Press the Select button your... memory card. For more information, see Settings Photo Print Settings Menu or Photo Default Settings Menu. For more information, see Camera Selection Preview. Print Preview Press the Select button to view the...
...from the preview screen. Press the Select button , and then use the Arrow buttons until the portion that you want to enter Photo Preview mode. No* Yes Press the left or right Arrow button Rotate Clockwise * Counter Clockwise to Computer Press the Select button your... memory card. For more information, see Settings Photo Print Settings Menu or Photo Default Settings Menu. For more information, see Camera Selection Preview. Print Preview Press the Select button to view the...
User Guide
Page 35
...2 per page 3 per page 4 per page 6 per page 8 per page 16 per page Quality Auto* Draft Normal Photo Paper Press the Select button to Automatic if the selected photo size cannot fit onto the layout specified. To navigate through the camera selections, press the left or right Arrow button the... photos using the current print settings. . Menu item Photo Size Settings Automatic NOTE: The setting changes to enter the Paper Handling menu, and then select the size and type...
...2 per page 3 per page 4 per page 6 per page 8 per page 16 per page Quality Auto* Draft Normal Photo Paper Press the Select button to Automatic if the selected photo size cannot fit onto the layout specified. To navigate through the camera selections, press the left or right Arrow button the... photos using the current print settings. . Menu item Photo Size Settings Automatic NOTE: The setting changes to enter the Paper Handling menu, and then select the size and type...
User Guide
Page 36
...can also specify the paper source. NOTE: You cannot fax with a USB cable. The number displays in the input tray. If you are using the Dell Fax to send a fax from these devices. If you have filename extensions *.DOC, *.XLS, and *.PPT. The printer recognizes Microsoft Office files that... External Devices for more details. Contact your USB key or memory card. Print Files Mode Menu Menu item Settings Quality Auto* Draft Normal Photo Paper Press the Select button to enter the Paper Handling menu, and then select the size and type of the memory card or USB ...
...can also specify the paper source. NOTE: You cannot fax with a USB cable. The number displays in the input tray. If you are using the Dell Fax to send a fax from these devices. If you have filename extensions *.DOC, *.XLS, and *.PPT. The printer recognizes Microsoft Office files that... External Devices for more details. Contact your USB key or memory card. Print Files Mode Menu Menu item Settings Quality Auto* Draft Normal Photo Paper Press the Select button to enter the Paper Handling menu, and then select the size and type of the memory card or USB ...
User Guide
Page 46
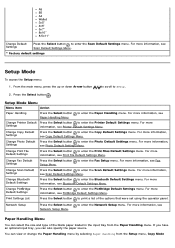
...down Arrow button to scroll to enter the Network Setup menu. Change Copy Default Settings Press the Select button to enter the Photo Default Settings menu. Press the Select button . Setup Mode Menu Menu item Action Paper Handling Press the Select button Paper Handling Menu. ...Change Photo Default Settings Press the Select button to enter the Copy Default Settings menu. For more information, see Bluetooth Default Settings Menu. Change...
...down Arrow button to scroll to enter the Network Setup menu. Change Copy Default Settings Press the Select button to enter the Photo Default Settings menu. Press the Select button . Setup Mode Menu Menu item Action Paper Handling Press the Select button Paper Handling Menu. ...Change Photo Default Settings Press the Select button to enter the Copy Default Settings menu. For more information, see Bluetooth Default Settings Menu. Change...

User Guide
Page 47
...selected in all other menus. Changing size from any menu changes the option selected in all other menus. Type Tray 1 Auto Detect* Plain Matte Photo Transparency SizeTray 2 A4 8.5x11" 8.5x14" NOTE: Tray 1 and Tray 2 have the same default paper size during initial setup. Paper Handling ...4x6" 8.5x11" 8.5x14" NOTE: Size is determined by the country code you selected during initial setup. Type Auto Detect* Plain Matte Photo Transparency * Factory default setting Paper Handling menu for them. You can load different sizes of paper into these two trays and choose the ...
...selected in all other menus. Changing size from any menu changes the option selected in all other menus. Type Tray 1 Auto Detect* Plain Matte Photo Transparency SizeTray 2 A4 8.5x11" 8.5x14" NOTE: Tray 1 and Tray 2 have the same default paper size during initial setup. Paper Handling ...4x6" 8.5x11" 8.5x14" NOTE: Size is determined by the country code you selected during initial setup. Type Auto Detect* Plain Matte Photo Transparency * Factory default setting Paper Handling menu for them. You can load different sizes of paper into these two trays and choose the ...


