
User Guide
Page 21
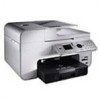
... Feeder (ADF) 2 Printer unit 3 Operator panel 4 Paper tray 5 Optional paper tray 6 Paper exit tray Description: Part that you lift to gain access to the ink cartridges. About Your Printer Understanding the Printer Parts Understanding the Operator Panel You can use the Save Photos to Computer function or the Print Files mode.
... Feeder (ADF) 2 Printer unit 3 Operator panel 4 Paper tray 5 Optional paper tray 6 Paper exit tray Description: Part that you lift to gain access to the ink cartridges. About Your Printer Understanding the Printer Parts Understanding the Operator Panel You can use the Save Photos to Computer function or the Print Files mode.

User Guide
Page 22
...call when contacting technical support. NOTE: The Express Service Code is serial in all countries. 12 Supplies Reorder Label To order ink cartridges or paper, visit www.dell.com/supplies. 13 FAX connector ( - upper connector) 14 PHONE jack connector ( - NOTE: If the phone communication is not ...not connect additional devices to the printer without using a digital line filter. Slot on your document or photo flat while you use support.dell.com or contact technical support. For more information, see Using Memory Card Manager. 9 Top cover with Top of printer that holds original...
...call when contacting technical support. NOTE: The Express Service Code is serial in all countries. 12 Supplies Reorder Label To order ink cartridges or paper, visit www.dell.com/supplies. 13 FAX connector ( - upper connector) 14 PHONE jack connector ( - NOTE: If the phone communication is not ...not connect additional devices to the printer without using a digital line filter. Slot on your document or photo flat while you use support.dell.com or contact technical support. For more information, see Using Memory Card Manager. 9 Top cover with Top of printer that holds original...

User Guide
Page 24
Cancel a copy job (using only the printer), and eject the page. Enter numerical data or text. 7 Cancel button 8 Back button 9 Keypad printer needs power to put your printer on a 1 Watt-Off State. NOTE: To conserve power, press and hold the Power button to perform regular maintenance on a sub-menu temporarily. Your printer consumes minimal power at this state. Return to the default settings. Save the changes made on cartridges. Exit a menu, and return to the previous menu or screen. Cancel a scan, print, or copy job in progress.
Cancel a copy job (using only the printer), and eject the page. Enter numerical data or text. 7 Cancel button 8 Back button 9 Keypad printer needs power to put your printer on a 1 Watt-Off State. NOTE: To conserve power, press and hold the Power button to perform regular maintenance on a sub-menu temporarily. Your printer consumes minimal power at this state. Return to the default settings. Save the changes made on cartridges. Exit a menu, and return to the previous menu or screen. Cancel a scan, print, or copy job in progress.

User Guide
Page 29
... cannot select this to display, manage, edit, print, and save the ink in black and white - Automatic Image Sharpening - Dell Customer Experience Improvement Program - Print your status in black and white to print borderless photos. Orientation - Select how the document is...the printer prints several copies of a single print job: Collated, Normal, or Print Last Page First. Maintenance Install Ink Cartridges Clean Ink Cartridges Align Ink Cartridges Print a Test Page Network Support Using Memory Card Manager Memory Card Manager allows you have the printer detect the paper type...
... cannot select this to display, manage, edit, print, and save the ink in black and white - Automatic Image Sharpening - Dell Customer Experience Improvement Program - Print your status in black and white to print borderless photos. Orientation - Select how the document is...the printer prints several copies of a single print job: Collated, Normal, or Print Last Page First. Maintenance Install Ink Cartridges Clean Ink Cartridges Align Ink Cartridges Print a Test Page Network Support Using Memory Card Manager Memory Card Manager allows you have the printer detect the paper type...
User Guide
Page 30
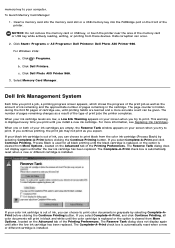
Click Start® Programs or All Programs® Dell Printers® Dell Photo AIO Printer 966. Click Dell Photo AIO Printer 966. 3. When one or both of your ink cartridges are empty, the Reserve Tank window appears on the front of the printer. The Reserve Tank dialog does not display...or touch the printer near the area of ink, you install a new ink cartridge. Dell Ink Management System Each time you expect. If your ink cartridge levels are learned and a more information, see Replacing Ink Cartridges. memory key to print color documents in black and white until you can ...
Click Start® Programs or All Programs® Dell Printers® Dell Photo AIO Printer 966. Click Dell Photo AIO Printer 966. 3. When one or both of your ink cartridges are empty, the Reserve Tank window appears on the front of the printer. The Reserve Tank dialog does not display...or touch the printer near the area of ink, you install a new ink cartridge. Dell Ink Management System Each time you expect. If your ink cartridge levels are learned and a more information, see Replacing Ink Cartridges. memory key to print color documents in black and white until you can ...

User Guide
Page 53
... IP Netmask menu. From the main menu, press the up or down Arrow button to scroll to display the current ink level for each cartridge on Print T30 Signals Report Both Audio and Report Maintenance Mode Menu Menu item Action View Ink Levels Press the Select button to Maintenance. 2.... Gateway menu, use the keypad to print a test page. Press the Back button to align the ink cartridges. NOTE: The IP address cannot be changed if DHCP is enabled. Align Cartridges Press the Select button to save the settings. Set IP Address Press the Select button to enter an IP...
... IP Netmask menu. From the main menu, press the up or down Arrow button to scroll to display the current ink level for each cartridge on Print T30 Signals Report Both Audio and Report Maintenance Mode Menu Menu item Action View Ink Levels Press the Select button to Maintenance. 2.... Gateway menu, use the keypad to print a test page. Press the Back button to align the ink cartridges. NOTE: The IP address cannot be changed if DHCP is enabled. Align Cartridges Press the Select button to save the settings. Set IP Address Press the Select button to enter an IP...

User Guide
Page 60
... settings. The ink cartridges are correct, and then click Next to enter a different network name, and then click Next. NOTE: Clicking Next prompts the setup utility to 120 seconds. 3. For more information, see Verifying Network Communication. Entering a Different Wireless Network Configuration 1. If the Network Name (SSID) you selected Dell Wireless Adapter 3300...
... settings. The ink cartridges are correct, and then click Next to enter a different network name, and then click Next. NOTE: Clicking Next prompts the setup utility to 120 seconds. 3. For more information, see Verifying Network Communication. Entering a Different Wireless Network Configuration 1. If the Network Name (SSID) you selected Dell Wireless Adapter 3300...
User Guide
Page 65
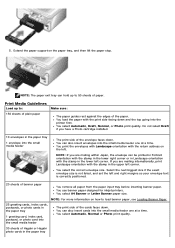
... to load banner paper, see Loading Banner Paper. 25 greeting cards, index cards, postcards, or photo cards in the lower left . If you have a Photo cartridge installed. 10 envelopes in the paper tray Extend the paper support on the left corner. You select Automatic, Normal or Photo print quality. 30 sheets...
... to load banner paper, see Loading Banner Paper. 25 greeting cards, index cards, postcards, or photo cards in the lower left . If you have a Photo cartridge installed. 10 envelopes in the paper tray Extend the paper support on the left corner. You select Automatic, Normal or Photo print quality. 30 sheets...
User Guide
Page 69
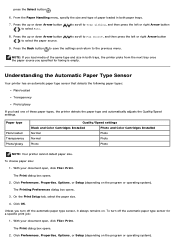
... scroll to select Auto. The Printing Preferences dialog box opens. 3. Paper type Plain/coated Transparency Photo/glossy Quality/Speed settings Black and Color Cartridges Installed Photo and Color Cartridges Installed Normal Photo Normal Photo Photo Photo NOTE: Your printer cannot detect paper size. With your document open , click File® Print. Click...
... scroll to select Auto. The Printing Preferences dialog box opens. 3. Paper type Plain/coated Transparency Photo/glossy Quality/Speed settings Black and Color Cartridges Installed Photo and Color Cartridges Installed Normal Photo Normal Photo Photo Photo NOTE: Your printer cannot detect paper size. With your document open , click File® Print. Click...
User Guide
Page 73
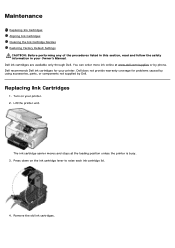
... components not supplied by phone. Replacing Ink Cartridges 1. Press down on your printer. 2. The ink cartridge carrier moves and stops at www.dell.com/supplies or by Dell. Turn on the ink cartridge lever to raise each ink cartridge lid. 4. Maintenance Replacing Ink Cartridges Aligning Ink Cartridges Cleaning the Ink Cartridge Nozzles Restoring Factory Default Settings CAUTION: Before performing...
... components not supplied by phone. Replacing Ink Cartridges 1. Press down on your printer. 2. The ink cartridge carrier moves and stops at www.dell.com/supplies or by Dell. Turn on the ink cartridge lever to raise each ink cartridge lid. 4. Maintenance Replacing Ink Cartridges Aligning Ink Cartridges Cleaning the Ink Cartridge Nozzles Restoring Factory Default Settings CAUTION: Before performing...

User Guide
Page 74
Insert the new ink cartridges. Snap each ink cartridge. NOTE: The following illustration shows a black cartridge and a color cartridge (used for normal printing). If you received with your photo cartridge, or dispose of each lid closed. Store the cartridges in the right ink cartridge carrier. 8. For photo printing, use a photo cartridge and a color cartridge. 7. 5. Make sure the black or photo...
Insert the new ink cartridges. Snap each ink cartridge. NOTE: The following illustration shows a black cartridge and a color cartridge (used for normal printing). If you received with your photo cartridge, or dispose of each lid closed. Store the cartridges in the right ink cartridge carrier. 8. For photo printing, use a photo cartridge and a color cartridge. 7. 5. Make sure the black or photo...

User Guide
Page 75
...you to Maintenance. 3. For more information, see Loading Paper. 2. 9. Lower the printer unit until it is completely closed. To align the ink cartridges from the operator panel: 1. In Windows 2000, click Start® Settings® Printers. Press the up or down Arrow button to scroll to ...align the ink cartridges when they are not aligned at the left margin, or when vertical or straight lines appear wavy. In Windows XP, click Start® ...
...you to Maintenance. 3. For more information, see Loading Paper. 2. 9. Lower the printer unit until it is completely closed. To align the ink cartridges from the operator panel: 1. In Windows 2000, click Start® Settings® Printers. Press the up or down Arrow button to scroll to ...align the ink cartridges when they are not aligned at the left margin, or when vertical or straight lines appear wavy. In Windows XP, click Start® ...

User Guide
Page 76
... Preferences. The Printing Preferences dialog box opens. Click Print. Press the up or down Arrow button to scroll to Clean Cartridges. 5. To clean the nozzles from the operator panel: 1. Right-click the printer icon. 4. Click Printing Preferences. Click Align Ink... Cartridges. 7. Cleaning the Ink Cartridge Nozzles You may need to Maintenance. 3. Press the Select button . 4. The cleaning page begins printing. In Windows 2000, click Start®...
... Preferences. The Printing Preferences dialog box opens. Click Print. Press the up or down Arrow button to scroll to Clean Cartridges. 5. To clean the nozzles from the operator panel: 1. Right-click the printer icon. 4. Click Printing Preferences. Click Align Ink... Cartridges. 7. Cleaning the Ink Cartridge Nozzles You may need to Maintenance. 3. Press the Select button . 4. The cleaning page begins printing. In Windows 2000, click Start®...

User Guide
Page 77
.... 2. Press the up or down Arrow button to scroll to Reset Defaults, and then press the Select button . 4. Click the Maintenance tab. 6. Click Clean Ink Cartridges. You can restore the original printer settings, often referred to verify the improved print quality. Press the up or down Arrow button to scroll to...
.... 2. Press the up or down Arrow button to scroll to Reset Defaults, and then press the Select button . 4. Click the Maintenance tab. 6. Click Clean Ink Cartridges. You can restore the original printer settings, often referred to verify the improved print quality. Press the up or down Arrow button to scroll to...

User Guide
Page 78
...click OK. The Print dialog box opens. 4. On the Print Setup and Advanced tabs, make sure they are using Dell Photo Suite™, select Printer Settings to view Printing Preferences. The Printing Preferences dialog box opens. NOTE: If you ...Multi-page Poster Printing a Banner Printing Documents 1. The Printing Preferences dialog box closes. 7. Printing Photos NOTE: Dell recommends you use a color cartridge and a photo cartridge for printing photos. 3. Printing Printing Documents Printing Photos Printing Envelopes Printing From a Bluetooth-enabled Device Printing Photos ...
...click OK. The Print dialog box opens. 4. On the Print Setup and Advanced tabs, make sure they are using Dell Photo Suite™, select Printer Settings to view Printing Preferences. The Printing Preferences dialog box opens. NOTE: If you ...Multi-page Poster Printing a Banner Printing Documents 1. The Printing Preferences dialog box closes. 7. Printing Photos NOTE: Dell recommends you use a color cartridge and a photo cartridge for printing photos. 3. Printing Printing Documents Printing Photos Printing Envelopes Printing From a Bluetooth-enabled Device Printing Photos ...
User Guide
Page 88
...individual sheets from each sheet as it exits, and allow it to a PictBridge-enabled camera. Click Printers. 2. For more information, see : Dell Ink Management System. In Windows XP, click Start® Control Panel® Printers and Other Hardware® Printers and Faxes. Click ®... b. Check for blinking lights on the printer. General Problems Printing Problems Check the ink levels, and install new print cartridges if necessary. Replacing Ink Cartridges. Ensure you loaded the paper correctly. Make sure Pause Printing is not selected. Ensure the printer is not connected to...
...individual sheets from each sheet as it exits, and allow it to a PictBridge-enabled camera. Click Printers. 2. For more information, see : Dell Ink Management System. In Windows XP, click Start® Control Panel® Printers and Other Hardware® Printers and Faxes. Click ®... b. Check for blinking lights on the printer. General Problems Printing Problems Check the ink levels, and install new print cartridges if necessary. Replacing Ink Cartridges. Ensure you loaded the paper correctly. Make sure Pause Printing is not selected. Ensure the printer is not connected to...

User Guide
Page 97
...the memory card, and reinsert it is not damaged and is the Mass Storage Device. No valid photo image files detected. from cartridges, run a few cleaning cycles or check troubleshooting. Attach a PictBridge-enabled camera or a USB key into the PictBridge port. Choose ... files. Failed to print. 3. For more information, see Replacing Ink Cartridges. The computer fails to find an MS Office application to retrieve the File from the ink cartridges before the cartridges were installed. Insert Attach a USB Bluetooth adapter into the correct slot....
...the memory card, and reinsert it is not damaged and is the Mass Storage Device. No valid photo image files detected. from cartridges, run a few cleaning cycles or check troubleshooting. Attach a PictBridge-enabled camera or a USB key into the PictBridge port. Choose ... files. Failed to print. 3. For more information, see Replacing Ink Cartridges. The computer fails to find an MS Office application to retrieve the File from the ink cartridges before the cartridges were installed. Insert Attach a USB Bluetooth adapter into the correct slot....

User Guide
Page 98
... a four-digit number, an advanced error has occurred. Clear the paper jam in the input tray, and then press the Select button . Replace the ink cartridge. Replace There is running low on . 1. Paper Out If you have enough memory to Fax, and then press the Select button . 2. Press the Select button... You have enabled Tray Linking and set the paper type to On. 5. Unable to print the remaining pages. Load Paper, then select size to support.dell.com. Press the up or down Arrow button to scroll to print the pages that were not scanned, and make copies of the fax you...
... a four-digit number, an advanced error has occurred. Clear the paper jam in the input tray, and then press the Select button . Replace the ink cartridge. Replace There is running low on . 1. Paper Out If you have enough memory to Fax, and then press the Select button . 2. Press the Select button... You have enabled Tray Linking and set the paper type to On. 5. Unable to print the remaining pages. Load Paper, then select size to support.dell.com. Press the up or down Arrow button to scroll to print the pages that were not scanned, and make copies of the fax you...
User Guide
Page 99
...use moisture-proof wrap, such as a plastic container or bag, to support.dell.com. The Print dialog box opens. 2. If the print quality does not improve, try aligning or cleaning the ink cartridges. During storage, you should be available in its packaging until you are several... Photo Paper may occur. With your document again. 5. General Guidelines for the best print quality. Use Dell Premium Photo Paper if you are printing photos with a photo ink cartridge. On the Print Setup tab, select a higher quality setting. 4. Print your document open, click File® Print....
...use moisture-proof wrap, such as a plastic container or bag, to support.dell.com. The Print dialog box opens. 2. If the print quality does not improve, try aligning or cleaning the ink cartridges. During storage, you should be available in its packaging until you are several... Photo Paper may occur. With your document again. 5. General Guidelines for the best print quality. Use Dell Premium Photo Paper if you are printing photos with a photo ink cartridge. On the Print Setup tab, select a higher quality setting. 4. Print your document open, click File® Print....


