User Guide
Page 5
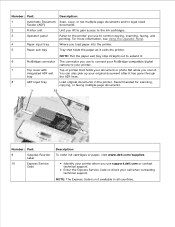
... tray stop straight out to extend it. 6 PictBridge connector The connector you use support.dell.com or contact technical support. Number: Part: Description: 1 Automatic Document Scan, copy, or fax multiple page documents and/or legal sized Feeder (ADF) documents. 2 Printer unit Unit you lift to gain access to the ink cartridges. 3 Operator panel...
... tray stop straight out to extend it. 6 PictBridge connector The connector you use support.dell.com or contact technical support. Number: Part: Description: 1 Automatic Document Scan, copy, or fax multiple page documents and/or legal sized Feeder (ADF) documents. 2 Printer unit Unit you lift to gain access to the ink cartridges. 3 Operator panel...
User Guide
Page 7
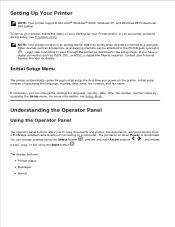
...wall jack. If necessary, you encounter problems during setup, see Setup Mode. and initiate a scan, copy, or fax using the Select button , and left and right Arrow buttons ; NOTE: Your printer modem is required. Other devices such as described in the setup steps. The... and print photos from a PictBridge-enabled camera without connecting to the PHONE jack connector ( - Initial Setup Menu The printer automatically cycles through the printer as a telephone or answering machine can change settings using the Start button . Understanding the Operator Panel Using the Operator ...
...wall jack. If necessary, you encounter problems during setup, see Setup Mode. and initiate a scan, copy, or fax using the Select button , and left and right Arrow buttons ; NOTE: Your printer modem is required. Other devices such as described in the setup steps. The... and print photos from a PictBridge-enabled camera without connecting to the PHONE jack connector ( - Initial Setup Menu The printer automatically cycles through the printer as a telephone or answering machine can change settings using the Start button . Understanding the Operator Panel Using the Operator ...

User Guide
Page 8
...: 1 Power 2 Error message light 3 Back 4 Left arrow 5 Cancel 6 Select 7 Right arrow 8 Pause 9 A keypad number or symbol Purpose: To turn your printer on the display. Insert a three-second pause in progress. NOTE: Enter a pause only when you want to make. Increase a number on the... printer display. Type numbers to wait for an outside line or get through a list on the display. Clear current settings and return to the fax default. Cancel a scan, print, or copy job in the number to be dialed...
...: 1 Power 2 Error message light 3 Back 4 Left arrow 5 Cancel 6 Select 7 Right arrow 8 Pause 9 A keypad number or symbol Purpose: To turn your printer on the display. Insert a three-second pause in progress. NOTE: Enter a pause only when you want to make. Increase a number on the... printer display. Type numbers to wait for an outside line or get through a list on the display. Clear current settings and return to the fax default. Cancel a scan, print, or copy job in the number to be dialed...

User Guide
Page 9
10 Start 11 LCD (Liquid Crystal Display) Start a scan, copy, or fax job. To show options available to you initiate a copy without specifying color or black and white, color is used by default. NOTE: If you .
10 Start 11 LCD (Liquid Crystal Display) Start a scan, copy, or fax job. To show options available to you initiate a copy without specifying color or black and white, color is used by default. NOTE: If you .
User Guide
Page 10
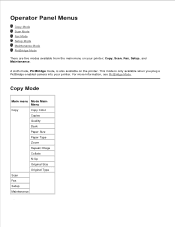
... Type Zoom Repeat Image Collate N-Up Original Size Original Type Scan Fax Setup Maintenance 1. 2. A sixth mode, PictBridge mode, is only available when you plug a PictBridge-enabled camera into your printer: Copy, Scan, Fax, Setup, and Maintenance. For more information, see PictBridge... Mode. Operator Panel Menus Copy Mode Scan Mode Fax Mode Setup Mode Maintenance Mode PictBridge Mode There are five modes ...
... Type Zoom Repeat Image Collate N-Up Original Size Original Type Scan Fax Setup Maintenance 1. 2. A sixth mode, PictBridge mode, is only available when you plug a PictBridge-enabled camera into your printer: Copy, Scan, Fax, Setup, and Maintenance. For more information, see PictBridge... Mode. Operator Panel Menus Copy Mode Scan Mode Fax Mode Setup Mode Maintenance Mode PictBridge Mode There are five modes ...
User Guide
Page 13
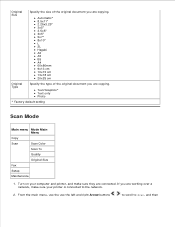
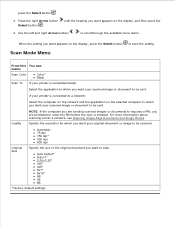
Text/Graphics* Text only Photo * Factory default setting Scan Mode Main menu Mode Main Menu Copy Scan Scan Color Scan To Quality Original Size Fax Setup Maintenance 1. If you are working over a network, make sure your computer and printer, and make sure they are connected. Automatic* 8.5x11" 2.25x3.25" 3x5" 3.5x5" 4x6" 5x7" 8x10" ...are copying. From the main menu, use the use the left and right Arrow buttons to scroll to the network. 2. Turn on your printer is connected to Scan, and then 3. Original Size Specify the size of the original document you are copying.
Text/Graphics* Text only Photo * Factory default setting Scan Mode Main menu Mode Main Menu Copy Scan Scan Color Scan To Quality Original Size Fax Setup Maintenance 1. If you are working over a network, make sure your computer and printer, and make sure they are connected. Automatic* 8.5x11" 2.25x3.25" 3x5" 3.5x5" 4x6" 5x7" 8x10" ...are copying. From the main menu, use the use the left and right Arrow buttons to scroll to the network. 2. Turn on your printer is connected to Scan, and then 3. Original Size Specify the size of the original document you are copying.
User Guide
Page 14
... on the selected computer to which you want your original document or image to save the setting. Scan Mode Menu From this You can: menu: Scan Color Color* Black Scan To If your printer is connected to a network: Select the computer on the network and the application on the display,... press the Select button to be sent. Specify the resolution for which you want to be scanned. 2. Press the right Arrow...
... on the selected computer to which you want your original document or image to save the setting. Scan Mode Menu From this You can: menu: Scan Color Color* Black Scan To If your printer is connected to a network: Select the computer on the network and the application on the display,... press the Select button to be sent. Specify the resolution for which you want to be scanned. 2. Press the right Arrow...
User Guide
Page 15
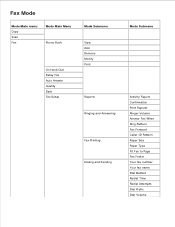
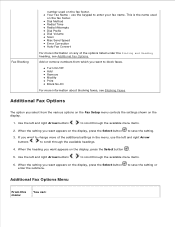
Fax Mode Mode Main menu Copy Scan Fax Mode Main Menu Phone Book On Hook Dial Delay Fax Auto Answer Quality Dark Fax Setup Mode Submenu View Add Remove Modify Print Reports Ringing and Answering Fax Printing Dialing and Sending Mode Submenu Activity Report Confirmation Print Reports Ringer Volume Answer Fax When Ring Pattern Fax Forward Caller ID Pattern Paper Size Paper Type Fit Fax to Page Fax Footer Your fax number Your fax name Dial Method Redial Time Redial Attempts Dial Prefix Dial Volume
Fax Mode Mode Main menu Copy Scan Fax Mode Main Menu Phone Book On Hook Dial Delay Fax Auto Answer Quality Dark Fax Setup Mode Submenu View Add Remove Modify Print Reports Ringing and Answering Fax Printing Dialing and Sending Mode Submenu Activity Report Confirmation Print Reports Ringer Volume Answer Fax When Ring Pattern Fax Forward Caller ID Pattern Paper Size Paper Type Fit Fax to Page Fax Footer Your fax number Your fax name Dial Method Redial Time Redial Attempts Dial Prefix Dial Volume
User Guide
Page 16
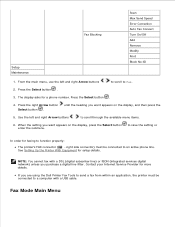
... line) or ISDN (integrated services digital network) unless you are using the Dell Printer Fax Tools to send a fax from within an application, the printer must be connected to save the setting or enter the submenu. Setup Maintenance Fax Blocking Scan Max Send Speed Error Correction Auto Fax Convert Turn On/Off Add Remove...
... line) or ISDN (integrated services digital network) unless you are using the Dell Printer Fax Tools to send a fax from within an application, the printer must be connected to save the setting or enter the submenu. Setup Maintenance Fax Blocking Scan Max Send Speed Error Correction Auto Fax Convert Turn On/Off Add Remove...
User Guide
Page 19
Dial Method Redial Time Redial Attempts Dial Prefix Dial Volume Scan Max Send Speed Error Correction Auto Fax Convert For more of the options listed under the Dialing and Sending heading, see Blocking Faxes. Use the ...
Dial Method Redial Time Redial Attempts Dial Prefix Dial Volume Scan Max Send Speed Error Correction Auto Fax Convert For more of the options listed under the Dialing and Sending heading, see Blocking Faxes. Use the ...
User Guide
Page 22
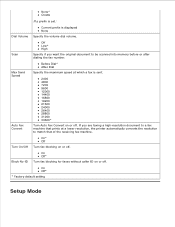
... that of the receiving fax machine. Max Send Speed Auto Fax Convert Before Dial* After Dial Specify the maximum speed at a lower resolution, the printer automatically converts the resolution to be scanned into memory before or after dialing the fax number. Turn On/Off On* Off Turn fax blocking on or off... . Scan Off Low* High Specify if you are faxing a high-resolution document to a fax machine that prints at which a fax is displayed None Specify the volume ...
... that of the receiving fax machine. Max Send Speed Auto Fax Convert Before Dial* After Dial Specify the maximum speed at a lower resolution, the printer automatically converts the resolution to be scanned into memory before or after dialing the fax number. Turn On/Off On* Off Turn fax blocking on or off... . Scan Off Low* High Specify if you are faxing a high-resolution document to a fax machine that prints at which a fax is displayed None Specify the volume ...
User Guide
Page 23
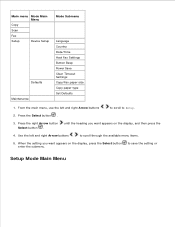
Main menu Mode Main Menu Copy Scan Fax Setup Device Setup Defaults Maintenance Mode Submenu Language Country Date/Time Host Fax Settings Button Beep Power Save Clear Timeout Settings Copy/Fax paper ...
Main menu Mode Main Menu Copy Scan Fax Setup Device Setup Defaults Maintenance Mode Submenu Language Country Date/Time Host Fax Settings Button Beep Power Save Clear Timeout Settings Copy/Fax paper ...

User Guide
Page 26
... task. You may discard the page when printing You may discard the page when printing is complete. Maintenance Mode Main menu Mode Main Menu Copy Scan Fax Setup Maintenance Ink Levels Clean Cartridges Align Cartridges Print Test Page 1. to clean the ink cartridges. Clean Cartridges Press the Select button to print...
... task. You may discard the page when printing You may discard the page when printing is complete. Maintenance Mode Main menu Mode Main Menu Copy Scan Fax Setup Maintenance Ink Levels Clean Cartridges Align Cartridges Print Test Page 1. to clean the ink cartridges. Clean Cartridges Press the Select button to print...

User Guide
Page 34
Right-click the Dell AIO Printer 946 icon. 3. On the Print Setup tab, select the paper type. 5. Click OK. Place these items on the scanner glass. Loading Original Documents Into the ADF ... load postcards, photo cards, photo paper, or small images in the ADF. Click Printing Preferences. Paper Guidelines for scanning, copying, and faxing. 4. In Windows XP, click Start Control Panel Printers and Other Hardware Printers and Faxes. To turn off the automatic paper type sensor for loading multiple-page documents. In Windows 2000, click...
Right-click the Dell AIO Printer 946 icon. 3. On the Print Setup tab, select the paper type. 5. Click OK. Place these items on the scanner glass. Loading Original Documents Into the ADF ... load postcards, photo cards, photo paper, or small images in the ADF. Click Printing Preferences. Paper Guidelines for scanning, copying, and faxing. 4. In Windows XP, click Start Control Panel Printers and Other Hardware Printers and Faxes. To turn off the automatic paper type sensor for loading multiple-page documents. In Windows 2000, click...
User Guide
Page 43
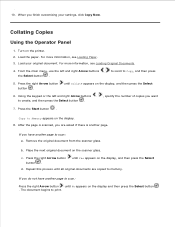
...and right Arrow buttons the Select button . c. Repeat this process until No appears on the printer. 2. Collating Copies Using the Operator Panel 1. Load your settings, click Copy Now. After the page is scanned, you are copied to create, and then press the Select button . , specify the ...number of copies you do not have another page. Press the right Arrow button button . to scroll to print. 1. Copy to scan: a. If you want 7. Place the next original document on the display. 8. 9. 10. The document begins to Copy, and then press 5. Turn...
...and right Arrow buttons the Select button . c. Repeat this process until No appears on the printer. 2. Collating Copies Using the Operator Panel 1. Load your settings, click Copy Now. After the page is scanned, you are copied to create, and then press the Select button . , specify the ...number of copies you do not have another page. Press the right Arrow button button . to scroll to print. 1. Copy to scan: a. If you want 7. Place the next original document on the display. 8. 9. 10. The document begins to Copy, and then press 5. Turn...
User Guide
Page 45
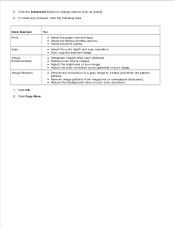
... to a black and white dot pattern (dither). Click this tab: Print Scan Image Enhancements Image Patterns To: Select the paper size and type. Sharpen your color document. 7. Auto-crop the scanned image. Reduce the background noise on your blurry images. 5. Select borderless printing... options. Select the color depth and scan resolution. Click Copy Now. Straighten images after scan (deskew). To make any changes, click the following tabs. Adjust the color correction curve (gamma) of your ...
... to a black and white dot pattern (dither). Click this tab: Print Scan Image Enhancements Image Patterns To: Select the paper size and type. Sharpen your color document. 7. Auto-crop the scanned image. Reduce the background noise on your blurry images. 5. Select borderless printing... options. Select the color depth and scan resolution. Click Copy Now. Straighten images after scan (deskew). To make any changes, click the following tabs. Adjust the color correction curve (gamma) of your ...
User Guide
Page 46
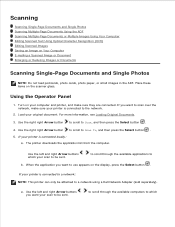
... you want your printer is connected to a network using a Dell Network Adapter (sold separately). Turn on the display, press the Select button . to scroll through the available applications to be attached to the network. 2. Use the right right Arrow button to scroll to Scan, and then press the Select button . 4. Scanning Scanning Single-Page Documents...
... you want your printer is connected to a network using a Dell Network Adapter (sold separately). Turn on the display, press the Select button . to scroll through the available applications to be attached to the network. 2. Use the right right Arrow button to scroll to Scan, and then press the Select button . 4. Scanning Scanning Single-Page Documents...

User Guide
Page 47
... document. Click Start Programs or All Programs Dell Printers Dell AIO Printer 946. 4. Scanning Multiple-Page Documents Using the ADF When your settings, click Scan Now. Press the Select button . 6. NOTE: This can also open the Dell All-In-One Center from the operator panel on your scan. 7. Load your printer. The Dell All-In-One Center opens. a. On the next screen, click...
... document. Click Start Programs or All Programs Dell Printers Dell AIO Printer 946. 4. Scanning Multiple-Page Documents Using the ADF When your settings, click Scan Now. Press the Select button . 6. NOTE: This can also open the Dell All-In-One Center from the operator panel on your scan. 7. Load your printer. The Dell All-In-One Center opens. a. On the next screen, click...
User Guide
Page 48
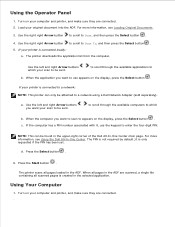
...upper-right corner of the Dell All-In-One Center main page. d. Turn on your printer is connected to a network using a Dell Network Adapter (sold separately). Use the right right Arrow button to scroll to Scan To, and then press the Select button . 5. The printer downloads the application list from... the computer. For more information, see Using the Dell All-In-One Center. Press the Start button . Use the right right Arrow button to scroll to Scan, and then press the Select button . 4. If your computer and printer, and make sure they are connected. 2. NOTE: This...
...upper-right corner of the Dell All-In-One Center main page. d. Turn on your printer is connected to a network using a Dell Network Adapter (sold separately). Use the right right Arrow button to scroll to Scan To, and then press the Select button . 5. The printer downloads the application list from... the computer. For more information, see Using the Dell All-In-One Center. Press the Start button . Use the right right Arrow button to scroll to Scan, and then press the Select button . 4. If your computer and printer, and make sure they are connected. 2. NOTE: This...

User Guide
Page 49
... opens on your 5. Click Start Programs or All Programs Dell Printers Dell AIO Printer 946. 4. Select Dell All-In-One Center. The Dell All-In-One Center opens. When your printer. NOTE: If the program you finish customizing your original document. in Scan mode, press the Start button . The printer scans all scanned pages is in Scan mode, press the Start button computer. . From the...
... opens on your 5. Click Start Programs or All Programs Dell Printers Dell AIO Printer 946. 4. Select Dell All-In-One Center. The Dell All-In-One Center opens. When your printer. NOTE: If the program you finish customizing your original document. in Scan mode, press the Start button . The printer scans all scanned pages is in Scan mode, press the Start button computer. . From the...


