
Owner's Manual
Page 2
Ordering Supplies Dell™ ink and toner cartridges are available only through Dell. US Australia Austria Belgium Canada Chile Colombia Czech Denmark Finland France Germany Ireland Italy Japan 877-INK-2-YOU 1300 303 290 08 20 - 24 05 30 35 02.713 1590 ...If your country is not listed, contact your Dell distributor to print using the following print cartridges. Supply Item Standard Capacity black ink cartridge Standard Capacity color ink cartridge High Capacity black ink cartridge High Capacity color ink cartridge Photo ink cartridge Part number J5566 J5567 M4640 M4646 J4844 Your ...
Ordering Supplies Dell™ ink and toner cartridges are available only through Dell. US Australia Austria Belgium Canada Chile Colombia Czech Denmark Finland France Germany Ireland Italy Japan 877-INK-2-YOU 1300 303 290 08 20 - 24 05 30 35 02.713 1590 ...If your country is not listed, contact your Dell distributor to print using the following print cartridges. Supply Item Standard Capacity black ink cartridge Standard Capacity color ink cartridge High Capacity black ink cartridge High Capacity color ink cartridge Photo ink cartridge Part number J5566 J5567 M4640 M4646 J4844 Your ...

Owner's Manual
Page 7
... Fax Configuration 62 6 Understanding the Software Using the Dell All-In-One Center 63 Using Printing Preferences 65 Using Dell Picture Studio 67 Using Memory Card Manager 68 Dell Ink Management System 68 Removing and Reinstalling the Software 70 7 Ink Cartridge Maintenance Replacing Ink Cartridges 71 Aligning Ink Cartridges 74 Cleaning the Ink Cartridge Nozzles 76 8 Troubleshooting Setup Problems 77 Computer Problems...
... Fax Configuration 62 6 Understanding the Software Using the Dell All-In-One Center 63 Using Printing Preferences 65 Using Dell Picture Studio 67 Using Memory Card Manager 68 Dell Ink Management System 68 Removing and Reinstalling the Software 70 7 Ink Cartridge Maintenance Replacing Ink Cartridges 71 Aligning Ink Cartridges 74 Cleaning the Ink Cartridge Nozzles 76 8 Troubleshooting Setup Problems 77 Computer Problems...

Owner's Manual
Page 13
...the printer. For more information on your document or photo face down to the ink cartridges. The other black or photo. Surface on the main body of the printer. Carrier that holds two ink cartridges, one color and the other end of the printer, and then lower the printer... the USB cable (sold separately) that connects your computer. Number 4 5 6 7 8 9 10 11 12 13 Part: Paper exit tray Printer unit Ink cartridge carrier Scanner support USB connector Power connector Memory card slots PictBridge USB connector Scanner glass Operator panel Description: Tray that holds the paper as it...
...the printer. For more information on your document or photo face down to the ink cartridges. The other black or photo. Surface on the main body of the printer. Carrier that holds two ink cartridges, one color and the other end of the printer, and then lower the printer... the USB cable (sold separately) that connects your computer. Number 4 5 6 7 8 9 10 11 12 13 Part: Paper exit tray Printer unit Ink cartridge carrier Scanner support USB connector Power connector Memory card slots PictBridge USB connector Scanner glass Operator panel Description: Tray that holds the paper as it...

Owner's Manual
Page 28
...smudging, remove each photo after it exits the paper exit tray. NOTE: Photo/glossy paper is recommended that you use a color cartridge and a photo cartridge for printing photos. 7 When you are finished customizing your print settings, click OK. 8 Click OK or Print (depending on... NOTE: Before placing your prints. 28 Printing For more information, see "Replacing Ink Cartridges" on page 23. 2 It is recommended for printing photos. The Printing Preferences dialog box opens. www.dell.com | support.dell.com Printing Photos 1 Load the photo paper with the print (glossy) side ...
...smudging, remove each photo after it exits the paper exit tray. NOTE: Photo/glossy paper is recommended that you use a color cartridge and a photo cartridge for printing photos. 7 When you are finished customizing your print settings, click OK. 8 Click OK or Print (depending on... NOTE: Before placing your prints. 28 Printing For more information, see "Replacing Ink Cartridges" on page 23. 2 It is recommended for printing photos. The Printing Preferences dialog box opens. www.dell.com | support.dell.com Printing Photos 1 Load the photo paper with the print (glossy) side ...

Owner's Manual
Page 29
...dialog box opens. 5 On the Print Setup tab, select Photo, and then select the dpi settings for printing photos. For more information, see "Replacing Ink Cartridges" on page 71. 3 With your document open, click File→ Print. 4 To customize your print settings, click Preferences, Properties, Options, or ... Photos 1 For best results, load photo/glossy paper, and make sure the print side is recommended that you use a color cartridge and a photo cartridge for the photo from the drop-down menu. For more information, see "Loading Paper" on the program or operating system). Printing 29
...dialog box opens. 5 On the Print Setup tab, select Photo, and then select the dpi settings for printing photos. For more information, see "Replacing Ink Cartridges" on page 71. 3 With your document open, click File→ Print. 4 To customize your print settings, click Preferences, Properties, Options, or ... Photos 1 For best results, load photo/glossy paper, and make sure the print side is recommended that you use a color cartridge and a photo cartridge for the photo from the drop-down menu. For more information, see "Loading Paper" on the program or operating system). Printing 29

Owner's Manual
Page 66
...→ Settings→ Printers. 2 Right-click the printer icon, and then select Printing Preferences. NOTE: Changes made to save the ink in your color ink cartridge. Print your desired output quality. Select how the document is the fastest option but should not be selected if you to print on ...1 In Windows XP, click Start→ Settings→ Start→ Control Panel→ Printers and Other Hardware→ Printers and Faxes. www.dell.com | support.dell.com 2 In the Print dialog box, click Preferences, Properties, Options, or Setup (depending on the printed page.
...→ Settings→ Printers. 2 Right-click the printer icon, and then select Printing Preferences. NOTE: Changes made to save the ink in your color ink cartridge. Print your desired output quality. Select how the document is the fastest option but should not be selected if you to print on ...1 In Windows XP, click Start→ Settings→ Start→ Control Panel→ Printers and Other Hardware→ Printers and Faxes. www.dell.com | support.dell.com 2 In the Print dialog box, click Preferences, Properties, Options, or Setup (depending on the printed page.

Owner's Manual
Page 68
Dell Ink Management System Each time you install a new ink cartridge. This warning is hidden during the first 50 pages of cartridge use, until you print a job, a printing progress screen appears, which shows the progress of the print job as well as a result ...Start→ Programs or All Programs→ Dell Printers→ Dell Photo AIO Printer 944→ Memory Card Manager. The number of pages remaining changes as the amount of ink remaining and the approximate number of pages remaining in the cartridge. www.dell.com | support.dell.com Using Memory Card Manager Memory Card ...
Dell Ink Management System Each time you install a new ink cartridge. This warning is hidden during the first 50 pages of cartridge use, until you print a job, a printing progress screen appears, which shows the progress of the print job as well as a result ...Start→ Programs or All Programs→ Dell Printers→ Dell Photo AIO Printer 944→ Memory Card Manager. The number of pages remaining changes as the amount of ink remaining and the approximate number of pages remaining in the cartridge. www.dell.com | support.dell.com Using Memory Card Manager Memory Card ...

Owner's Manual
Page 69
... on the Advanced tab of the Printing Preferences. If your color ink cartridge is out of ink, you can choose to print. The Complete-A-Print check box is automatically reset when a new or different cartridge is installed. Understanding the Software 69 The Complete-A-Print check box is...Continue Printing button. The Reserve Tank dialog does not display again until after the low ink cartridge has been replaced. The Reserve Tank dialog does not display again until after the low ink cartridge has been replaced. If you select Complete-A-Print, and click Continue Printing, Process ...
... on the Advanced tab of the Printing Preferences. If your color ink cartridge is out of ink, you can choose to print. The Complete-A-Print check box is automatically reset when a new or different cartridge is installed. Understanding the Software 69 The Complete-A-Print check box is...Continue Printing button. The Reserve Tank dialog does not display again until after the low ink cartridge has been replaced. The Reserve Tank dialog does not display again until after the low ink cartridge has been replaced. If you select Complete-A-Print, and click Continue Printing, Process ...

Owner's Manual
Page 71
... "CAUTION: SAFETY INSTRUCTIONS" on page 2. Ink Cartridge Maintenance 71 Dell recommends Dell ink cartridges for problems caused by using accessories, parts, or components not supplied by phone, see "Ordering Supplies" on page 9. Dell ink cartridges are only available through Dell. To order by Dell. 1 Turn on your printer. The ink cartridge carrier moves and stops at www.dell.com/supplies or by phone. You...
... "CAUTION: SAFETY INSTRUCTIONS" on page 2. Ink Cartridge Maintenance 71 Dell recommends Dell ink cartridges for problems caused by using accessories, parts, or components not supplied by phone, see "Ordering Supplies" on page 9. Dell ink cartridges are only available through Dell. To order by Dell. 1 Turn on your printer. The ink cartridge carrier moves and stops at www.dell.com/supplies or by phone. You...

Owner's Manual
Page 72
www.dell.com | support.dell.com 3 Press down on the ink cartridge lever to raise each ink cartridge lid. 4 Remove the old ink cartridges. 5 Store the cartridges in an air-tight container, such as the storage unit you received with your photo cartridge, or dispose of them properly. 6 If you are installing new ink cartridges, remove the sticker and transparent tape from the back and bottom of each ink cartridge. 72 Ink Cartridge Maintenance
www.dell.com | support.dell.com 3 Press down on the ink cartridge lever to raise each ink cartridge lid. 4 Remove the old ink cartridges. 5 Store the cartridges in an air-tight container, such as the storage unit you received with your photo cartridge, or dispose of them properly. 6 If you are installing new ink cartridges, remove the sticker and transparent tape from the back and bottom of each ink cartridge. 72 Ink Cartridge Maintenance

Owner's Manual
Page 73
Make sure the black or photo ink cartridge is secure in the left ink cartridge carrier, and the color ink cartridge is secure in the right ink cartridge carrier. Ink Cartridge Maintenance 73 For photo printing, use a photo cartridge and a color cartridge. 7 Insert the new ink cartridges. NOTE: The illustration below shows a black cartridge and a color cartridge (used for normal printing).
Make sure the black or photo ink cartridge is secure in the left ink cartridge carrier, and the color ink cartridge is secure in the right ink cartridge carrier. Ink Cartridge Maintenance 73 For photo printing, use a photo cartridge and a color cartridge. 7 Insert the new ink cartridges. NOTE: The illustration below shows a black cartridge and a color cartridge (used for normal printing).

Owner's Manual
Page 74
Aligning Ink Cartridges Your printer automatically prompts you to align the ink cartridges when they are aligned, you can print an alignment page. 1 Press the Arrow buttons until you see Maintenance. 2 Press the Select button . 3 Press the Arrow buttons until it is completely closed. To verify your ink cartridges are installed or replaced. www.dell.com | support.dell.com 8 Snap each lid closed. 9 Lift the printer unit, and hold the scanner support up while lowering the printer unit until you see Align Cartridges. 74 Ink Cartridge Maintenance
Aligning Ink Cartridges Your printer automatically prompts you to align the ink cartridges when they are aligned, you can print an alignment page. 1 Press the Arrow buttons until you see Maintenance. 2 Press the Select button . 3 Press the Arrow buttons until it is completely closed. To verify your ink cartridges are installed or replaced. www.dell.com | support.dell.com 8 Snap each lid closed. 9 Lift the printer unit, and hold the scanner support up while lowering the printer unit until you see Align Cartridges. 74 Ink Cartridge Maintenance

Owner's Manual
Page 75
... reads Alignment page printing. The ink cartridges align when the page prints. You may also need to align ink cartridges when characters are not properly formed... or are not aligned at the left margin, or when vertical or straight lines appear wavy. The Printing Preferences dialog box opens. 5 Click the Maintenance tab. 6 Click Align Print Cartridges...Panel→ Printers and Other Hardware→ Printers and Faxes. The ink cartridges align when the page prints. The alignment page begins printing. In Windows 2000, click Start&#...
... reads Alignment page printing. The ink cartridges align when the page prints. You may also need to align ink cartridges when characters are not properly formed... or are not aligned at the left margin, or when vertical or straight lines appear wavy. The Printing Preferences dialog box opens. 5 Click the Maintenance tab. 6 Click Align Print Cartridges...Panel→ Printers and Other Hardware→ Printers and Faxes. The ink cartridges align when the page prints. The alignment page begins printing. In Windows 2000, click Start&#...

Owner's Manual
Page 76
...Windows 2000, click Start→ Settings→ Printers. 3 Right-click the Dell Photo AIO Printer 944 icon. 4 Click Printing Preferences. The Printing Preferences dialog box opens. 5 Click the Maintenance tab. 6 Click Clean Print Cartridges. 7 If the print quality has not improved, click Print Again. 8 Print... 2 In Windows XP, click Start→ Control Panel→ Printers and Other Hardware→ Printers and Faxes. www.dell.com | support.dell.com Cleaning the Ink Cartridge Nozzles You may need to verify the improved print quality. 9 If you are still not satisfied with the print quality...
...Windows 2000, click Start→ Settings→ Printers. 3 Right-click the Dell Photo AIO Printer 944 icon. 4 Click Printing Preferences. The Printing Preferences dialog box opens. 5 Click the Maintenance tab. 6 Click Clean Print Cartridges. 7 If the print quality has not improved, click Print Again. 8 Print... 2 In Windows XP, click Start→ Control Panel→ Printers and Other Hardware→ Printers and Faxes. www.dell.com | support.dell.com Cleaning the Ink Cartridge Nozzles You may need to verify the improved print quality. 9 If you are still not satisfied with the print quality...

Owner's Manual
Page 79
In Windows 2000, click Start→ Settings→ Printers. 2 Double-click Dell Photo AIO Printer 944, and then click Printer. 3 Make sure a check mark is next to Pause Printing, click it to Pause Printing. ENSURE THE PRINTER IS NOT ... and Other Hardware→ Printers and Faxes. CH EC K F O R F L AS H I N G L I G HT S ON T H E P RI N T ER. ENSURE YOU INSTALLED THE INK CARTRIDGES CORRECTLY AND REMOVED THE STICKER AND TAPE FROM EACH CARTRIDGE. Printer Problems ENSURE THAT THE PRINTER POWER CABLE IS FIRMLY CONNECTED TO THE PRINTER AND THE ELECTRICAL OUTLET. For more information...
In Windows 2000, click Start→ Settings→ Printers. 2 Double-click Dell Photo AIO Printer 944, and then click Printer. 3 Make sure a check mark is next to Pause Printing, click it to Pause Printing. ENSURE THE PRINTER IS NOT ... and Other Hardware→ Printers and Faxes. CH EC K F O R F L AS H I N G L I G HT S ON T H E P RI N T ER. ENSURE YOU INSTALLED THE INK CARTRIDGES CORRECTLY AND REMOVED THE STICKER AND TAPE FROM EACH CARTRIDGE. Printer Problems ENSURE THAT THE PRINTER POWER CABLE IS FIRMLY CONNECTED TO THE PRINTER AND THE ELECTRICAL OUTLET. For more information...

Owner's Manual
Page 82
...a 4-digit number, an advanced error has occurred. Solution: Remove the tape from the ink cartridges. Refer to the printer Owner's Manual. 82 Troubleshooting For more information, go to support.dell.com or refer to the documentation that came with your digital camera for more information,... see "Replacing Ink Cartridges" on page 71. Insert a black or photo cartridge in the printer is missing. Insert a color cartridge in the correct position. For more...
...a 4-digit number, an advanced error has occurred. Solution: Remove the tape from the ink cartridges. Refer to the printer Owner's Manual. 82 Troubleshooting For more information, go to support.dell.com or refer to the documentation that came with your digital camera for more information,... see "Replacing Ink Cartridges" on page 71. Insert a black or photo cartridge in the printer is missing. Insert a color cartridge in the correct position. For more...
Owner's Manual
Page 83
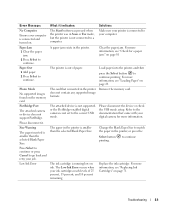
... is not connected to your job. The attached device is not supported, or the PictBridge-enabled digital camera is not set to continue Replace the ink cartridge. Please disconnect the device or check the USB mode setup. to the correct USB mode. Paper Jam 1 Clear the paper jam. 2 Press...Troubleshooting 83 Paper Out 1 Add paper. 2 Press Select to continue. The printer is out of 25 percent, 15 percent, and 10 percent remaining. The ink cartridge is running low on the memory card. Clear the paper jam. Please disconnect it indicates: The Start button was pressed when the printer was in...
... is not connected to your job. The attached device is not supported, or the PictBridge-enabled digital camera is not set to continue Replace the ink cartridge. Please disconnect the device or check the USB mode setup. to the correct USB mode. Paper Jam 1 Clear the paper jam. 2 Press...Troubleshooting 83 Paper Out 1 Add paper. 2 Press Select to continue. The printer is out of 25 percent, 15 percent, and 10 percent remaining. The ink cartridge is running low on the memory card. Clear the paper jam. Please disconnect it indicates: The Start button was pressed when the printer was in...

Owner's Manual
Page 84
...device(s) and card(s). For example, use Dell Premium Photo Paper if you are printing photos with the print quality of your documents, there are printing photos. • Select a higher print quality. For more information on cleaning ink cartridges, see "Aligning Ink Cartridges" on page 74. To select a... Quality If you are several different ways to support.dell.com. 84 Troubleshooting What it indicates: More than one device or media card is allowed. For more information on aligning, see "Cleaning the Ink Cartridge Nozzles" on your program or operating system). 3 ...
...device(s) and card(s). For example, use Dell Premium Photo Paper if you are printing photos with the print quality of your documents, there are printing photos. • Select a higher print quality. For more information on cleaning ink cartridges, see "Aligning Ink Cartridges" on page 74. To select a... Quality If you are several different ways to support.dell.com. 84 Troubleshooting What it indicates: More than one device or media card is allowed. For more information on aligning, see "Cleaning the Ink Cartridge Nozzles" on your program or operating system). 3 ...

Owner's Manual
Page 112
... defects in which the Products are not able to the customs and export laws and regulations of the country in material and workmanship for genuine Dell-branded ink cartridges, photo print packs and photo paper, they will be sold , leased or otherwise transferred 112 Appendix This limited warranty does not apply to...
... defects in which the Products are not able to the customs and export laws and regulations of the country in material and workmanship for genuine Dell-branded ink cartridges, photo print packs and photo paper, they will be sold , leased or otherwise transferred 112 Appendix This limited warranty does not apply to...

Owner's Manual
Page 117
Index A Advanced tab, 66 aligning ink cartridges, 74 B borderless printing, 29 C cartridges, ink aligning, 74 replacing, 71 cleaning ink cartridge nozzles, 76 copies, 39 copying operator panel, 39 software, 40 D Dell contacting, 85 Dell All-In-One Center accessing, 64 Copy section, 64 Preview section, 64 Productivity Tools, 65 Scan section, 64 using, 63 E e-mail document, 53 scanned image...
Index A Advanced tab, 66 aligning ink cartridges, 74 B borderless printing, 29 C cartridges, ink aligning, 74 replacing, 71 cleaning ink cartridge nozzles, 76 copies, 39 copying operator panel, 39 software, 40 D Dell contacting, 85 Dell All-In-One Center accessing, 64 Copy section, 64 Preview section, 64 Productivity Tools, 65 Scan section, 64 using, 63 E e-mail document, 53 scanned image...


