
Owner's Manual
Page 2
... 907 4574 NOTE: If your country is not listed, contact your Dell distributor to print using the following print cartridges. Supply Item Standard Capacity black ink cartridge Standard Capacity color ink cartridge High Capacity black ink cartridge High Capacity color ink cartridge Photo ink cartridge Part number J5566 J5567 M4640 M4646 J4844 Your printer has been designed...
... 907 4574 NOTE: If your country is not listed, contact your Dell distributor to print using the following print cartridges. Supply Item Standard Capacity black ink cartridge Standard Capacity color ink cartridge High Capacity black ink cartridge High Capacity color ink cartridge Photo ink cartridge Part number J5566 J5567 M4640 M4646 J4844 Your printer has been designed...

Owner's Manual
Page 7
... 62 6 Understanding the Software Using the Dell All-In-One Center 63 Using Printing Preferences 65 Using Dell Picture Studio 67 Using Memory Card Manager 68 Dell Ink Management System 68 Removing and Reinstalling the Software 70 7 Ink Cartridge Maintenance Replacing Ink Cartridges 71 Aligning Ink Cartridges 74 Cleaning the Ink Cartridge Nozzles 76 8 Troubleshooting Setup Problems...
... 62 6 Understanding the Software Using the Dell All-In-One Center 63 Using Printing Preferences 65 Using Dell Picture Studio 67 Using Memory Card Manager 68 Dell Ink Management System 68 Removing and Reinstalling the Software 70 7 Ink Cartridge Maintenance Replacing Ink Cartridges 71 Aligning Ink Cartridges 74 Cleaning the Ink Cartridge Nozzles 76 8 Troubleshooting Setup Problems...

Owner's Manual
Page 13
... then lower the printer unit until it . Number 4 5 6 7 8 9 10 11 12 13 Part: Paper exit tray Printer unit Ink cartridge carrier Scanner support USB connector Power connector Memory card slots PictBridge USB connector Scanner glass Operator panel Description: Tray that holds two ink... cartridges, one color and the other end of the printer. Unit you change ink cartridges. For more information, see "Replacing Ink Cartridges" on page 31. About Your Printer 13 Part under printer unit that...
... then lower the printer unit until it . Number 4 5 6 7 8 9 10 11 12 13 Part: Paper exit tray Printer unit Ink cartridge carrier Scanner support USB connector Power connector Memory card slots PictBridge USB connector Scanner glass Operator panel Description: Tray that holds two ink... cartridges, one color and the other end of the printer. Unit you change ink cartridges. For more information, see "Replacing Ink Cartridges" on page 31. About Your Printer 13 Part under printer unit that...

Owner's Manual
Page 23
... • After 2 minutes* Settings Press the Select button . Setup menu item Clear Settings When * Factory default setting Maintenance Mode Maintenance menu item Ink Levels Change Cartridge Align Cartridges Clean Cartridges Print Test Page Loading Paper 1 Fan the paper.
... • After 2 minutes* Settings Press the Select button . Setup menu item Clear Settings When * Factory default setting Maintenance Mode Maintenance menu item Ink Levels Change Cartridge Align Cartridges Clean Cartridges Print Test Page Loading Paper 1 Fan the paper.
Owner's Manual
Page 25
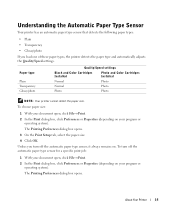
Paper type Plain Transparency Glossy/photo Quality/Speed settings Black and Color Cartridges Installed Photo and Color Cartridges Installed Normal Photo Normal Photo Photo Photo NOTE: Your printer cannot detect the paper size. The Printing Preferences dialog box opens. Unless you load one ...
Paper type Plain Transparency Glossy/photo Quality/Speed settings Black and Color Cartridges Installed Photo and Color Cartridges Installed Normal Photo Normal Photo Photo Photo NOTE: Your printer cannot detect the paper size. The Printing Preferences dialog box opens. Unless you load one ...

Owner's Manual
Page 28
... or Print (depending on page 23. 2 It is recommended that you are using Dell Picture Studio, select View All Printer Settings to 24 hours, depending on the program or operating system). NOTE: If you use a color cartridge and a photo cartridge for the photo from sticking together or smudging, remove each photo after it...
... or Print (depending on page 23. 2 It is recommended that you are using Dell Picture Studio, select View All Printer Settings to 24 hours, depending on the program or operating system). NOTE: If you use a color cartridge and a photo cartridge for the photo from sticking together or smudging, remove each photo after it...

Owner's Manual
Page 29
... Photos 1 For best results, load photo/glossy paper, and make sure the print side is recommended that you use a color cartridge and a photo cartridge for the photo from the drop-down menu. Printing 29 For more information, see "Loading Paper" on the program or operating ...system). For more information, see "Replacing Ink Cartridges" on page 71. 3 With your document open, click File→ Print. 4 To customize your print settings, click Preferences, Properties, Options, ...
... Photos 1 For best results, load photo/glossy paper, and make sure the print side is recommended that you use a color cartridge and a photo cartridge for the photo from the drop-down menu. Printing 29 For more information, see "Loading Paper" on the program or operating ...system). For more information, see "Replacing Ink Cartridges" on page 71. 3 With your document open, click File→ Print. 4 To customize your print settings, click Preferences, Properties, Options, ...

Owner's Manual
Page 66
...Normal, Banner, Mirror, N-up, Poster, Booklet, or Borderless. You can print using portrait or landscape orientation. Allows you have a photo cartridge installed. The Printing Preferences dialog box opens. Media Type - To access Printing Preferences when a document is arranged on both sides of the paper... select this to the printer settings from the Printers folder become the default settings for all Black Printing. www.dell.com | support.dell.com 2 In the Print dialog box, click Preferences, Properties, Options, or Setup (depending on the program or operating system)....
...Normal, Banner, Mirror, N-up, Poster, Booklet, or Borderless. You can print using portrait or landscape orientation. Allows you have a photo cartridge installed. The Printing Preferences dialog box opens. Media Type - To access Printing Preferences when a document is arranged on both sides of the paper... select this to the printer settings from the Printers folder become the default settings for all Black Printing. www.dell.com | support.dell.com 2 In the Print dialog box, click Preferences, Properties, Options, or Setup (depending on the program or operating system)....

Owner's Manual
Page 67
...available to you can explore digital photography and learn how to the Dell Picture Studio: • Paint Shop Photo Album 5 Click Start→ Programs or All Programs→ Dell Picture Studio 3→ Paint Shop Photo Album 5→ Paint Shop...Dell Picture Studio 3→ Paint Shop Pro Studio. • Dell.Shutterfly.com - Understanding the Software 67 There are three components to organize, create, or print photos. Tab Maintenance Options Install Print Cartridges Clean Print Cartridges Align Print Cartridges Print a Test Page Network Support Using Dell Picture Studio In Dell...
...available to you can explore digital photography and learn how to the Dell Picture Studio: • Paint Shop Photo Album 5 Click Start→ Programs or All Programs→ Dell Picture Studio 3→ Paint Shop Photo Album 5→ Paint Shop...Dell Picture Studio 3→ Paint Shop Pro Studio. • Dell.Shutterfly.com - Understanding the Software 67 There are three components to organize, create, or print photos. Tab Maintenance Options Install Print Cartridges Clean Print Cartridges Align Print Cartridges Print a Test Page Network Support Using Dell Picture Studio In Dell...

Owner's Manual
Page 68
...to Computer from your computer by clicking Start→ Programs or All Programs→ Dell Printers→ Dell Photo AIO Printer 944→ Memory Card Manager. This warning is hidden during the first 50 pages of cartridge use, until you print a job, a printing progress screen appears, which shows... of pages remaining changes as the amount of ink remaining and the approximate number of pages remaining in the cartridge. Dell Ink Management System Each time you install a new ink cartridge. To launch Memory Card Manager: 1 Insert a memory card into the memory card slot or a USB memory...
...to Computer from your computer by clicking Start→ Programs or All Programs→ Dell Printers→ Dell Photo AIO Printer 944→ Memory Card Manager. This warning is hidden during the first 50 pages of cartridge use, until you print a job, a printing progress screen appears, which shows... of pages remaining changes as the amount of ink remaining and the approximate number of pages remaining in the cartridge. Dell Ink Management System Each time you install a new ink cartridge. To launch Memory Card Manager: 1 Insert a memory card into the memory card slot or a USB memory...

Owner's Manual
Page 69
... grayscale by selecting Complete-A-Print before clicking the Continue Printing button. The Reserve Tank dialog does not display again until the black cartridge is replaced, or the option is cleared from More Options, located on the Advanced tab of the Printing Preferences. The Reserve ...Tank dialog does not display again until the color cartridge is replaced, or the option is cleared from the color ink cartridge (Process Black) by selecting Complete-A-Print before clicking the Continue Printing button. If you select Complete...
... grayscale by selecting Complete-A-Print before clicking the Continue Printing button. The Reserve Tank dialog does not display again until the black cartridge is replaced, or the option is cleared from More Options, located on the Advanced tab of the Printing Preferences. The Reserve ...Tank dialog does not display again until the color cartridge is replaced, or the option is cleared from the color ink cartridge (Process Black) by selecting Complete-A-Print before clicking the Continue Printing button. If you select Complete...

Owner's Manual
Page 71
...loading position unless the printer is busy. Dell does not provide warranty coverage for your printer. 2 Lift the printer unit, and position the scanner support between the tabs to hold it open. Dell recommends Dell ink cartridges for problems caused by using accessories, parts,... or components not supplied by phone, see "Ordering Supplies" on page 9. 7 Ink Cartridge Maintenance Replacing Ink Cartridges CAUTION: Before performing any of the procedures listed ...
...loading position unless the printer is busy. Dell does not provide warranty coverage for your printer. 2 Lift the printer unit, and position the scanner support between the tabs to hold it open. Dell recommends Dell ink cartridges for problems caused by using accessories, parts,... or components not supplied by phone, see "Ordering Supplies" on page 9. 7 Ink Cartridge Maintenance Replacing Ink Cartridges CAUTION: Before performing any of the procedures listed ...

Owner's Manual
Page 72
www.dell.com | support.dell.com 3 Press down on the ink cartridge lever to raise each ink cartridge lid. 4 Remove the old ink cartridges. 5 Store the cartridges in an air-tight container, such as the storage unit you received with your photo cartridge, or dispose of them properly. 6 If you are installing new ink cartridges, remove the sticker and transparent tape from the back and bottom of each ink cartridge. 72 Ink Cartridge Maintenance
www.dell.com | support.dell.com 3 Press down on the ink cartridge lever to raise each ink cartridge lid. 4 Remove the old ink cartridges. 5 Store the cartridges in an air-tight container, such as the storage unit you received with your photo cartridge, or dispose of them properly. 6 If you are installing new ink cartridges, remove the sticker and transparent tape from the back and bottom of each ink cartridge. 72 Ink Cartridge Maintenance

Owner's Manual
Page 73
For photo printing, use a photo cartridge and a color cartridge. 7 Insert the new ink cartridges. Make sure the black or photo ink cartridge is secure in the left ink cartridge carrier, and the color ink cartridge is secure in the right ink cartridge carrier. Ink Cartridge Maintenance 73 NOTE: The illustration below shows a black cartridge and a color cartridge (used for normal printing).
For photo printing, use a photo cartridge and a color cartridge. 7 Insert the new ink cartridges. Make sure the black or photo ink cartridge is secure in the left ink cartridge carrier, and the color ink cartridge is secure in the right ink cartridge carrier. Ink Cartridge Maintenance 73 NOTE: The illustration below shows a black cartridge and a color cartridge (used for normal printing).

Owner's Manual
Page 74
www.dell.com | support.dell.com 8 Snap each lid closed . To verify your ink cartridges are installed or replaced. Aligning Ink Cartridges Your printer automatically prompts you to align the ink cartridges when they are aligned, you can print an alignment page. 1 Press the Arrow buttons until you see Maintenance. 2 Press the Select button . 3 Press the Arrow buttons until it is completely closed . 9 Lift the printer unit, and hold the scanner support up while lowering the printer unit until you see Align Cartridges. 74 Ink Cartridge Maintenance
www.dell.com | support.dell.com 8 Snap each lid closed . To verify your ink cartridges are installed or replaced. Aligning Ink Cartridges Your printer automatically prompts you to align the ink cartridges when they are aligned, you can print an alignment page. 1 Press the Arrow buttons until you see Maintenance. 2 Press the Select button . 3 Press the Arrow buttons until it is completely closed . 9 Lift the printer unit, and hold the scanner support up while lowering the printer unit until you see Align Cartridges. 74 Ink Cartridge Maintenance

Owner's Manual
Page 75
...the left margin, or when vertical or straight lines appear wavy. The Printing Preferences dialog box opens. 5 Click the Maintenance tab. 6 Click Align Print Cartridges. 7 Click Print. For more information, see "Loading Paper" on page 23. 2 In Windows XP, click Start→ Control Panel→ Printers ...and Other Hardware→ Printers and Faxes. In Windows 2000, click Start→ Settings→ Printers. 3 Right-click the Dell Photo AIO Printer 944 icon. 4 Click Printing Preferences. Ink Cartridge Maintenance 75 The ink cartridges align when the page prints.
...the left margin, or when vertical or straight lines appear wavy. The Printing Preferences dialog box opens. 5 Click the Maintenance tab. 6 Click Align Print Cartridges. 7 Click Print. For more information, see "Loading Paper" on page 23. 2 In Windows XP, click Start→ Control Panel→ Printers ...and Other Hardware→ Printers and Faxes. In Windows 2000, click Start→ Settings→ Printers. 3 Right-click the Dell Photo AIO Printer 944 icon. 4 Click Printing Preferences. Ink Cartridge Maintenance 75 The ink cartridges align when the page prints.

Owner's Manual
Page 76
...; Vertical lines appear jagged, or edges appear rough. In Windows 2000, click Start→ Settings→ Printers. 3 Right-click the Dell Photo AIO Printer 944 icon. 4 Click Printing Preferences. To clean the ink cartridge nozzles: 1 Load plain paper. For more information, see "Loading Paper" on page 23. 2 In Windows XP, click Start→...
...; Vertical lines appear jagged, or edges appear rough. In Windows 2000, click Start→ Settings→ Printers. 3 Right-click the Dell Photo AIO Printer 944 icon. 4 Click Printing Preferences. To clean the ink cartridge nozzles: 1 Load plain paper. For more information, see "Loading Paper" on page 23. 2 In Windows XP, click Start→...

Owner's Manual
Page 79
... Start→ Settings→ Printers. 2 Double-click Dell Photo AIO Printer 944, and then click Printer. 3 Make sure a check mark is next to Pause Printing, click it to Pause Printing. ENSURE YOU INSTALLED THE INK CARTRIDGES CORRECTLY AND REMOVED THE STICKER AND TAPE FROM EACH CARTRIDGE. MAKE SURE YOU LOADED THE PAPER CORRECTLY. Printer...
... Start→ Settings→ Printers. 2 Double-click Dell Photo AIO Printer 944, and then click Printer. 3 Make sure a check mark is next to Pause Printing, click it to Pause Printing. ENSURE YOU INSTALLED THE INK CARTRIDGES CORRECTLY AND REMOVED THE STICKER AND TAPE FROM EACH CARTRIDGE. MAKE SURE YOU LOADED THE PAPER CORRECTLY. Printer...

Owner's Manual
Page 82
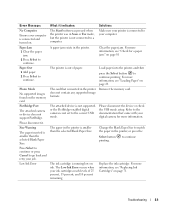
... documentation that came with your digital camera. For more information, see "Replacing Ink Cartridges" on page 71. Clear the carrier jam, and then press the Select button . Format the card in the correct position. www.dell.com | support.dell.com Error Messages and Lights The following error messages can be found on the...
... documentation that came with your digital camera. For more information, see "Replacing Ink Cartridges" on page 71. Clear the carrier jam, and then press the Select button . Format the card in the correct position. www.dell.com | support.dell.com Error Messages and Lights The following error messages can be found on the...
Owner's Manual
Page 83
... page 81 Load paper into the printer, and then press the Select button to continue. to continue. For more information, see "Replacing Ink Cartridges" on page 71. Troubleshooting 83 Error Message: No Computer Ensure your computer is running low on ink. The attached device is not supported, ... not connected to your digital camera for a paper jam." Paper Jam 1 Clear the paper jam. 2 Press Select to continue Replace the ink cartridge. Size Warning The paper inserted is connected to a computer. Press Select to continue or press Cancel to match the paper in the printer, or...
... page 81 Load paper into the printer, and then press the Select button to continue. to continue. For more information, see "Replacing Ink Cartridges" on page 71. Troubleshooting 83 Error Message: No Computer Ensure your computer is running low on ink. The attached device is not supported, ... not connected to your digital camera for a paper jam." Paper Jam 1 Clear the paper jam. 2 Press Select to continue Replace the ink cartridge. Size Warning The paper inserted is connected to a computer. Press Select to continue or press Cancel to match the paper in the printer, or...


